


Are you trying to discover visual steps to connect a Google Domain to Wix?
Doesn't it feel frustrating when you've built a great website on Wix, but you're stuck figuring out how to connect it to your shiny new domain name? It's like hosting a party but not being able to send out the invitations.
We get it; this technical mumbo-jumbo can feel like a headache, especially when you're eager to share your website with the world.
That's exactly why we've created this easy-to-follow guide. We're going to help you cross this hurdle in a simple and stress-free way. Imagine just 28 illustrated steps, and you'll be at the finish line.
We'll start with the basics, showing you how to purchase your domain name from Google Domains. Don't worry; we've broken it down into 13 easy-peasy steps.
Then, it's time for the main event, connecting your newly purchased domain to your Wix site. With our guide, you'll sail through this process in just 15 steps.
Remember, you're not alone in this. We're here to make this journey as smooth as possible for you. So, let's leave the confusion behind and get started on this exciting adventure.
By the end, not only will you have your domain pointing proudly to your website, but you'll also have learned a new skill all by yourself. Ready? Let's dive in.
Understanding How to Connect Google Domain to Wix
To link a Google Domain to a Wix site, you first need to purchase a domain name. Once you have purchased a domain name, you can then connect it to your Wix site. In this article, we will walk you through the steps involved in both of these processes.
- Purchase Domain
Purchasing a domain name is crucial as it becomes your unique digital address, helping customers find you online.
It not only lends credibility to your business or personal brand but also enhances your visibility on the internet. You can significantly improve your ranking in search results by choosing the right domain.
Furthermore, a domain name can serve as your online brand, reflecting your business name, professional service, or the theme of your website. It can also protect your brand from being used by others and foster customer trust in your business.
Platforms From Where You Can Purchase Domain Name
You can purchase a domain name from various platforms known as domain registrars. These include:
- GoDaddy: Known for its excellent customer service and comprehensive offerings, it's one of the largest domain registrars worldwide.
- Namecheap: Offers competitive prices for domain registration, renewal, and transfer.
- Bluehost: While primarily a hosting service, it also provides domain registration.
- Google Domains: An excellent choice for those already using Google's services.
- HostGator: Offers both domain registration and website hosting services.
- Connect to Wix Site
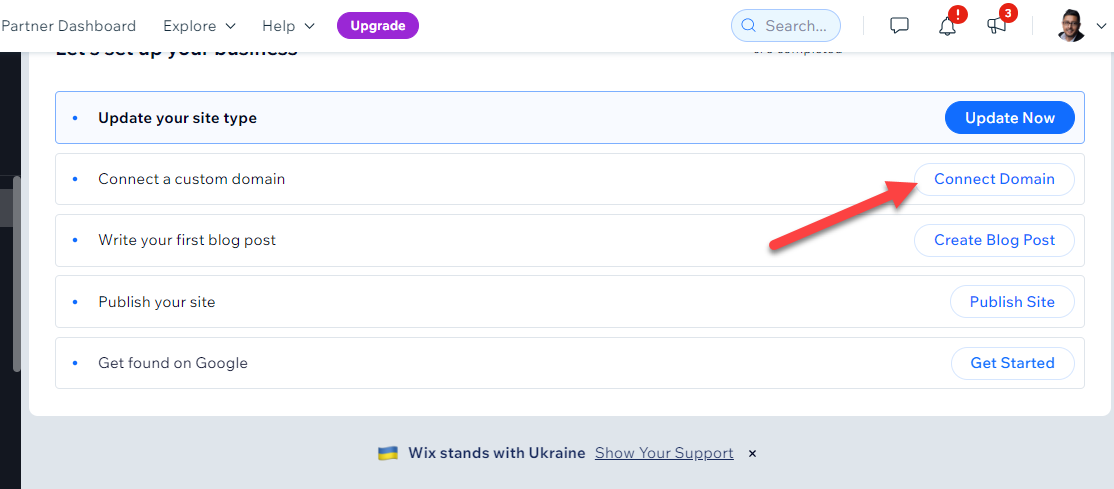
Yes, you can connect your existing domains to your Wix site. Connecting your existing domain to Wix brings a host of advantages.
It allows you to maintain the brand recognition associated with your existing web address while benefitting from Wix's user-friendly website-building features.
It provides a seamless transition for your customers who can still reach you at your familiar domain, minimizing any potential loss of traffic or brand confusion.
Connecting your existing domain to Wix also allows you to take advantage of Wix's robust SEO tools, analytics, and site management capabilities. This can greatly enhance your online presence, improving your site's visibility in search engine rankings.
Furthermore, if you're seeking to revamp your website using Wix's intuitive design interface, connecting your existing domain lets you do so without changing your website's address.
Steps: How to Connect Google Domain to Wix
Let's start by going over the steps you can follow to purchase a domain name from Google Domains. We'll do this because we'll need to use the purchased domain to connect to our Wix site later.
I'll walk you through the steps step-by-step, and I'll provide visual screen shots to help you along the way. These steps will be very helpful for purchasing a domain name from Google Domains.
Learn More:
- How Does Wix Work? Learn the Use of Wix Editor & Wix ADI
- Learn How to Add PDF & Document Button to Wix (Step by Step Visual Guide)
- Learn How to Add Google Analytics to Wix: Visual Step-By-Step Guide
Step 1. Go to Google Domain Website
The initial step in this process requires you to navigate to the Google Domains site. This platform is our starting point, the basis from where we will begin our exploration of how to acquire a domain name.
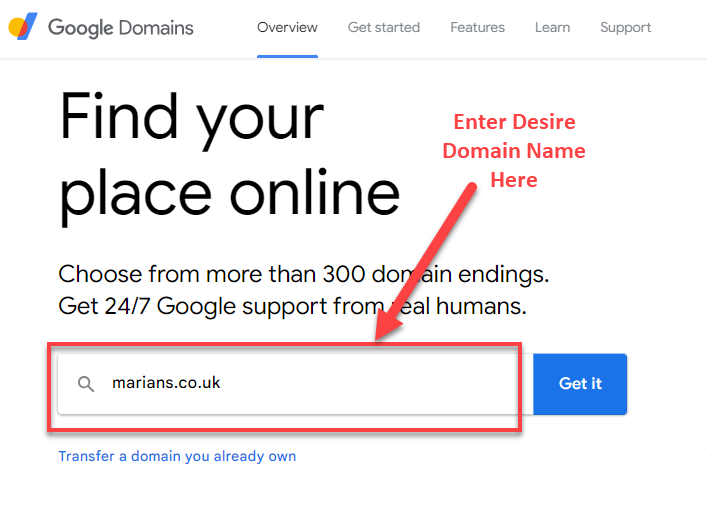
Step 2. Enter Your Desired Domain to Check its Availability
Next, we're going to check if the domain name we want is available. You just type it in and click on the 'Get it' button. It's important to know what domain name you want before this step because this is the name you're going to use later.
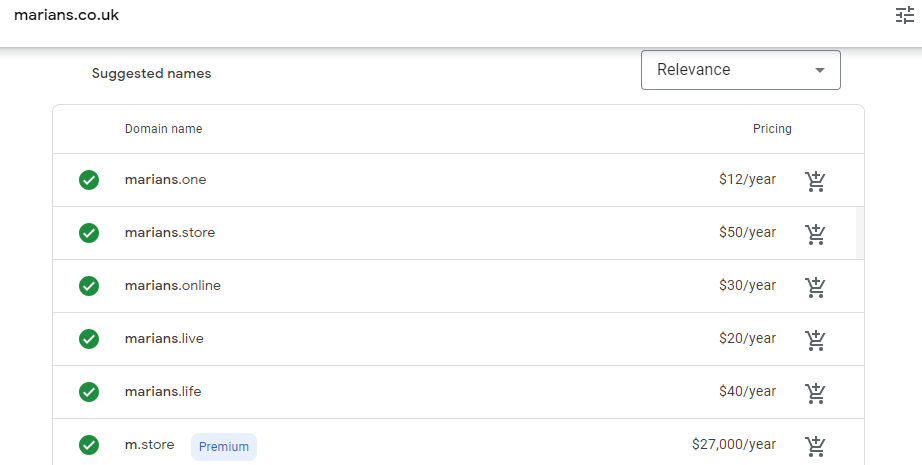
To teach you how it works, I'll be buying the domain 'marians.co.uk.' You can see what it looks like in the screenshot below.
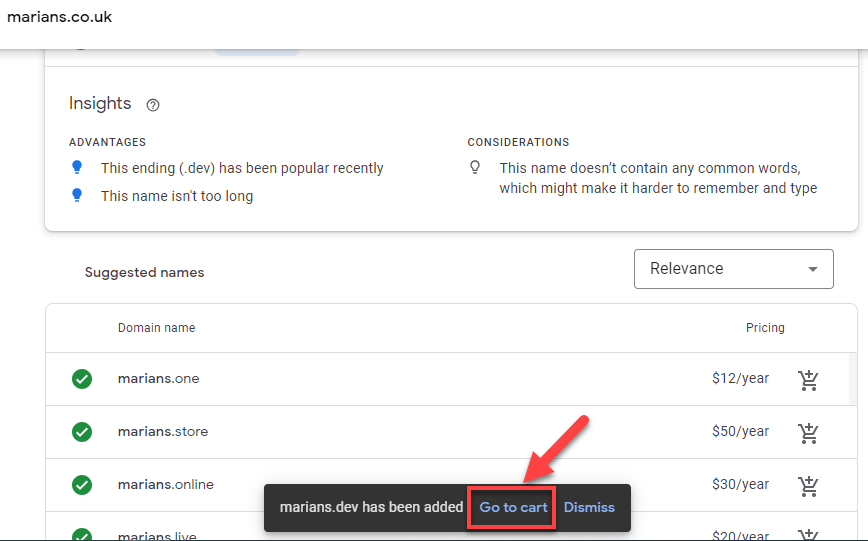
Step 3. Click on Add to Cart
Should you discover that the domain name you have input is available, proceed by clicking on "add to cart".
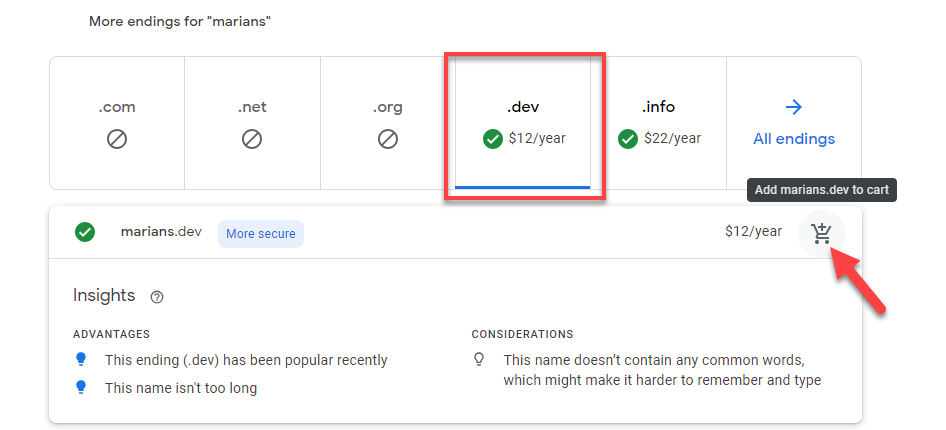
In the event that it has already been bought, as in my case with marians.co.uk, we will explore related suggestions to the domain name we initially keyed in. We have the option to buy these suggested domain names for our future needs.
Step 4. Click on Go to Cart at Bottom of the Page
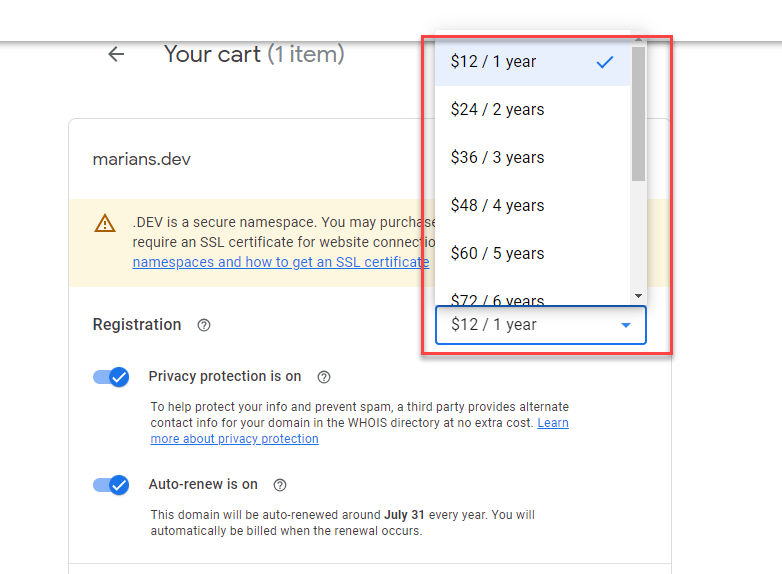
Step 5. Choose Years For Domain Registration
The duration for which you want to own the domain name is entirely up to you. For my purposes, I will choose a one-year period, as I only require the domain for a year.
You should select according to your specific needs and remember to consider the niche of your website.
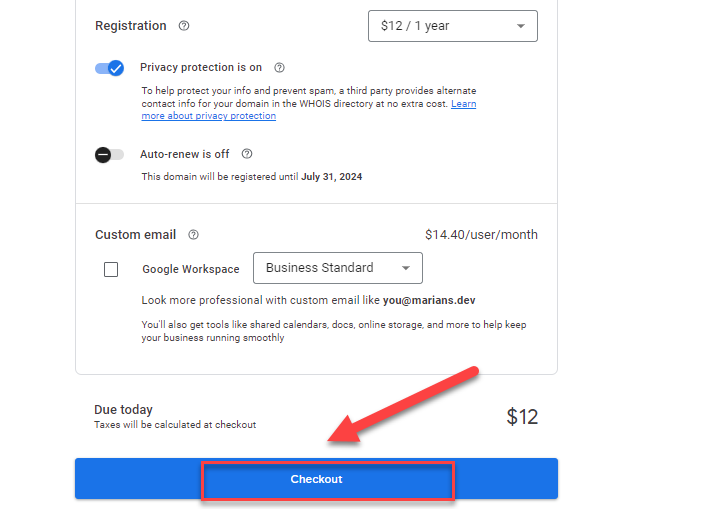
Step 6. Click on Checkout
Once you've chosen the duration for your domain name registration, it's time to adjust some settings.
Verify that privacy protection is enabled; if it's not, make sure to turn it on. Below that, there's an option for auto-renewal that you should verify. Ideally, this setting should always be deactivated.
If left on, upon completion of your registered domain duration, your domain will renew automatically and you will be charged through PayPal or the payment method of your choice.
Once you've made these adjustments, proceed by clicking the checkout button at the bottom of the page.
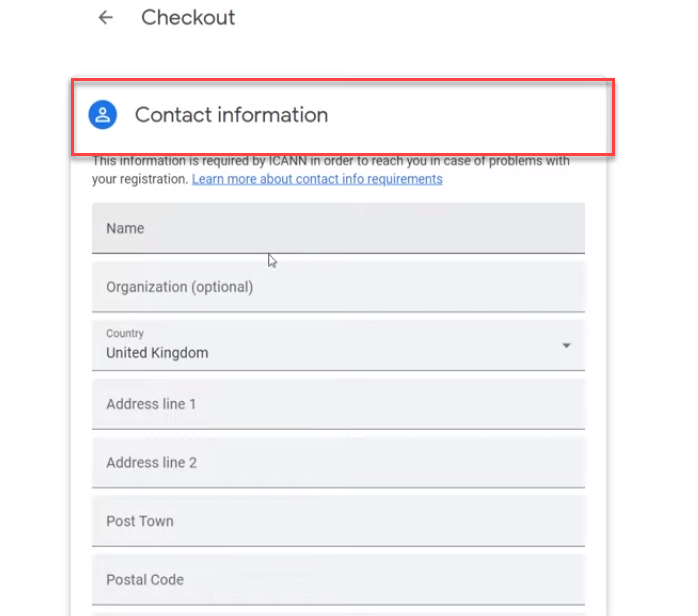
Step 7. Enter Contact Information
At this point, you'll be prompted to input details such as your name, organization name, country, and address. After entering this information, be sure to review and verify it with utmost care.
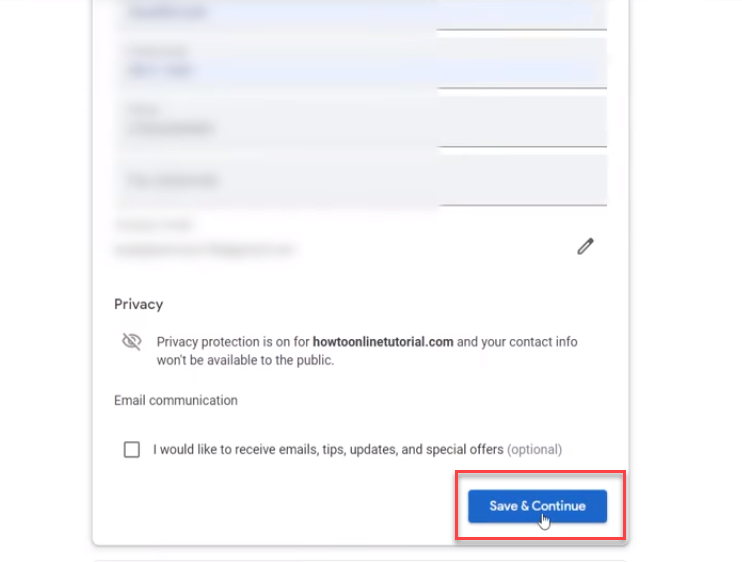
Step 8. Click on Save and Continue
Once you have entered all your contact details and confirmed their accuracy, you should proceed to the next step by clicking "Save & Continue".
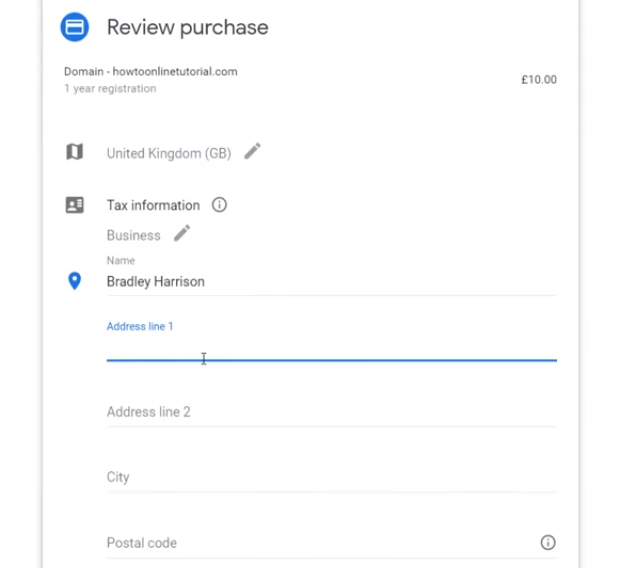
Step 9. Review Purchase
Next, you'll need to input your tax information. This will involve providing your name, city, and postal code.
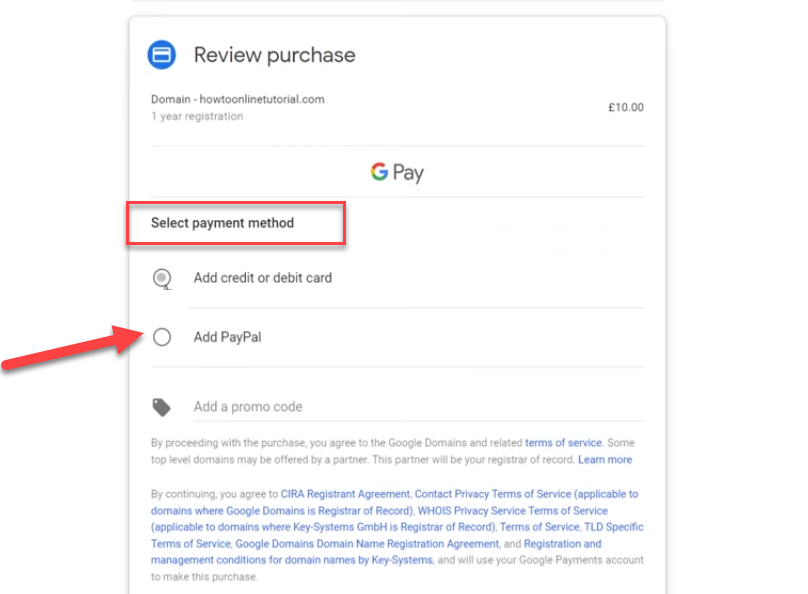
Step 10. Select Payment Method
A crucial step is choosing your preferred payment method for the domain charges. You have the option to pay using a credit or debit card, or you may opt to use PayPal if it suits you better.
In this case, I will be selecting PayPal as my payment method for the domain fees.
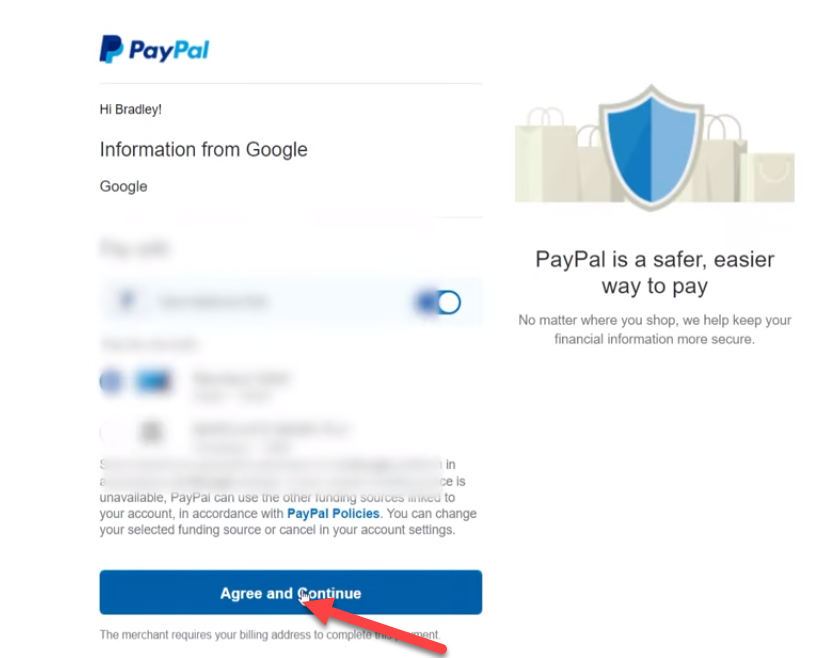
Step 11. Click on Agree and Continue
Input your PayPal, debit, or credit card details in the given field, and then proceed by clicking the button labeled "Agree and Continue."
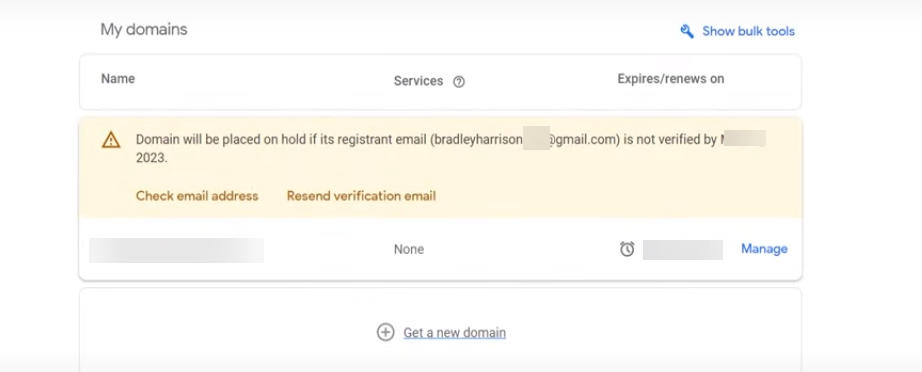
Step 12. Check you Expiry Date for the Domain Name
Ensure that the expiry date for your domain is accurate and confirm that privacy protection is enabled. Once these details have been validated, you can proceed to click on "my domains."

Step 13. Confirmation Message
Upon clicking on "My Domains" in the top left corner of the dashboard, you will be able to see the domain you've purchased. This is a way to confirm whether your domain purchase was successful.
Please note that it may take up to 24 hours for the domain to become functional. You should expect to see a message on your screen confirming this when you navigate to "My Domains."
Steps: How to Connect Existing Google Domain to Wix
Yes, you can connect an existing domain to your Wix site. This can be beneficial as it maintains your domain's established SEO ranking, aids in preserving your brand identity, and allows your existing audience to find you easily on your new Wix site.
Learn More:
- How to Unpublish a Wix Site (Visual Step by Step Guide)
- How to Cancel Wix Subscription Visual Step By Step Guide
- Elevate Your Wix Design: Learn How to Add Columns & Text in Wix
Step 1. Sign In to Wix Account
First of all, visit the site Wix.com, then click on the login at the left side of the Wix site.
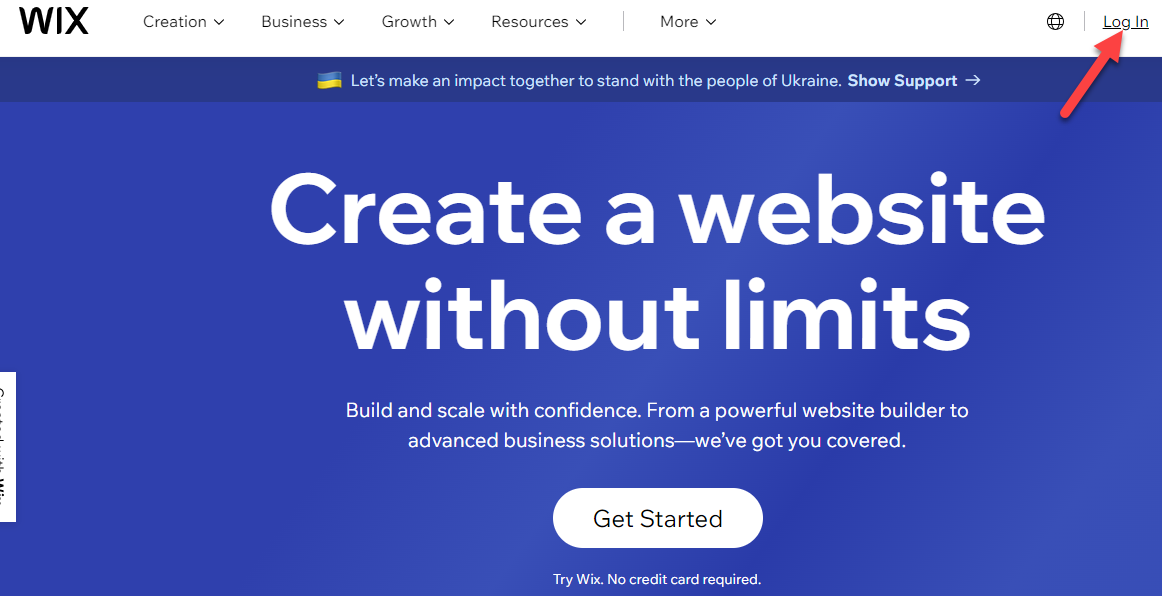
Start by logging into your account on Wix.com. To do this, you need to input your email and password. Once signed in, you'll gain access to your account dashboard, where you have the ability to design or modify your site.

If you haven't yet acquired a Wix premium plan, it's advisable to purchase one. Following the acquisition of your plan, navigate through your Wix account accordingly.
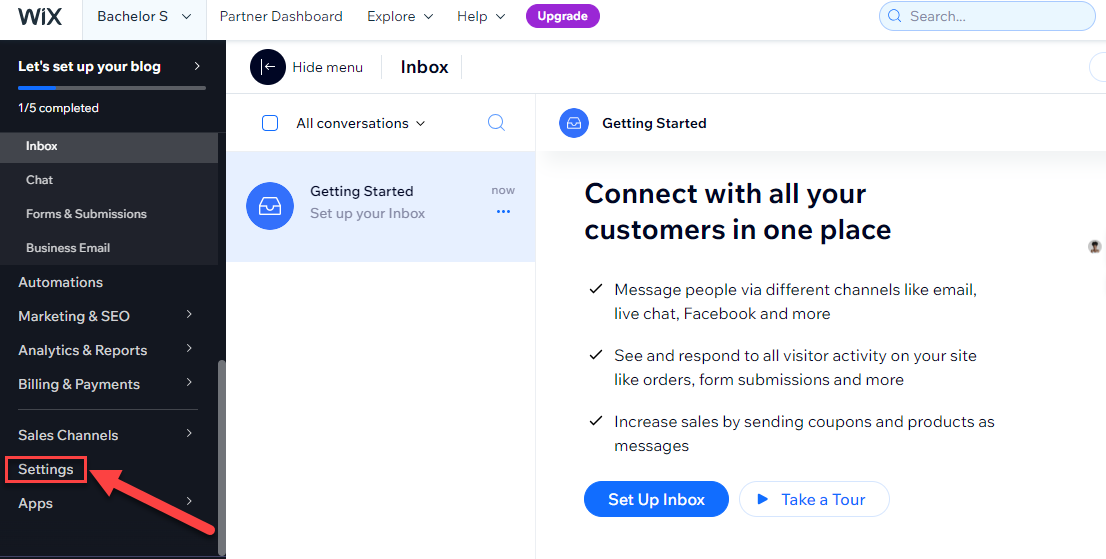
Step 2. Click on Settings
On the Wix dashboard, navigate to the 'Settings' option, which is located at the lower end of the menu on the left-hand side.
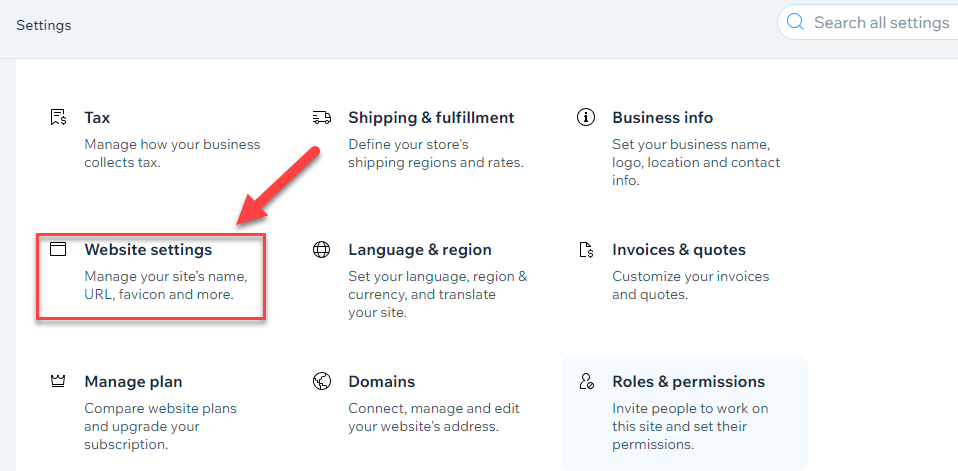
Step 3. Click on the Website Settings
Now, all the potential settings available on Wix will be displayed on your screen.
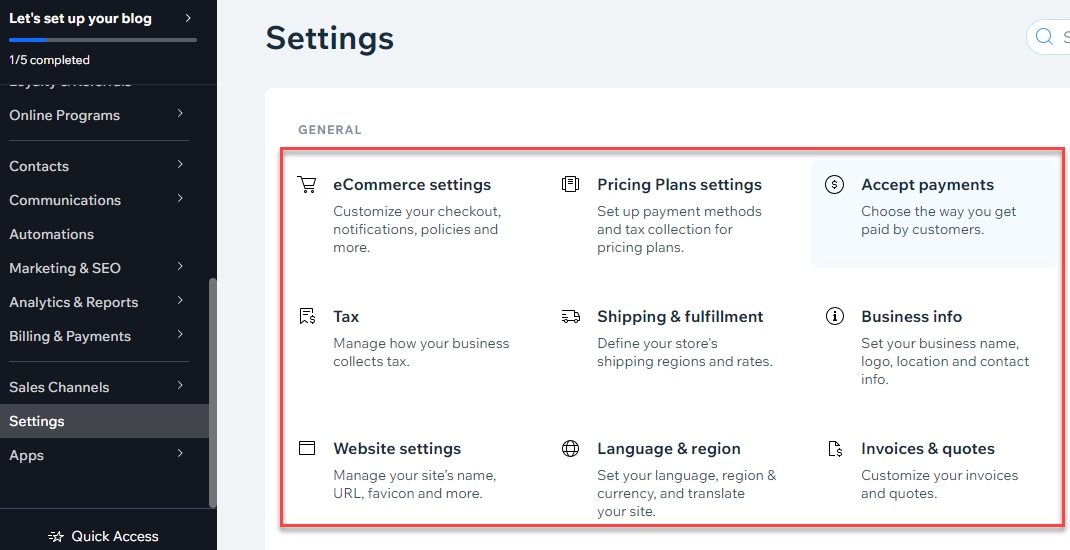
Among these various options, navigate to 'Website Settings' and select it with a click.
Step 4. Click on the Site to Which You Need to Connect Domain
You'll now have to select the site to which you wish to link the newly purchased domain from Google Domains. For my part, I'll be connecting it to 'My Site 1', the site I want to associate with the domain name I've acquired.
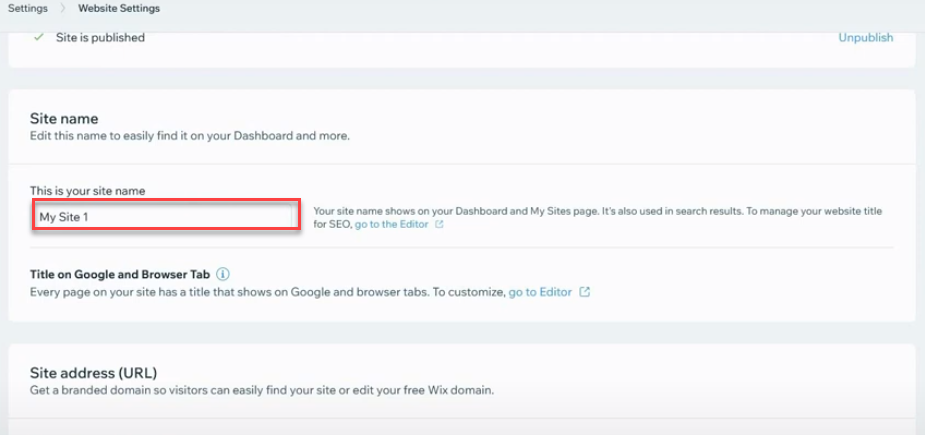
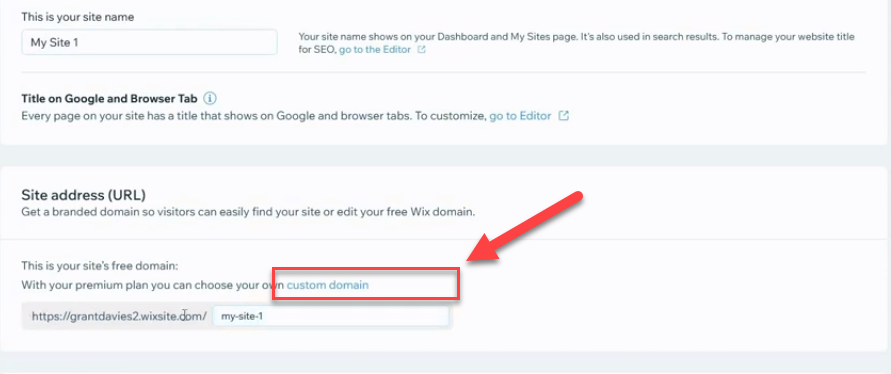
Step 5. Click on the “Custom Domain”
You have the option to modify the name of your Wix site, or you can keep it as it is. Then, navigate to the upper part of the site address tab and click on the custom domain.
Step 6. Enter Here Purchased Domain and Click on Let’s go Button
As previously mentioned, we bought a domain name from Google Domains. It's at this point that we need to input that specific domain name, then give a click to the "Let's Go" button.

Step 7. Click on “Yes, I Own this Domain”
You'll be prompted to specify whether you already own the domain or if you need to purchase it from Wix. Since we acquired it from Google Domains, we'll proceed with the option for an existing domain. To do so, click on "Yes, I own this Domain."

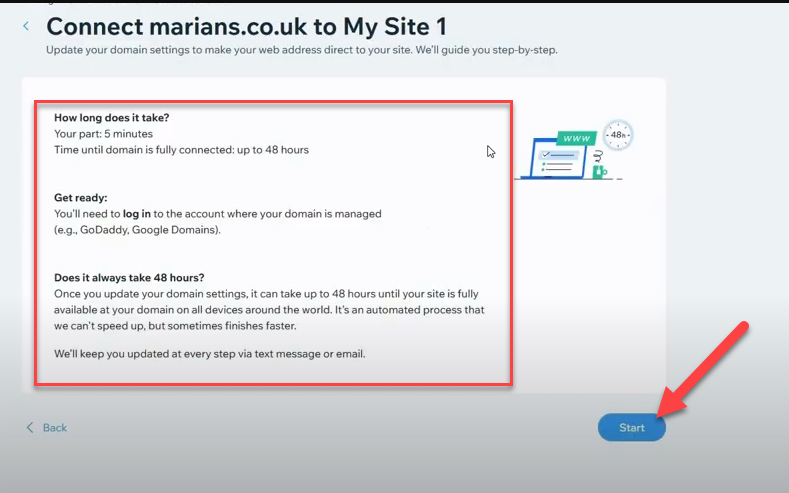
Step 8. Click on Start Button
Carefully review and confirm the information displayed on your screen. Once you have verified its accuracy, proceed through the process by clicking the "Start" button.
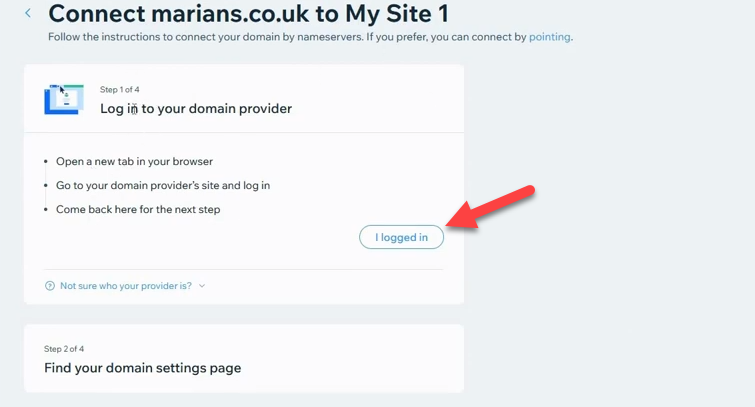
Step 9. Click on I logged In button
In this window, select the option indicating that I logged In. Subsequently, in a new tab, navigate to the website of your domain name provider where you made your purchase.
In our case, given that we bought a domain from Google Domains, we'll open its account in a new tab for further action.
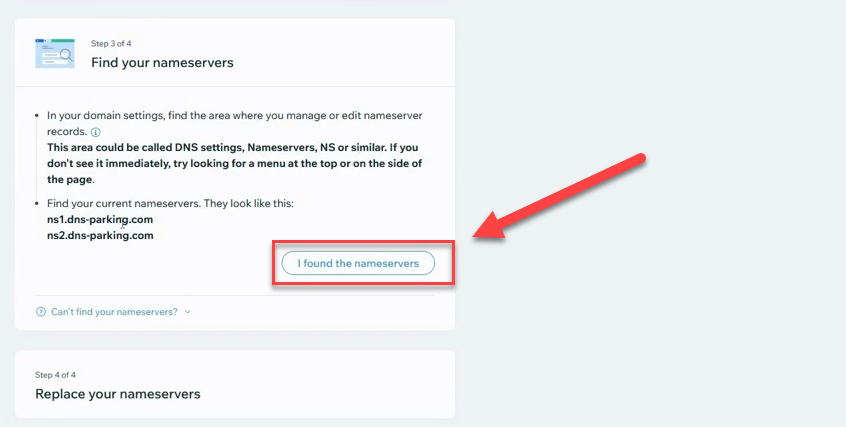
Step 10. Click on I found Nameserver
The Domain Name System (DNS) settings in a domain connection relate to how your domain name is connected to your website or email service.
Essentially, DNS is the phone book for the internet; it translates human-readable domain names (like www.example.com) into IP addresses that computers can comprehend.
Give a Click to “I found the nameservers.”
DNS settings usually include the following records:
- A Records (Address Records): These map domain names to individual IP addresses. For example, your A record could map your domain name to the IP address of your website's server.
- CNAME Records (Canonical Name Records): These are used to map one domain name to another. For instance, you could use a CNAME record to map www.yourdomain.com to yourdomain.com.
- MX Records (Mail Exchange Records): These are used to route your domain's email to the servers hosting your email account. For example, if you use a service like Gmail for your domain's email, your MX records would point to Google's servers.
- TXT Records: These are used for a variety of purposes. One common use is to verify domain ownership with services like Google Search Console or Microsoft Office 365.
- NS Records (Name Server Records): These tell the internet which servers are authoritative for your domain's DNS records. These are usually set to the servers provided by your domain registrar or DNS hosting service.
- SPF Records (Sender Policy Framework): These records are used to prevent spammers from using your domain to send emails. They do this by specifying which mail servers are authorized to send email to your domain.
- DKIM Records (DomainKeys Identified Mail): Email authentication using DKIM Records is designed to detect spoofing. This allows the receiver to verify whether incoming mail from a domain has been authorized by the administrators of that domain.
- DMARC Records (Domain-based Message Authentication, Reporting & Conformance): These records build upon the SPF and DKIM protocols to enhance the security of your domain's email.
To set up your website or email, you need to change these records at the place where your domain is registered or use a dedicated DNS hosting service if your domain registrar doesn't provide DNS hosting.
Note: Incorrectly editing DNS settings can break your website or email, so it's important to understand what you're doing or consult with a professional if you're unsure.
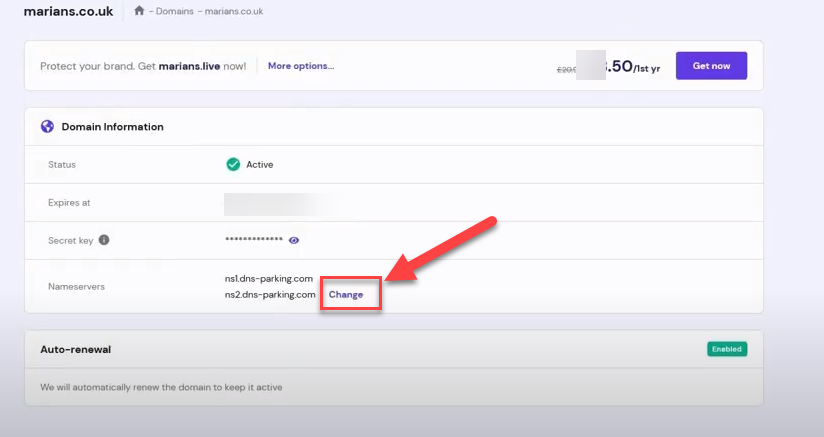
Step 11. Copy Nameservers and Click on Change button on Your Domain Manage Page
Wix will now generate two sets of nameservers. You need to copy these codes and paste them into the domain manager page of your domain provider.
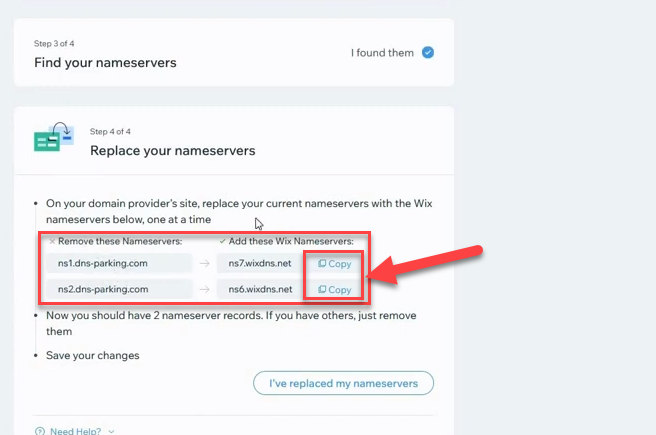
In our case, Google Domains is our domain provider, so we would go to the Google Domains dashboard and click the "Change" button next to the existing nameservers.
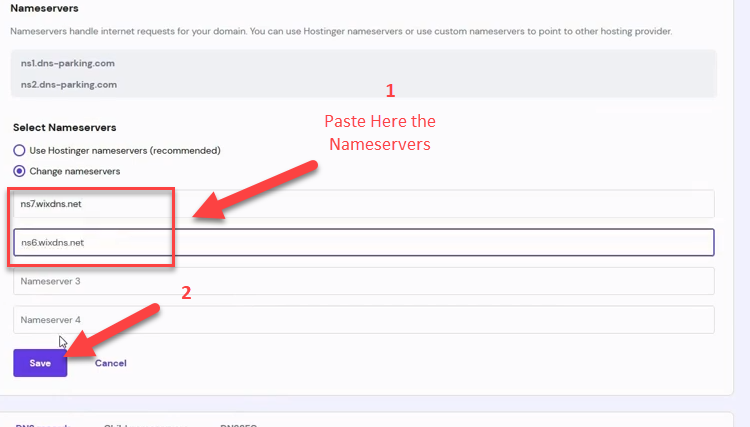
Step 12. Replace Nameservers and Click on Save button
When you click the "Change" button, a new window with your domain's existing nameservers will open.
Copy these nameservers from Wix and paste them into the corresponding fields on your domain provider's page.
Click the "Save" button at the bottom of the page once the nameservers have been pasted.
Step 13. Nameservers Changed Confirmation Message Arrive, Click on Close
A pop-up message will appear, indicating that your nameservers have been Changed. You can check the accuracy of the nameservers within this window.
Once done, click the close button located at the lower right corner of the pop-up to dismiss it.

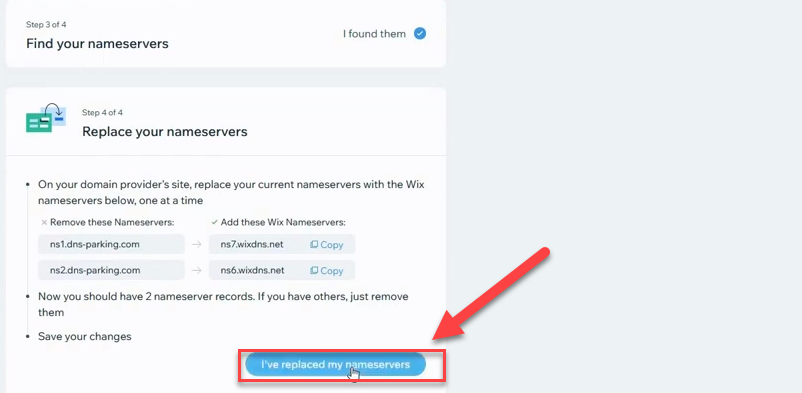
Step 14. Click on I have Replace my Nameservers
We have already duplicated and pasted the nameservers into the domain provider management page. Now, proceed by selecting the 'I have Replaced My Nameservers' option on the Wix page.
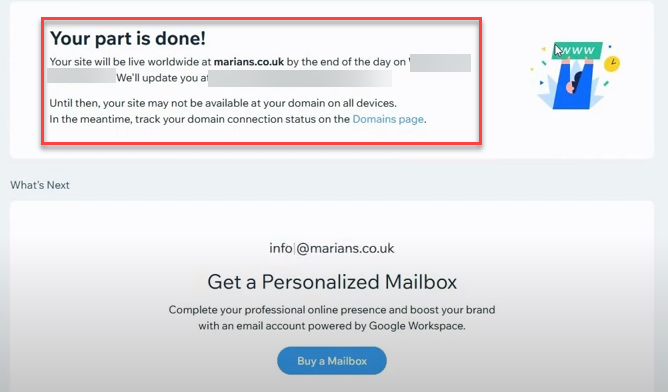
Step 15. Domain is Connected Confirmation Message Arrive
The domain marians.co.uk is now successfully linked to My Site 1. The following pop-up notification affirms this successful domain connection.
Wrapping Up
Purchasing a domain and linking it to your Wix site is a process that can significantly elevate your online presence and enhance the visibility of your website.
This process begins with purchasing a domain from reliable registrars such as Google Domains, GoDaddy, or Namecheap, which gives your brand a unique digital address.
Thereafter, you can link the domain to your Wix site, taking advantage of Wix's robust website-building features, SEO tools, and analytics to improve your site's visibility in search engine rankings.
This comprehensive guide has detailed all the necessary steps, from purchasing a domain to successfully connecting it to your Wix site.
By following these steps, you can create a strong online identity, protect your brand, and ensure a seamless user experience for your customers.
FAQs
How do I index my website on Google?
To index your website on Google, first ensure that your site is live and accessible to Google's crawlers. Then, use Google Search Console to submit your website. You'll need to verify your site ownership in Search Console by adding a meta tag, uploading an HTML file, or using other methods provided by Google. After verification, submit your sitemap through the Search Console. This helps Google better understand the structure of your site. Regularly updating your content and ensuring your site is SEO-friendly will also aid in indexing.
How to Link Google Domain to Wix: A Step-by-Step Guide?
Linking your Google Domain to your Wix website is a straightforward process. First, purchase your domain through Google Domains. Then, in your Wix account, go to the Domains section and enter your domain name. Wix will provide you with the necessary nameservers, which you need to update in your Google Domain settings. Once the nameservers are updated, your domain will be successfully linked to your Wix site.
How to Transfer a Domain from Google to Wix?
Transferring your domain from Google Domains to Wix is a simple process. First, ensure your domain is unlocked and obtain the transfer authorization code from your Google Domains account. Then, in your Wix account, go to the Domains section and initiate the transfer process by entering your domain name and the authorization code. Follow the prompts to complete the transfer, which may take up to 7 days to finalize.
How to Connect Wix to Google Domain: A Comprehensive Guide?
Connecting your Wix website to a domain purchased through Google Domains is a simple process. In your Wix account, navigate to the Domains section and select the option to connect a domain you already own. Enter your Google Domain name and proceed to update your domain's nameservers to the ones provided by Wix. Once the nameservers are updated in your Google Domains account, your Wix site will be successfully connected to your domain.
What are Wix Nameservers? Understanding Their Role in Connecting Domains?
Wix nameservers are the DNS addresses that direct your domain to your Wix-hosted website. When connecting a domain to your Wix site, you'll need to update your domain's nameservers to the ones provided by Wix. These nameservers typically look like ns1.wixdns.net and ns2.wixdns.net. By pointing your domain's nameservers to Wix, you ensure that visitors are directed to your Wix site when they enter your domain name in their browser.
How can you connect Wix to the GoDaddy domain?
To connect your Wix site to a domain you've purchased through GoDaddy, start by logging into your Wix account and accessing your site's dashboard. Go to the 'Domains' section and select 'Connect a domain you already own.' Enter your domain name and select 'GoDaddy' as your provider. Wix will provide you with the DNS settings that you need to update in your GoDaddy account. Log in to your GoDaddy account, go to your domain's DNS settings, and update them as per Wix's instructions. The changes may take up to 48 hours to propagate.
Can I transfer a domain to Wix?
Yes, you can transfer a domain to Wix. To do this, your domain must be at least 60 days old and not have any transfer locks. First, obtain an authorization code (also known as an EPP code or transfer key) from your current domain host. Then, in your Wix account, go to the 'Domains' section and select 'Transfer a domain to Wix.' Enter your domain name and the authorization code. Follow the prompts to complete the transfer. Note that transferring a domain does not automatically transfer the website content or email service associated with that domain.
Can Wix use my existing domain?
Yes, Wix can use your existing domain. You can either transfer your domain to Wix (as mentioned above) or connect it while keeping it registered with your current host. Connecting your domain involves changing its DNS settings to point to Wix's servers. This is done through your current domain host's platform. After updating the settings, you'll need to verify the connection in your Wix account.
Why would my domain not connect to Wix?
If your domain is not connecting to Wix, it could be due to several reasons:
- DNS Settings Not Updated Correctly: Ensure that the DNS settings in your domain host account are correctly updated as per Wix's instructions.
- Propagation Time: DNS changes can take up to 48 hours to propagate. If it’s been less than 48 hours since you made the changes, you might need to wait a bit longer.
- Domain Lock or Privacy Protection: If your domain has a transfer lock or privacy protection enabled, it might prevent the connection. Check your domain settings.
- Expired Domain: Ensure your domain registration has not expired.
- Incorrect Domain Name: Double-check if you entered the correct domain name in your Wix settings.


.svg)