


Have you ever found yourself lost in the complexities of WordPress, thinking about how to insert tables to your WordPress posts? You're not alone. Many users seek to enhance their content's structure and clarity, and here's the good news: WordPress accommodates this need.
Adding tables helps organize data visually, simplifying complex information to make it digestible for visitors. This feature isn't just about neatness; it's about leveraging WordPress's capabilities to improve reader engagement and comprehension.
In this guide, you will learn two ways to add tables in WordPress Posts
- Utilize TablePress plugin for table integration in pages.
- Insert tables manually in WordPress posts.
By the end of this guide, the confusion of unstructured content will be a thing of the past. You'll use tables like a pro, transforming your posts into visually appealing, easily digestible information that captivates and retains your audience's attention.
Method 1. Adding Tables in WordPress Posts and Pages Using TablePress Plugin
Using the TablePress plugin in WordPress is pivotal for creating dynamic, responsive tables without coding. It enhances content interaction, eases data presentation, and ensures site aesthetics and functionality.
Steps to Add tables in WordPress Using TablePress Plugin
We will now delve into a detailed guide, complete with visual aids like screenshots, to illustrate the process of utilizing the TablePress plugin for integrating tables into your WordPress pages and posts.
This approach is highly efficient as it allows for the importing of tables that have been previously saved, streamlining content updates.
The ability to reuse and manage these tables makes consistent formatting and data presentation simpler, enhancing overall content quality and site maintenance efficiency.
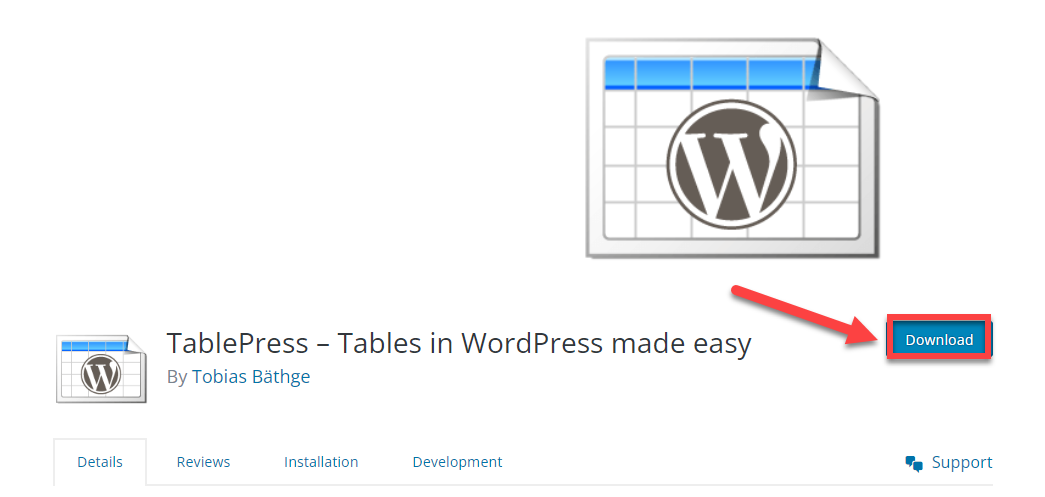
Step 1. Install and Activate TablePress Plugin
The initial step requires you to install and activate the TablePress plugin. You can easily find this plugin by conducting a Google search or, alternatively, navigate through your WordPress dashboard by clicking on 'Appearance' and then 'Plugins' to add the TablePress plugin directly.
Step 2. Click on TablePress to Add New Table
Once installed, locate 'TablePress' in your dashboard's sidebar and click on it. This action opens a new window displaying various options such as 'All Tables,' 'Add New,' 'Import,' 'Export,' and others.
Since this is our initial usage and we haven't created any tables yet, we need to select the 'Add New' button situated at the top of this window to proceed with creating a new table.

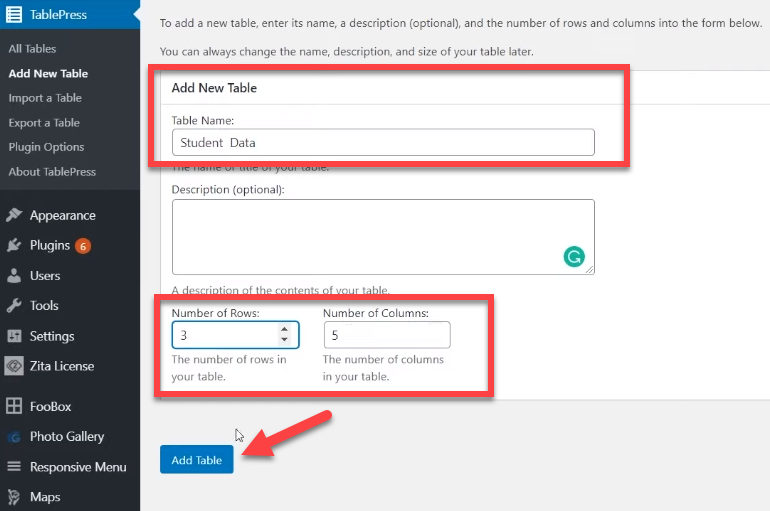
Step 3. Set Number of Rows and Number of Columns
Upon selecting the 'Add New' button, a new window emerges on your screen. In this window, you have the option to assign a 'Table Name' and include a description, clarifying the table's intended use.
Crucially, you must specify the number of rows and columns that align with your content requirements. After setting these parameters, proceed by clicking on 'Add Table.'
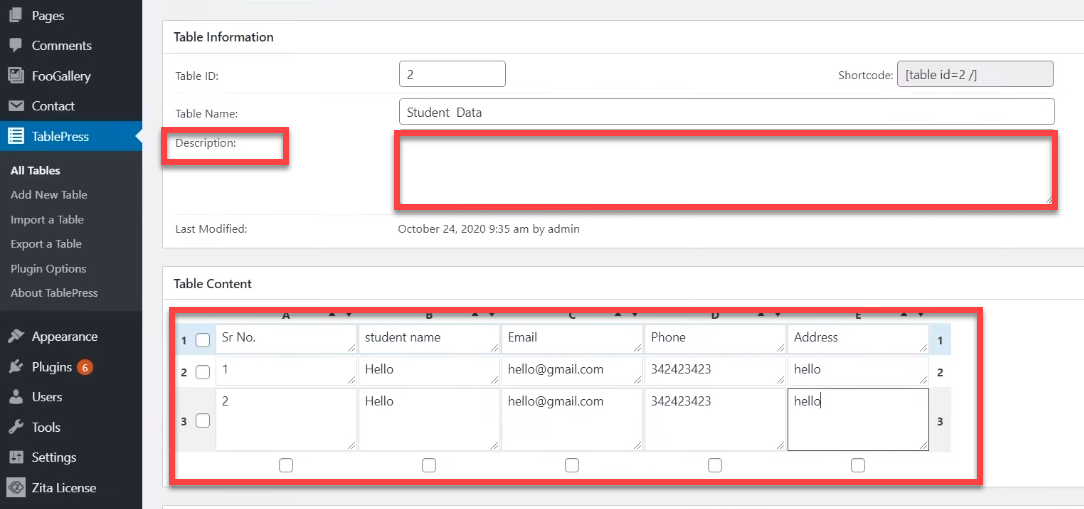
Step 4. Add Description and Write Content in Table
Clicking on 'Add Table' initiates a new phase where you can input content into the freshly created table, structured according to your selected rows and columns.
Step 5. Do Table Manipulation from Advanced Settings
Utilizing the table manipulation options, you have the flexibility to add or remove rows, as well as incorporate images within the table. For cell customization, employ the 'Insert,' 'Delete,' or 'Hide' buttons to make the desired adjustments.

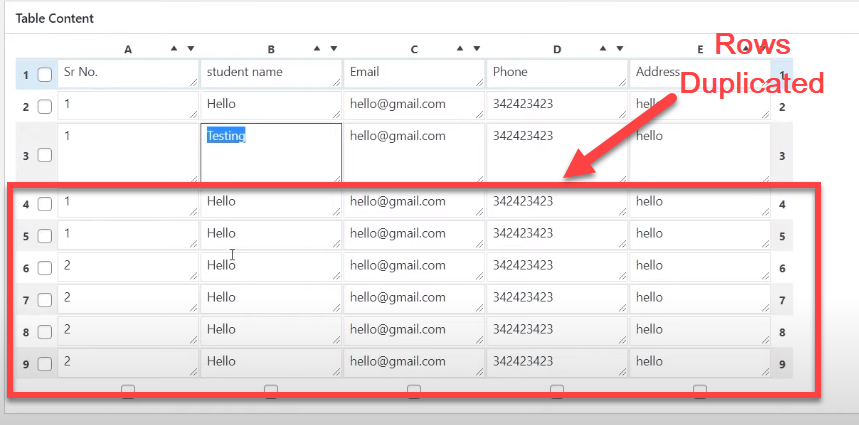
To duplicate rows, you first need to select the ones you want to replicate. Beneath the table, you'll find a section for table manipulation, where there is a 'Duplicate' button. After choosing the relevant rows, simply click this 'Duplicate' button to create copies of the selected rows.
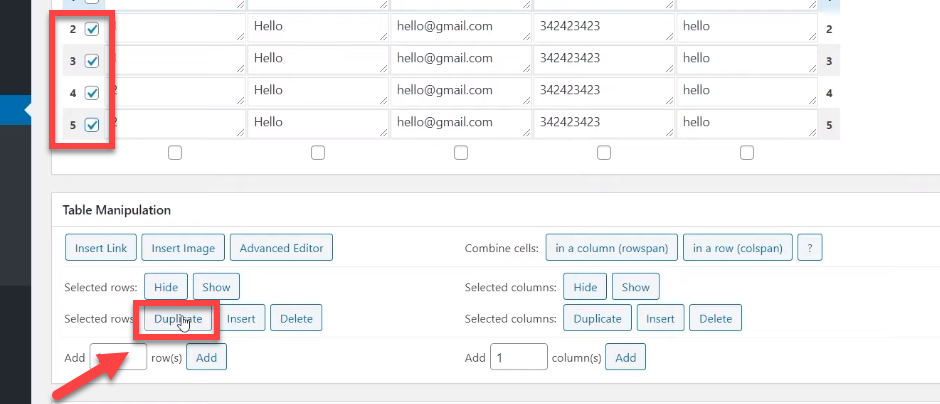
After clicking the 'Duplicate' button, you will notice that the rows have been replicated.
Step 6. Copy and Paste the Shortcode in the WordPress Post or Page
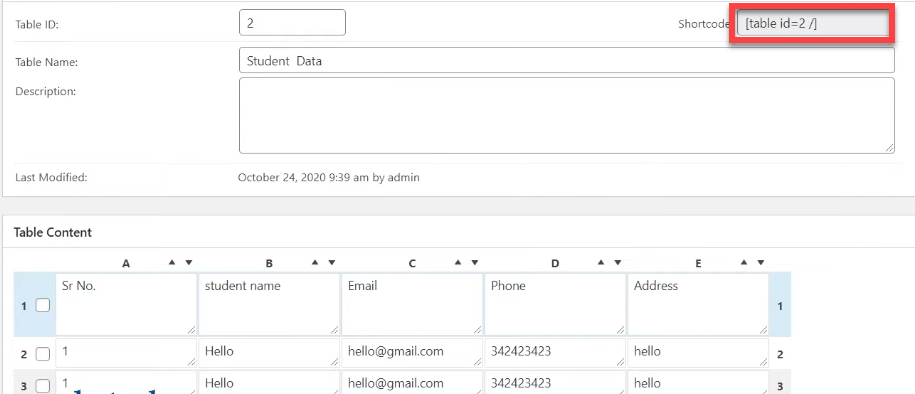
At the top, you'll see a shortcode that TablePress has generated for your table, intended for use in WordPress pages or posts.
By inserting this shortcode into your posts and then clicking the 'Update' button, the table will be integrated. At this stage, you need to copy the provided code from TablePress.
Next, navigate to the posts or pages where you wish to insert the table created via the TablePress Plugin.
After choosing a post, as in this case, the 'About Us' page, click on the '+' symbol to add a new block. From the ensuing popup menu, select 'Shortcode.'
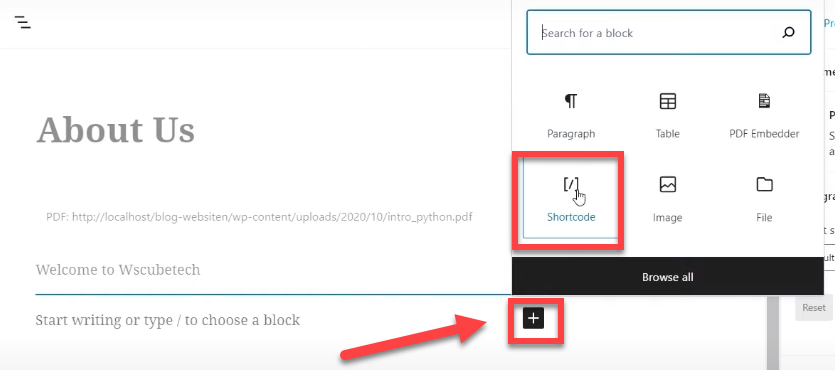
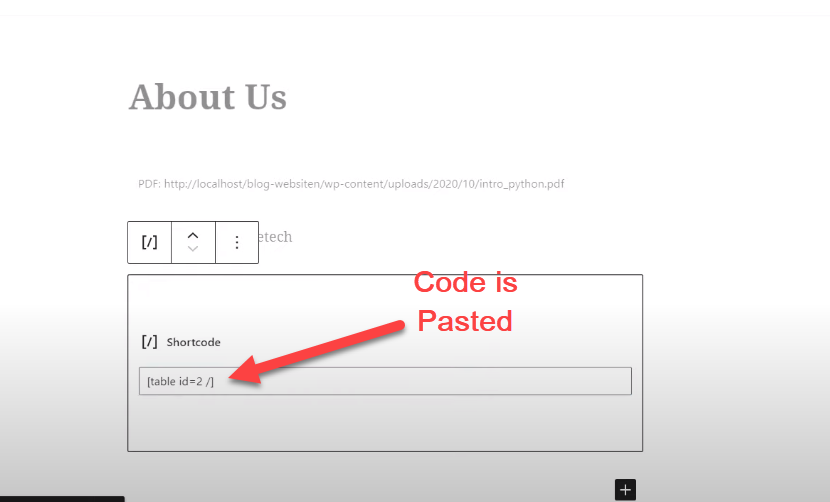
Upon clicking on the 'Shortcode,' you'll encounter a block within the post asking for a code. At this point, paste the code you previously copied from TablePress into this field.
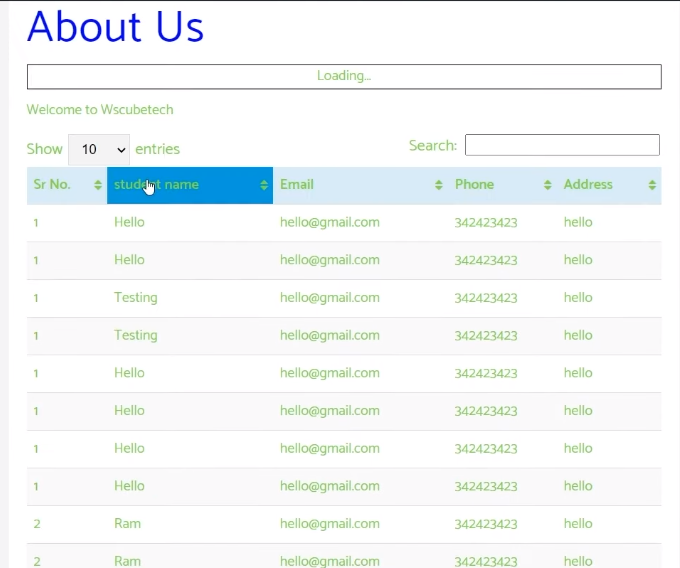
Step 7. Have a Look at Table after Publication
Once you've entered the code, hit the 'Update' button. You'll notice the table you created in TablePress now appears on the 'About Us' page of your WordPress site. This visibility is solely due to the insertion of the Shortcode.
Therefore, using this method to incorporate tables into your WordPress posts and WordPress pages is efficient and effective.
Method 2. Adding Tables in WordPress Posts and Pages Manually
Incorporating tables into your WordPress pages is a straightforward process, thanks to the user-friendly WordPress editor.
This built-in feature facilitates the organization of content in a structured format, making complex information more accessible to your readers.
Instead of relying on external tools, you can create, design, and customize tables directly within your page drafts.
By utilizing tables, you enhance user experience, making your content more digestible and engaging, thereby retaining reader interest and potentially increasing your site's traffic.Lets delve into steps of adding tables in wordpress manually.
Steps to Add Tables in WordPress Pages Manually
Adding tables to WordPress posts organizes data visually, enhancing readability and improving user engagement by presenting information clearly and concisely.
Next, we'll outline the process of inserting tables into WordPress posts step by step, complete with screenshot guidance.
Step 1. Go to WordPress Dashboard
You need to visit the admin page of the wordpress, where you have to enter the username and password. Then click on the login button that you will find at the right bottom of the pop up.
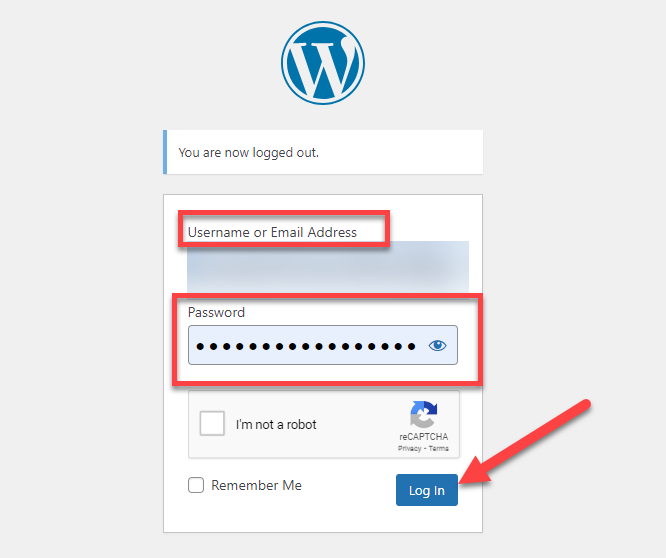
To access the administrative dashboard of your WordPress site, first navigate to the WordPress admin page, which is typically found at a URL ending in /wp-admin, unless it's been customized.
Simply click on the Login button to gain entry to the backend of your WordPress website. It's always a good practice to use a secure and unique password to ensure your site remains safe from unauthorized access.
Should you ever forget your login information, there's usually a recovery or reset option near the login area.
Step 2. Select the Post
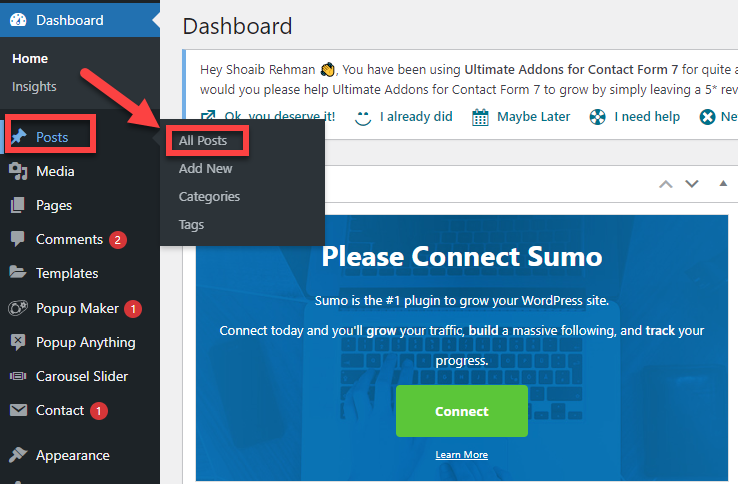
In order to add a table to a blog post or website page you need to select the blog post. Thus navigate for the Posts and click on it.
When you click on it, it will open a pop up on your screen click on All Posts and here you will find all your posts. Select the post from them in which you want to add Tables.
Step 3. Click on Block “+” Sign
Upon accessing the post, you will notice a '+' block situated in the middle-right section of the interface. If you right-click on this symbol, it gives you the option to add a title for your table. The title should be relevant to the content you wish to display.

For example, if you're creating a table to display information regarding your students, you could title it "Student Data" or something along those lines.
Consequently, when you select the block icon, a popup window appears, prompting you to choose the 'Table' option.

This will present you with a variety of table formats to choose from. Select the one that best suits your needs.
Furthermore, if you're interested in keeping a consistent design, there's also an option to select a table that aligns with the theme you're using.
Step 4. Choose Number of Rows and Column
After clicking a table, you have the option to select the desired number of rows and columns. To do this, look for a section or block on the left side of the interface.
Here, you can input the number of rows and columns based on the content you wish to include.

For instance, if you aim to have a table with 4 rows and 3 columns, you can input these values in the appropriate fields labeled "rows" and "columns."
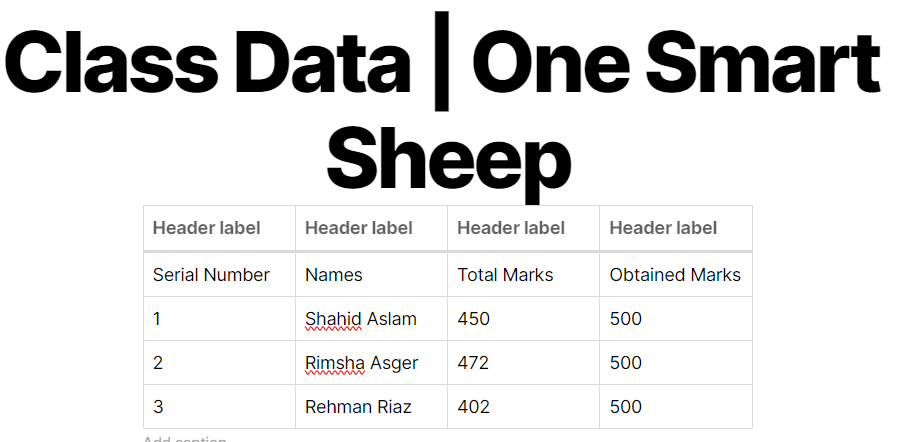
Using our earlier example, you might label the first column "Student Name", the second one "Roll Number", and the third "Marks".
Once you've input all your specifications, locate the "Create Table" button, usually found on the bottom right side of the interface. Clicking this will generate your table according to the instructions you've given.

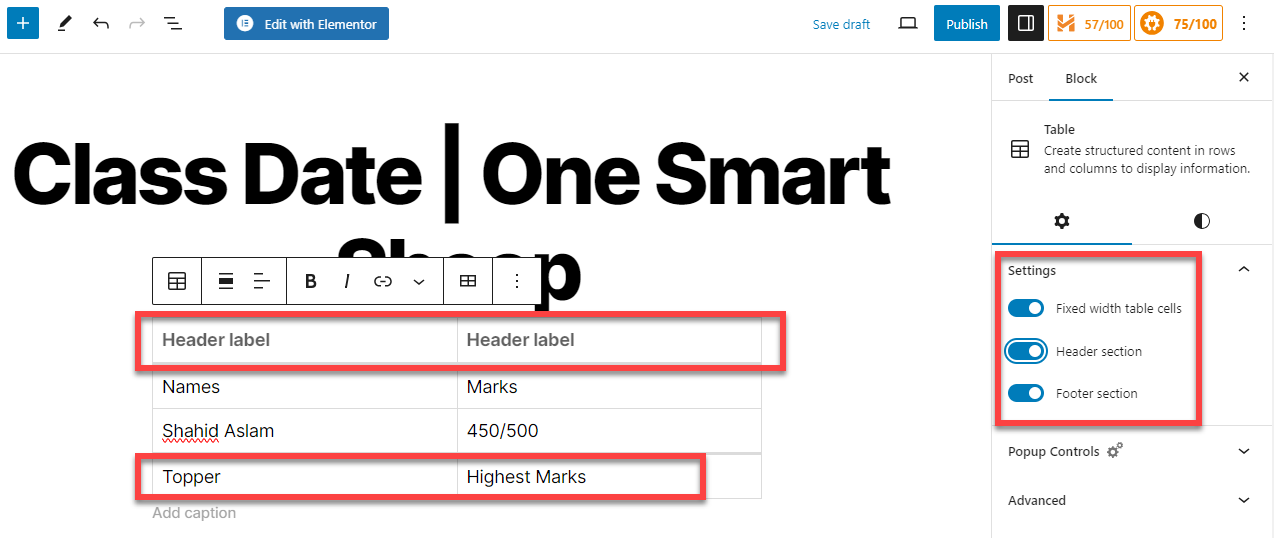
After creation, the table will appear on your worksheet. You'll notice two distinct blue markers within the table.
The first one designates the heading area, where you can insert titles like "Serial Number", "Name", "Marks", etc. The second one corresponds to the body of the table, where the main content will reside.
Step 5. Change Style of Table
After inputting data into a table, you might find the need to make various formatting adjustments to enhance its appearance or clarity. One such adjustment could be changing the color of specific content in WordPress.
For instance, if you wish to modify the color of a heading, simply select the desired text or cell. Once selected, navigate to the color box or palette in your software interface. Here, you'll find a range of color options to choose from. Pick the color that best suits your preferences or design needs.
Beyond the basic structure, there are options to further customize your table. If you want to include a heading for the table, there's a "header" option. Clicking on it will allow you to define headers for each column.
Additionally, if you'd like to include a footer for any additional notes or information, simply click on the "footer" option and input the content you desire.
What are the Common Usage of WordPress Tables
- Data Presentation: Tables allow the orderly presentation of statistics, metrics, or other quantitative data. They're essential for comparison posts, financial reports, research data, or technical specifications.
- Product Comparisons: E-commerce and review sites use tables to list products with their features, prices, ratings, or reviews for side-by-side comparison.
- Event Schedules: Events or businesses can use tables to display schedules, timelines, or programs, outlining activities, times, locations, speakers, etc.
- Pricing Tables: Many businesses use tables to present different pricing tiers for services or products, often showcasing what is included in each package clearly and effectively.
- Tabular Content: Articles or studies involving lots of data can benefit from tables, as they make it easier for readers to follow the information, whether it's a roster, a list of resources, or bibliographical data.
- Content Agendas: Blogs or educational websites use tables to outline lesson plans, reading lists, syllabi, or other structured content formats.
- Financial Information: Financial reports, budgets, expense tracking, and other money-related information are often displayed in table format for clear, easy-to-understand financial storytelling.
- Sporting Data: Sports websites use tables for displaying team standings, player statistics, match schedules, and game results in an organized manner.
- Inventory Lists: For businesses with inventories, tables can organize details about stock, including quantities, conditions, prices, and descriptions.
Wrapping Up
Integrating tables into your WordPress website, whether manually or through plugins like TablePress, significantly enhances the structure and readability of your content.
This comprehensive guide has illuminated the straightforward yet impactful methods of table insertion, detailing each step from accessing the WordPress dashboard to the final stages of content input and table manipulation.
Tables serve as versatile tools, indispensable for presenting various data types, from product comparisons and financial details to event schedules and inventory lists, in a clear, organized format.
By utilizing tables, content creators can significantly improve user engagement, aesthetic appeal, and the overall effectiveness of information presentation on their websites.
Thus, mastering the art of adding tables is a valuable skill set, fostering a more enriching and accessible user experience for visitors to your WordPress site.
FAQs
What is the difference between table of contents and index?
A "table of contents" is typically found at the beginning of a document or book, providing a chapter-by-chapter breakdown of sections and subsections, often with page numbers. It's a guide to the structured layout of the document.
In contrast, an "index" is located at the end of the document, offering an alphabetical list of terms, topics, and names used in the text, along with the page numbers where they can be found. The index helps readers locate specific information quickly.
How do I add a table of contents in WordPress Gutenburg?
To add a table of contents in Gutenberg (the block editor in WordPress), you can use a dedicated 'Table of Contents' plugin. Once installed and activated, create or edit a post, and you'll typically find an option to insert the 'Table of Contents' block within the post.
Some plugins automatically generate a table of contents based on your headings, which you can position at the start of your article or in a sidebar, depending on your layout preferences and the plugin's functionality.
What is a table Plugin in WordPress?
A table plugin in WordPress is an add-on that allows you to create, manage, and design tables within your posts or pages. They're useful for presenting various types of data in a structured, organized, and readable format. Popular table plugins include TablePress, wpDataTables, and Ninja Tables.
These plugins offer a user-friendly interface and functionalities like sorting, pagination, filtering, and more without requiring any coding knowledge.
How do I create a dynamic table in WordPress?
To create a dynamic table in WordPress, you'll need to use a plugin that supports dynamic content, such as wpDataTables or similar.
Once the plugin has been installed and activated, you can create a new table and select the option to make it dynamic, usually by importing data from various sources (like MySQL, Excel, CSV, etc.) or by integrating with other platforms or APIs.
These dynamic tables can automatically update when the underlying data changes, ensuring your site always displays the most current information. They also allow for interactive elements like real-time filtering, sorting, and searching.


.svg)