


How to hide a page in WordPress? This is a burning question for countless WordPress site owners.
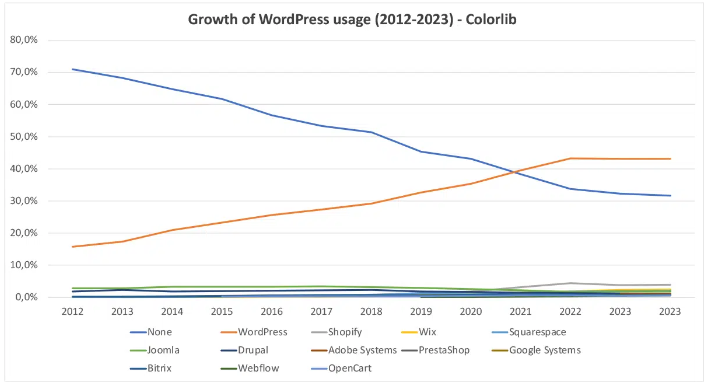
As the fastest-growing CMS for over a decade, with its usage increasing by 3.7% from 2021 to 2023 alone, many WordPress site owners grapple with the challenge of content privacy and control in this content-driven era.
It's essential, yet how do you keep it hidden from the all-seeing eyes of search engines, especially Google? Navigating this challenge is crucial, not just for site aesthetics but also for security and professional presentation.
In this guide, you will learn five ways to hide a page in WordPress
- Change visibility settings to hide a page
- Use the Robot.txt file for hiding
- Remove a page from the navigation menu
- Set a unique password to hide from search engines
- Delay publishing until the page is ready
We will provide a step-by-step guide with screenshots, and we will also discuss the reasons for hiding wordpress pages from the search engine at the end of this blog post.
Dive into our comprehensive guide to understand and master the art of concealing specific pages, ensuring your WordPress content surfaces only when and where you want it to.
Method 1: Hide a WordPress Page by Changing Visibility Setting
Controlling page visibility in WordPress safeguards sensitive content, allows for staging of drafts, offers exclusive access to select users, and keeps certain pages from search engine indexing. This feature enhances site management and user experience.
Using five simple visual steps in this method, we'll demonstrate how to hide a WordPress page using the visibility settings.
Step 1: Visit the Dashboard of Your WordPress Website
To log in, navigate to the admin login page and input your designated username and password. Once entered correctly, you'll be granted access to manage and modify your website's content and settings. Ensure you keep these login details secure to prevent unauthorized access.
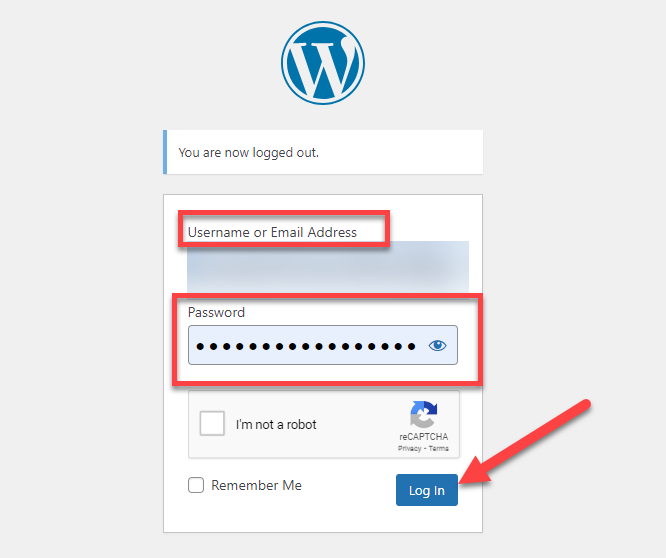
If you want to access the dashboard of your WordPress website, it's essential to log in to the website's admin page. This dashboard is the control center of your site, where you can manage content, settings, and other functionalities.

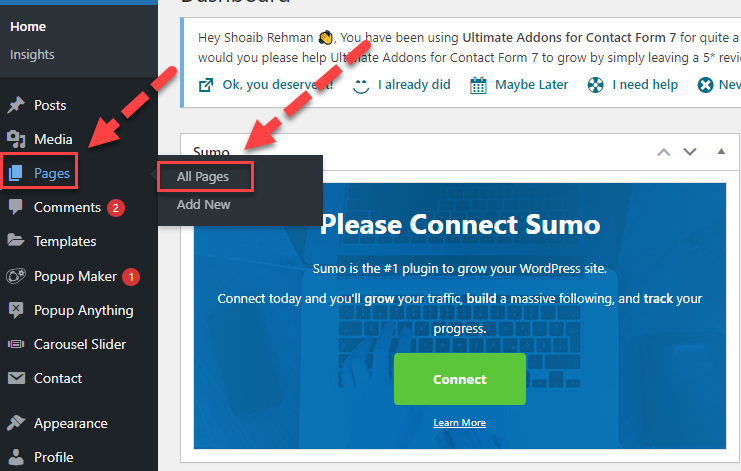
Step 2: Select the Page You Want to Hide
Within the dashboard, search for the "Pages" option. Upon locating it, click on it. A dropdown or pop-up menu will subsequently appear. From this menu, select "All Pages".
This will display a list of all the pages on your website. Browse through this list to identify and select the specific page you wish to hide or modify. Once selected, you can proceed to change its visibility settings or make other adjustments as required.
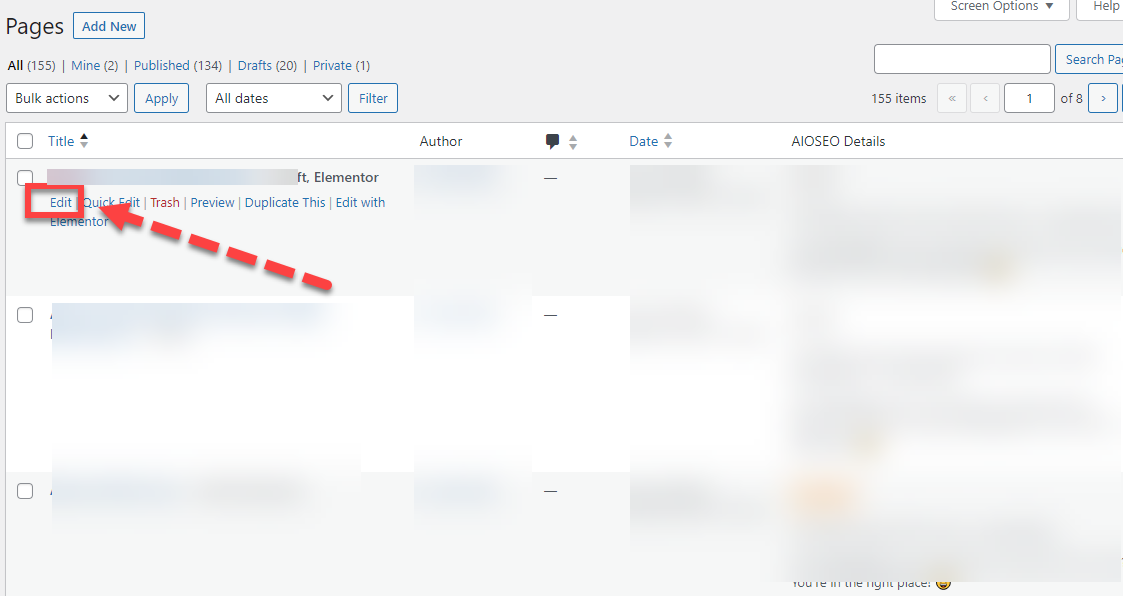
Choose the specific page you wish to conceal from the list. Once you've identified the desired page, locate the "Edit" option directly below the page's title.
Click on this "Edit" link to access the page's settings and make the necessary changes to its visibility. By doing so, you can easily control who views this page or if it appears on your website at all.
Step 3: Click on Visibility Option
Upon selecting "edit," the page transitions into a mode that allows for modifications. On the page's right-hand side, there's a feature labeled "Visibility."
This tool provides you the capability to adjust the page's accessibility settings, including the option to conceal or hide the page from certain viewers or the general audience.

Step 4: Control How this Post is Viewed
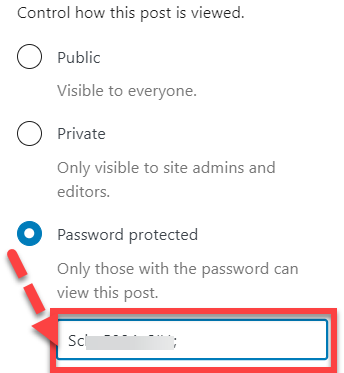
To manage the visibility of this post, you have the choice of setting it as public, private, or password-protected. If you intend to hide it, selecting the visibility option will prompt a new window to appear.

If your intention is to restrict the visibility of this page solely to the website's administrators and editors, then you should select the 'private' option.
This ensures that only those with higher access privileges, such as admins and editors, can view the content, keeping it hidden from general users and visitors.
.

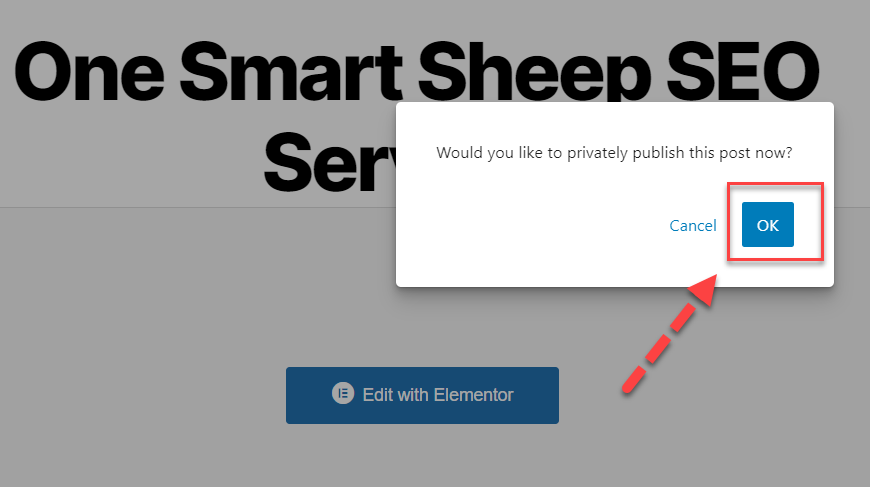
Step 5: Click OK button to Hide the Selected Page
Upon selecting the "private" option, a prompt will appear asking, "Would you like to privately publish this post now?" This prompt provides two choices: "OK" and "Cancel." Since our goal is to conceal the page, press the "OK" button.
Method 2: Hide a WordPress Page by Using Robot.txt File
Utilizing the robots.txt file to hide a WordPress page enhances site management and privacy. It instructs search engines to exclude specific pages from indexing, safeguarding sensitive content from unwanted visibility in search results.
This method offers a simple yet effective layer of content protection without altering the page's accessibility for regular users.
Step 1: Take the URL of the Page You Want to Hide
To hide a specific page on your WordPress website, it's essential to first obtain the URL of that particular page.
This URL is the unique identifier for the content you wish to hide, ensuring that you target the correct page without inadvertently affecting others. Once you have this URL, you can proceed with the necessary steps to restrict its visibility.
https://onesmartsheep.com/post/25-best-wordpress-art-gallery-themes-to-use
Step 2: Add this Code to in Robot.txt File
To hide a specific post or page on your WordPress website using the robots.txt file, you'll need to create or modify this file. Within the robots.txt file, use the Disallow: directive followed by the path to your page.

This tells search engines not to index or crawl that specific page. To target the exact page you want to hide, simply replace 'your-page/' with the specific URL path of your desired page. Here's a sample of how the code should appear

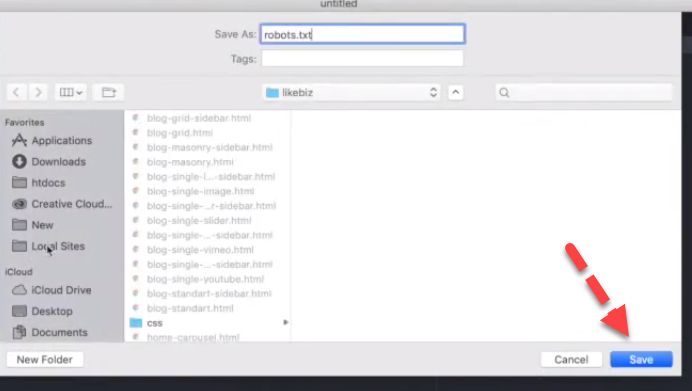
Step 3: Save Robot.txt File
Now, after making the necessary changes to the robots.txt file, ensure you save your modifications. You can finalize and store the changes you've made by clicking the 'Save' button.
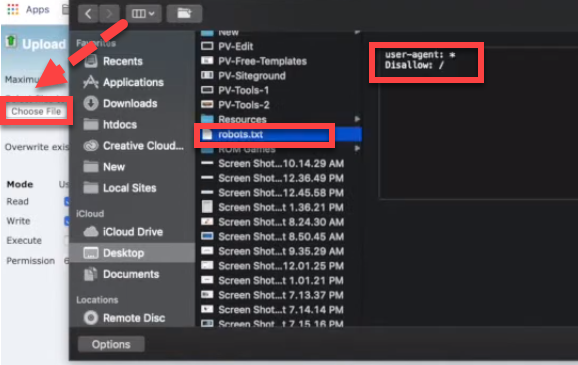
Step 4: Upload the Robot.text File in Cpanel
Once you've saved your modifications, return to the website's cPanel. From there, navigate to the 'File Manager' and proceed by selecting the 'Upload' option to incorporate your changes.

After selecting the 'Upload' option, you'll be prompted to click on the 'Choose File' button. From here, locate and select the file you saved earlier. Once chosen, proceed to upload the file.
Method 3: Hide a WordPress Page from the Navigation Menu
Hiding a WordPress page from the navigation menu enhances the user experience by decluttering the interface.
It allows admins to keep essential but infrequently accessed pages (like legal terms or special offers) accessible without overwhelming visitors. Additionally, it provides flexibility in content presentation and site design optimization.
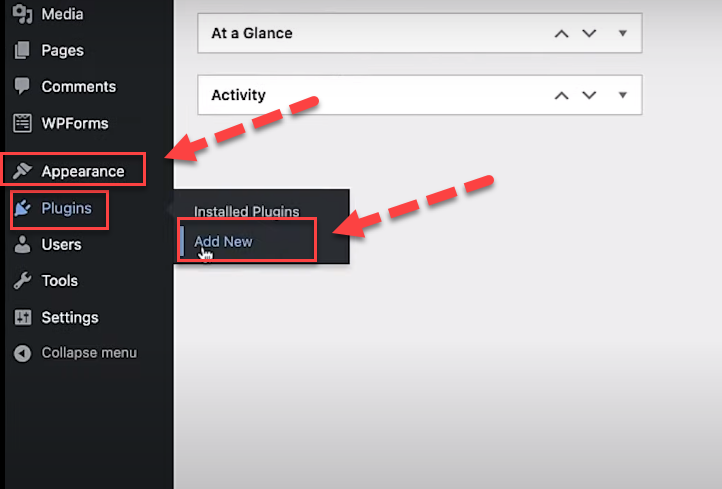
Step 1: Activate the Plugin “Exclude Page From Menu”
In this approach, we'll utilize a plugin designed to exclude pages from the menu. Start by activating the plugin. You can add a new plugin by navigating to the plugins section and selecting 'Add New.'
In the search bar write to navigate for the plugin “exclude pages from menu”. Then click on the install button.

After the installation process has been successfully completed, you'll need to activate the feature or plugin. To do this, simply locate and click on the "Activate" button. This step ensures that the installed component is ready for use on your website.

Step 2: Select the Page from the Menu You Want to Hide
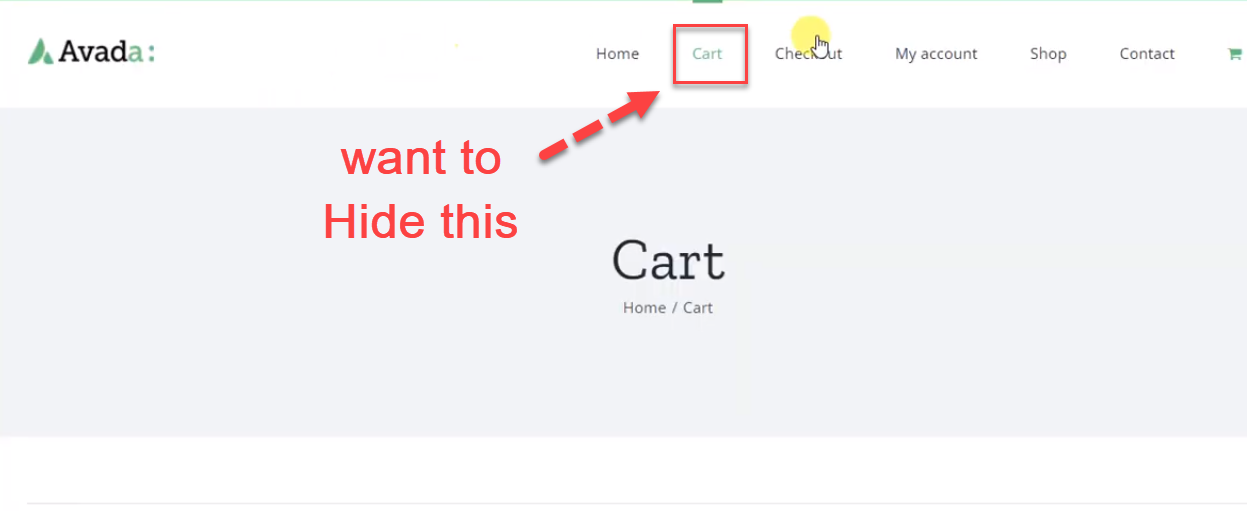
From the available menu options, choose the specific page you wish to conceal; in this instance, I've opted for the 'Cart' page. My aim is to ensure this particular page remains absent from the main navigation bar for a cleaner user experience.
Step 3: Click on Edit Page
In this phase, navigate to and open the specific page you wish to shield from search engines. Once there, locate the 'Edit Page' option, typically found at the header's top, and click on it to access the page's editing mode.

Step 4:Click on “Exclude this Page from Menu”
After selecting the 'Edit Page' option, you'll be directed to WordPress's page editor, where modifications to the page can be made.
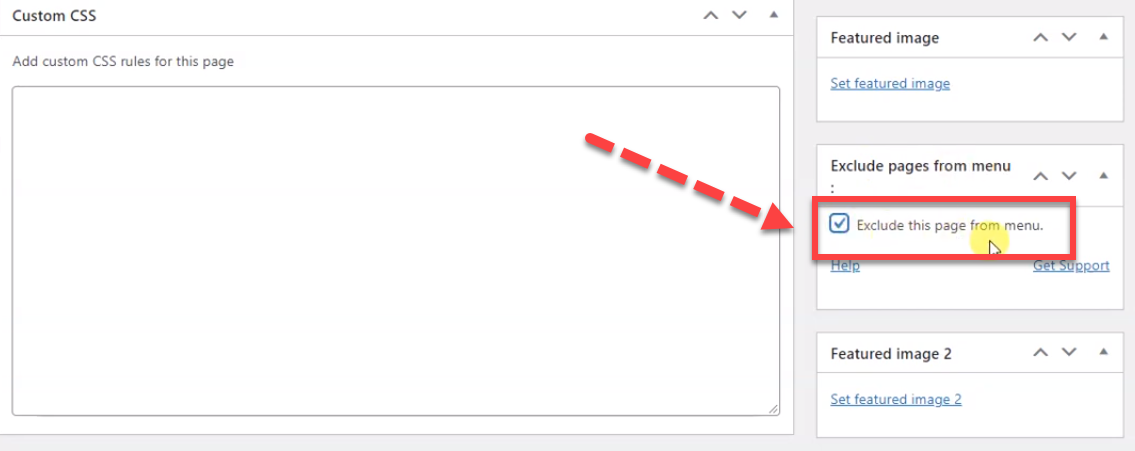
Scroll through the editor and locate the 'exclude page from the menu' option. Typically, this is positioned on the right-hand side, often beneath the 'featured image' section.

Select the checkbox labeled 'Exclude page from the menu.' By doing so, you're instructing the system to keep this particular page out of your site's main navigation menu.
Navigate upwards on the page and locate the 'Update' button, typically situated in the top right section of the screen. Clicking on this button will save and implement any changes you've made.

Step 5: Check the Cart Page is Removed
After pressing the 'Update' button, navigate back to your website's main view. Refresh the homepage to see the changes take effect. You'll observe that the 'Cart' option has been successfully removed from the menu bar.

Method 4: Hide a WordPress Page from Search Engine by Setting a Unique Password
Setting a unique password to hide a WordPress page from search engines ensures enhanced content security. This method prevents unauthorized access while ensuring only those with the password can view the page.
It's a tailored approach to content confidentiality, safeguarding sensitive information from general search engine indexing.
Step 1: Click on Visibility in Editable Mode
After selecting 'Edit' located below the title, the website transitions into an editable mode. Within this mode, find and click on the 'Visibility' setting. A pop-up will appear, and from the available options, choose 'Password Protected.'

Step 2: Click on Password Protected and Setup a Strong Password
Establish a robust password to ensure security. Once you've selected the 'Password Protected' option, a designated field or tab will appear beneath it, prompting you to input your chosen password.
Step 3: Check the Visibility Status
Establish a robust password to ensure security. Once you've selected the 'Password Protected' option, a designated field or tab will appear beneath it, prompting you to input your chosen password.

Method 5: Hide a WordPress Published Page Until it is Ready to Use
Hiding a WordPress page until it's ready ensures that visitors only see polished, finalized content.
This maintains a site's professionalism, prevents the dissemination of incorrect or unfinished information, and ensures a seamless user experience. It's a proactive approach to quality control, ensuring only ready-to-view content is live.
Step 1: Check the Status is Publish
Choose the specific WordPress page you want to modify and hit the 'Edit' option. Upon entering the editing interface, you'll notice the page is marked as published. However, upon review, you might discern that it isn't yet optimized for your target audience.
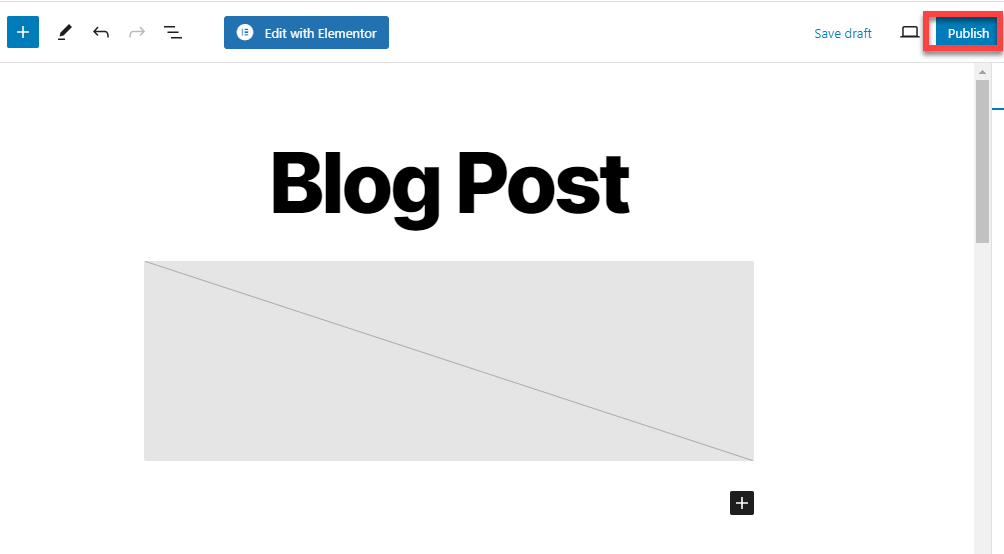
Step 2: Click on Save Draft
Opt for the 'Save draft' choice available in the options. By doing so, the page gets stored in the website's backend, ensuring it remains unpublished. Consequently, this page remains hidden from search engines and won't appear in search results.

Reasons to Hide a WordPress Page From the Search Engine
- Privacy Concerns: Some pages may contain sensitive or private information that you don't want the public to access. Keeping them hidden ensures they remain confidential.
- Website Development: When redesigning or updating your website, you might not want incomplete or test pages to be indexed by search engines.
- Special Promotions: If you have a landing page for a specific audience or promotional event, you might not want it to be widely accessible via search engines.
- Member-only Content: Pages designed for specific members or subscribers should remain exclusive to them and not be available to the general public.
- Avoiding Duplicate Content: Search engines like Google penalize websites with duplicate content. If you have pages with similar content, it's wise to hide some to avoid potential SEO penalties.
- Better User Experience: Irrelevant or out-of-date pages can confuse or frustrate users. By ensuring only relevant pages are indexed, you provide a better browsing experience.
- Temporary Content: If you have seasonal pages or content related to specific events, you might want them hidden after the event has concluded.
- SEO Optimization: In some cases, it may be strategic to prevent certain pages from being indexed to ensure that the most relevant and important pages are easily found by users.
- Legal or Regulatory Reasons: Some content might need to be hidden due to legal restrictions or regulatory compliance.
- Limiting Access: You might have pages that are meant only for internal use, training, or other specific audiences.
Wrapping UP
Hiding a WordPress page from Google or other search engines is a crucial feature for many website owners.
Whether you're refining content, protecting sensitive information, or staging updates, controlling visibility ensures you present only the most polished and relevant content to your audience.
The steps provided in this blog equip you with multiple methods to achieve this, be it through visibility settings, robots.txt, or plugins.
Always remember a well-managed website reflects your commitment to your audience, and controlling your content's visibility is a big part of that management.
Ensure you test the visibility after making changes to guarantee your content remains private as intended.
FAQs
Here are some FAQs related to hiding a WordPress page from Google.
1. How do I hide my website from the public?
To hide your website from the public, you can:
- Use a "Coming Soon" or "Maintenance Mode" plugin if you're using platforms like WordPress. This keeps your website hidden while you work on it.
- Adjust the robots.txt file to prevent search engines from crawling and indexing your site. You can add User-agent: * and Disallow: / to the file.
- Set website visibility settings in your Content Management System (CMS) to 'private'.
- Password-protect your entire website or specific directories using tools provided by your hosting provider.
2. What happens when you make a WordPress page private?
When you set a WordPress page to 'private,' it means:
- The page is not visible to the public or regular site visitors.
- Only logged-in users with the appropriate permissions (typically administrators and editors) can view the private page.
- Private pages won't appear in search results, website menus, or feeds.
- The page remains published but in a restricted mode, so it's not treated as a draft or pending review.
3. Does Google index private WordPress pages?
No, Google and other search engines do not index private WordPress pages. When a page is set to private in WordPress, it sends a 'noindex' directive to search engines, signaling them not to index the page.
Additionally, private pages are not accessible to users who are not logged in, preventing search engine crawlers from accessing the content in the first place.
However, always ensure there are no direct links to private pages from public pages, as crawlers might try to access them if linked.
4. How can I hide a WordPress page from Google without deleting it?
You can hide a page from Google using methods like changing visibility settings, editing the robots.txt file, password-protecting the page, removing it from menus, or saving it as a draft. These methods keep the page intact but hidden from search engines.
5. Is using the robots.txt file enough to stop Google from indexing a page?
While editing the robots.txt file can block search engines from crawling a page, it doesn’t guarantee it won’t be indexed if it's linked elsewhere. For stronger control, combine this with a meta noindex tag or WordPress visibility settings.
6. Can hiding a WordPress page affect SEO?
Yes, it can. Hiding important or linked pages may break navigation or affect internal linking. Only hide pages that aren’t crucial to your SEO strategy, like test pages, outdated content, or private resources.
7. Will a password-protected page appear in search results?
No, password-protected pages are typically excluded from indexing. WordPress automatically sends a noindex signal, and search engines can’t access protected content.
8. What’s the easiest way to hide a page temporarily?
The simplest way is to switch the page status to “Draft” or change the visibility to “Private.” This instantly removes the page from public view and search engine indexing without deleting any content.


.svg)