


Have you ever felt stuck trying to how to Add Keywords in WordPress? Are you struggling with these, wondering how to give your content that SEO edge? You're not alone.
Many website owners stumble at this crucial step despite its vital role in digital visibility. Dive into our comprehensive guide on how to seamlessly integrate keywords and meta descriptions in WordPress, boosting your site's ranking and driving organic traffic.
A meta description is a short summary, usually 160 characters long, that describes the content of a web page. Displayed in search engine results, it helps users decide whether to click on a link, influencing click-through rates.
Usually (but not always), Google displays a page's meta description below its URL and title.
For Example:

With step-by-step instructions and expert insights, we've demystified the process to empower even the most tech-averse user. Here are all the steps which we’ll cover in today’s blog.
- How to add keywords in WordPress using all in one SEO
- Enabling meta keywords support in all in one SEO plugin
- Adding keywords and meta descriptions to your WordPress posts and pages
- Adding keywords and a meta description for your homepage
- How to add keywords and meta descriptions to WordPress category
Other then that, we’ll cover the following topics:
- Why do we add keywords and meta descriptions in WordPress?
- What is the importance of adding keywords and meta descriptions for SEO
With that said, are you ready to unlock the full potential of your content? Let's get started.
Step 1: How to add Keywords in WordPress Using All in One SEO
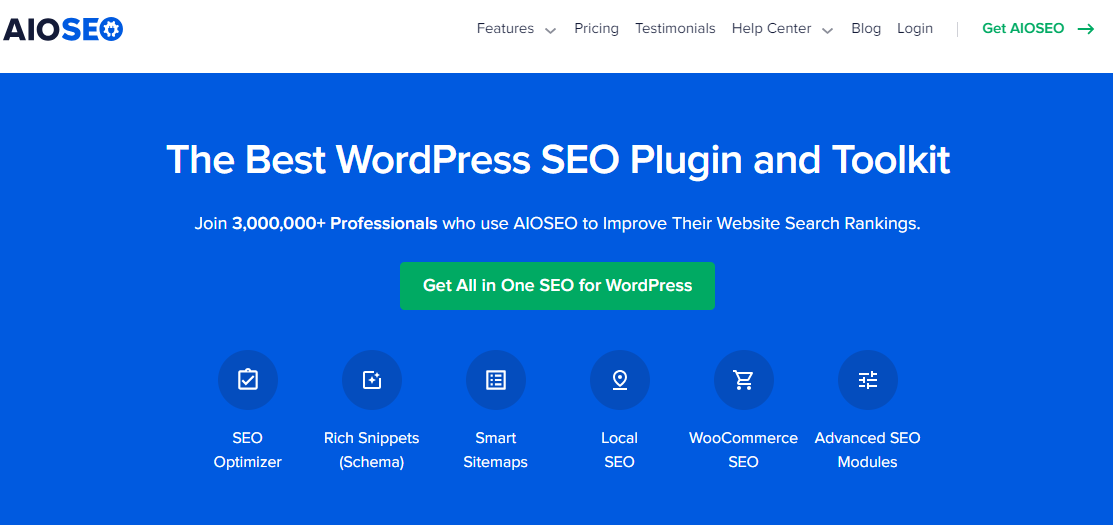
All in One SEO is a popular WordPress plugin designed to improve website SEO. It offers features like meta tag generation, sitemap creation, and social media integration, helping sites rank higher and gain more traffic.
Next, we'll delve into the process of installing the All in One SEO plugin, linking it to your website, and the configurations to consider during installation.
Do you want to learn which plugin is better: Yoast SEO or AIOSEO? In order to know more deeply visit our guide by clicking the link below;
Yoast SEO Vs All in One SEO | Which Suits Best for Your Website.
Step 1.1 Visit AIOSEO Website
To begin the installation of the AIOSEO plugin, first head to the AIOSEO website. This is because we require a license code which can be downloaded from this site and then linked to the WordPress website.
Step 1.2 Select the Suitable Deal and Download the It
Pricing is always a pivotal factor. Hence, it's vital to carefully examine what each deal offers. Choose the one that aligns with your requirements.
Given your regular interactions with the WordPress backend, the $199 per year deal seems optimal. While this is my suggestion, do pick the one that resonates most with your needs.
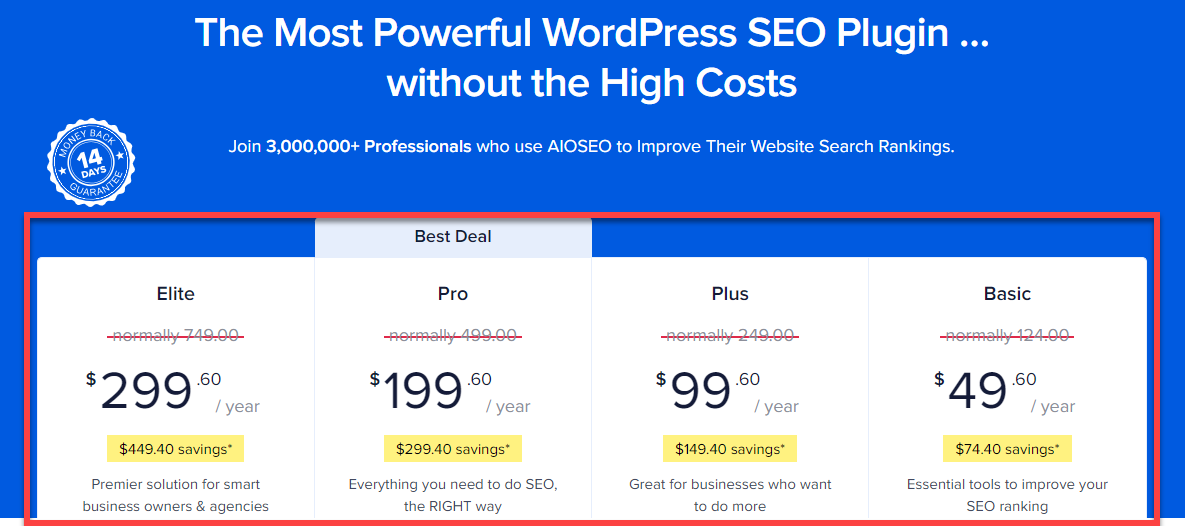
Once you've chosen your desired deal, you'll be prompted to enter your banking details to process the payment for your selected package. After completing all the necessary steps, you can then download the AIOSEO plugin installation file.
Step 1.3 Go to Website Dashboard
Next, return to the website's backend by logging into the WP-admin section of your WordPress site using your email and password. Once logged in, you'll be directed to your website's dashboard, where you can make changes.
Step 1.4 Click on Plugins and then Add New
On the dashboard, look for the 'plugins' option located after the 'appearance' option. Hovering over 'plugins' will reveal a dropdown with options like 'Installed Plugins,' 'Add New,' and 'Plugin Editor.' Simply click on 'Add New'.

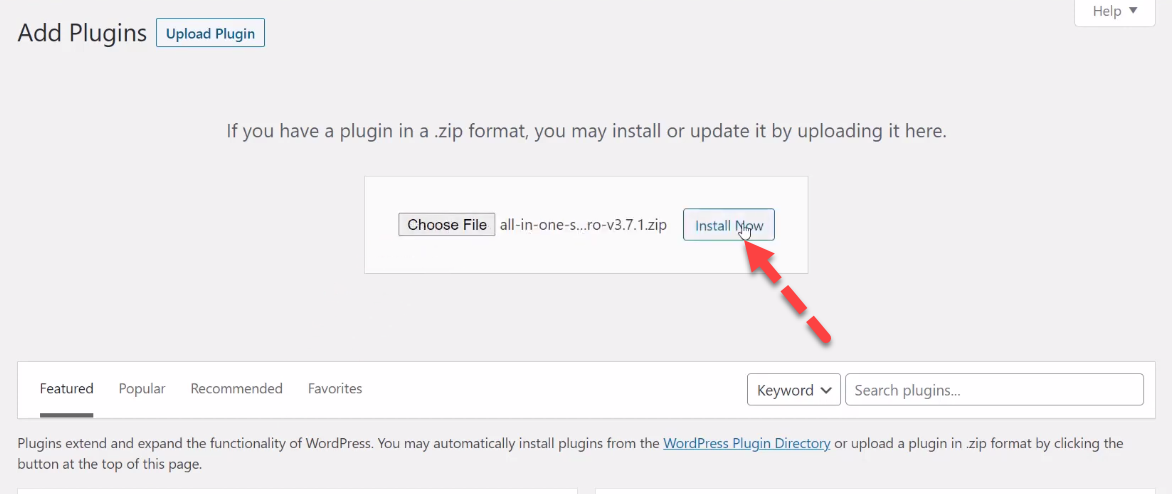
Step 1.5 Click on Choose File
After clicking 'Add New,' you'll see an option to 'Choose file' on your screen. Select the file that you previously downloaded from the AIOSEO website and proceed to upload it.

Step 1.6 Upload the File Downloaded from AIOSEO
Once you've selected and uploaded the AIOSEO setup file, you can initiate the installation by clicking the 'Install Now' button. Just click on 'Install Now' to proceed.
Step 1.7 Click on Activate Plugin
Following the installation of the plugin, the next step is activation. To activate the plugin, simply click on the blue 'Activate' button.

Learn More:
How to Fix The Critical Error in WordPress (Visual Steps Guide)
Step 2: Enabling Meta Keyword Support in All in One SEO Plugin
Now will connect the All in One SEO plugin to our website, and do some changes as well. In just 6 steps I will tell you how to set up the All in One SEO Plugin.
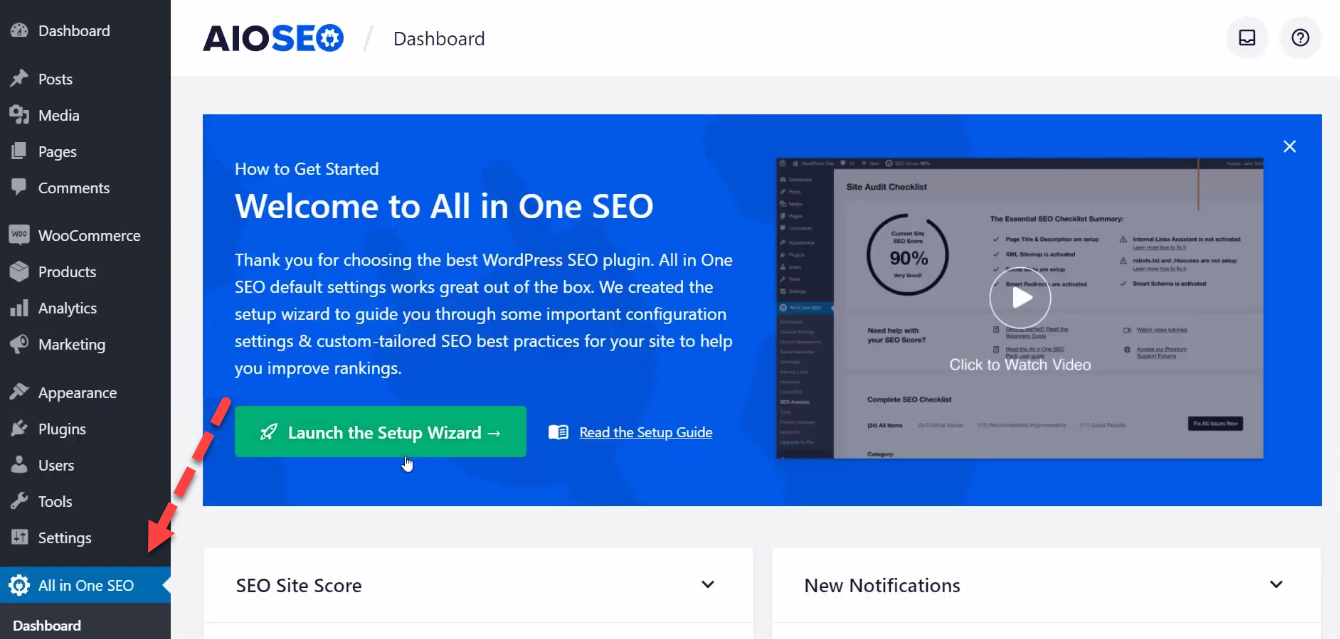
Step 2.1 Click on “All in One SEO” in Dashboard
In the dashboard, look for 'All in One SEO' situated below the 'setting' option. Once located, click on it. A new page will appear where you have the option to initiate the plugin by clicking on 'Launch the Setup Wizard.'
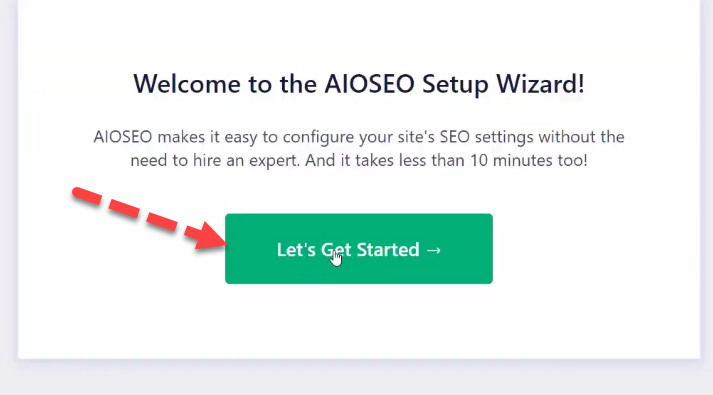
Step 2.2 Launch the AIOSEO Setup Wizard
Upon selecting the 'Launch the Setup Wizard,' a welcome message will greet you. Proceed by clicking on the 'Let's Get Started' button.
Step 2.3 Select the Category for Your Website
You'll then need to identify the category your website belongs to, be it a blog, online store, or news channel. Choose the one that best aligns with your website's nature.

Step 2.4 Add Title and Description for AIOSEO
After designating your website's category, as you scroll further, you'll encounter a section asking for the title and description of the AIOSEO plugin.
Ensure the title doesn't exceed 60 characters and the description stays within 128-160 characters. Once your description is set, click on 'Save and Continue'.

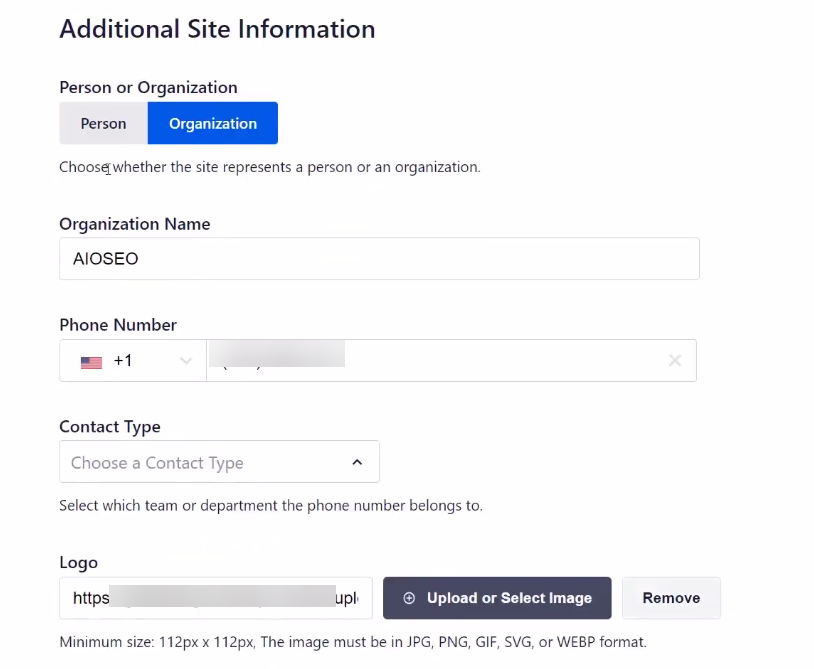
Step 2.5 Add Additional information and Click on Save and Continue
Subsequently, a new window will pop up. Here, you're required to input personal details and other supplementary information, such as your organization's name, phone number, etc.
Step 2.6 Enable SEO Features
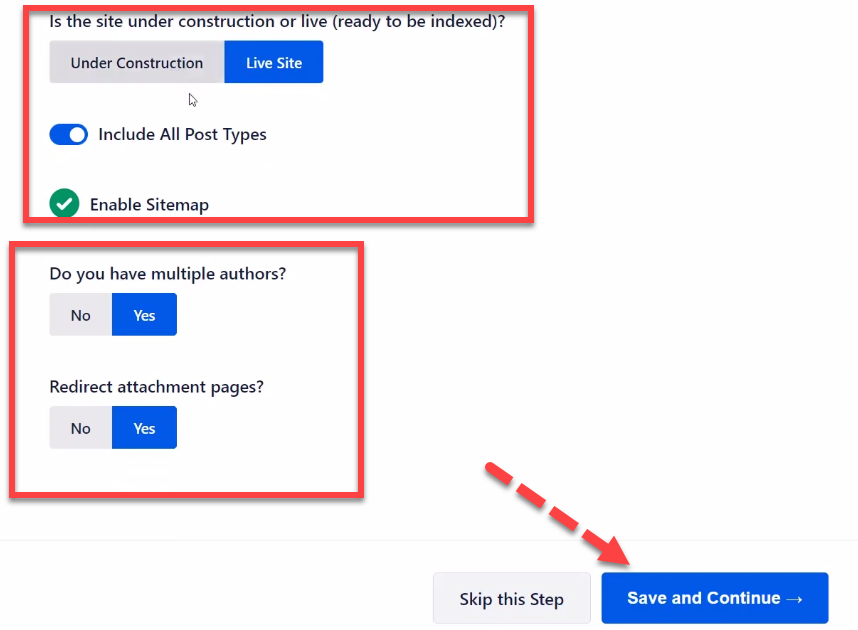
You'll then be prompted about which SEO features you'd like to enable. Customize according to your needs, ensuring you enable essential settings like meta keywords, SEO images, and other vital on-page SEO settings.

Following this, you'll need to respond to a few queries like: Is the site currently live or under construction? Do you have multiple content contributors? And, should attachment pages be redirected? Pick the responses that best suit your scenario and then click 'Save and Continue.'
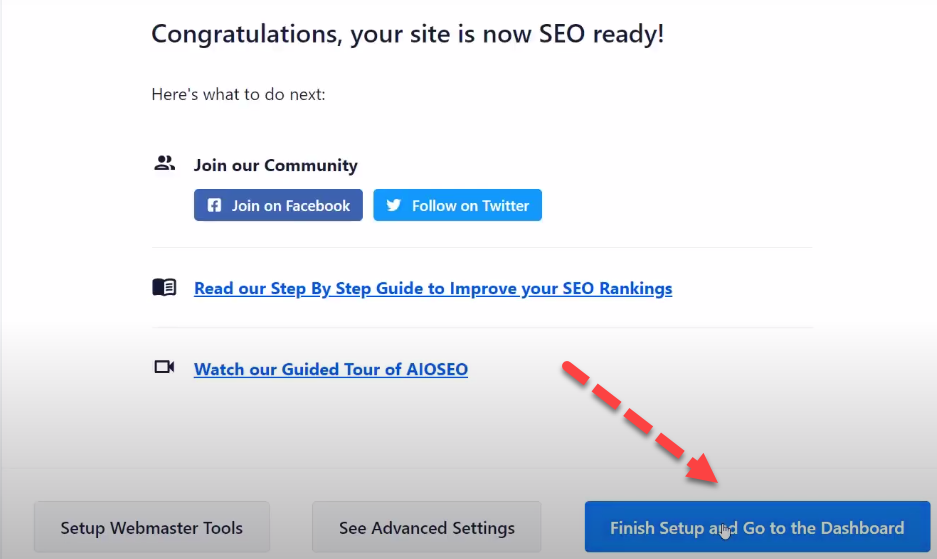
Step 2.7 Click on Finish Setup and go to Dashboard
Upon completing the aforementioned step, a congratulatory message will appear, indicating that your site is now SEO-ready, signifying the successful installation of the AIOSEO plugin.
With its assistance, you can integrate keywords in your title and focal phrase, as well as embed a description.
Learn More:
9 Best WordPress Accordion Plugins for Streamlined Content Display
Step 3: Adding Keywords and Meta Descriptions to Your WordPress Posts and Pages
All in One SEO is a popular WordPress plugin designed to improve website SEO. It offers features like meta tag generation, sitemap creation, and social media integration, helping sites rank higher and gain more traffic.
Next, we'll delve into the process of installing the All in One SEO plugin, linking it to your website, and the configurations to consider during installation.
Step 3.1 Navigate for Posts and Then Click on All Posts
To incorporate keywords and meta descriptions, first head to 'Posts' on the dashboard, located at the top. A dropdown will appear, where you should select 'All Posts'.

Step 3.2 Click on Edit
All your posts will now be displayed. Place your cursor over the post you wish to enhance with a keyword and description. Several options will emerge; click on the 'Edit' option.

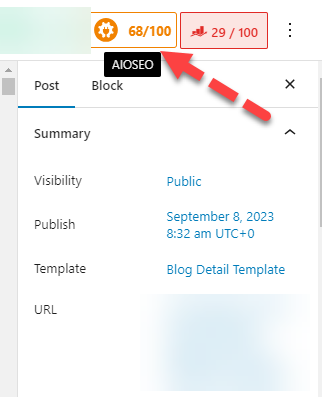
Step 3.3 Click on AIOSEO
You'll notice the AIOSEO symbol at the upper right of your screen, which displays the SEO score for your post or page. In my instance, it reads 68/100, indicating there's room for improvement. A score above 80 is deemed satisfactory. Click on the AIOSEO symbol.
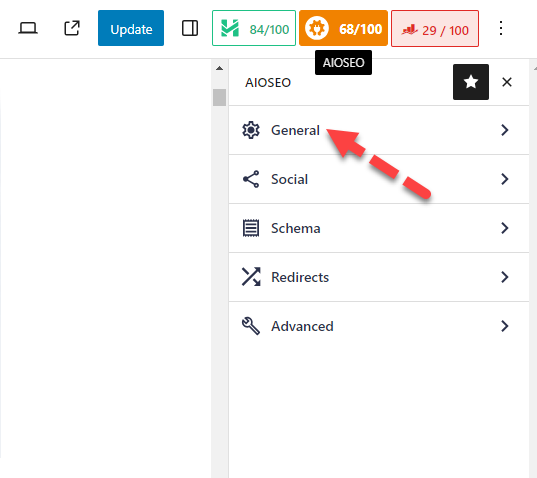
Step 3.4 Go to General Option
Upon clicking AIOSEO, a range of options will be listed. To add a description, navigate and click on the 'General' setting.
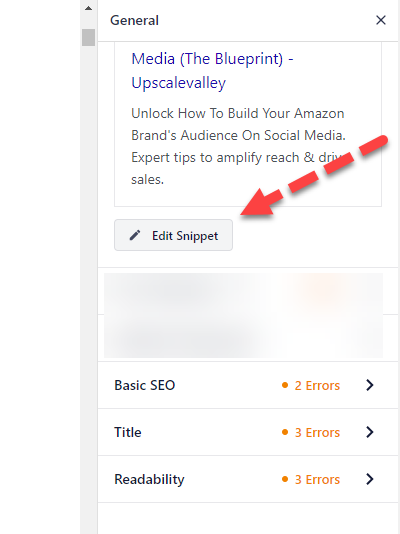
Step 3.5 Click on Edit Snippet
Upon selecting 'General', various configuration options for your post will appear. You'll need to proceed by clicking the 'Edit Snippet' option.
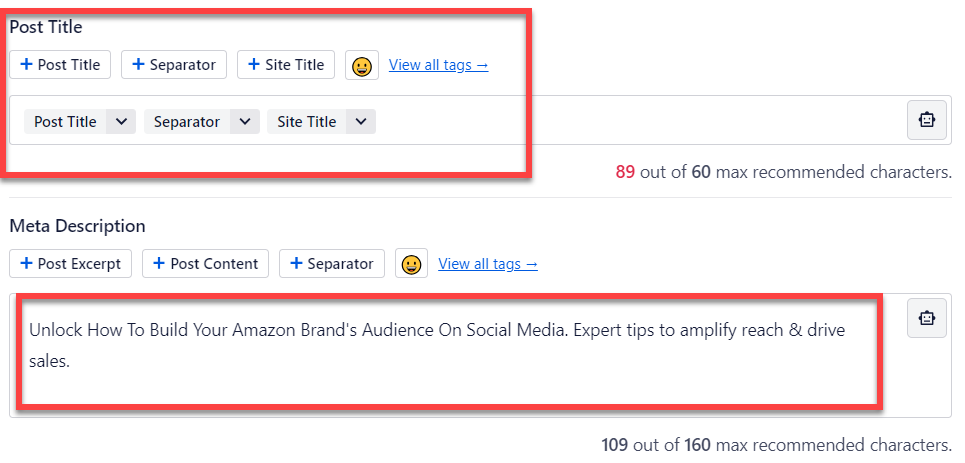
Here, you can incorporate keywords into your title. Ensure the title not only contains keyword variations but also offers value to readers. In the provided box, enter your desired title. Below it, input a description within a 109-160 character range.
Step 3.6 Click on Social at Top
For optimizing social media posts' SEO, start by adding relevant titles and tags, including your primary keyword as a tag if appropriate. Then, craft a Facebook title and a description for the post, keeping it under 200 characters. Note that the character limit for this section spans from 0 to 200 characters.

Step 3.7 Add keyword in Focus Keyphrase
In the 'Focus keyphrase' box, input the keyword you aim for your page to rank for in search results.
Consistently use your main keyword in the title, meta description, and focus keyphrase sections. Even the capitalization should be standardized, preferably in title case, across these components.

Learn More:
7 Best WordPress Membership Plugins for Community Building
Step 4: Adding Keywords and a Meta Description for Your Homepage
The homepage description offers a snapshot of a website's purpose and content. It influences search engine rankings, aids in attracting the right audience, and enhances user understanding.
A compelling description can drive more organic traffic and set the tone for the user's journey on the site. Let's delve into the steps for adding a description to the homepage without a plugin.
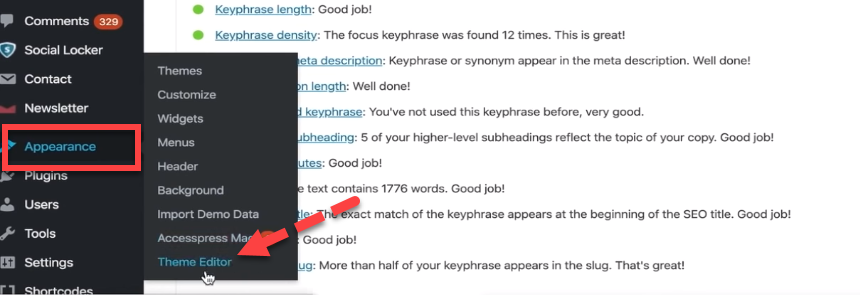
Step 4.1 Click on Appearance and then Theme Editor in Dashboard
In the dashboard, hover over the 'Appearance' option. A drop down menu will appear, displaying options such as themes, customization, widgets, menus, header, and Theme Editor. Proceed by selecting 'Theme Editor'.
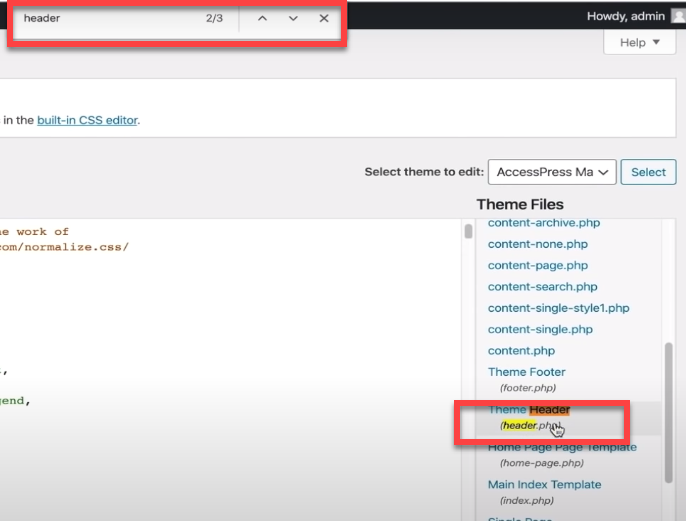
Step 4.2 Navigate for ‘header.php’ File
When you select the 'theme editor' option, a fresh window will appear on your display. To quickly locate the 'header.php' file, use the shortcut Ctrl+F and type 'header.' Upon its appearance in the search results, click on it to access its content.
The 'theme editor' in WordPress is a built-in tool that allows users to directly modify and customize their theme's source code. While it provides granular control, it's essential to exercise caution, as changes can directly affect the website's appearance and functionality.
Step 4.3 Visit SEOptimer Website
A crucial step when crafting a description for your website's homepage is to visit the SEOptimer site. Navigate to its meta description creation page. Within its complimentary meta tag generator, input a description and, in the subsequent box, list keywords separated by commas.

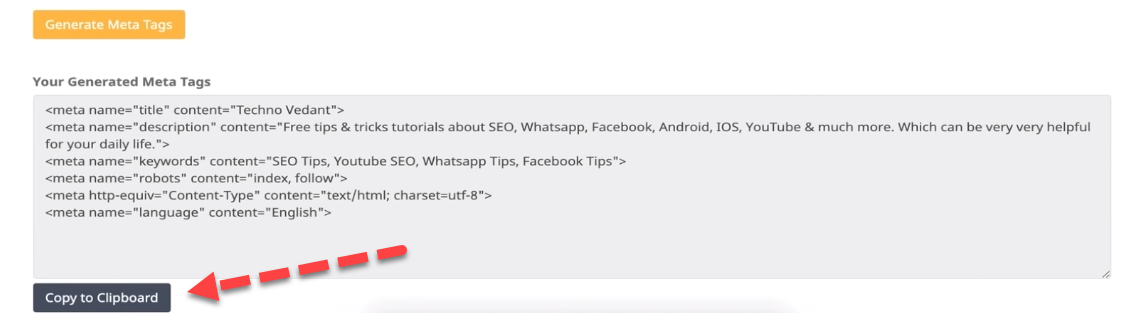
Step 4.4 Generate Meta Tags
To create the meta tags, click on the yellow 'Generate Meta Tags' button. This action will yield a meta description for the homepage.
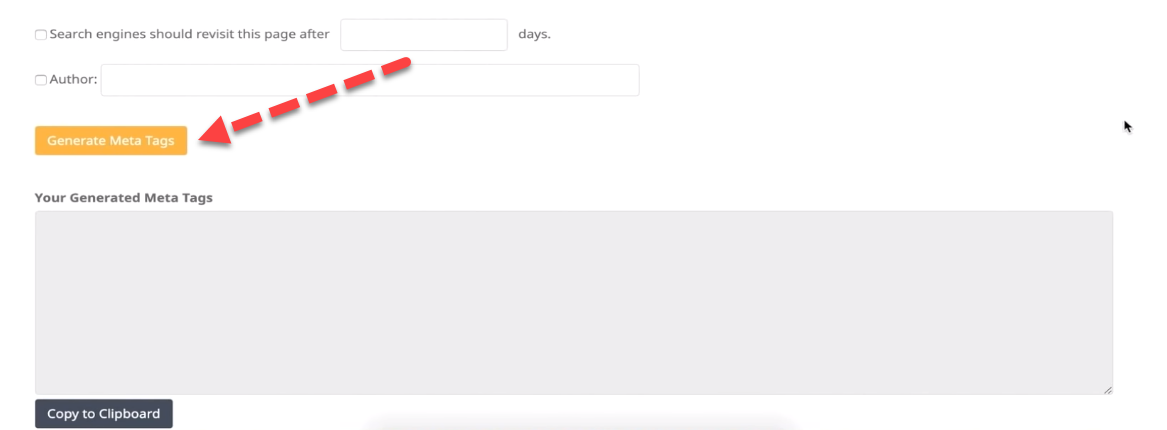
Step 4.5 Copy Meta Tags and Paste in Header
Once you click the button, a code will appear in a box beneath it. Your next step is to copy this code; simply click 'Copy to Clipboard' and revert to the header.php file.
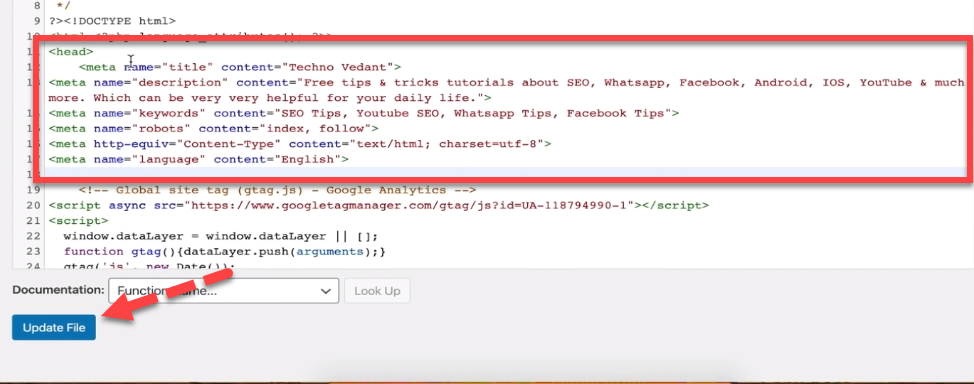
Access the header.php file and scan for the header section's coding, specifically searching for the <head> tag.
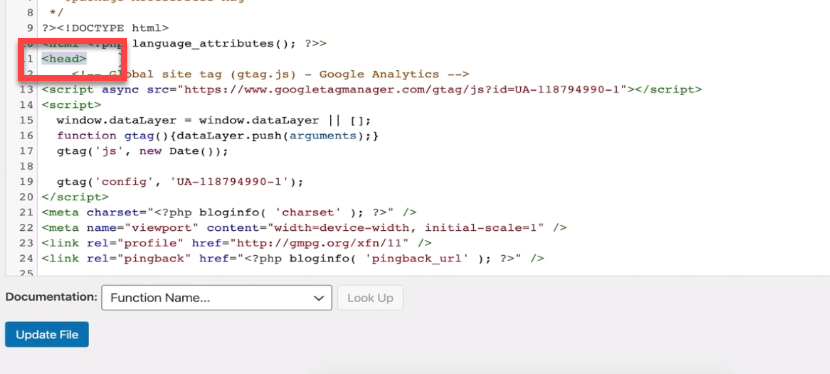
Upon locating the <head> tag, paste the previously copied code right beneath it. After embedding the code, hit the 'Update File' button. It's essential to retain this code for any potential future reference.
Learn More: How to Reinstall WordPress Without Losing Data [Visual Guide]
Step 5: How to Add Keywords and Meta Descriptions to WordPress Category
Categories in WordPress help organize posts into specific topics, aiding navigation and content discovery. They're essential for structuring content and enhancing user experience.
Adding descriptions to categories clarifies the topic, aids SEO, and provides context, ensuring users and search engines understand the content's theme and relevance. Let's now discuss the steps involved in adding a description to an existing WordPress category.
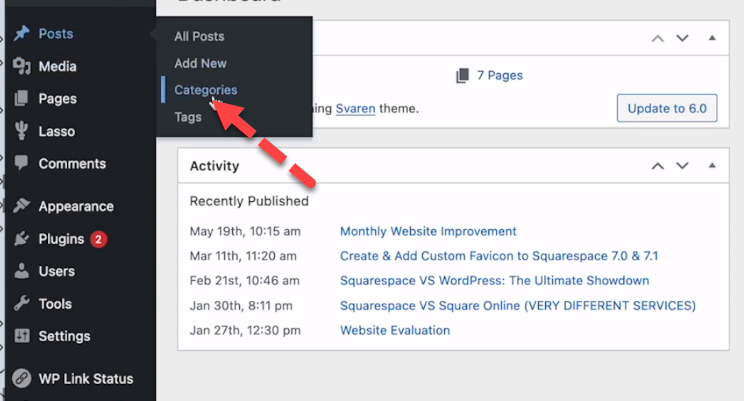
Step 5.1 Click on Categories
To add a description to a WordPress category, you can go to the Posts page and then click on the Categories tab.
Step 5.2 Add Description for New Category
To add a description to a new category, you can enter a name for the category in the first box, enter a slug in the next box, and then enter a description in the third box. Finally, click the Update button.

Step 5.3: To Add Description in Existing Category Click on Edit
To add a description to an existing category, you can click the Edit link that appears below the category name when you hover your cursor over it.
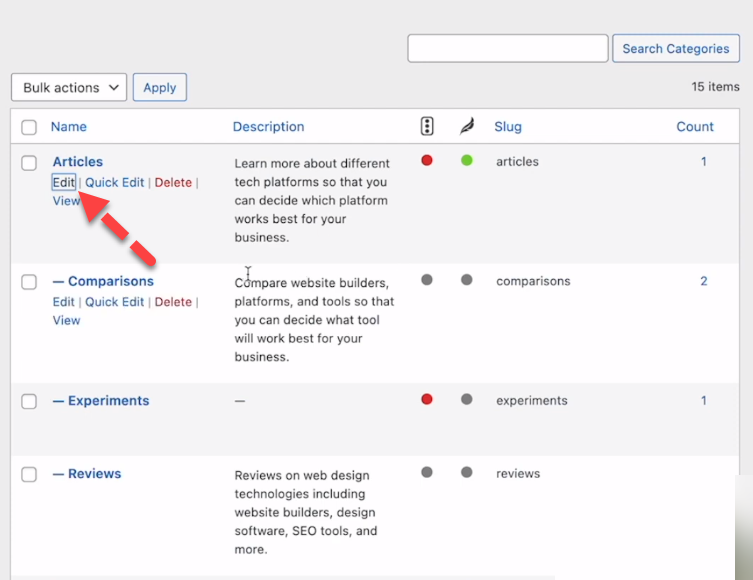
The category name and slug are already present, but you can also add a description for the article category. In search results and on category pages, this description will appear. It should be under 160 characters long and should include a keyword that is relevant to the category.

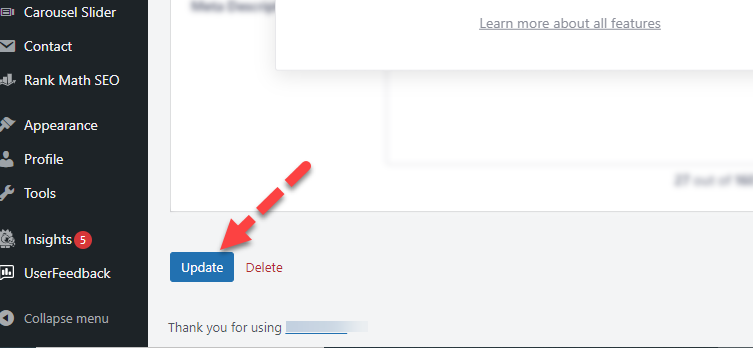
Step 5.4 Click on Update
After that, scroll to the bottom of the page and click on the Update button. By clicking the Update button, the description will be successfully added to your page.
However, it may take 3-4 days for the description to appear in Google search results. In some cases, it may take even longer.
Learn More: 11-Tips: How to Boost the Speed and Performance of WordPress
Why Do We Add Keywords and Meta Descriptions in WordPress?
In WordPress, keywords and meta descriptions are added for several important reasons related to search engine optimization (SEO) and user experience. Here’s why they are valuable:
- SEO (Search Engine Optimization): Both keywords and meta descriptions are pivotal SEO elements. By analyzing them, search engines are able to determine whether a page is relevant to a specific search query.
- Improve Click-Through Rates (CTR): People are more likely to click on your link if your meta description is compelling. It acts as a brief "ad" for the content on your page.
- Content Summary: A meta description provides a concise summary of the page's content, offering potential readers insight into what to expect.
- Ranking: Properly optimized keywords can improve the ranking of your content on search engines, making it more likely for users to find your content.
- Relevance and Targeting: Keywords help ensure that your content reaches the right audience. They help match user queries to the most relevant content.
- Structured Content: Using categories and tags (which often derive from keyword research) aids in the logical structuring and organization of content, improving the user experience.
- User Intent: Proper keyword use ensures your content matches what users are searching for. It helps in driving more relevant traffic to your site, improving user engagement and conversions.
What is the importance of Adding keywords and meta description for SEO
Adding keywords and meta descriptions for SEO is vital for multiple reasons. Firstly, they ensure enhanced visibility in search engine results. When your content matches relevant search queries, it stands a better chance of ranking higher.
A well-crafted meta description provides a snapshot of your content, and if it's compelling, it can persuade users to click on your page over competitors. By improving the user experience, organic traffic can increase.
Additionally, keywords help search engines discern the topic and context of your content, ensuring it reaches users who will find it beneficial.
When users encounter content that aligns with their search intent, they are less likely to leave immediately, reducing the bounce rate. Furthermore, if you're employing search engine marketing strategies, accurate keywords ensure your ads target the right audience.
Overall, optimizing your content with precise keywords and descriptions not only improves website visibility but also fosters organic growth and gives a competitive edge in the digital space.
Wrapping Up
All in One SEO is a comprehensive WordPress plugin specifically engineered to enhance a website's SEO performance.
By guiding users step-by-step through the process, from installation to detailed configuration, the plugin ensures that site owners can optimize their content effectively.
The meticulous integration of meta tags, keywords, and descriptions plays a pivotal role in improving a website's visibility in search engine results. These elements collectively drive higher click-through rates, better search rankings, and more targeted traffic.
In the realm of digital marketing, where competition is fierce, tools like All in One SEO provide a strategic advantage by ensuring that content is not only accessible but also relevant to the right audience.
Such optimizations are instrumental for businesses or individuals keen on maximizing their digital footprint and fostering organic growth. Overall, mastering how to add keywords in WordPress is crucial for boosting your site's SEO and attracting the right audience. For more expert tips and comprehensive guidance on optimizing your WordPress website, visit One Smart Sheep and unlock a wealth of strategies to enhance your digital presence.Overall, mastering how to add keywords in WordPress is crucial for boosting your site's SEO and attracting the right audience. For more expert tips and comprehensive guidance on optimizing your WordPress website, visit One Smart Sheep and unlock a wealth of strategies to enhance your digital presence.
FAQs
Why are keywords and meta descriptions important in WordPress SEO?
They improve your site's search ranking and increase click-through rates by making content more relevant and enticing for users.
How do I add keywords and meta descriptions to WordPress using All in One SEO?
Install and activate All in One SEO, then use the plugin to easily add keywords and meta descriptions for posts and pages.
Can I add keywords and meta descriptions to my WordPress homepage?
Yes, use the All in One SEO plugin or manually edit the header.php file to add keywords and meta descriptions for your homepage.
Overall, mastering how to add keywords in WordPress is crucial for boosting your site's SEO and attracting the right audience. For more expert tips and comprehensive guidance on optimizing your WordPress website, visit One Smart Sheep and unlock a wealth of strategies to enhance your digital presence.
Overall, mastering how to add keywords in WordPress is crucial for boosting your site's SEO and attracting the right audience. For more expert tips and comprehensive guidance on optimizing your WordPress website, visit One Smart Sheep and unlock a wealth of strategies to enhance your digital presence.
FAQs
Why are keywords and meta descriptions important in WordPress SEO?
They improve your site's search ranking and increase click-through rates by making content more relevant and enticing for users.
How do I add keywords and meta descriptions to WordPress using All in One SEO?
Install and activate All in One SEO, then use the plugin to easily add keywords and meta descriptions for posts and pages.
Can I add keywords and meta descriptions to my WordPress homepage?
Yes, use the All in One SEO plugin or manually edit the header.php file to add keywords and meta descriptions for your homepage.
Overall, mastering how to add keywords in WordPress is crucial for boosting your site's SEO and attracting the right audience. For more expert tips and comprehensive guidance on optimizing your WordPress website, visit One Smart Sheep and unlock a wealth of strategies to enhance your digital presence.
FAQs
Why are keywords and meta descriptions important in WordPress SEO?
They improve your site's search ranking and increase click-through rates by making content more relevant and enticing for users.
How do I add keywords and meta descriptions to WordPress using All in One SEO?
Install and activate All in One SEO, then use the plugin to easily add keywords and meta descriptions for posts and pages.
Can I add keywords and meta descriptions to my WordPress homepage?
Yes, use the All in One SEO plugin or manually edit the header.php file to add keywords and meta descriptions for your homepage.


.svg)