


Do you want to learn how to add HTML to Wix? In this blog post, we will demystify the process of adding HTML to Wix websites, walking you through seven simple steps with handy screenshots to guide you. By the end of this guide, you'll be equipped with the know-how to take your Wix site customization to the next level.
But the journey doesn't stop there. As an added bonus, we'll dive deeper into the world of web development, exploring intriguing topics like the distinct capabilities of iFrames compared to Wix Corvid. We'll also uncover other hidden corners of your Wix website where you can embed HTML code for added functionality.
Ever wondered if Wix HTML code can be customized? We've got you covered. As part of our grand finale, we will delve into the depths of Wix HTML customization, opening doors to endless possibilities. If you're specifically looking for how to add HTML to Wix, this guide will answer all your questions.
So, whether you're a seasoned web developer or just starting, this blog post promises a treasure trove of knowledge and practical skills.
TL;DR:
Log in to Wix, open your site in the editor, click the "+" button, select "Embed Code," choose "Embed HTML," paste your HTML code, and click "Apply" to add custom features to your page.
Quick Step-by-Step FlowChart
For those looking for a quick overview, here’s a step-by-step flowchart that outlines the entire process at a glance.

Here are the topics we’ll cover in this guide:
- Steps to add HTML to Wix
- How does iFrame stand out from Wix Corvid?
- Other locations where you can embed HTML code in Wix website
- Can Wix HTML code be customized?
- Reasons to add HTML
With that out of the way, strap in and get ready for a thrilling ride through the dynamic landscape of Wix HTML and beyond.
Steps to Add HTML to Wix
HTML, or HyperText Markup Language, is the standard markup language used to create web pages. It is a fundamental building block of the internet as we know it, serving as the basic structure of a web page, while CSS (Cascading Style Sheets) and JavaScript add style and interactivity, respectively. If you've ever wondered how to add HTML to Wix, these next steps will walk you through it.
Step 1: Sign In to Wix.com

Start by logging into your account on Wix.com. To do this, you will need to input your email and password. Once signed in, you'll gain access to your account dashboard, where you have the ability to design or modify your site.

If you haven't yet acquired a Wix premium plan, it's advisable to purchase one. Following the acquisition of your plan, navigate through your Wix account accordingly.
Step 2: Click on the ‘My Sites’
You are currently viewing your Wix account dashboard on your screen. To proceed, locate the "My Sites" option at the top section of the dashboard, typically found in the header. Clicking on this option will reveal all the sites you've previously designed. If you're new, this step is key in the journey of mastering how to add HTML to Wix.

Step 3: Click on the ‘Edit Site’
The next crucial step is to choose the site where you intend to incorporate the HTML code, thus enhancing its functionality. Identify the desired site and click on it.
Once you've made your selection, you'll notice an "Edit Site" option in the top-right corner of your screen. Proceed by clicking on this.

In order to learn more you can step in to our guide on ‘How to Make a WiX Website (Visual Step by Step Guide)’.
Step 4: Click on ‘+’ Button
Your selected site will now open in a new tab, ready for editing. With the site in editable mode, you can start making modifications. Since our goal is to add HTML code, look for the '+' button, typically found on the right side of the dashboard. Click on this '+' button to proceed.

Upon clicking this button, a menu containing all possible additions for this section will appear on your screen. This button facilitates a range of editing features and components that can be added to your site.

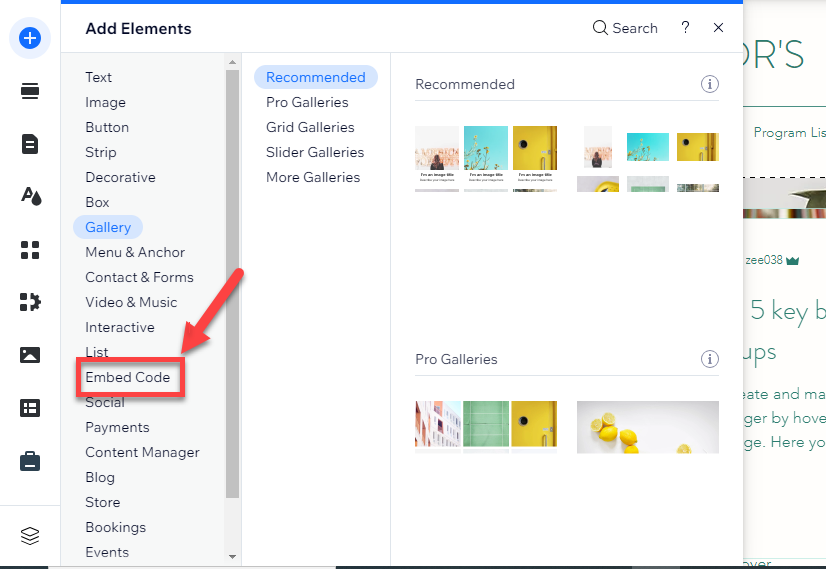
Step 5: Click on ‘Embed Code’
From the list of available elements, your task is to locate the "Embed Code" option. Typically, this can be found as the seventh item from the bottom in the "Add Elements" menu. This option is crucial for anyone learning how to add HTML to Wix.
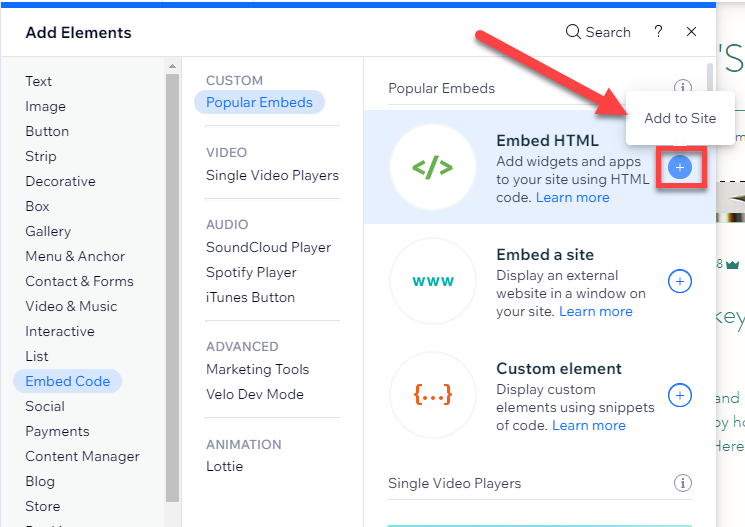
Step 6: Click on ‘+’ Embed HTML
When you clicked on the Embed code then in pop you will see that three to four options are given. These are actually codes that you can add in your site. Here you need to click on the “+” Embed HTML .
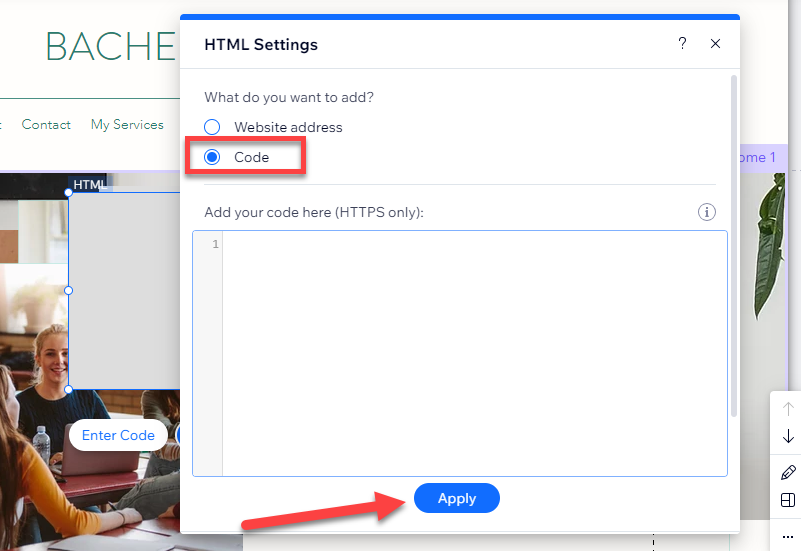
Step 7: Paste HTML Code and Click on ‘Apply’
A box-like area will appear on your screen, the size of which can be adjusted. Think of this space as a container for the output of your HTML code.

Clicking on the box prompts another pop-up to appear. This is where you're expected to input your HTML code. Within the HTML settings, you will be asked to choose what you want to add, namely:
- Website Address
- Code
Here, you should select 'code' and proceed to input your HTML code into the box provided. Once you've successfully added your HTML code, you can finalize the changes by clicking on 'Apply.' Congratulations, you’ve just completed the key process of how to add HTML to Wix.
Note: Adding HTML code to Wix can be challenging and may not always produce the desired results. If you are not familiar with coding, it is best to avoid adding HTML code to your Wix site.
In this post, I want to explore the more subtle features of HTML iFrames and explain how they differ from Wix Corvid.
How Does iFrame Stand Out from Wix Corvid?
iFrame and Wix Corvid (now known as Velo by Wix) are two different tools used in web development, serving distinct purposes:
iFrame (Inline Frame)
- Purpose: iFrame is an HTML element used to embed content from another source into your webpage.
- Functionality: It allows you to display external content like videos, entire web pages, or other interactive elements within your existing webpage.
- Usage: Think of iFrame as a window on your website that displays content hosted on another site.
Wix Corvid (Velo by Wix)
- Purpose: Velo by Wix is an open development platform used to create advanced web applications within the Wix environment.
- Functionality: It allows developers to use JavaScript and Wix's APIs to customize the user experience, manage data, create dynamic pages, and build complex web applications.
- Usage: Unlike iFrame, Velo is not for embedding external content but for creating and extending the functionality of websites using customized code and features.
Key Differences:
- iFrame: Primarily used to embed external content within a webpage.
- Wix Corvid (Velo): Used to build complex, interactive web applications within Wix, offering more control and customization options for developers.
In summary, iFrame is suitable for embedding content, while Velo by Wix is designed for developing more sophisticated, personalized websites and applications.
Other Locations Where You Can Embed Html Code in Wix Website
In a Wix website, you can add custom HTML code to any page using the HTML iFrame/Embed tool. You can place this tool in multiple locations throughout your site. However, due to Wix's structured editor, there are certain restrictions. Here's a brief guide:
- Page Body: You can add the HTML iFrame/Embed tool anywhere within the main body of any page on your Wix site. This is the most common area where users add custom HTML.
- Header and Footer: Unlike some other platforms, Wix does not natively allow you to add custom HTML to the header or footer of your site through its visual editor. However, with Corvid by Wix (an open development platform), you can implement more advanced customization, including headers and footers.
- Lightboxes: You can also add the HTML iFrame/Embed tool to light boxes, which are like pop-up windows containing various content.
- Strip or Grid Layouts: You can add custom HTML inside strip or grid layouts, treating the HTML code as an individual element within the larger layout.
- Pop-ups and Notification Bars: You can add HTML code to pop-up elements like notification bars or call-to-action banners that appear on the screen when users interact with certain elements.
- Wix Stores and Product Pages: For e-commerce sites, HTML code can be embedded within individual product pages to add interactive features, third-party integrations, or enhanced styling.
By utilizing these additional locations and advanced features, you can further customize your Wix website's functionality and appearance with HTML code, expanding beyond the basic editor limitations.
Can Wix HTML Code be Customized?
Yes, Wix HTML code can be customized to meet the specific needs of your website. Wix offers an HTML iFrame/Embed tool that allows users to add custom HTML code, expanding the functionality of your site beyond what the standard Wix editor offers.
Benefits of Customizing HTML on Wix:
- Extended Features: Custom HTML enables you to add features or content that are not available through Wix's built-in tools.
- Third-Party Integration: You can embed external content like videos, maps, or widgets from other services.
- Custom Interactions: Add personalized forms, interactive features, or unique user interface elements.
Examples of What You Can Add:
- A custom-made e-commerce shopping cart
- A unique commenting system
- A dynamic event calendar
- Interactive data visualizations
Further Customization:
- Use CSS to adjust the appearance of your custom elements.
- Use JavaScript to add custom behaviors or interactions for a more personalized experience.
Things to Keep in Mind:
- A good understanding of HTML is essential to use this feature effectively.
- Incorrect or improper code may cause issues on your site.
- While it allows for more customization, this feature doesn't replace the need for server-side coding or advanced back-end functionality.
Reasons to Add HTML to Wix
HTML plays a crucial role in web development for several reasons, particularly when you want to customize and enhance your Wix website. By learning how to add HTML to Wix, you can improve the performance and uniqueness of your website. Here are some important reasons why adding HTML to Wix can be beneficial:
- Structure: HTML provides the structure for web content, ensuring that text, images, videos, and other multimedia elements are displayed correctly. Without HTML, a website would lack proper formatting and organization. When you add HTML to Wix, you can have complete control over how each element is positioned and displayed, making your site look professional and well-organized.
- SEO: HTML offers semantic information that helps search engines understand the content and context of a webpage. This can significantly impact its ranking in search results. Adding HTML to Wix allows you to use specific tags like headings, links, and meta descriptions that make your site more search-engine-friendly.
- Accessibility: HTML enables accessibility features such as alt text for images, proper heading hierarchies, and more. These elements ensure that your content is accessible to individuals with disabilities. When you add HTML to Wix, you can implement features that make your website compatible with screen readers and other assistive technologies.
- Customization and Flexibility: One of the main reasons to add HTML to Wix is to give you more flexibility in customization. While Wix provides many drag-and-drop features, there may be times when you need to insert custom HTML code to implement specific design elements or functionality that isn’t available through the platform’s standard options.
- Embedding External Content: HTML allows you to embed external content such as videos, social media feeds, third-party applications, and more. When you add HTML to Wix, you can easily integrate elements from external platforms like YouTube, Instagram, or Google Maps, giving your website additional functionality and enhancing user experience.
- Enhanced Design: While Wix offers many templates, there may be situations where you want a more customized look. HTML lets you fine-tune the layout, color scheme, and typography of your site.
- Functionality with JavaScript: By adding HTML to Wix, you can also insert JavaScript to add interactive features and advanced functionalities. Whether it's creating interactive forms, animations, or real-time updates, JavaScript can enhance user engagement. Adding custom HTML with JavaScript opens up many possibilities that Wix’s default options may not provide.
Importance of Adding HTML Code to Wix
All in all, Wix is a popular website builder, generally handles the underlying HTML for its users which allows them to build websites using a visual, drag-and-drop interface. However, Wix also allows for the addition of custom HTML code, which can extend the functionality of a Wix site or allow for more detailed customization.
Here are some reasons why you should learn how to add HTML to Wix.
- Enhanced Functionality and Customization: Integrating custom HTML code into a Wix site allows users to add features not natively supported by the platform, such as embedding external widgets or implementing unique design elements. This flexibility enables the creation of more personalized and feature-rich websites.
- Improved Search Engine Optimization (SEO): Properly structured HTML can enhance a site's SEO by providing search engines with clear information about the site's content. According to the Search Engine Guide, Clean and lean code can improve website performance issues more than most people think. Bloated code can slow down both spidering and page download, both of which can have an impact on a site's search engine rankings.
- Potential Performance Issues: While custom HTML offers greater control, it can also lead to performance challenges if not implemented carefully. For instance, excessive or unoptimized code can slow down page load times, negatively impacting user experience and search engine rankings. According to Eyekiller, bad code can take many forms, from JavaScript errors to invalid HTML markup, it can all cause significant dips in performance.
- Need for HTML Proficiency: To effectively implement custom HTML without introducing errors or performance issues, a solid understanding of HTML is essential. This knowledge helps in writing efficient code and troubleshooting potential problems, ensuring that customizations enhance the site without causing unintended complications.
Wrapping Up
HTML is an essential language in web development, providing structure and displaying various multimedia elements. It enhances accessibility, provides semantic information for search engines, and impacts a website's search engine rankings.
Wix, an easy-to-use website builder, enables users to add custom HTML code to extend their websites' functionality and customization level.
However, this freedom comes with the responsibility of correctly using HTML to avoid issues. Wix offers two powerful tools for customization - HTML iFrames and Wix Corvid. iFrames serve as a window within a webpage, embedding content from other sources.
In contrast, Wix Corvid is an open development platform for creating advanced, dynamic web applications. The main difference between them lies in their function: iFrames integrate external content, whereas Wix Corvid builds complex applications.
Wix users have the flexibility to integrate custom HTML code in multiple locations throughout their site using the HTML iFrame/Embed tool. Customizing HTML code can involve embedding external content or adding unique features.
However, a good understanding of HTML is necessary to avoid issues. Furthermore, while the tool extends customization, it does not substitute for server-side coding or complex back-end functionality. With appropriate knowledge and careful use, iFrames and Wix Corvid can be powerful tools in creating a unique and engaging web experience.
Overall, incorporating HTML into your Wix website opens up endless possibilities for customization and functionality, enabling you to create a truly unique web experience. If you're ready to elevate your website but need expert guidance, reach out to One Smart Sheep for professional web development services tailored to your needs!
FAQs
Here are some FAQs on learning how to add HTML to Wix.
How do I add HTML to my Wix footer?
To add HTML to your Wix footer, you can use the HTML code widget:
- Go to your site's editor and click on "Add" (+) on the left side.
- Select "More" and then "HTML Code".
- Drag the HTML Code widget to your footer area.
- Click "Enter Code" and paste your HTML code into the box.
- Click "Apply" to save the changes.
Does Wix show HTML code?
Yes, Wix does allow you to add and display HTML code through the use of their HTML Code widget, which can be placed in various areas of your site, including the footer.
How do I enter HTML code in Wix?
To enter HTML code in Wix, follow these steps:
1. Sign in to your Wix account and click on "Edit Site" for the desired website.
2. Click on the "+" button on the left side of the editor.
3. Select "Embed Code" from the list of elements.
4. Click on "Embed HTML" and paste your HTML code into the provided box.
5. Click "Apply" to save the changes.
How do I upload an HTML file to Wix?
Wix does not allow direct uploading of HTML files. Instead, you can copy the HTML code from your file and paste it into the HTML Code widget in the Wix editor, following the steps mentioned in the previous answer.
How do I add HTML and CSS to Wix?
To add HTML and CSS to your Wix site:
1. Open the Wix editor and click on the "+" button.
2. Choose "Embed Code" and then "Embed HTML."
3. Paste your HTML code, including any inline CSS, into the provided box.
4. Click "Apply" to save the changes.
Note that you cannot directly link an external CSS file in Wix, but you can include CSS within the <style> tags in your HTML code.
How do I add HTML to my Wix header?
Unfortunately, Wix does not natively allow adding custom HTML to the header or footer through the visual editor. However, you can use Corvid by Wix, an open development platform, to implement more advanced customization, including modifications to the header and footer.
What is the easiest way to add custom HTML code to my Wix website?
The easiest way to add custom HTML code to your Wix website is by using the HTML Code widget:
1. Open the Wix editor and click on the "+" button on the left side.
2. Go to "Embed Code" and select "Embed HTML."
3. Paste your HTML code into the provided box and click "Apply."
This method allows you to add custom HTML code to any page on your Wix site.
How to manage custom HTML code on a Wix website?
To manage custom HTML code on your Wix website:
1. Ensure you have a good understanding of HTML to avoid issues caused by improper code.
2. Regularly review and test your embedded HTML code to ensure it functions as intended.
3. Keep a backup of your custom code in case you need to restore it.
4. When updating your Wix site, check that your custom HTML code still works correctly.
5. If you encounter issues with your custom code, try debugging it using web developer tools in your browser or seek assistance from the Wix support team or community forums.


.svg)