


How to change link color in WordPress? This is a burning question while publishing content. Many new users don’t realise but they can change the colors of their links in any published content. However, this isn’t done solely for cosmetic purposes because there can be any number of reasons behind it.
People might not want to click on your links with dull colors. Changing the link color can make your WordPress posts or pages look more attractive. It's also a good way to highlight important parts of your content. That’s why today, we’re going to show you how to change link color in WordPress.
Here are all the topics which we’ll cover today:
- 6 Methods to Change Link Color in WordPress
- Why Do You Need to Change Your Website Link Color
Other then that, in this guide, you will learn six methods to change link color in WordPress
- Customize link colors via WordPress Customizer.
- Apply custom CSS code for link colors.
- Edit link colors in the Beaver Builder Theme.
- Use Global Style features for link color changes.
- Modify individual link colors with Elementor.
- Adjust link colors using Elementor Page Builder.
Changing the link color in WordPress differs from changing the font color. While font color modification affects all text, changing link color specifically targets clickable text, enhancing navigation and aesthetic appeal separately from the overall text appearance.
Dive in to discover easy, step-by-step methods that will transform your site's aesthetic appeal, making every link not just a pathway but a standout feature in its own right.
6 Methods to Change Link Color in WordPress
Changing the link color in WordPress is crucial for enhancing website aesthetics, improving user navigation, and aligning with brand identity.
Distinct link colors improve user experience by making clickable elements easily identifiable and can boost engagement by drawing attention to important content. That’s why learning how to change link color in WordPress can help in the overall browth of your website.
In the following sections, we'll explore six detailed methods for changing the link color in WordPress.
Each method will be outlined step-by-step, accompanied by clear screenshots to ensure you have a thorough understanding of the process.
This guide is designed to provide you with a comprehensive understanding, whether you're a beginner or an experienced user, to effectively customize your site's appearance.
Method 1: Change the Link Color in WordPress Through WordPress Customizer
To learn how to change link color in WordPress using the WordPress Customizer, follow these step-by-step instructions:
Step 1. Access the WordPress Customizer:
Log into your WordPress dashboard. Navigate to 'Appearance' and then click on 'Customize'. This will open the WordPress Customizer.

Step 2. Locate Color Settings:
In the Customizer, look for options labeled 'Color settings' or similar terminology. Depending on the theme you are using, these options may be located and named differently.

Step 3. Adjust Link Colors:
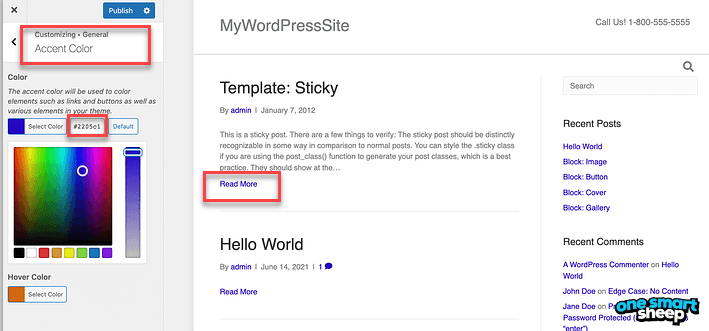
If you are using a theme like Hestia, go to 'Appearance Settings' > 'Colors'. Here, you can adjust the link colors using the 'Accent Color' settings. This will change the color of all links across your website.
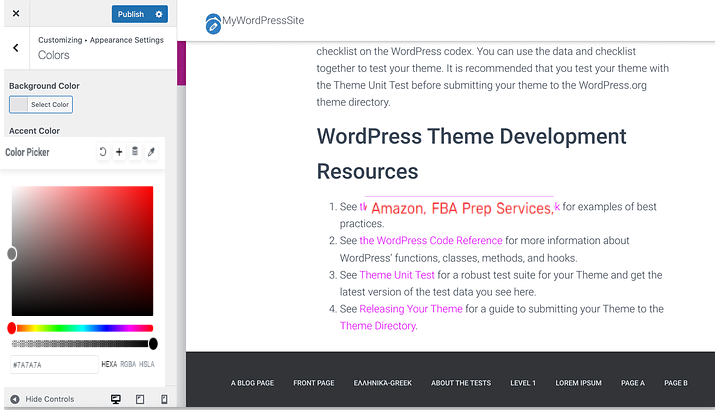
- For specific color preferences, enter the hex code for your desired color in the text field provided.
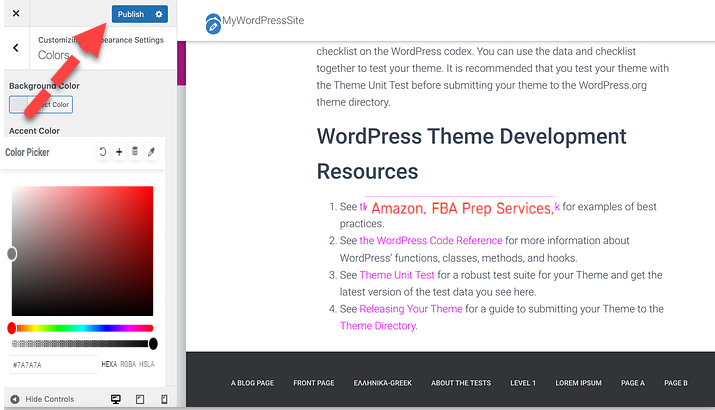
- After selecting the color, click on 'Publish' to save and apply the changes.
Step 4. Reverting to Default Settings:
If you wish to revert to the original link color, simply click on the 'Default' button in the Accent Color section. This will restore the theme's default link color.
Step 5. Using Other Themes:
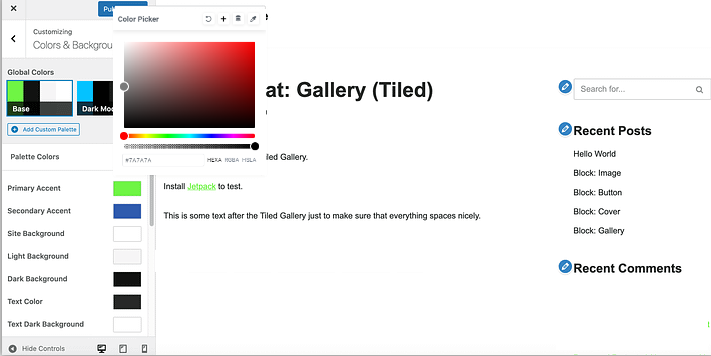
If you are using a different theme like Neve, the process is similar. In the Customizer, select 'Colors & Background'.
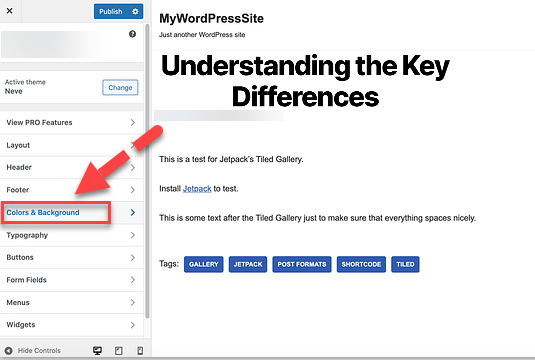
Then choose 'Primary Action.' Choose the color you want for your link and click 'Publish' to apply.
Step 6. Resetting to Default:
For themes like Neve, to revert to the default settings, go to the bottom of the 'Colors & Background' menu and select 'Reset all to default.'
Note: Remember, these steps are applicable if your theme supports link color customization directly from the WordPress Customizer. If your theme does not have this feature, you may need to use custom CSS or other methods to change link colors.
Method 2: Change the Link Color in WordPress by Using Custom CSS Code
If you want to change the color of your links in WordPress using custom CSS code. This is a bit more technical way of learning how to change link color in WordPress because it requires you have a bit of coding knowledge. However, once you understand what and how to do it then the entire process becomes easy as 1, 2, 3.
So, here are the step-by-step instructions on changing URL color with CSS:
Step 1. Choose Your Color:
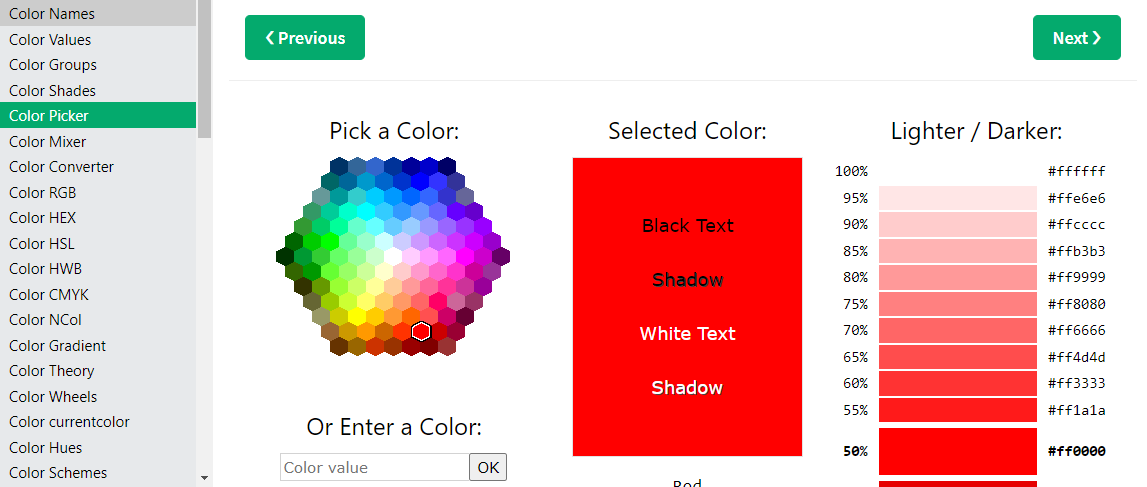
First, decide on the color you want for your links. Use a service like W3 school to find and select your perfect hex code. Hex codes are six-digit alphanumeric codes that represent specific colors.
If you want to know how to change the font color through different methods then you can visit one smart sheep guide.
Step 2. Access the WordPress Customizer:
Log into your WordPress dashboard. Navigate to 'Appearance' and then click on 'Customize'. This opens the WordPress Customizer.
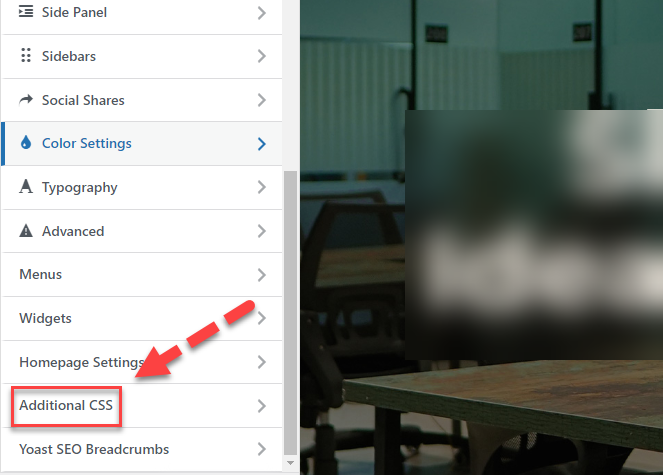
Step 3. Go to Additional CSS:
In the WordPress Customizer, locate and select 'Additional CSS' from the left-hand menu. Your WordPress site can be customized with CSS code in this section.
Enter the CSS Code:
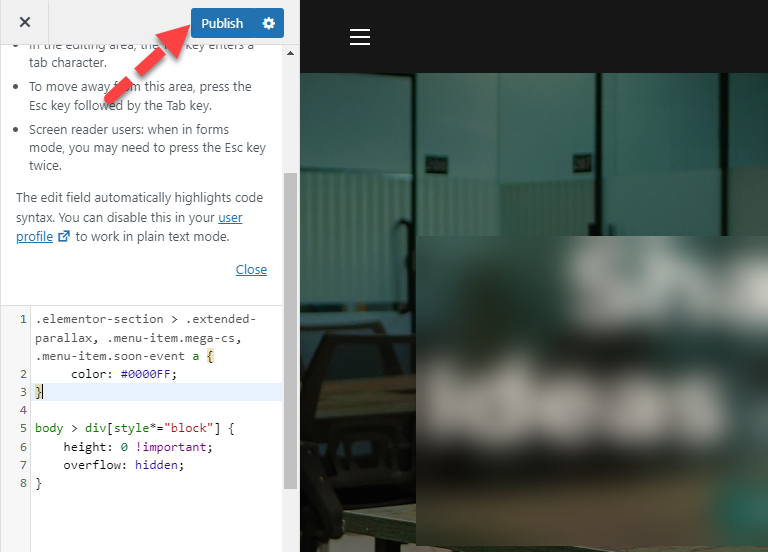
In the Additional CSS section, enter the following CSS code:
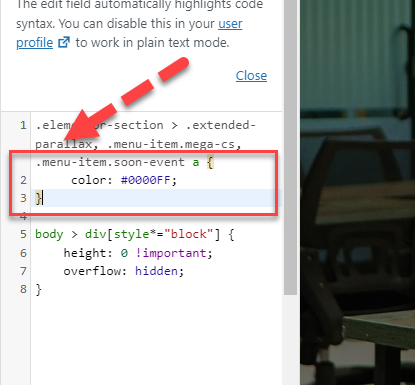
a { color: #0000FF; /* Replace with your chosen hex code */ }
Replace #0000FF with the W3 school of the color you selected. You can use this code to change the color of all hyperlinks on your website.
Step 4. Publish the Changes:
After adding the code, click on 'Publish' to make the changes live on your site. All your links should now display in the new color you've chosen.
Step 5. Adjusting or Reverting Changes:
If you're not satisfied with how the links look, you can modify the hex code in the Additional CSS section.
To revert back to the original link color of your theme, simply delete the CSS code from the Additional CSS box and click 'Publish' again.
Method 3: Change Link Color WordPress By Editing Your Beaver Builder Theme
If you wish to learn how to change link color in WordPress using the Beaver Builder theme, follow these steps:
Step 1. Access Theme Customization:
Go to your WordPress dashboard.

Navigate to 'Appearance' and then 'Themes'.
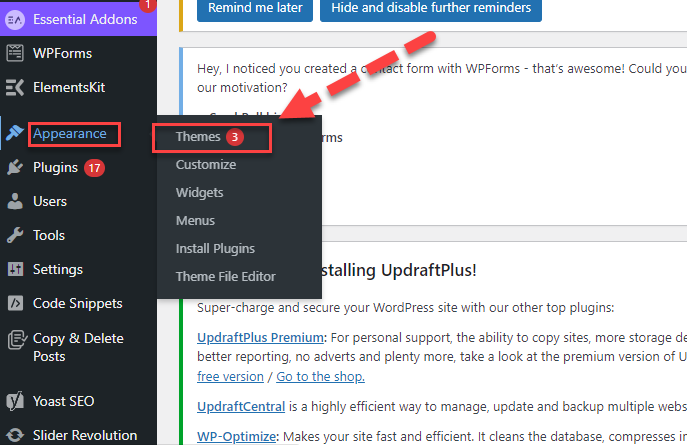
Hover over the Beaver Builder Theme and select 'Customize.' This opens the Beaver Builder editor.
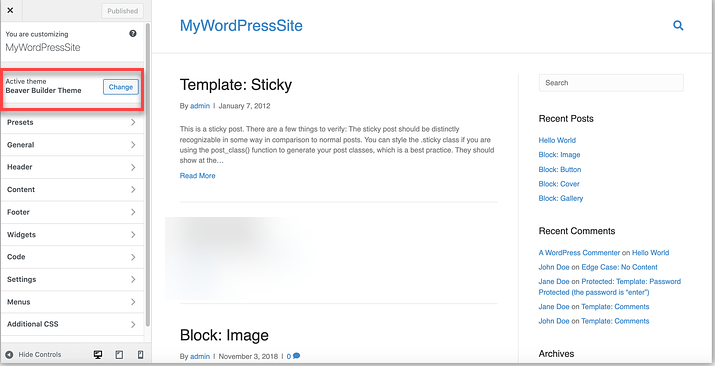
Step 2. Modify Accent Color:
In the Beaver Builder editor, go to the left-hand menu.Select 'General' and then 'Accent Color.' Click on 'Accent Color' to open the color picker.
Step 3. Choose a New Color:
Using the color picker, select a new color for your links.If you have a specific W3 school, enter it into the text field provided.

Step 4. Set Hover Color (Optional):
Beaver Builder also allows you to define a different color when you hover over a link. Select this option if desired and choose a color.

Step 5. Publish Your Changes:
After making your edits, click on 'Publish' to update your site. Your links will now display the new color you've chosen.

Step 6. Restoring Defaults:
If you wish to revert to the default link colors, navigate back to 'General' > 'Accent Color' in the Beaver Builder customizer and click on the 'Default' button.
Method 4: Change the Link Color in WordPress Posts Using the Global Style Feature
To change the link color in WordPress using Elementor for individual links, follow these steps:
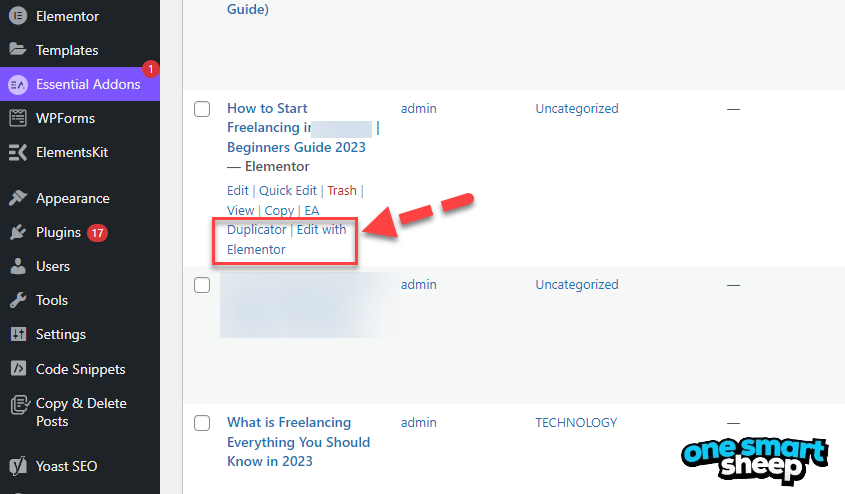
Step 1. Open Elementor Editor:
Navigate to the page or post where the link is located in WordPress.Click on 'Edit with Elementor' to open the Elementor editor.
Step 2. Select the Text Element:
Click on the text element that contains the link you want to change.Highlight the specific text or link within the Elementor text editor.
Step 3. Access Text Editing Options:
With the link text selected, click on the 'Style' tab in the Elementor panel.

Under 'Text Editor,' you'll find options for text color, typography, and more.
Step 4. Change Link Color:
Look for the 'Text Color' option and click on it. Choose a new color from the color palette or enter a custom hex code for your desired link color.

Step 5. Save and Publish:
After making the desired changes, click on the 'Update' button to save your changes. If it's a new page or post, click 'Publish' to make it live with the new link color.

Note: This method allows for precise control over the color of individual links on your pages or posts using Elementor, enabling you to highlight specific links or create a unique style for different sections of your website.
Method 5: Steps How Elementor Change Link Color (Individual Links)
To change the color of individual links in WordPress using Elementor, follow these steps:
Step 1. Open the Page with Elementor:
Navigate to the page where the link is located in your WordPress dashboard. Click on 'Edit with Elementor' to open the page in the Elementor editor.
Step 2. Select the Text with the Link:
Click on the text widget or section that contains the link you want to modify. Highlight the specific URL or text that you want to change the color for.

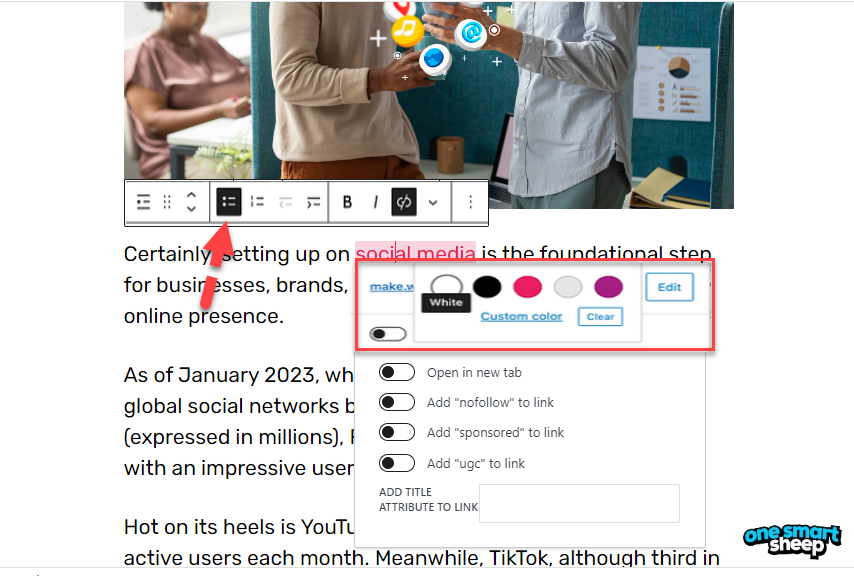
Step 3. Access Link Options:
With the text selected, click on the 'Link' icon in the Elementor toolbar. This should open a mini toolbar with additional link options.

Step 4. Change Text Color:
In the Elementor toolbar, you'll find an option for 'Text Color.'
Click on 'Text Color' and then select 'Custom Color' or choose from predefined colors.
Select a new color for your link using the color picker.
Thing to Remember: By following these steps, you can easily change the color of individual links on a page using Elementor. This method is particularly useful for highlighting specific links or creating contrast on landing pages and other important sections of your site.
Method 6: Change the Link Color through the Elementor Page Builder
In order to change the color of the link in WordPress using the Elementor Page Builder, follow these steps:
Step 1. Open Elementor Editor:
Open the page or post in WordPress where you want to change the link color. Click on 'Edit with Elementor' to launch the Elementor page builder.

Step 2. Access Site Settings:
In the Elementor editor, click on the Hamburger icon (three lines) in the upper-left corner.

Select 'Site Settings' from the menu.

Step 3. Navigate to Typography Settings:
In the Site Settings, click on 'Typography'. Here, you can modify the link color for its default (non-selected) state.

Ensure that the 'Normal' tab is selected for default link color settings.

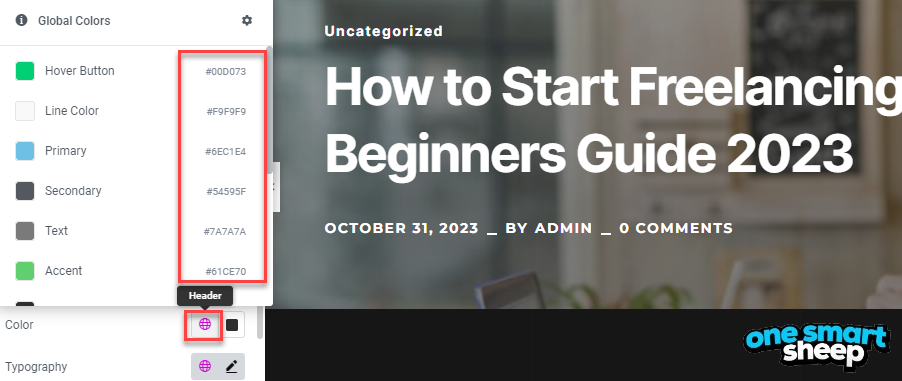
Step 4. Change Link Color:
Click on the Color setting icons. The first icon usually lists globally-defined colors of your theme, while the second opens the WordPress color picker.
Choose your desired color for the links.
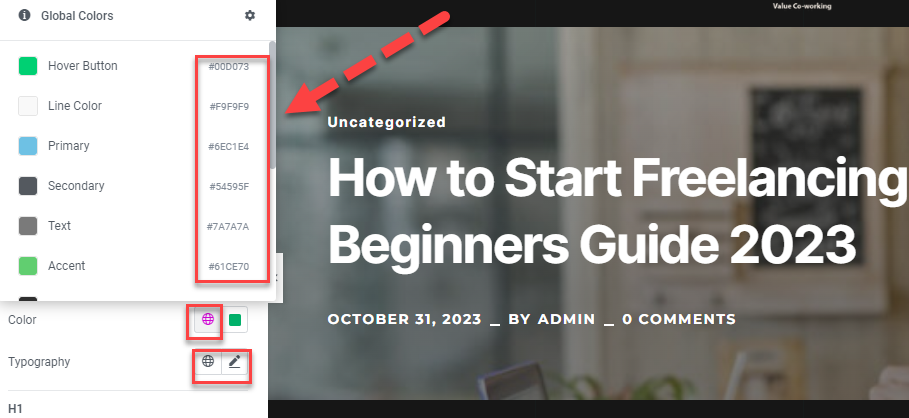
Step 5. Adjust Typography Attributes (Optional):
In the Typography section, you also have options to change the style, letter spacing, and line height of the links.
Make any additional typography adjustments as needed.
Step 6. Set Hover Color:
To change the hover color (color when the cursor is over the link), switch to the 'Hover' tab in the menu.

Use the Color and Typography settings to define a unique hover effect for the links.
Step 7. Save Changes:
Once you are satisfied with the color and typography settings, click on the 'Update' button.

Elementor will apply these changes to all links across your Elementor-designed pages and templates.
Why Do You Need to Change Your Website Link color?
As I mentioned before, there can be any number of reasons why you should change the link color on your website. Here are some reasons why you consider doing so.
- Enhanced User Experience: Differentiating the link color from regular text makes it easier for users to navigate your website. It improves the overall user experience by making clickable elements clearly identifiable.
- Visual Appeal and Brand Consistency: Customizing link colors improves your site's aesthetics and maintains consistency with your brand's color scheme. This consistency strengthens your brand identity and makes your website more memorable and recognizable to visitors.
- Visibility and Accessibility: A different color for links makes them stand out from regular text, helping users quickly identify clickable elements. This is particularly useful for accessibility, as it makes it easier for people with visual impairments to navigate your site.
- Brand Consistency: If you have specific brand colors, changing the link color to match your branding can make your website look more cohesive and professional.
- Improving Click-Through Rates: A well-chosen link color can draw attention and encourage users to click. For example, a contrasting color can highlight important links, such as calls-to-action (CTAs), making them more engaging.
- Focus on Important Content: By changing link colors, you can highlight important content on your site, such as calls to action, important resources, or navigation links. This strategic highlighting can guide user behavior and improve the effectiveness of your content.
- SEO and Engagement: Clear and distinct links can encourage more clicks, leading to increased user engagement and potentially improved SEO performance. When users spend more time interacting with your content, your site will be deemed more valuable and relevant by search engines.
- User Experience: Customizing link colors helps users differentiate between visited and unvisited links, which can enhance navigation and user experience.
- Aesthetic Appeal: Sometimes, the default link color may not suit your theme or design. Changing it allows you to better align the link colors with the overall color scheme of your website.
More Related Terms for Understanding
Hyperlink Blue Hex
The hex code for the classic hyperlink blue is a widely recognized shade that is often used to signify clickable links on the web. This color has become synonymous with web navigation and accessibility. The hex code for this standard hyperlink blue is #0000EE. This particular shade is bright enough to stand out against both light and dark backgrounds, making it a practical choice for web designers.
This traditional blue helps ensure that links are easily distinguishable from regular text, enhancing user experience by making navigation intuitive. The use of a specific and consistent color for hyperlinks helps users quickly identify actionable items on a webpage.
Elementor Change Link Color
In Elementor, a popular WordPress page builder, changing the link color is a straightforward process that allows for better customization of a website’s appearance to match a specific design aesthetic. To change the link color in Elementor, you would typically go to the Style tab in the Elementor panel when editing a text widget or any widget that contains a link.
From there, you can access the typography settings where link colors can be adjusted according to your preference. This feature provides flexibility in maintaining a cohesive color scheme across your website, ensuring that the links can be easily seen or blend well with the overall design depending on the desired outcome.
How to Change Hyperlink Color
Changing the hyperlink color in CSS is a common task for web developers looking to tailor the look of a website. To change the color of hyperlinks, you would use the CSS color property in conjunction with the appropriate selectors for links, typically a, a:link, a:visited, a:hover, and a:active. By specifying the color property within these selectors, you can customize the appearance of hyperlinks in different states (link, visited, hover, and active).
This allows for a dynamic user experience, as the color of the links can change depending on whether a link has been visited by the user or when they hover over it, providing visual feedback which can enhance the usability and aesthetic appeal of a website.
What is Link Blue Hex Code
The hex code for the classic hyperlink blue is a widely recognized shade that is often used to signify clickable links on the web. This color has become synonymous with web navigation and accessibility. The hex code for this standard hyperlink blue is #0000EE.
Wrapping Up
Changing the link color in WordPress enhances user experience and aligns with your brand's visual identity.
We've explored six methods to customize link colors, ranging from using WordPress Customizer, custom CSS, Beaver Builder, and Elementor Page Builder to individual link color changes with Elementor.
Each method provides step-by-step guidance, ensuring you can effectively modify your site's appearance, whether you're a beginner or an experienced user.
From global changes to individual link adjustments, these techniques offer flexibility in website customization, allowing you to highlight important content and improve navigation and aesthetics on your WordPress site.
Remember, consistent and distinct link colors not only improve user engagement but can also aid in SEO performance.
With these methods, you can easily make your links stand out, attract attention, and improve navigation. So, are you ready to take your customization skills further? Visit One Smart Sheep to explore more ways to tailor your WordPress site to fit your brand's unique style.
FAQs
Here are some FAQs for those wanting to learn how to change link color in WordPress.
1. Can I change the hyperlink color?
Yes, you can change the color of hyperlinks. This is typically done through CSS in web development, where you can specify the color for the <a> tags, or through options in your WordPress theme settings, where you might find options to customize the appearance of links.
2. How do I add a color button to Wordpress?
To add a colored button in WordPress, you have two primary methods. The first is by using a WordPress plugin that offers customizable button options, which allows for an easy interface to select colors and styles. The second method involves adding custom CSS code to your theme. This requires manually specifying styles for button elements in your site's CSS file.
3. Why are hyperlinks always blue?
The default blue color for hyperlinks is a standard convention established in the early days of the internet. This was chosen for its high contrast with a white background and for being easily distinguishable from regular text, making it clear to users that it is clickable.
4. Can you Change the hyperlink color in CSS?
Yes, you can change the hyperlink color using CSS. By targeting the anchor (<a>) elements in your CSS file, you can set the color property to any desired value. This customization allows for a consistent look and feel that matches the overall design of your website.
5. Is it possible to use different colors for different hyperlinks?
Yes, you can use different colors for different hyperlinks by assigning unique classes or IDs to each link and styling them individually in your CSS file.
6. How to change link color in WordPress for a specific page?
Use custom CSS targeting that page’s unique class (e.g., .page-id-42 a { color: #FF5733; }) in the WordPress Customizer under “Additional CSS.”
7. How to change link color in WordPress using Elementor?
In Elementor, go to the widget or section, click the “Style” tab, and adjust link color under “Typography”—no CSS needed.


.svg)