


In 2023, having a website is no longer an option but a necessity for any business or individual looking to establish a strong online presence. Whether you are a business owner, entrepreneur, freelancer, or simply want to create a personal blog, we will provide you with the essential steps to create a professional, attractive, and secure website using WordPress.
From choosing the right domain name and hosting plan to installing essential plugins and optimizing your website for search engines and performance, we have got you covered.
So, get ready to take the first step towards building your online presence, and follow along with this comprehensive guide that will equip you with the knowledge and skills to create a website that reflects your brand, engages your audience, and achieves your objectives.
Let's delve into the world of website creation and take advantage of the limitless opportunities available online.
Essential Steps to Create a Website From Scratch

Creating a website from scratch requires several essential steps. These steps include Setiing up your site, installing WordPress, choosing and installing a theme, installing essential plugins, optimizing your website for search engines, creating high-quality content, and ensuring website security and performance.
1. Setting Up Your WordPress Website
To set up a WordPress website, you must choose a domain name and hosting service. Domain names are web addresses that people will use to access your website, whereas hosting provides access to your website files.
If you're new to website development and don't know what WordPress is, we recommend reading this helpful article that provides an in-depth understanding of the concept.
As a beginner, You may find it difficult to determine which provider is best suited to your needs with so many options available. That's why we've done the research for you and have come to the conclusion that Bluehost is the go-to service provider for hosting and domain registration.
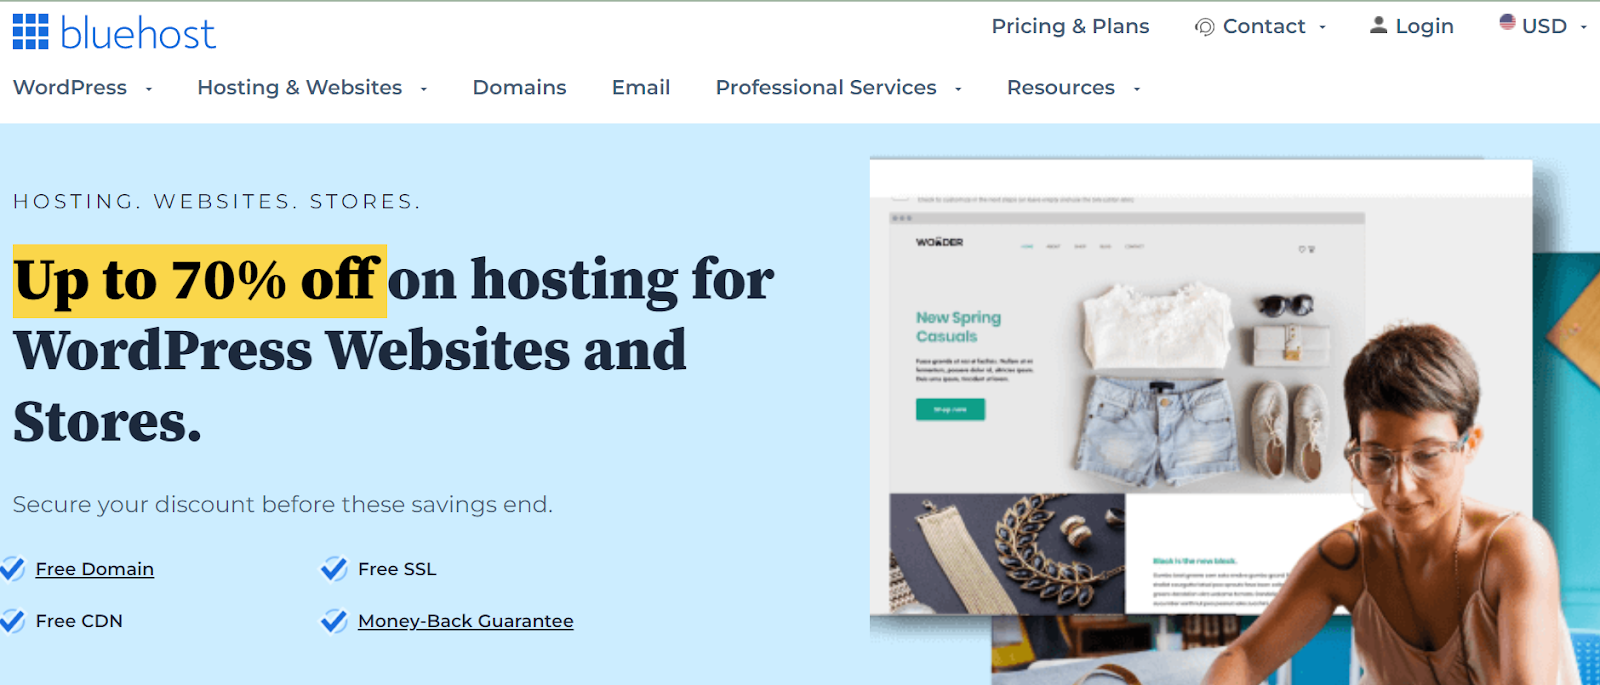
Not only does Bluehost offer affordable plans, but they are also renowned for their reliability, speed, and excellent customer support. Additionally, It integrates seamlessly with WordPress, making it an ideal choice for those looking to build a website on this popular platform.
Bluehost also offers a range of features and benefits that set it apart from other service providers. For example, they offer a free domain name for the first year of service, as well as a wide array of tools and resources to help you get your website up and running quickly and efficiently.
Their user-friendly interface and one-click WordPress installation make it easy for beginners to get started, while their scalable plans and flexible pricing options ensure that your website can grow along with your business.
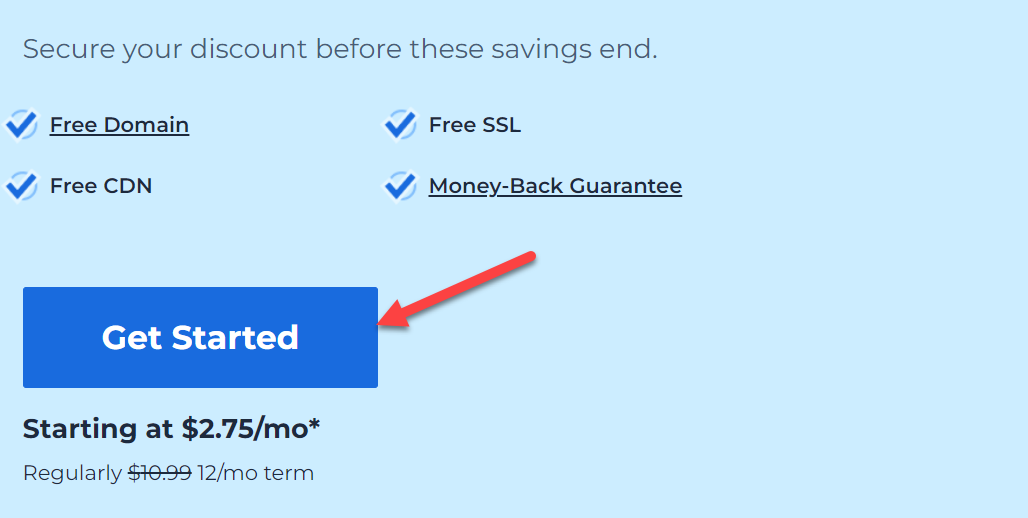
To purchase a domain name and hosting from Bluehost, start by visiting their website and selecting the "Get Started" button.
Choose a plan that fits your needs and budget. You can start small and upgrade later as your website traffic grows.

Next, you'll need to select a domain name. A domain name should be memorable, easy to spell, and relevant to your website's purpose.
Consider using keywords that describe your business or niche in your domain name. If your desired domain name is not available, Bluehost will offer alternative options.
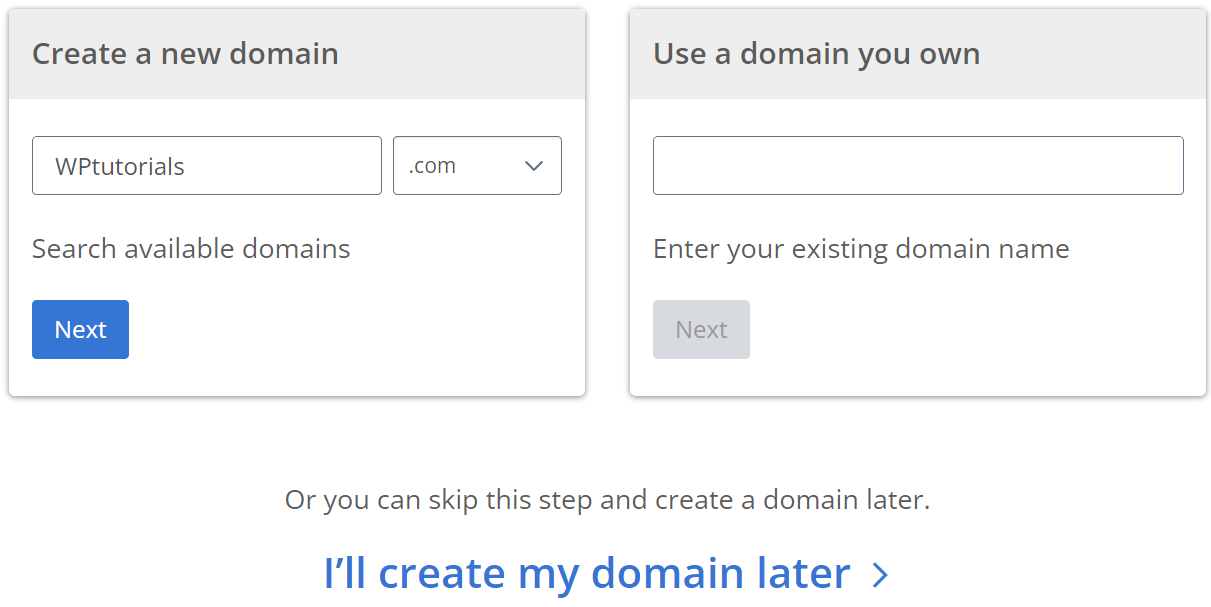
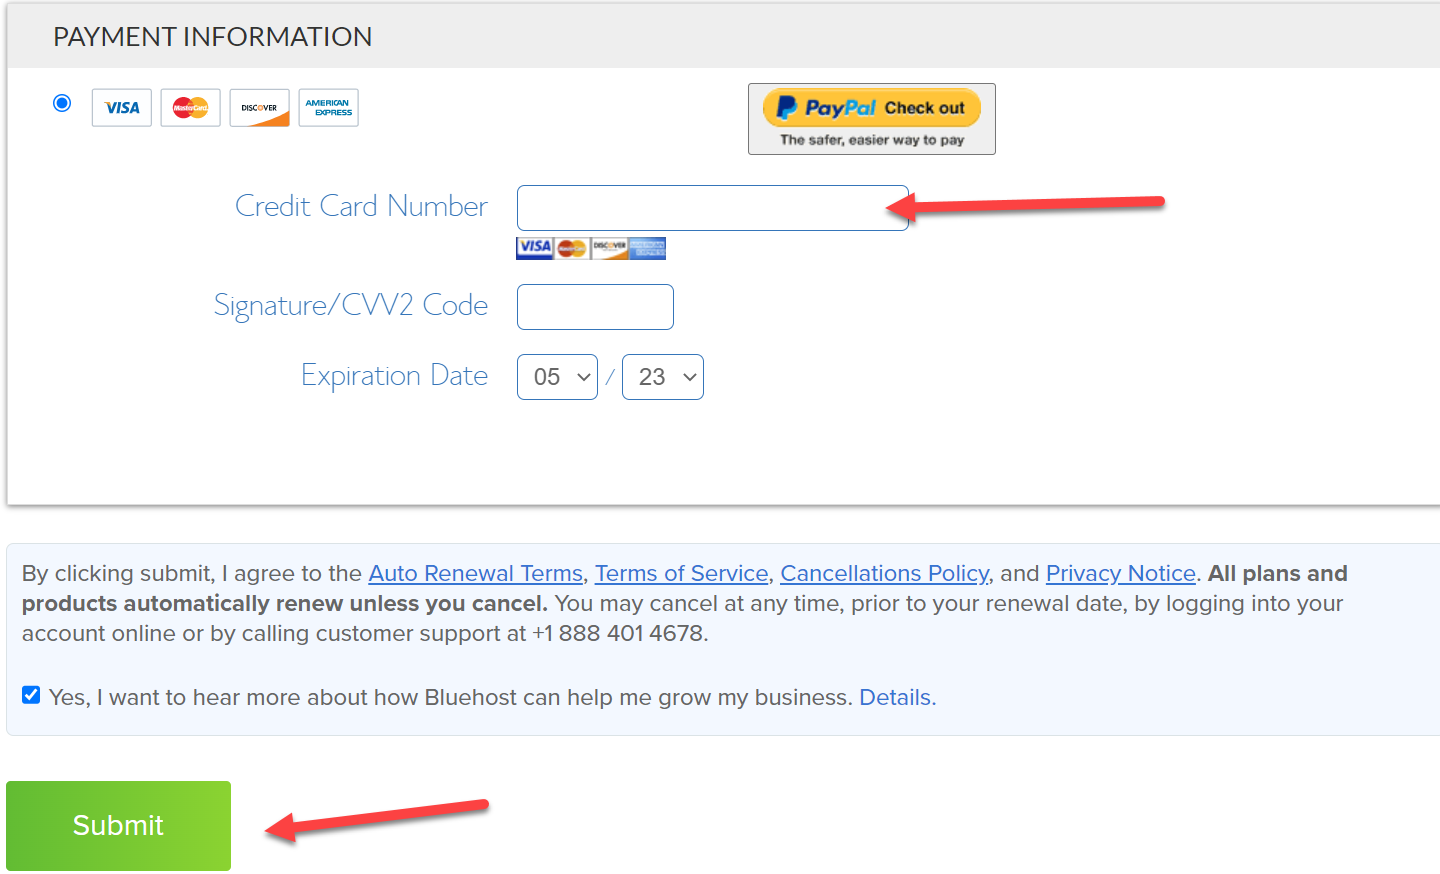
Once you've chosen your domain name, complete the checkout process by creating your account and entering your billing information.

Once you've chosen your domain name, complete the checkout process by creating your account and entering your billing information.
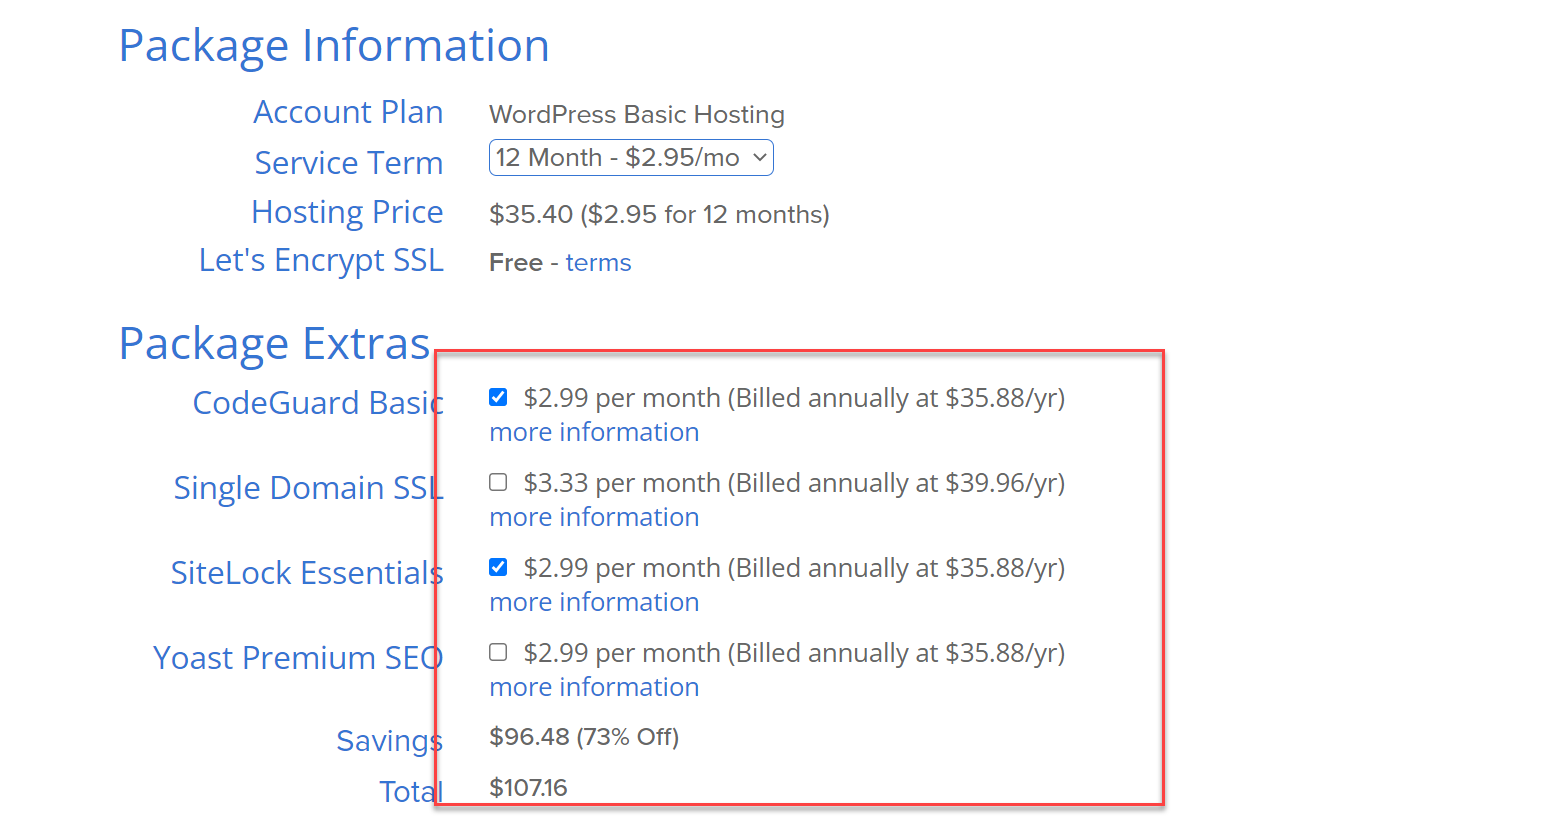
Bluehost offers various payment options, including credit cards and PayPal. You can put your card details here. After that, Click on "Submit"
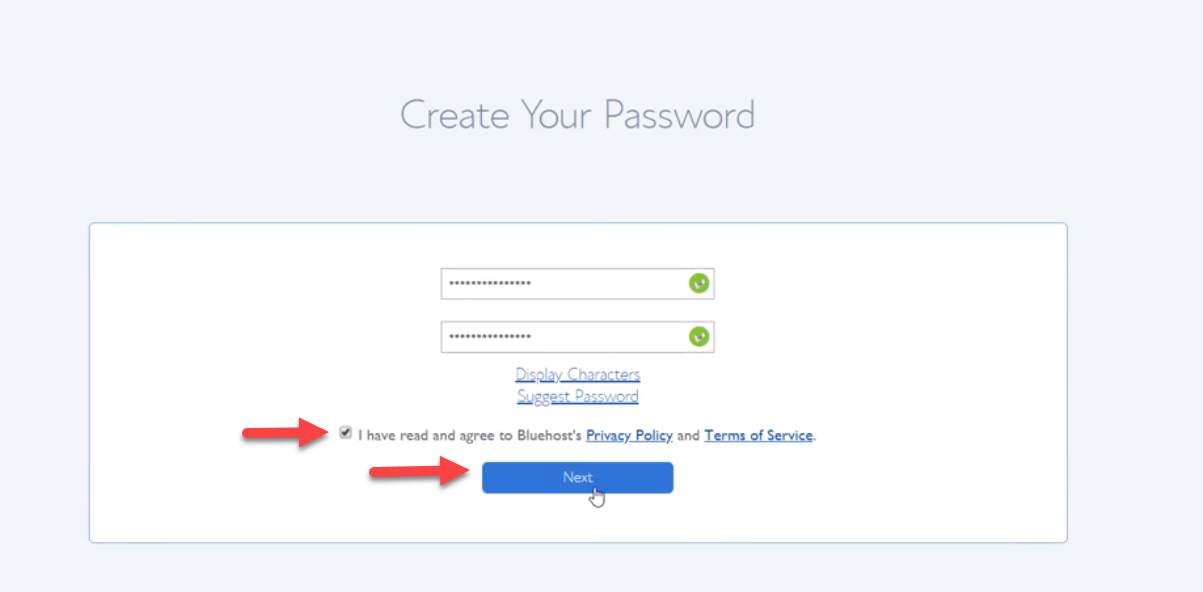
After completing your purchase, you will receive an email from Bluehost with instructions on how to access your account. You can click on "Set Password" to create your password for your Bluehost account.

After that, you will be directed to the next page, where you can set your password. Enter your password and click on "Next." Don't forget to check the small box just above this option.
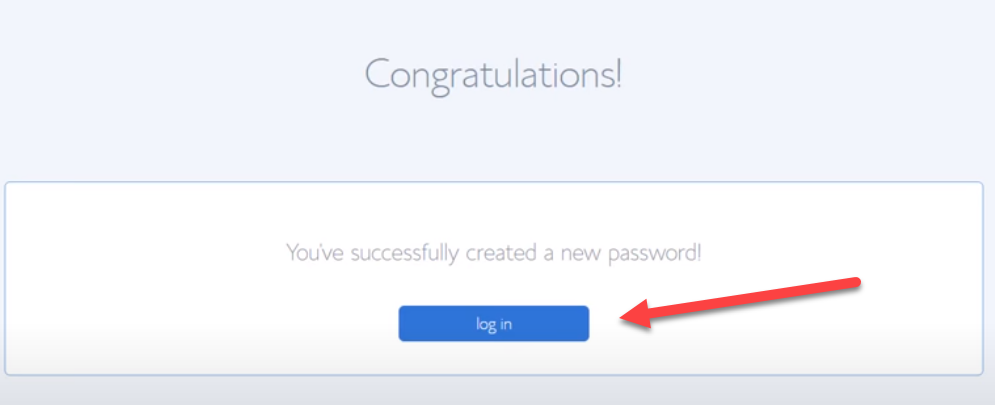
If all goes smoothly, your account will be successfully set up with Bluehost. Now you can log in to your account by clicking on "Log in."
2. Installing WordPress
From this point, you can effortlessly install WordPress with just a few clicks and begin constructing your website. A vast array of themes is available for your selection. You can pick a theme according to your preferences.
If your domain provider is GoDaddy, we recommend reading this helpful article on how to install WordPress on GoDaddy to streamline the process and ease any potential difficulties that may arise.
The article provides step-by-step instructions and helpful tips to ensure a successful installation process.
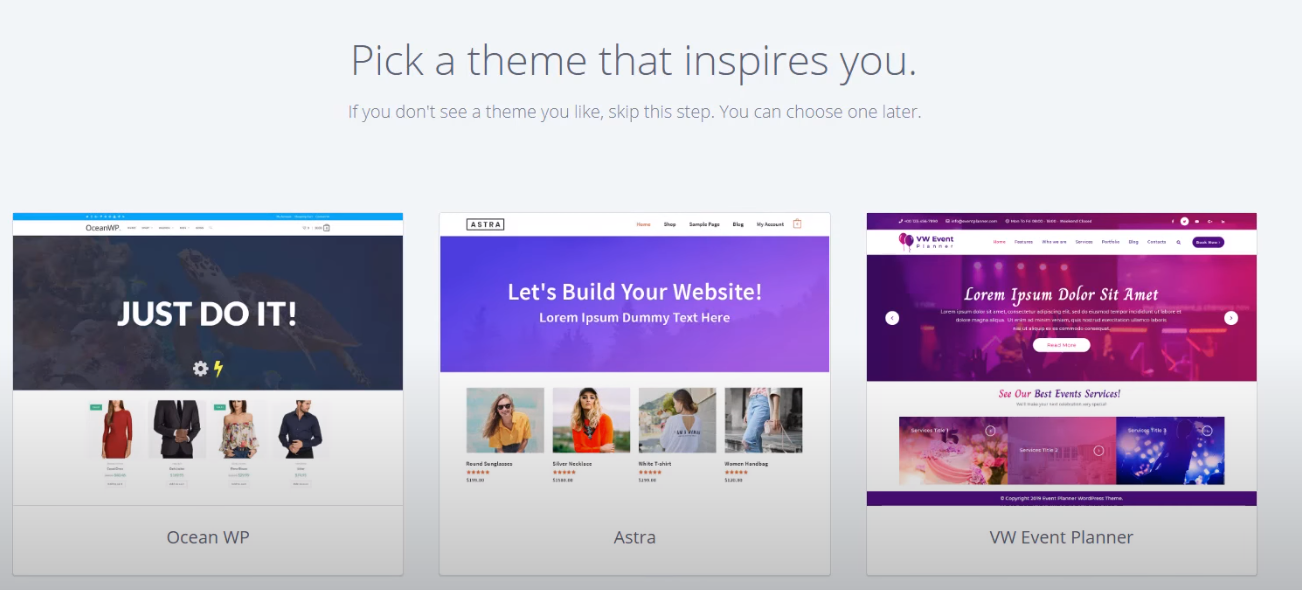
If you don't want to install a theme right now, you can also skip this option.
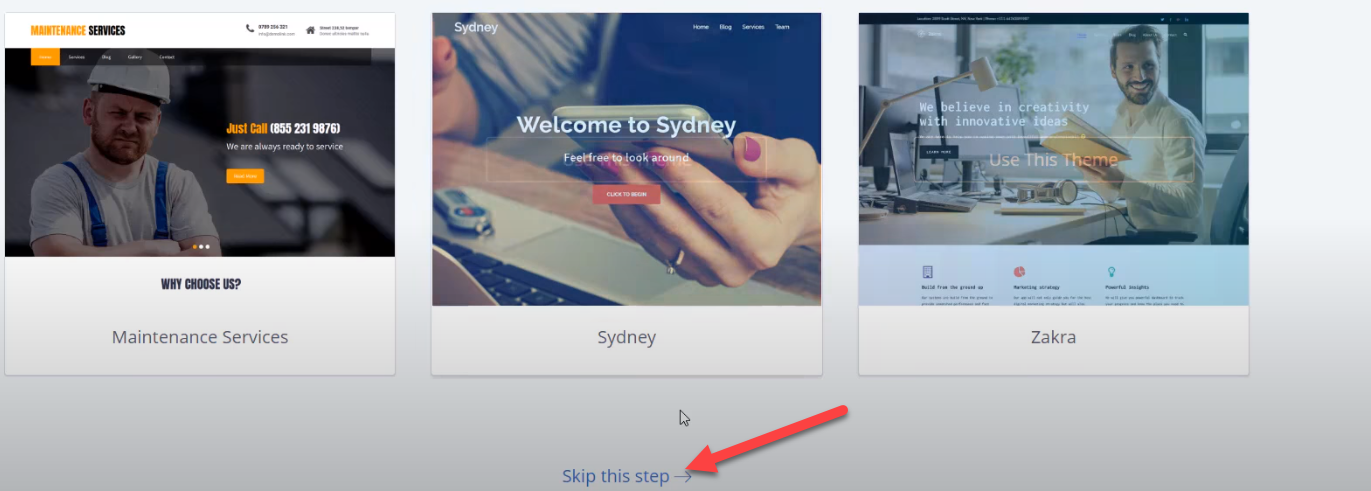
Upon selecting "Skip this step," you will be navigated to the subsequent page, where you will encounter the "Start Building" option. When you click this, you will be taken to the WordPress dashboard.

Now if you have skipped installing WordPress on your website, you need to log in to your Bluehost Account. Choose "My Sites" on the left. And Click "Create Site."

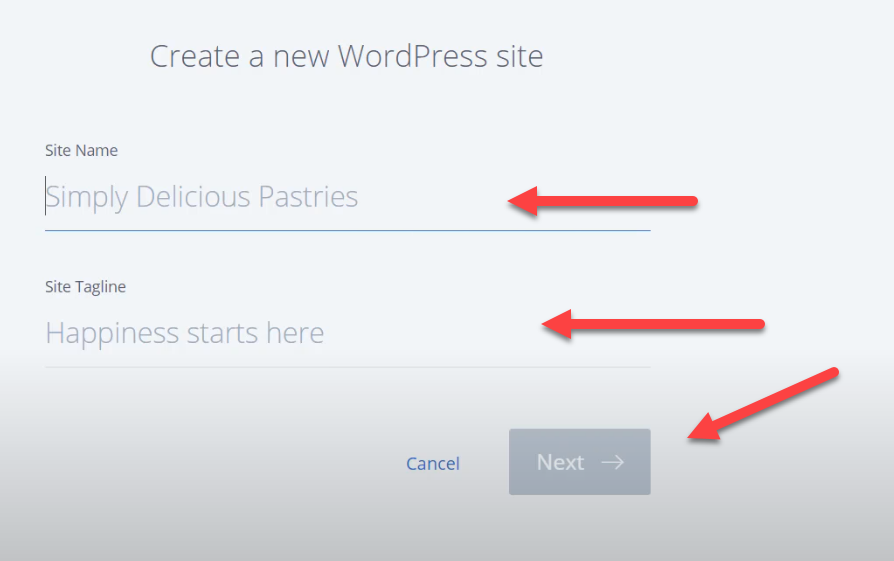
Now after putting your site name and tagline, click on "Next."
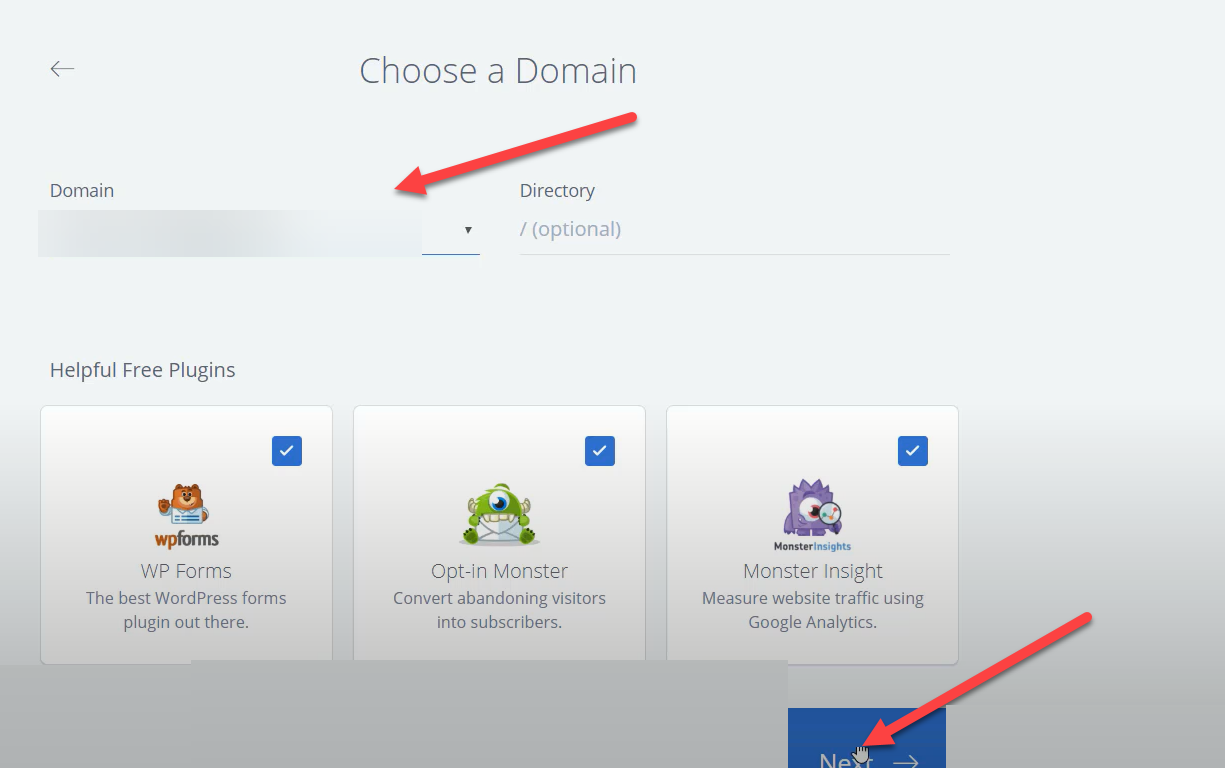
It's time to choose the domain where you want to install WordPress. Select that domain and click on "Next."
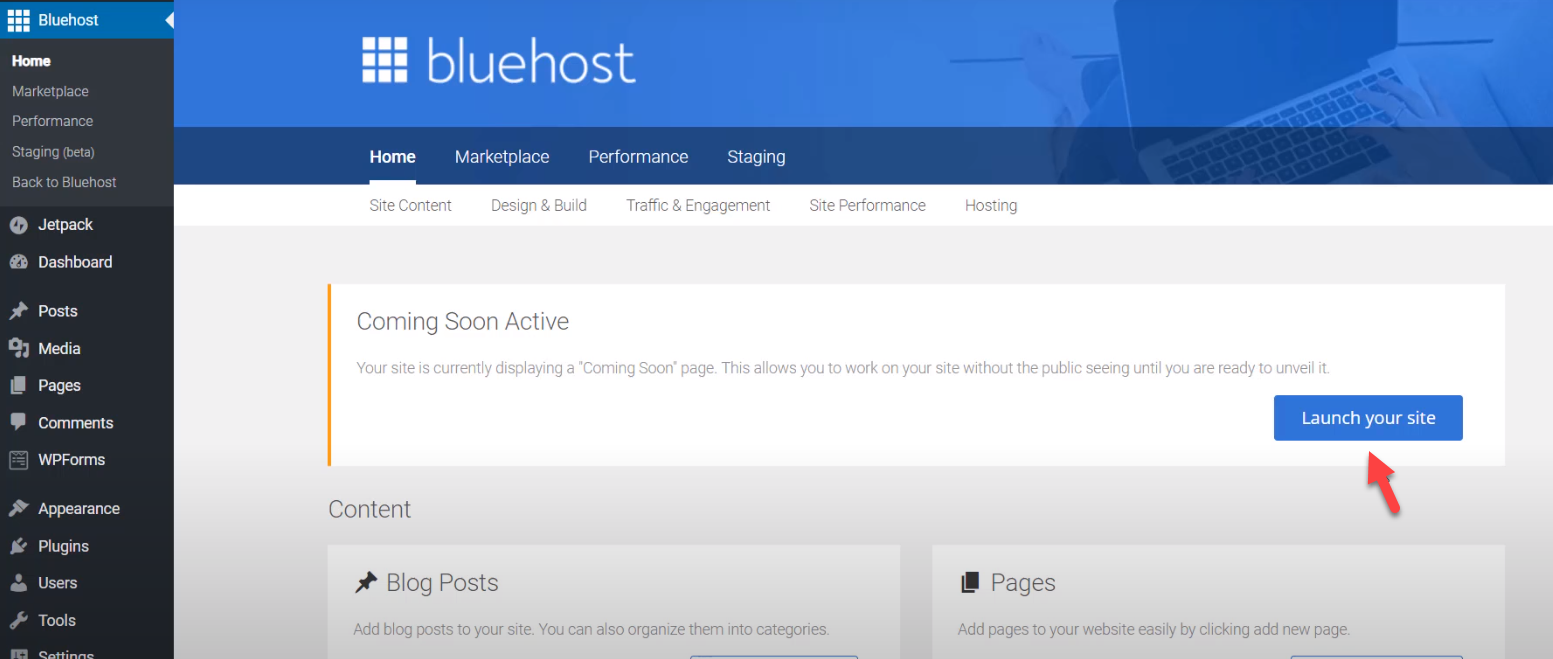
Congratulations! You have successfully installed WordPress on your website.
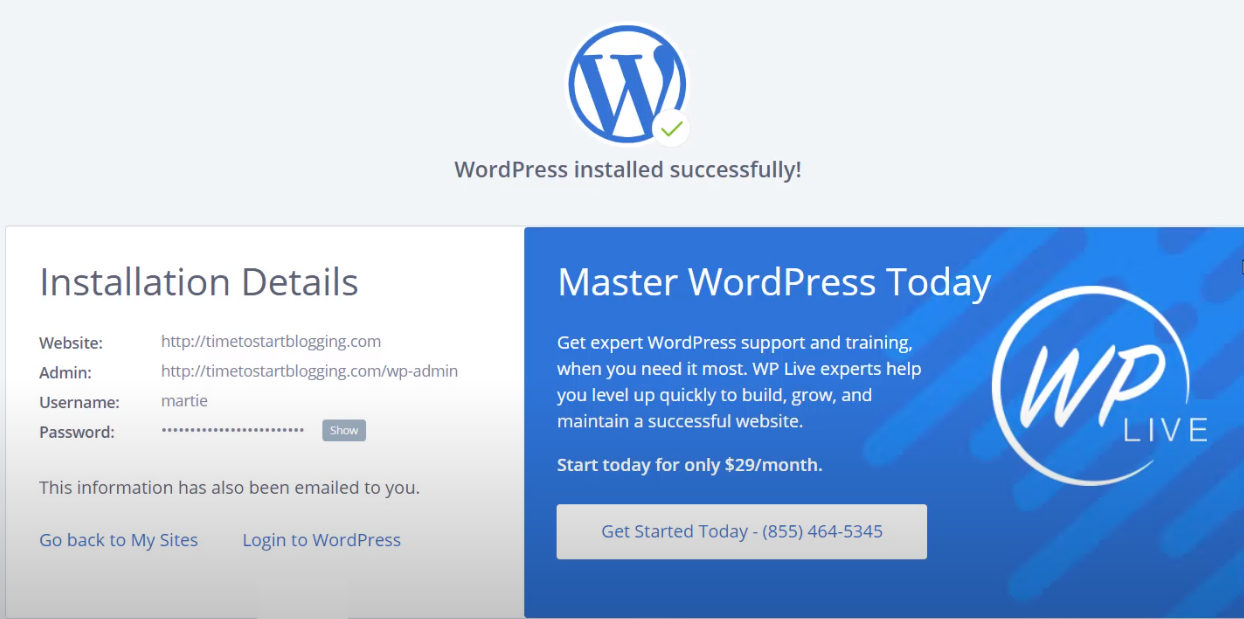
Following the successful installation of WordPress, you will access your dashboard and proceed to launch your website. Alternatively, you may choose to wait for a while before unveiling your site, allowing you to add some content to enhance its appearance and substance.
By choosing Bluehost as your hosting provider, you can rest assured that your website will have fast load times and reliable uptime. Plus, you'll have access to their excellent customer support team 24/7 in case you run into any issues.
3. Designing Your Website
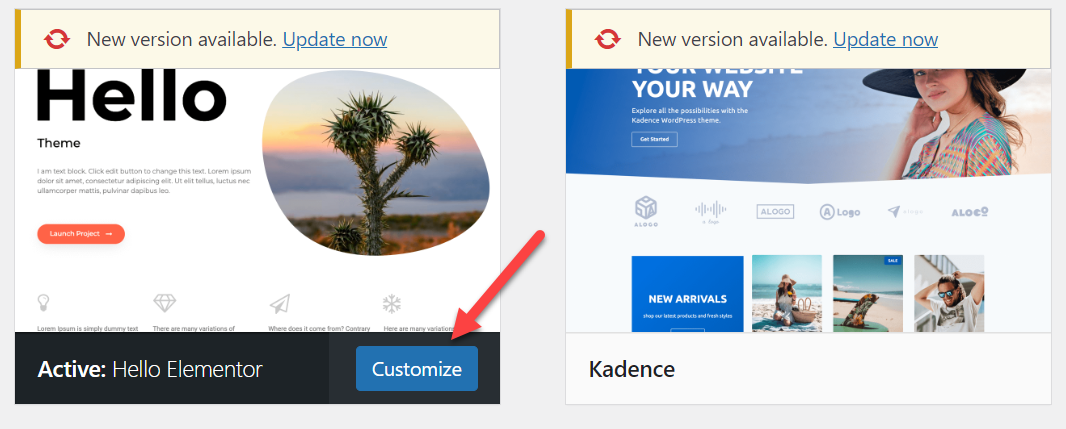
Once you've set up your WordPress website and installed WordPress on your website, it's time to start designing your site. The first step in designing your website is selecting a WordPress theme.
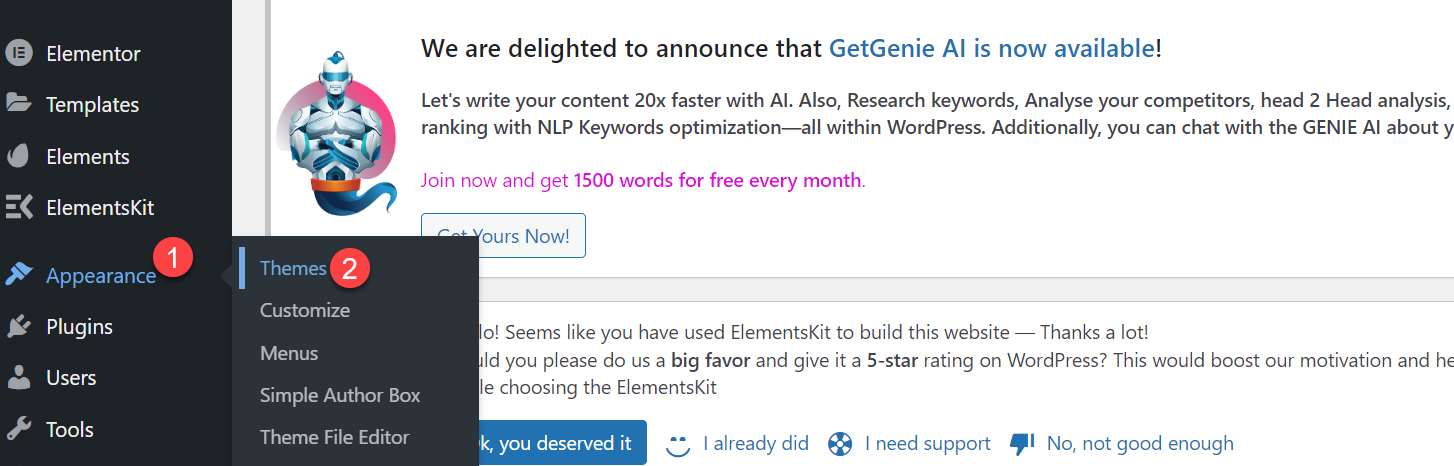
Themes are pre-made templates for WordPress that determines the layout and style of your website. WordPress offers both free and paid themes, and you can browse the themes by going to "Appearance"> "Themes" in your WordPress dashboard.
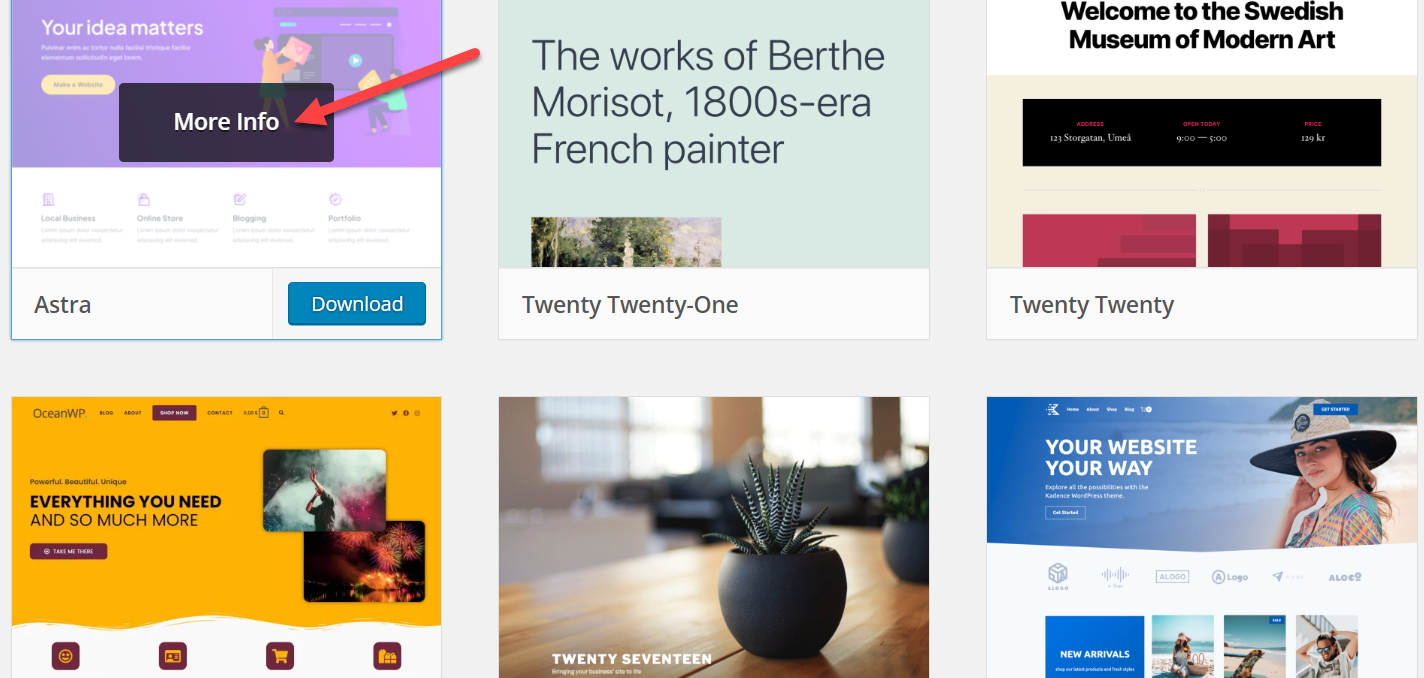
By clicking on "Theme Details," you can check each theme and view its features among the many options available.

Alternatively, You can browse the WordPress theme directory; simply go to the WordPress website and select "Themes" from the top navigation bar. Here, you can browse thousands of free and paid themes organized by category, features, and popularity.

To select a theme, look for one that fits the style and purpose of your website. You can preview a theme by clicking on it and viewing the demo. It will give you an idea of how the theme looks and functions.
4. Installing and Activating Your Chosen Theme
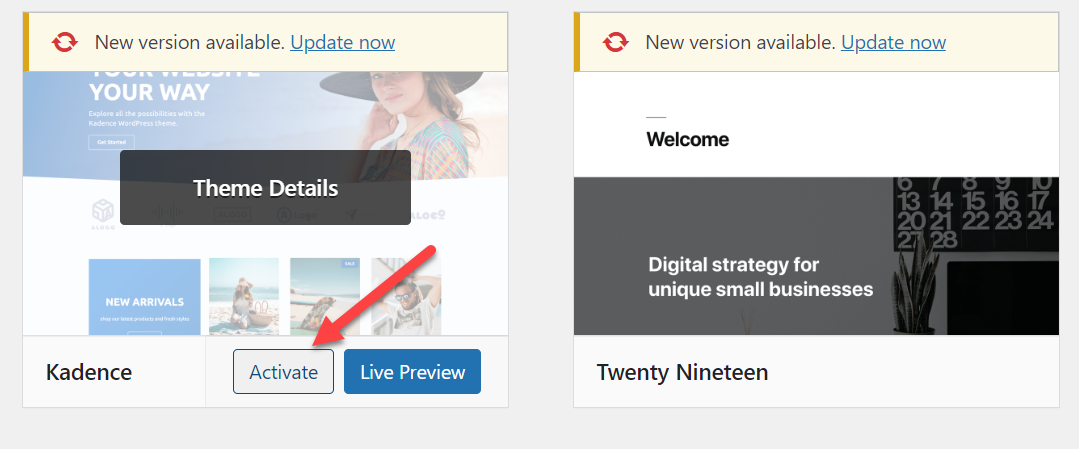
Once you've selected your WordPress theme, it's time to install and activate it on your website. To do this, go to "Appearance"> "Themes" in your WordPress dashboard.
From here, click on "Add New" to upload your new theme. You can either upload a theme that you've purchased or downloaded, or you can search for free themes directly through the WordPress dashboard.

After you have uploaded your theme, select "Install Now" and wait for the installation process to complete. After installation, click on "Activate" to apply your new theme to your website. However, if you want to use the available themes, then you just need to click on "Activate."
5. Customizing Your Theme
After you have selected and installed your WordPress theme, the next step is customizing your site's look and feel. Customizing your theme adds a personal touch to your website.
WordPress has a built-in feature called the Customizer that makes it easy to customize your theme. The Customizer allows you to make changes to your site's design and preview them in real time.
To use the Customizer, go to "Appearance"> "Customize" in your WordPress dashboard. From there, you can customize various aspects of your theme, including the background color, font, and header layout.
Remember that you can customize your theme in many ways, including uploading a logo or changing the color scheme. Additionally, you can add custom CSS to your theme through the WordPress customizer or by using a plugin.
Here are some examples of what you can customize in theme settings:
- Logo and Favicon: Upload a custom logo and favicon to your site to make it stand out.
- Color Scheme: Customize the colors of your site to match your brand.
- Layout: Choose the layout of your site, such as a boxed or full-width design.
- Fonts: Select fonts that match your style and brand.
Be sure to review the customization options available in your chosen theme's settings and experiment with different options to find the perfect design for your website.
With these simple steps, you can select, install, and activate a WordPress theme that fits your website's style and purpose.
6. Creating a Custom Layout with a Page Builder
While WordPress themes offer a range of customization options, sometimes you may want even more control over your site's layout. This is where page builder plugins come in.
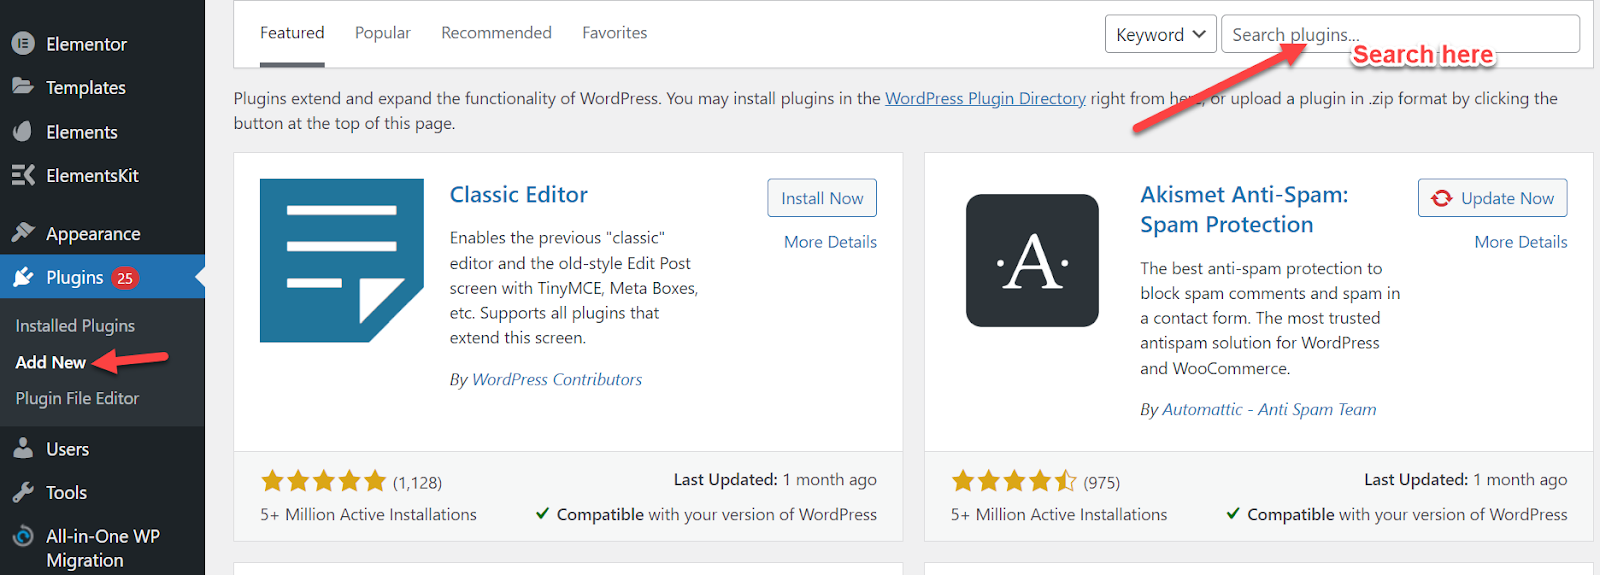
Page builder plugins allow you to create custom layouts and designs for your website with a user-friendly drag-and-drop interface. To get started with a page builder, install a plugin from the WordPress plugin directory.
Popular page builder plugins include Elementor, Beaver Builder, and Divi Builder. To install a plugin, go to "Plugins"> "Add New" in your WordPress dashboard and search for your desired page builder plugin.
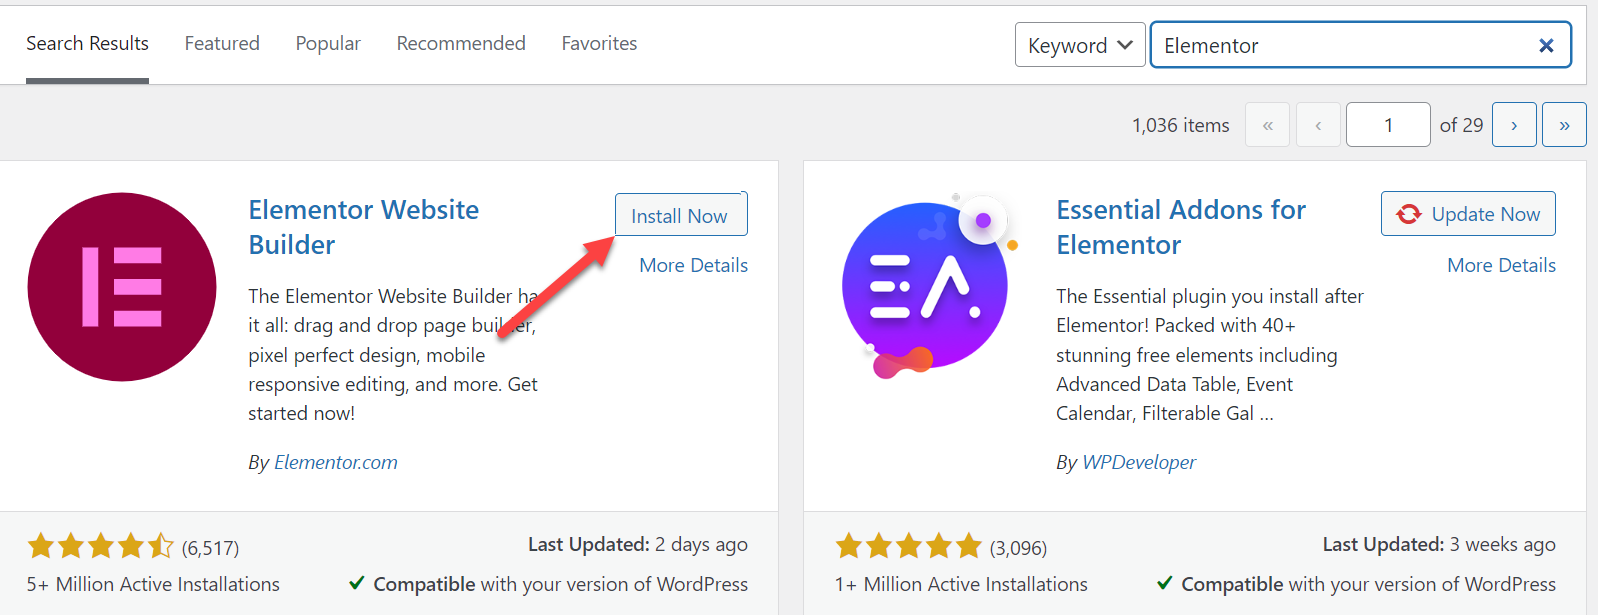
To install Elementor, simply search for it in the WordPress plugin directory by entering the name "Elementor" in the search bar.
Once you find the Elementor page builder plugin, click on "Install Now" to install it on your website. Once you've installed the plugin, activate it and follow the on-screen instructions to set it up.
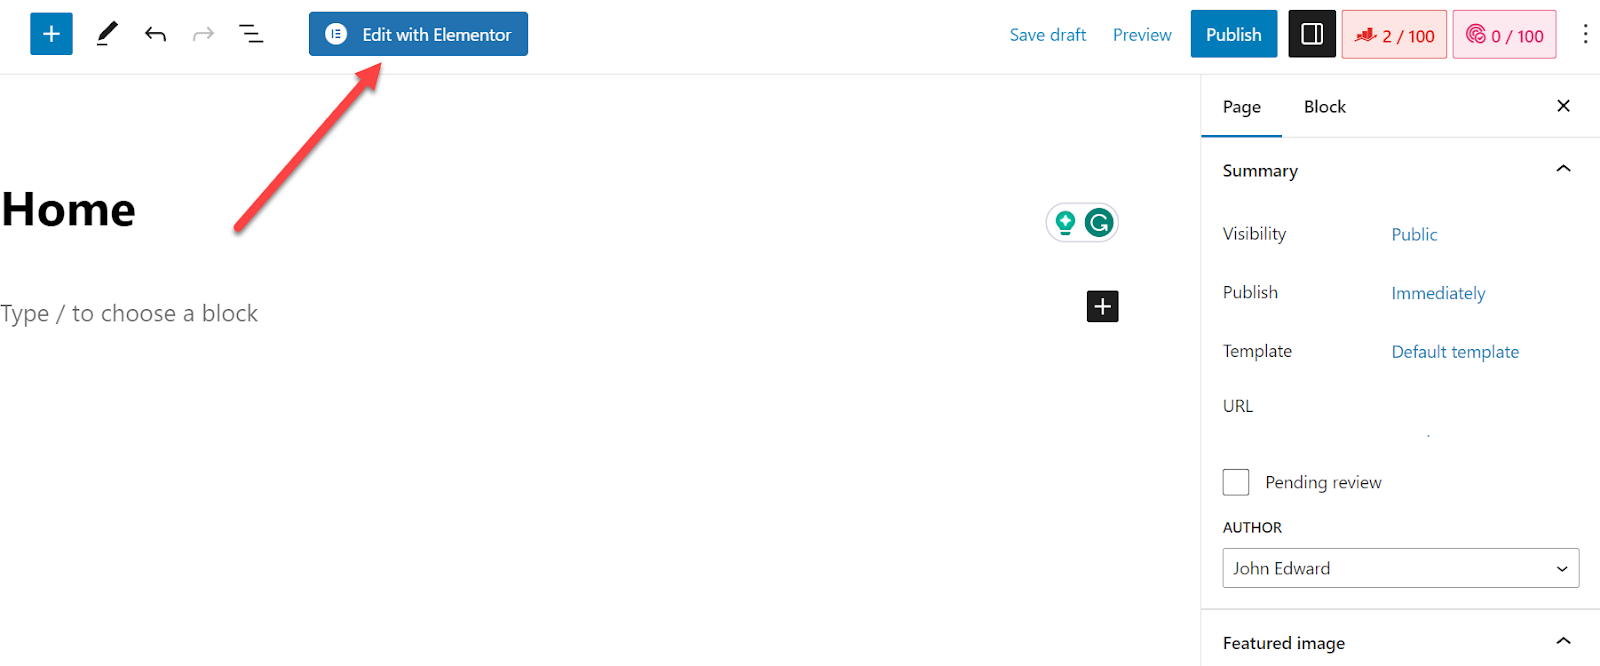
With your page builder plugin installed, it's time to start building your custom homepage layout. To do this, go to "Pages"> "Add New" in your WordPress dashboard and select the "Blank Page" template.
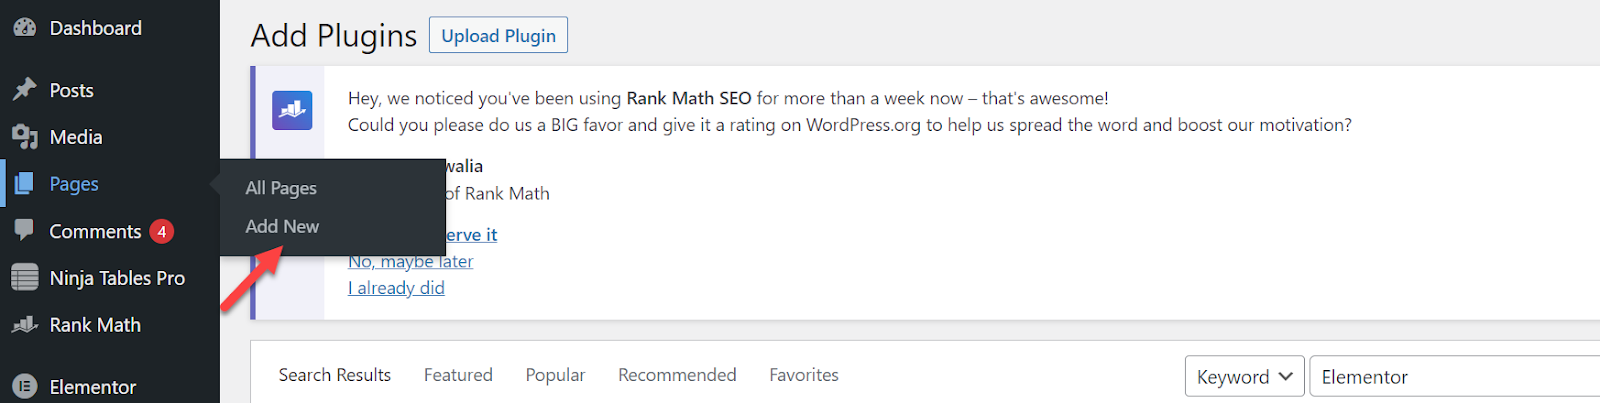
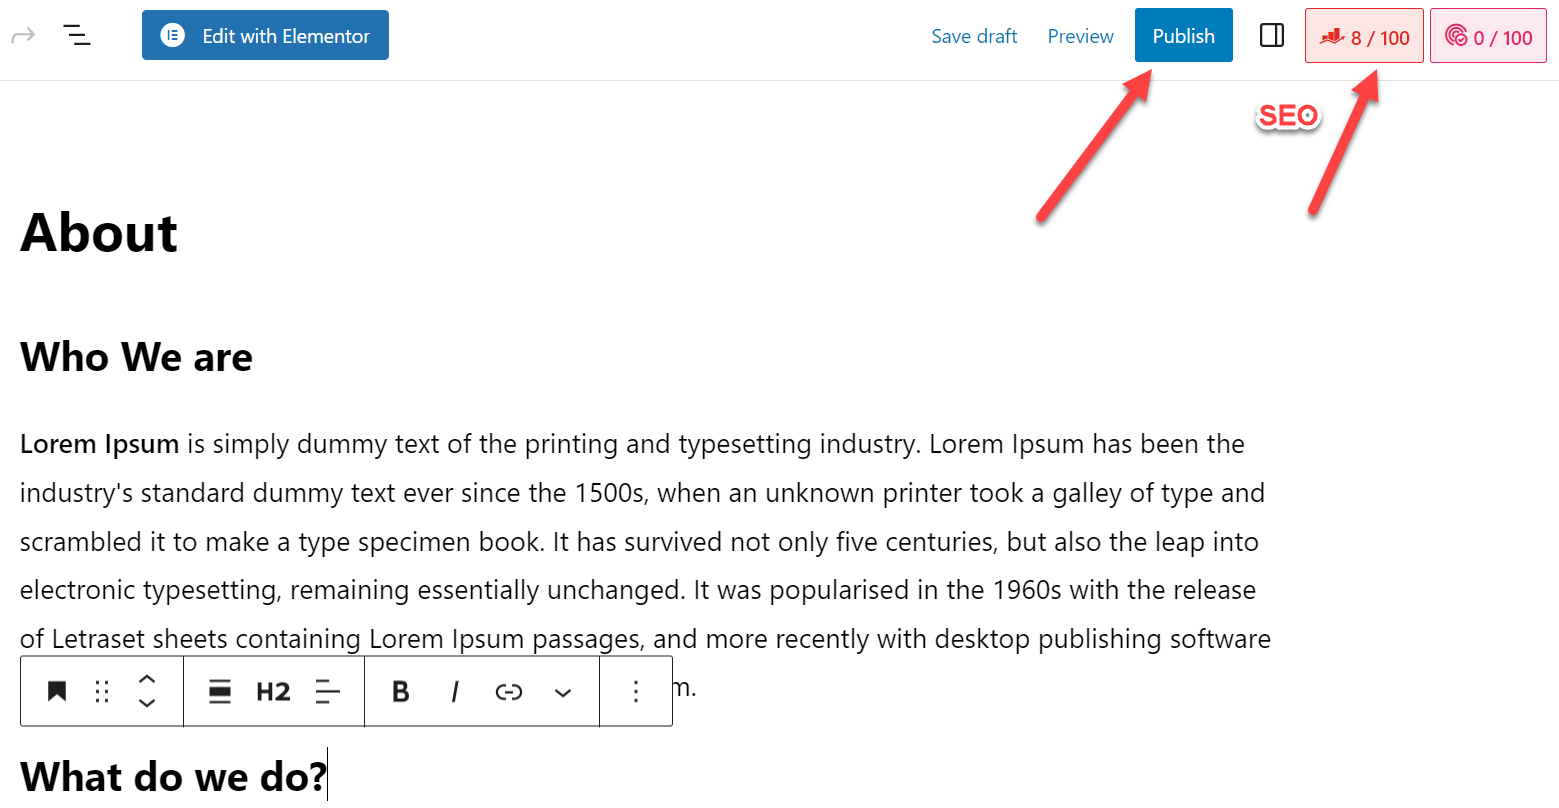
To get started with Elementor, you'll need to give your page a name. After you've done that, select "Edit with Elementor" to begin customizing your page with the Elementor page builder plugin.
Next, open the page in your page builder plugin. You'll see a range of widgets and modules that you can drag and drop onto the page. Some common modules include text boxes, image galleries, and buttons.
To create your custom layout, simply drag and drop widgets onto the page and arrange them as desired. Many page builders also offer pre-designed templates that you can use as a starting point for your design.
Once you've created your custom layout, be sure to save and publish the page. Your website will now display your custom homepage layout.

Don't be afraid to experiment with different widgets and drag-and-drop layouts until you find the perfect design for your website.
7. Adding Essential Plugins and Features
After you've designed your website, it's essential to install the most important plugins to enhance your website's functionality and performance.
Here are a few recommended plugins that should be installed on all WordPress sites:
- SEO Plugins
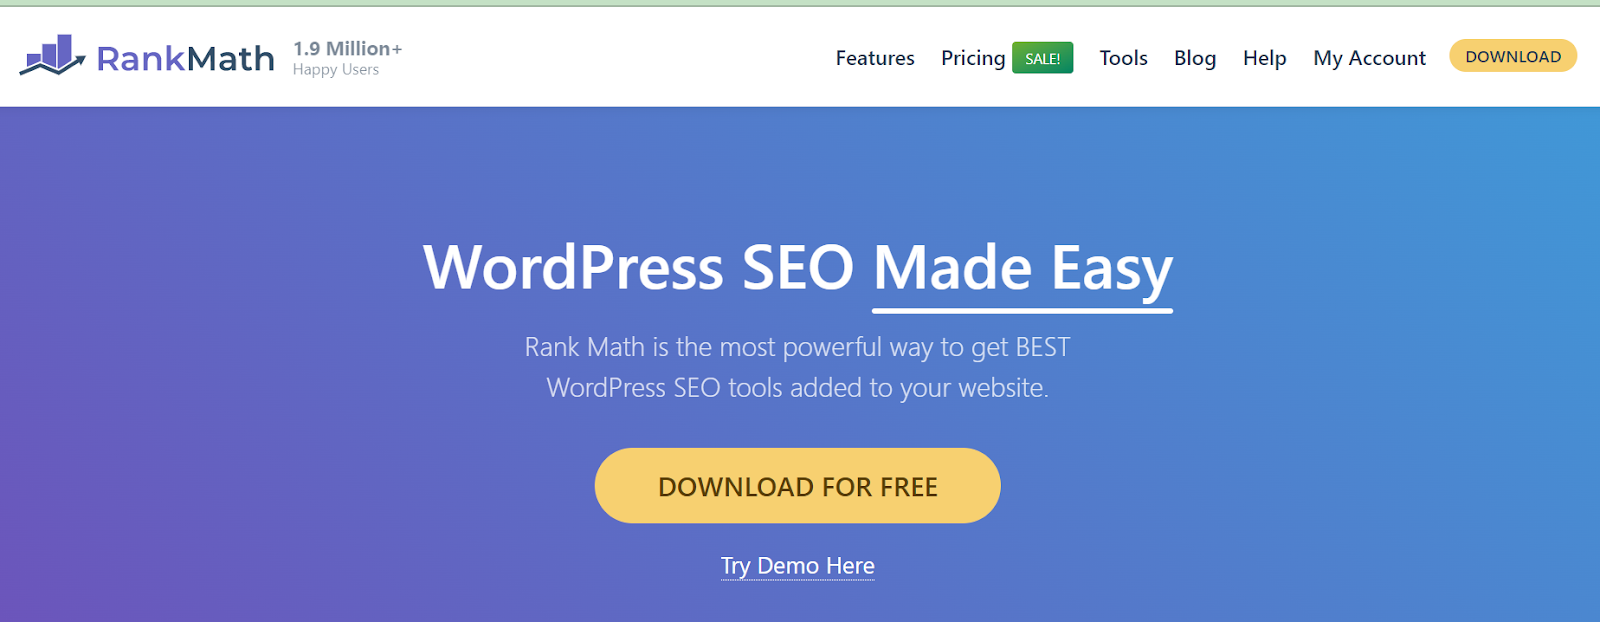
An SEO (Search Engine Optimization) plugin is essential for improving your website's online visibility and ranking. Yoast SEO, Rank Math, and All in One SEO Pack are the most popular and widely used SEO plugins.
- Security Plugin

WordPress sites are often vulnerable to hacking and security issues. To prevent such attacks and ensure website security, you need to install a security plugin such as Wordfence or iThemes Security.
- Contact Form Plugin

A contact form is a must-have feature for any website as it provides an easy way for visitors to get in touch with you. Popular contact form plugins include Contact Form 7 and WPForms.
- Performance Optimization Plugin
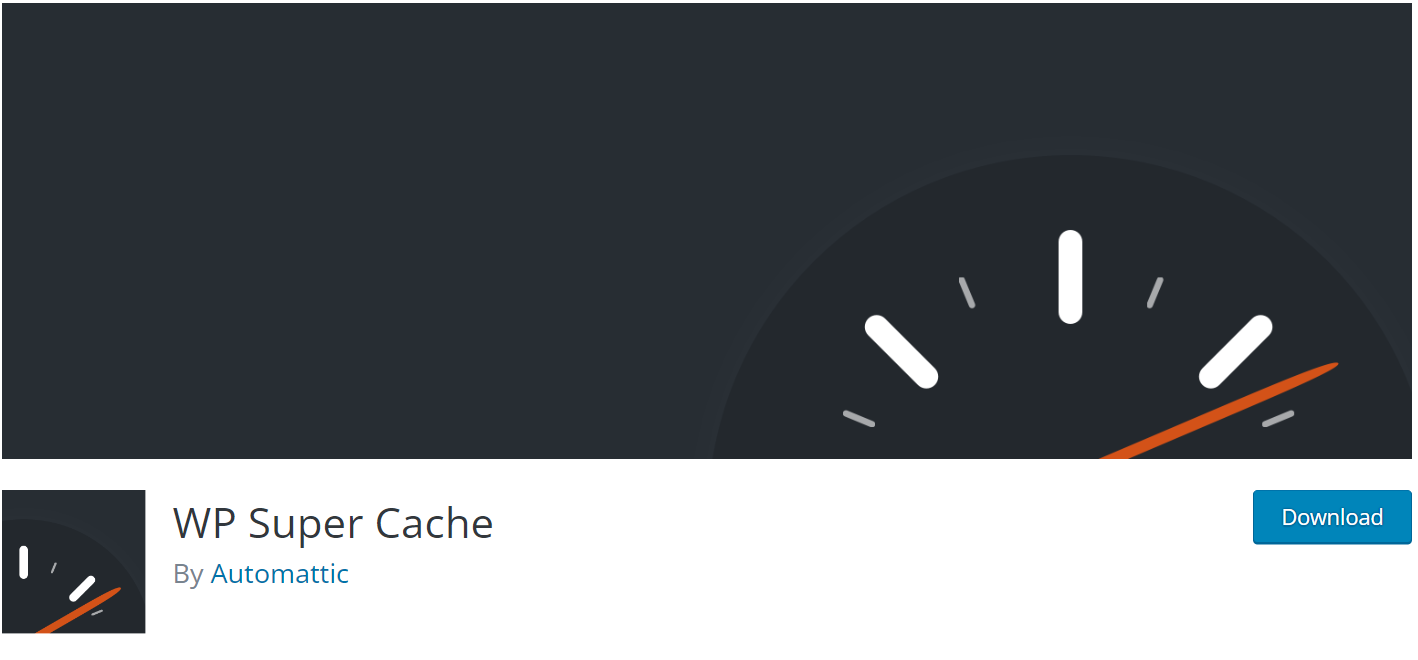
A performance optimization plugin can help you boost your site's speed and performance. W3 Total Cache and WP Super Cache are popular plugins to optimize the site's performance.
After installing these plugins, make sure to configure their settings properly. Each plugin has its own settings page where you can configure how they work.
For example, in the Yoast SEO plugin, you can set up search engine-friendly titles and descriptions for your pages and posts. In the iThemes Security plugin, you can enable settings such as Two-Factor Authentication to enhance your site's security.
8. Creating a Contact Form and Adding It to Your Website
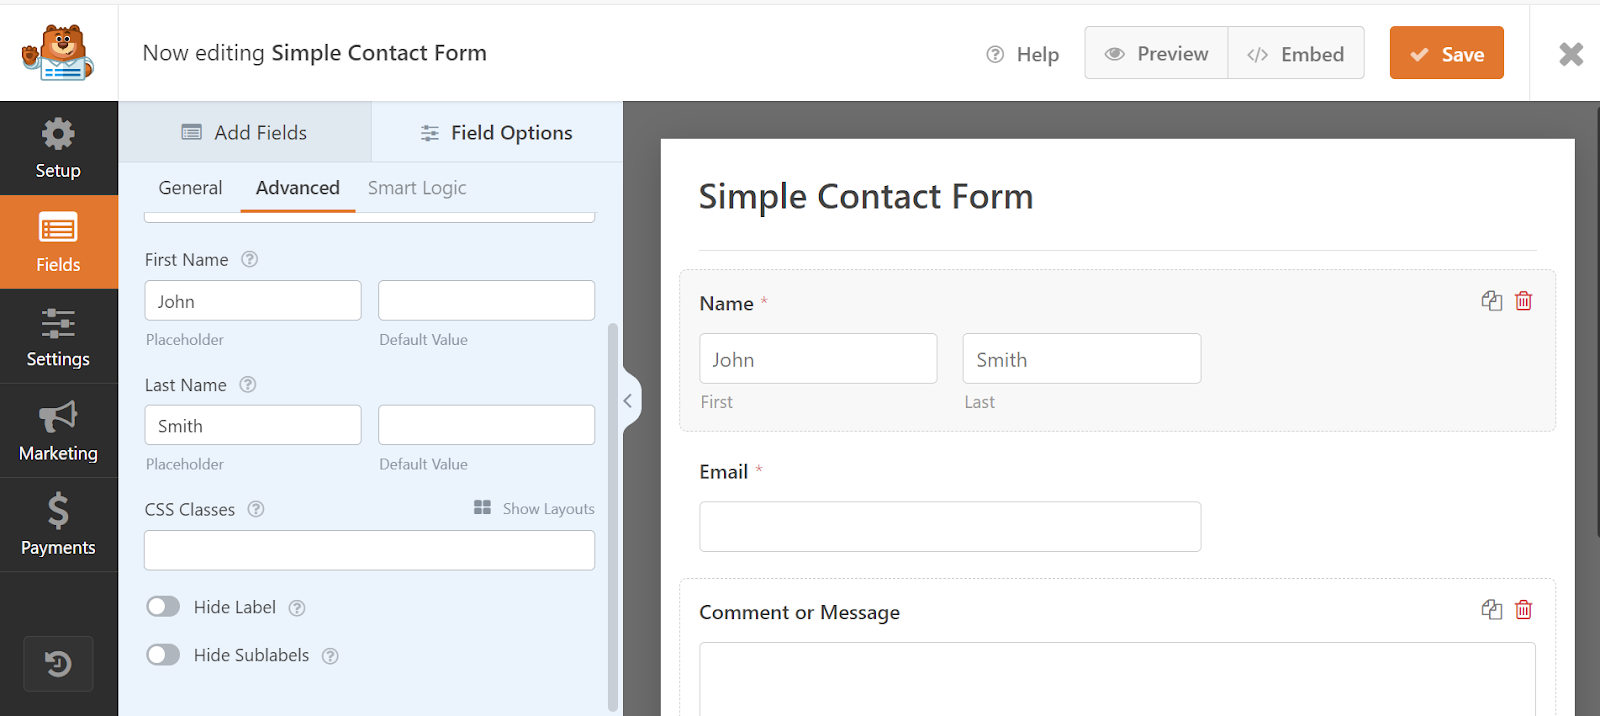
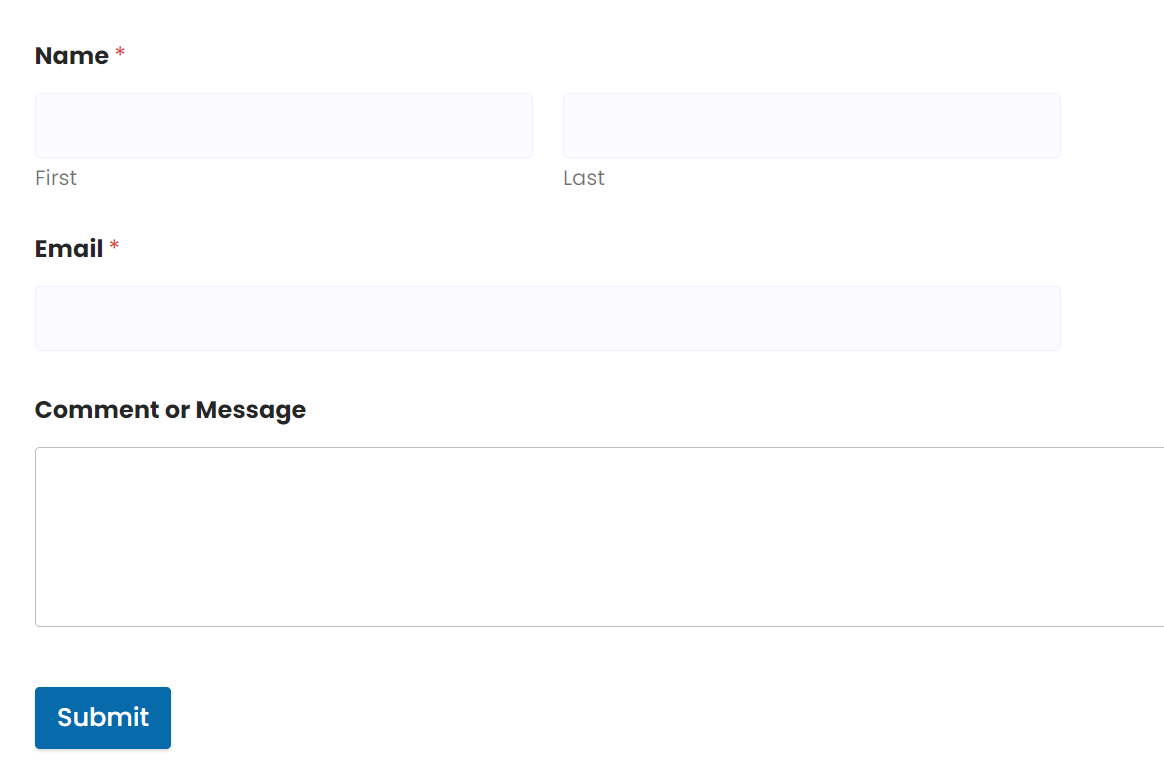
To create a contact form, install a contact form plugin such as WPForms. Once you've installed and activated the plugin, go to the plugin's settings page and create a new form.

Add the necessary fields, such as name, email, and message, and customize the form's style and layout according to your preference.
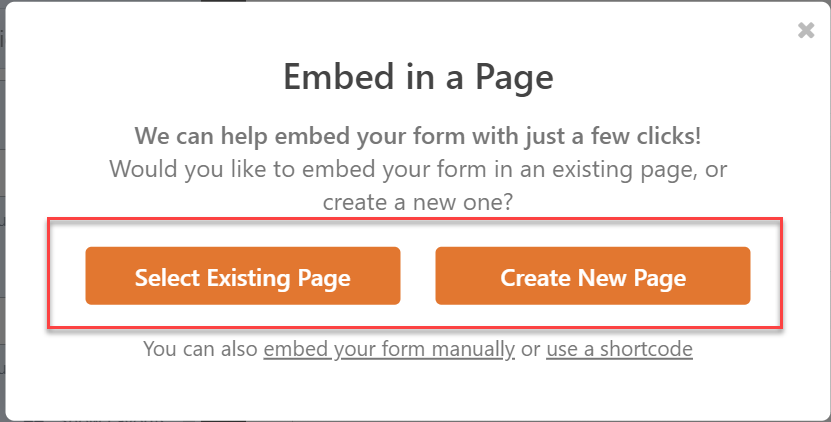
Once you've created the form, copy the shortcode provided by the plugin. Next, create a new page or post where you want to add the contact form. In the page or post editor, add the shortcode wherever you want the form to appear.
When visitors fill out the contact form, the plugin will send the message directly to your email address.
With these plugins, you can optimize your site for search engines, improve its security, add a contact form, and optimize your site's performance.
9. Creating Content for Your Website
Creating content is the backbone of any successful website. Content is what informs, educates, and engages visitors to your website.
Use the WordPress editor to format and optimize your blog posts, create essential pages such as About and Services, and add multimedia elements to engage your visitors.
- Writing and Publishing Blog Posts
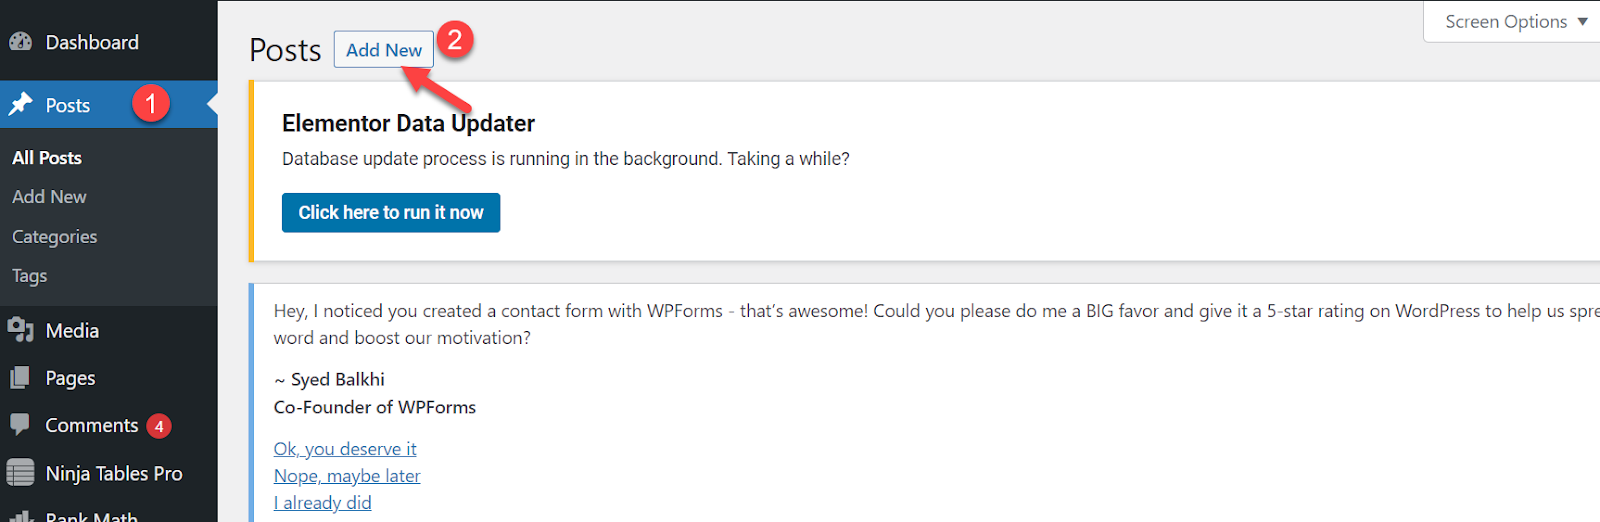
To write a blog post and publish it on your newly built website, log into your WordPress dashboard. Navigate to the left-hand side menu and click on "Posts," then click "Add New."
This brings up the WordPress Editor. Here, you can type in your blog post's title and main content. The title goes in the field at the top, and the body of your post goes in the larger text area below.

- Formatting and Optimizing Your Content
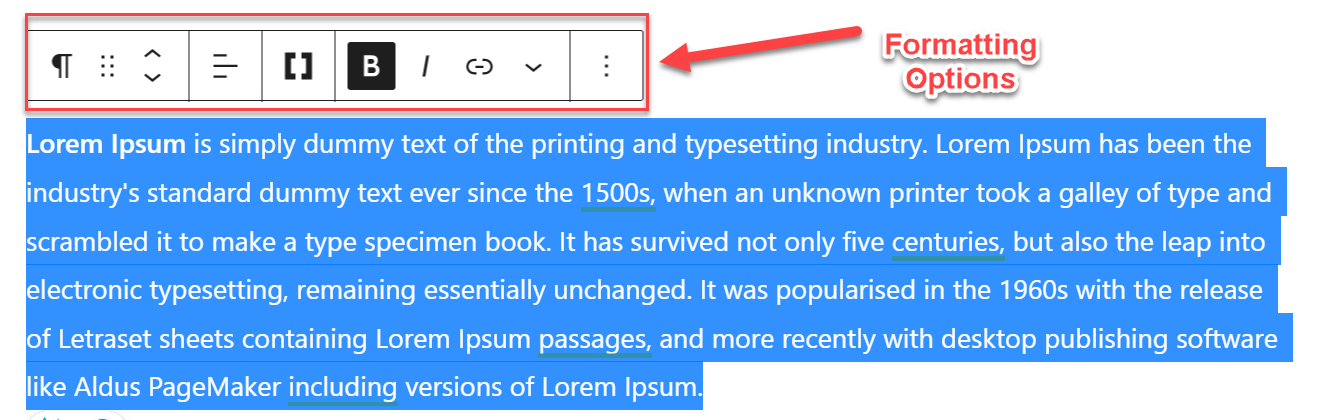
The WordPress editor works much like a typical word processor. Highlight the text to see options for formatting like bold, italic, underline, and more. You can also insert lists, quotes, and hyperlinks.
Use headings to break up your content. You can select different heading sizes from the toolbar at the top of the editor. The title of your post is typically Heading 1 (H1), so start your post with Heading 2 (H2), and use Heading 3 (H3) for sub-points under an H2 heading.
Add images and multimedia by clicking on the "+" button above the editor. This will allow you to upload images, audio files, or videos to include in your post.

To optimize your blog post for search engines, you can use the "Yoast SEO" plugin for WordPress. This allows you to add a meta description, focus keywords, and optimize your post for readability and SEO.
10. Building Essential Website Pages
From your WordPress dashboard, go to "Pages," then click "Add New." Title this page as "About."
In the editor, write about your business, team, history, or any other information that you feel is relevant to your visitors. This is your chance to share your story and create a connection with your audience. Don't forget to click "Publish" when you're done.
- Developing a Services or Products Page
Just like with the About page, navigate to "Pages," then click "Add New." Title the page as "Services" or "Products," depending on what you're offering.
Detail the services or products you offer. Include prices if appropriate. Consider including high-quality images or videos of your products/services. Click "Publish" when you're done.
11. Adding Multimedia Elements
From the WordPress editor, click on the "Add Media" button. A window will open, allowing you to select files from your computer to upload. You can select multiple files at once by holding down the Control (or Command on Mac) key as you click on each file.
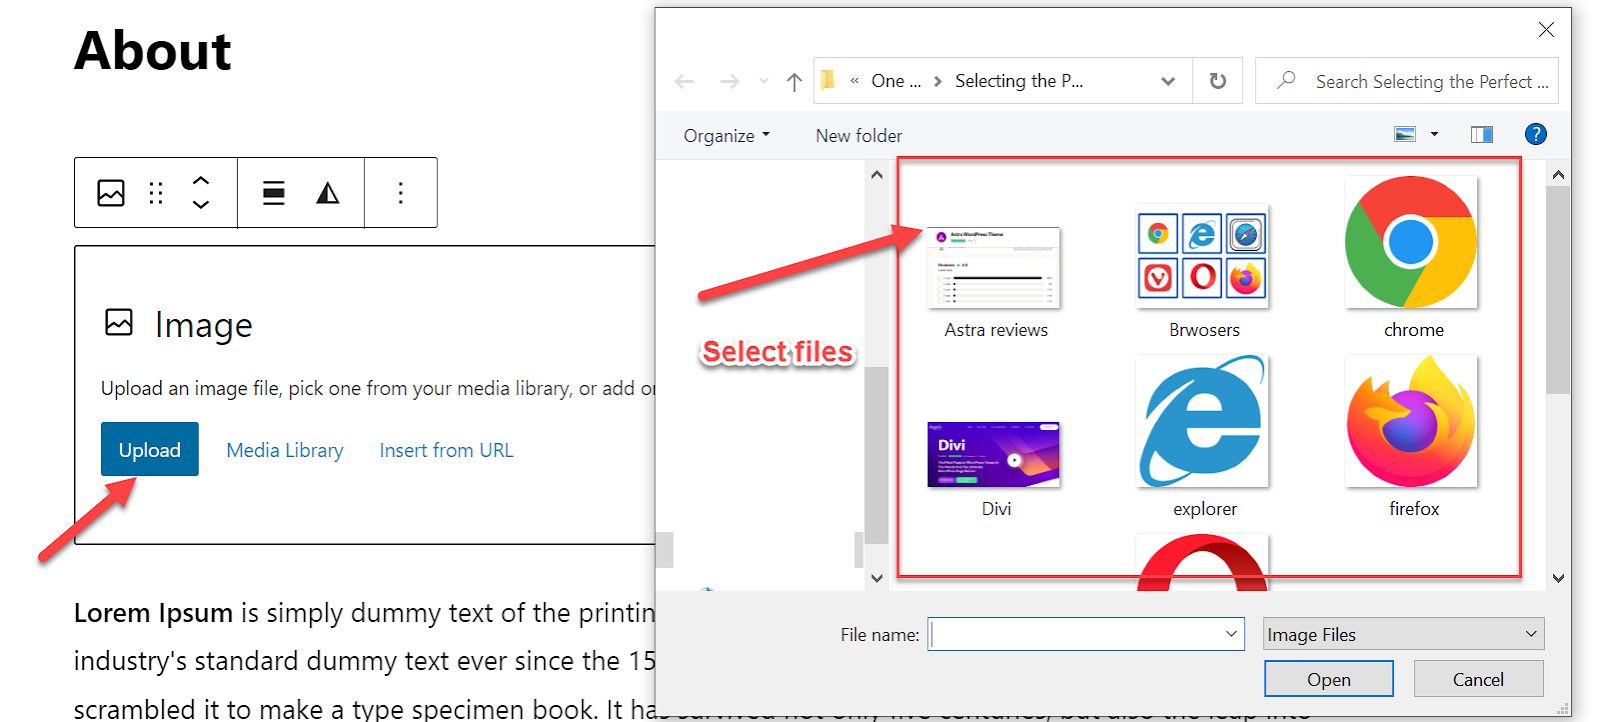
Once the files are uploaded, you can add them to your post or page. You can also add alt text to images, which is a brief description that helps with SEO and accessibility.

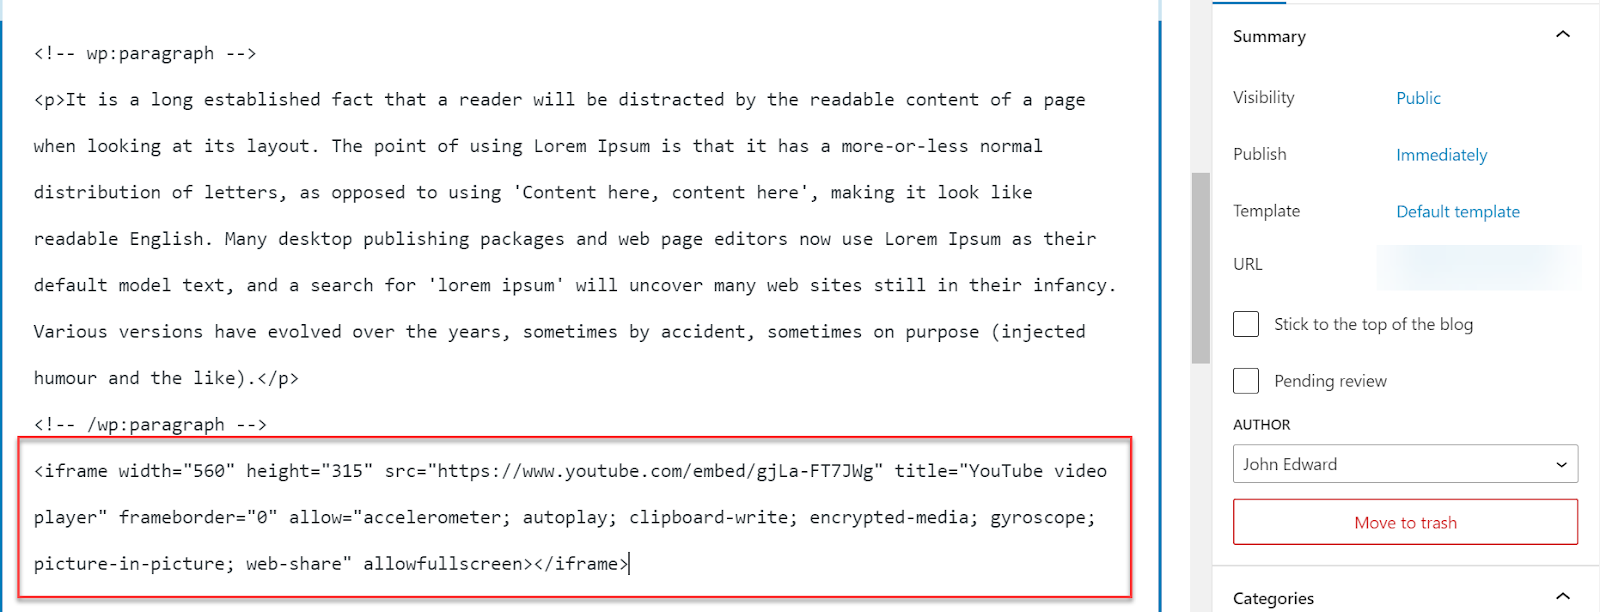
- Embedding External Content (e.g., YouTube videos)
To embed a YouTube video, navigate to the video on YouTube, click "Share" under the video, then click "Embed." Copy the embed code provided.
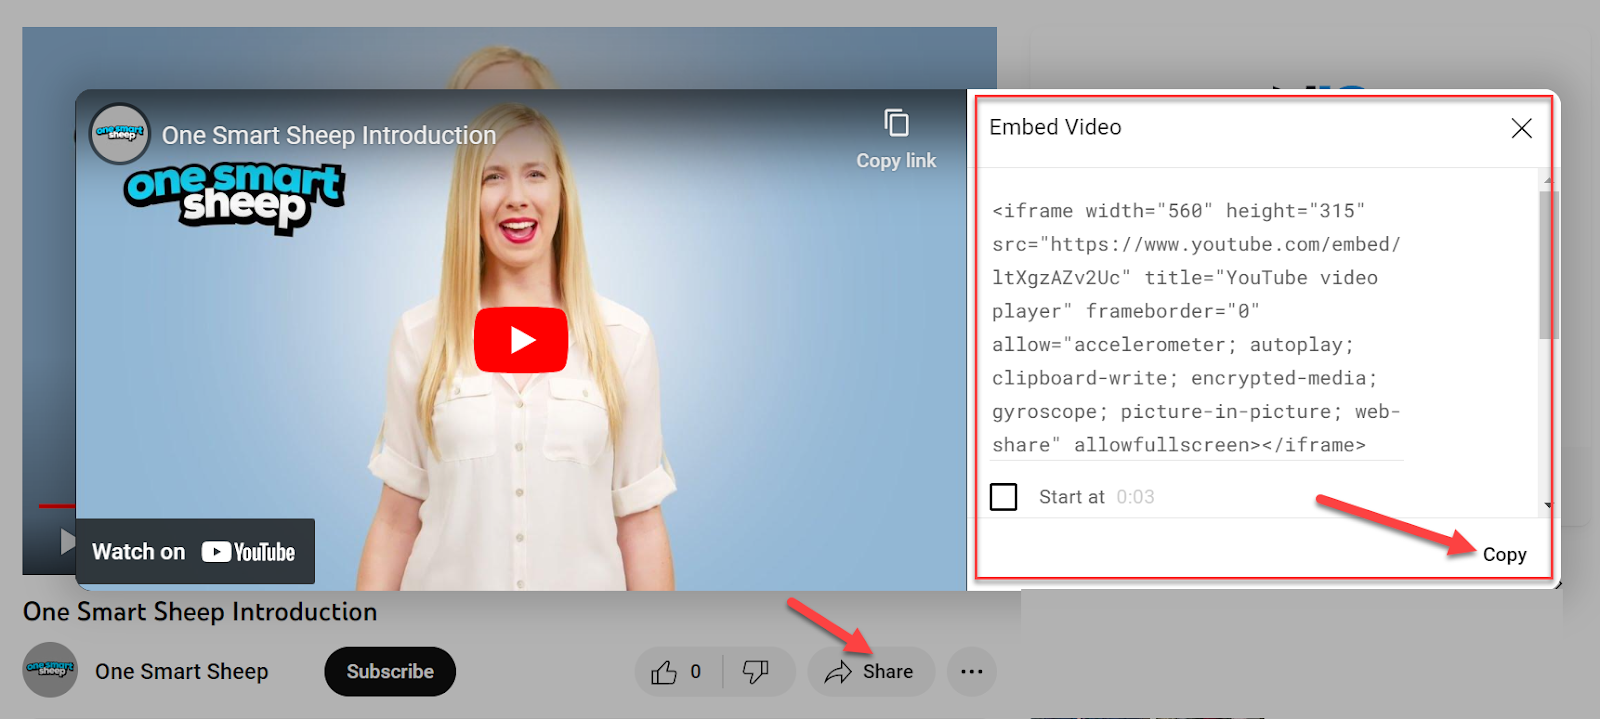
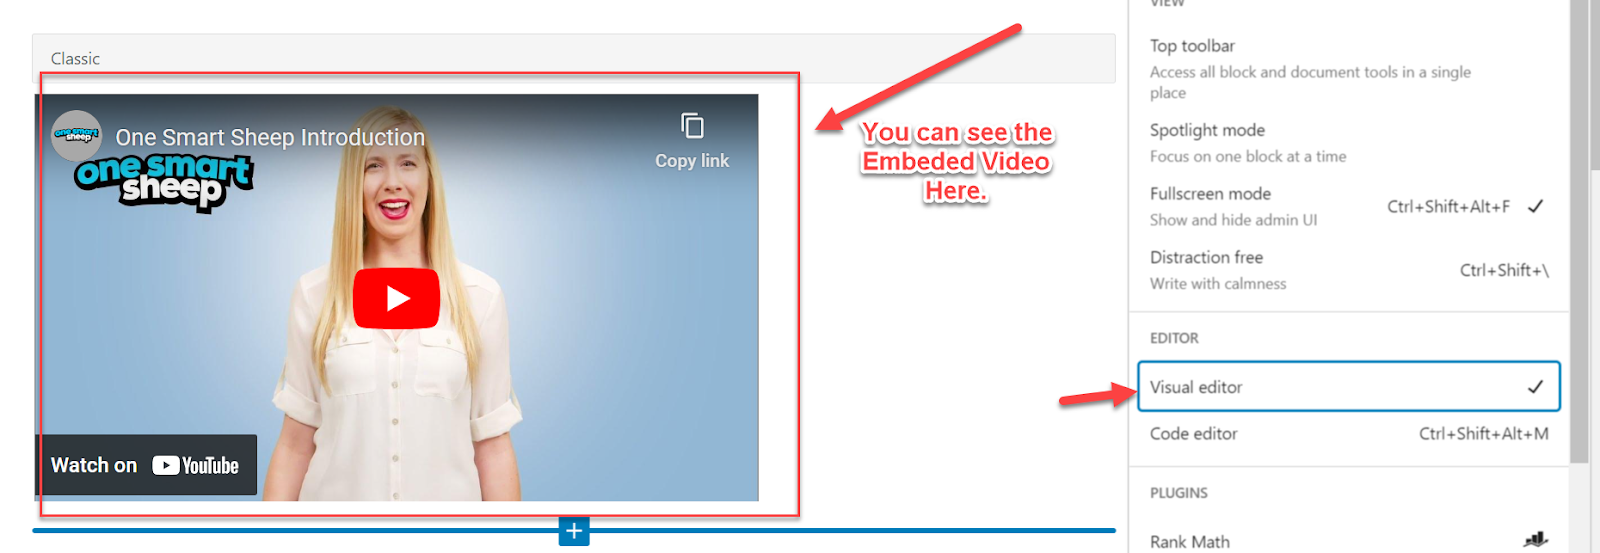
In the WordPress editor, switch to the "Code Editor" view (found in the top right of the editor).

Paste the embed code where you want the video to appear in your post.
Switch back to the "Visual Editor" view to see the video embedded in your post.
Remember, creating engaging and valuable content is key to the success of your website. WordPress makes it easy to add, format, and optimize this content.
12. Optimizing Your Website for Search Engines
Keyword research tools can help you find the right keywords that your potential customers are using. Here are the steps to use a tool like Google Keyword Planner:
Log in to Google Ads and navigate to the Keyword Planner under the "Tools & Settings" menu.

Click on "Discover New Keywords." Here, you can enter words, phrases, or a URL related to your business.

Click "Get Results.".
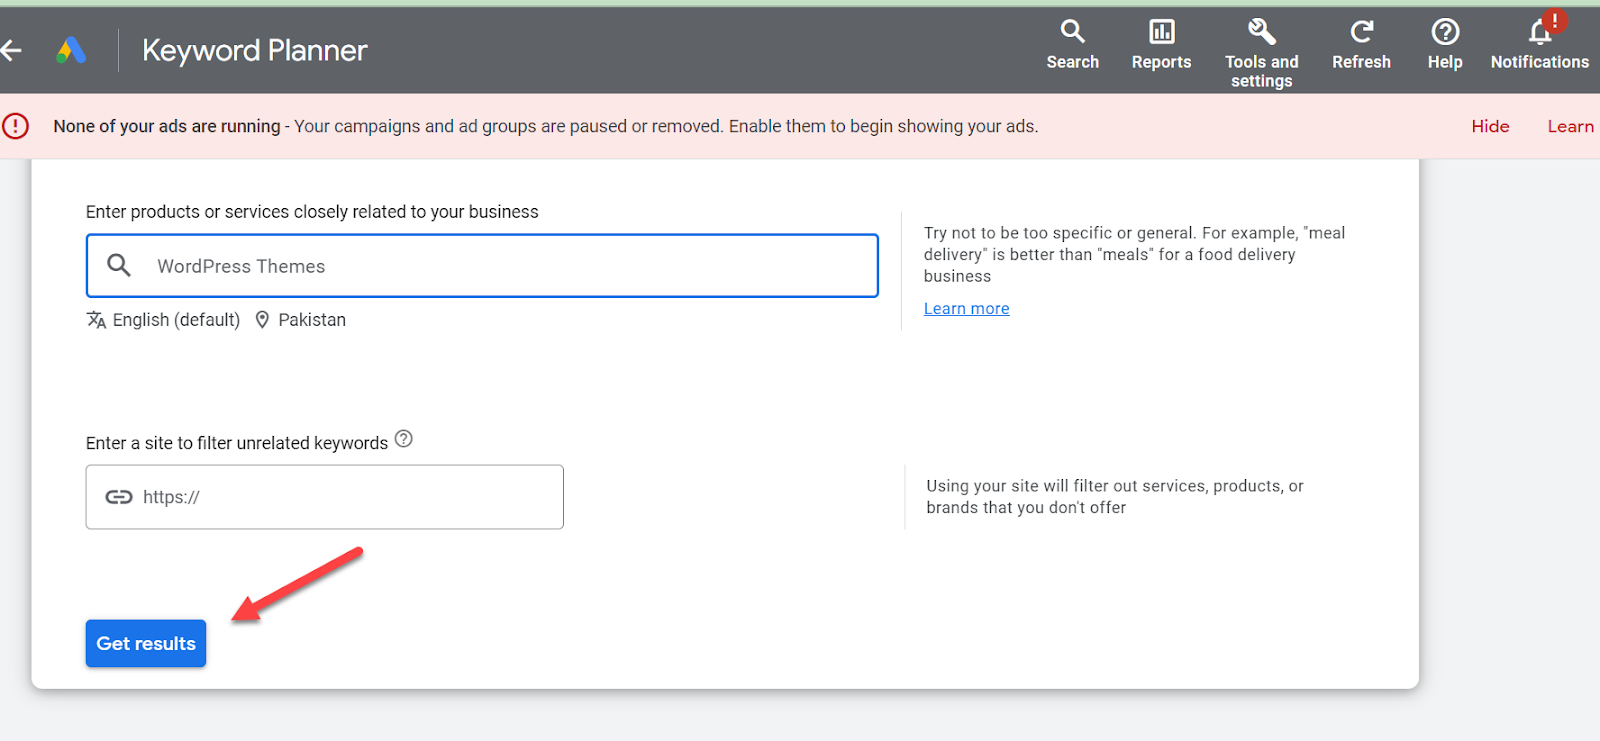
You'll see a list of keyword ideas along with information about competition and average monthly searches.

Ahrefs is another powerful tool that offers a variety of features to help with improving your website's SEO. One of its most popular features is keyword research, which can help you identify relevant keywords for your website and content.
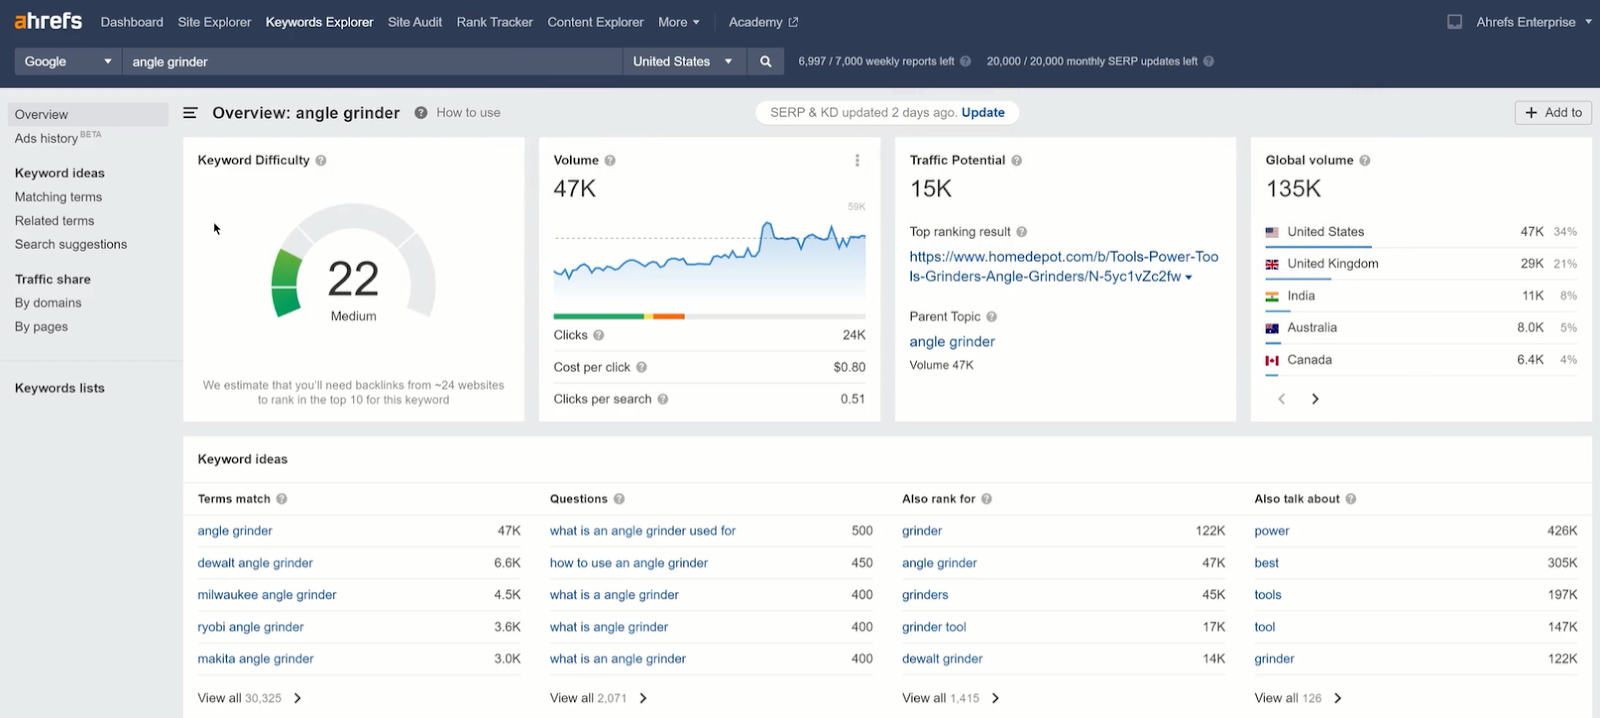
After conducting keyword research, you should have a list of potential keywords. Your target keywords should be relevant to your content, have a decent amount of search volume, and, ideally, have low competition.
- Implementing On-Page SEO Techniques
Title tags and meta descriptions are key elements of SEO. Here's how to optimize them using Yoast SEO plugin in WordPress: In the WordPress editor, scroll down to the Yoast SEO meta box below the main content area.
Click on "Edit Snippet." Here, you can edit the SEO title and meta description.
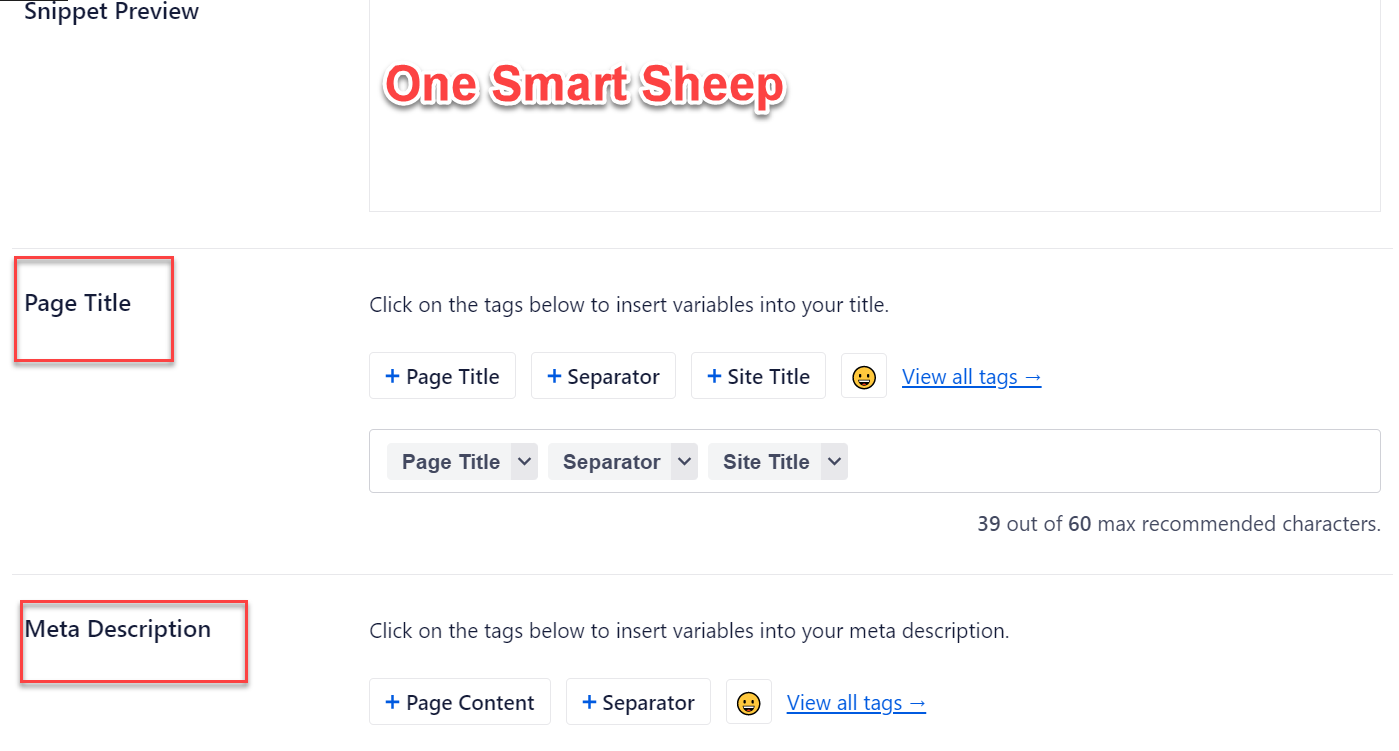
The SEO title should include your target keyword and should be compelling. The meta description should also include your target keyword and give a brief overview of the content.
For example, for a blog post about WordPress Themes, the SEO title could be "Best WordPress Themes of All Time," and the meta description could be "Discover the best WordPress theme provider for your website needs. Our extensive collection of themes ensures your site's unique and professional look."
- Creating SEO-Friendly URLs
SEO-friendly URLs should be easy to read, relevant to the content, and include your target keyword. In WordPress, you can edit the URL slug in the Yoast SEO meta box.
For example, the URL for the Best WordPress Themes blog post could be:
"www.onesmartsheep.com/best-wordpress-theems.”
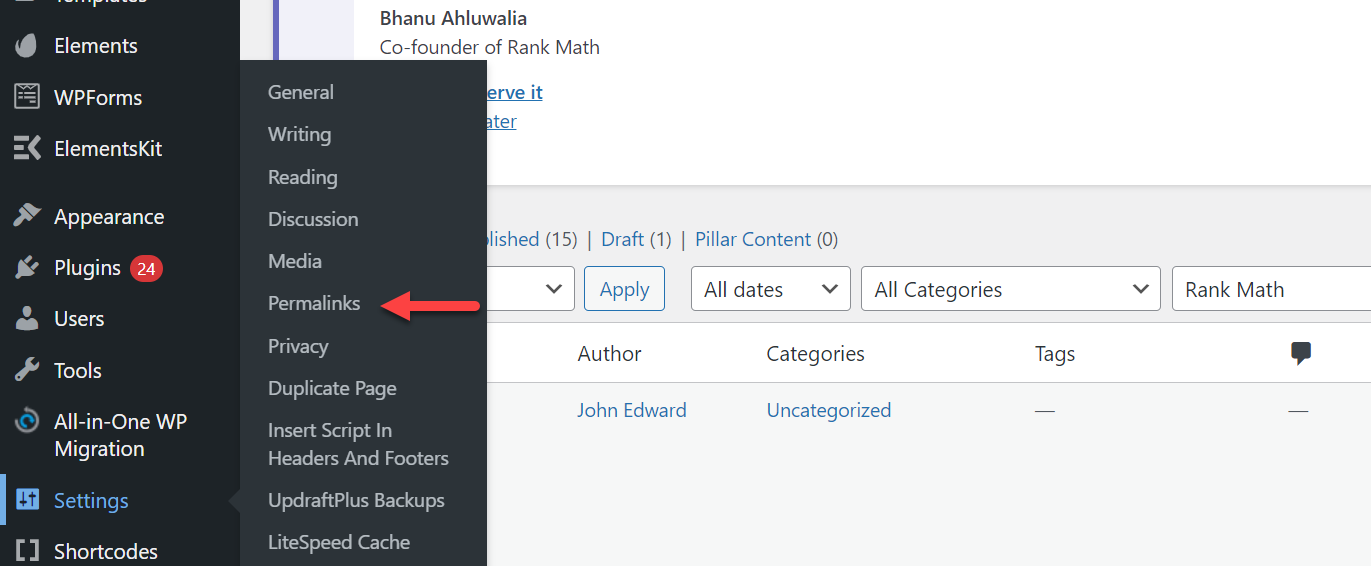
In case of any issues with your WordPress Permalinks URLs, we suggest taking a look at this article, as it provides comprehensive guidelines on how to fix them effortlessly.
The article covers the common problems related to Permalinks and offers detailed instructions to resolve them effectively.
- Using Header Tags and Optimizing Images
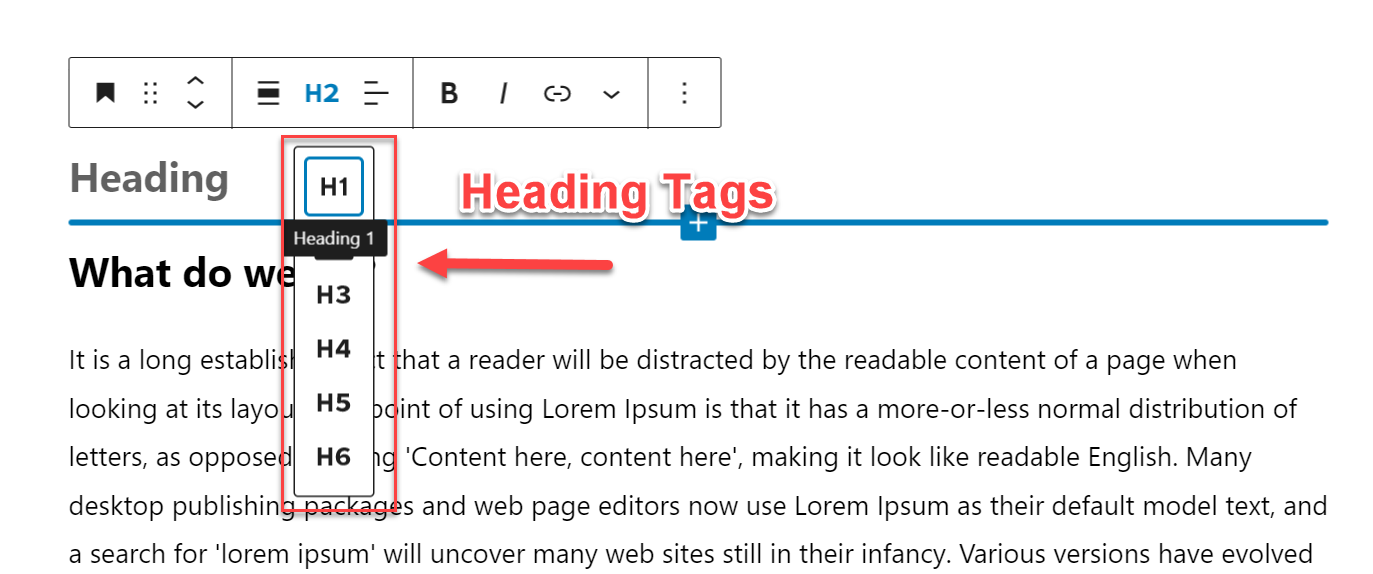
Header tags (H1, H2, H3, etc.) help organize your content and make it easier for search engines to understand. Your H1 tag should include your target keyword, and there should only be one H1 tag per page.
H2 and H3 tags can be used for subheadings and should also include relevant keywords where possible.
For image optimization:
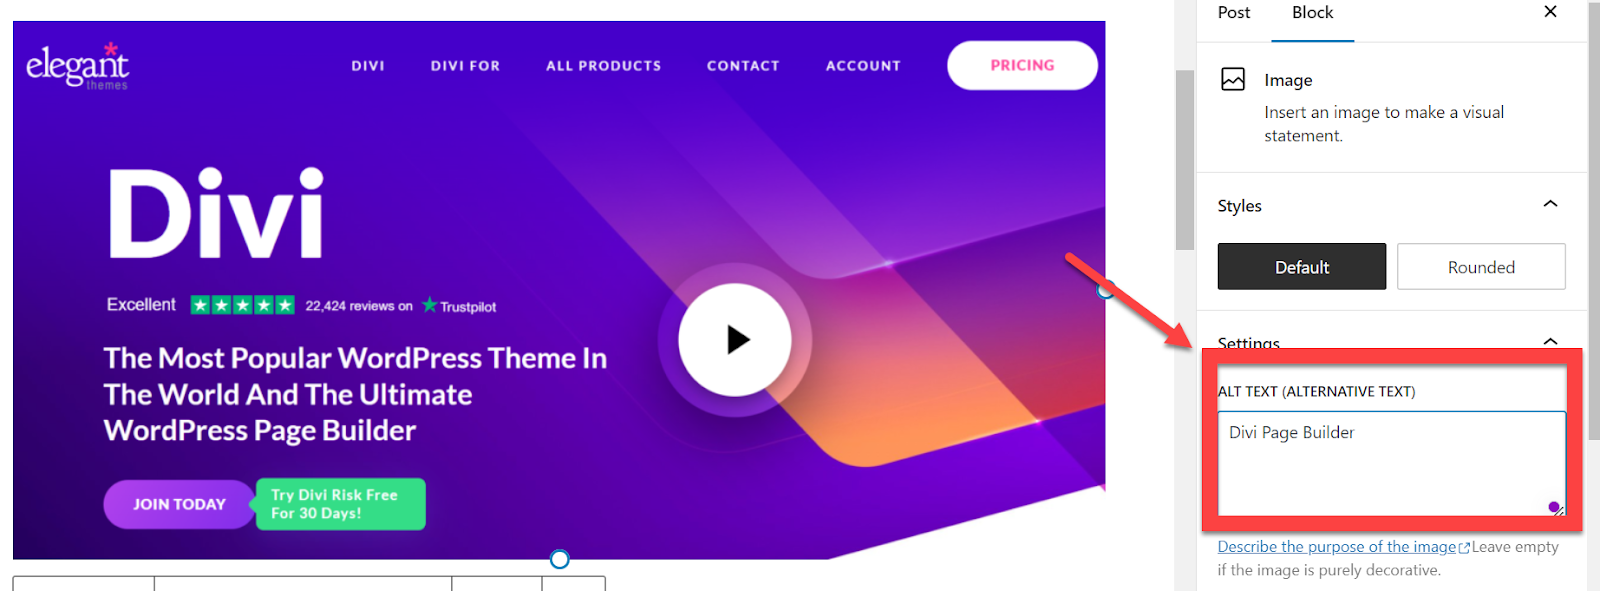
Use the "alt text" field to describe the image and include your target keyword where relevant.
The file name of the image should also be descriptive. For example, instead of "IMG_1234.jpg", rename the image to something like "Astra.jpg."
Try to keep the file size of the image as small as possible without sacrificing quality. Large images can slow down your site, which can negatively impact SEO.
13. Ensuring Website Security and Performance
Website security and performance are vital for enhancing your website's credibility and user experience. Here are some essential tips and techniques for ensuring website security and performance:
- Regularly Updating WordPress, Themes, and Plugins
Regularly updating your WordPress core, themes, and plugins is a crucial step for maintaining website security and performance. These updates often contain security patches, bug fixes, and new features that improve your site's functionality.
- Setting up Automatic Backups
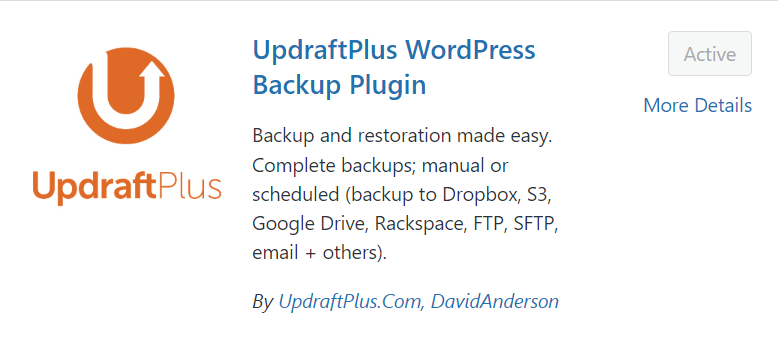
Regular backups help you restore your website in case of a security breach or data loss. Set up automatic backups to ensure that your website's data is safe and secure. You can use plugins like UpdraftPlus or Jetpack to schedule regular backups to a remote location.
- Implementing Website Security Best Practices
Implementing website security best practices can dramatically reduce the chances of a security breach.
The use of an SSL certificate is one of the best practices. An SSL (Secure Sockets Layer) certificate encrypts the connection between your website and the user's browser, ensuring that any sensitive information transmitted is secure.
Installing an SSL certificate is quick and easy, and it greatly enhances your website's security.

Another best practice is the use of two-factor authentication. It adds an extra layer of security to your website.
Instead of relying solely on a password, two-factor authentication requires a secondary authentication method, such as a code sent to your phone or a biometric scan. This greatly reduces the chances of unauthorized access to your website.
- Monitoring Website Performance and Optimizing for Speed
Monitoring your website's performance and optimizing for speed can improve user experience and website ranking.
Tools like Google PageSpeed Insights, GTmetrix, and Pingdom can help you monitor your website's performance and identify bottlenecks that need optimization.

There are several website speed optimization techniques that you can implement to improve your website's speed, such as:
- Minimizing HTTP requests
- Optimizing images and videos
- Enabling browser caching
- Minifying CSS and JavaScript files
- Using a content delivery network (CDN)
Wrapping Up
As we move towards 2023, creating a website is easier than ever before. With the growing number of website builders and content management systems, including WordPress, anyone can create a website in a matter of hours.
This guide has outlined the essential steps to create a WordPress website that is professional, attractive, secure, and performs well.
With the right domain name, hosting plan, theme, and essential plugins, you are off to a great start. Creating high-quality content and optimizing your website for search engines and performance helps attract and retain visitors, boosting your online presence.
Remember, creating a website takes time and effort and requires patience and persistence. Staying up-to-date with the latest web design trends, techniques, and best practices can push your website further and improve user experience.
With this guide, you have everything you need to get started on creating a website that is tailored to meet your specific needs. As we look forward to 2023, there's no better time than now to begin building your online presence, and it all starts with establishing your website.
So, go forth and create an online presence that showcases your talent, reaches your audience, and achieves your goals.


.svg)