


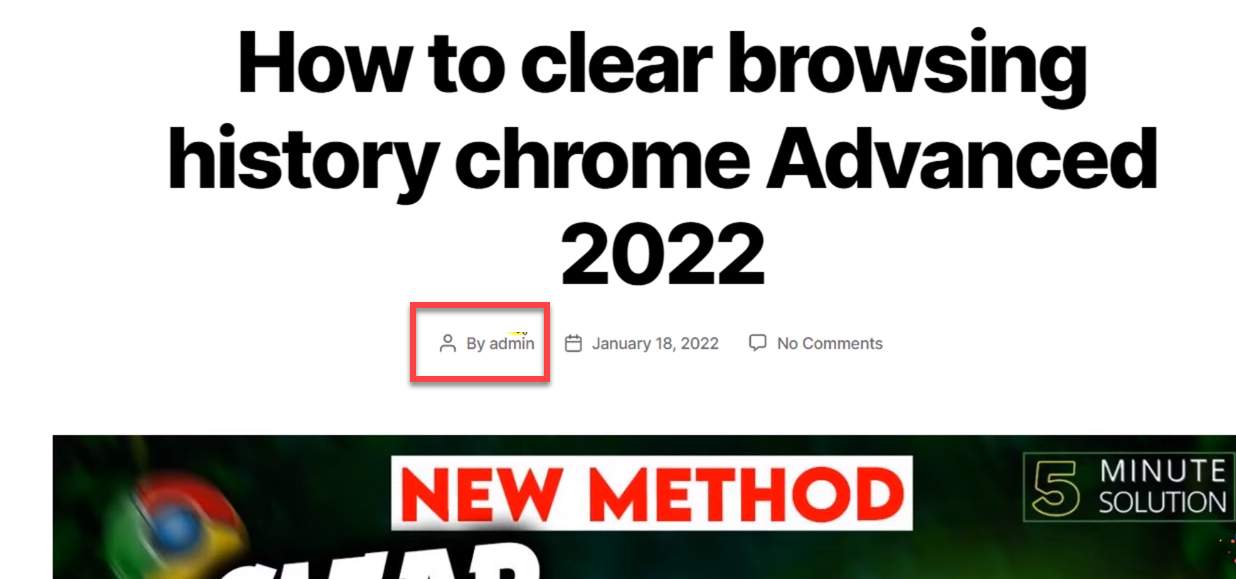
Are you looking to learn how to hide author name in WordPress posts? Many website owners do it for privacy, handling many writers, keeping a consistent brand style, or just wanting a neat website look. It's a common need.
By default, WordPress does not provide an out-of-the-box option to remove or hide the author's name from posts. The display of the author’s name is a theme feature, and most themes are designed to show authorship as it's a part of the standard post metadata.
In this guide, you will learn how to hide author name in WordPress posts using four different methods:
- Hide WordPress author using plugins
- Remove author from WordPress schema markup
- Substitute with a generic author name in WordPress
- Conceal author name in WordPress with CSS
Explore our in-depth guide to mastering the nuances of how to hide author name in WordPress post, ensuring your WordPress content maintains your desired privacy and professional appearance.
Since there are quite a few ways to hide the author's name in WordPress, we've found 4 different methods you go with. Each of the methods has been explained in a step-by-step manner so you can easily follow the guide and hide your own author name.
Method 1: Steps to Remove Author from WordPress Posts Using a Plugin
Hiding the author's name using a WordPress plugin is crucial for protecting privacy and maintaining a clean, professional site layout. It automates the process, saving time and avoiding manual errors.
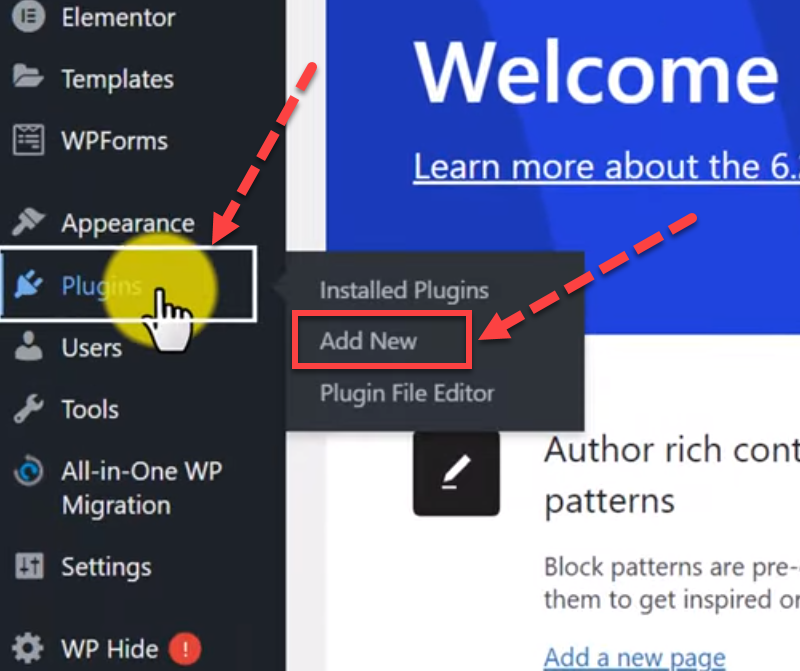
Step 1: Install and Activate Plugin
Upon logging into the WordPress admin page to reach the dashboard, navigate to the plugin section located beneath the appearance option.
Subsequently, a pop-up will appear, showcasing installed plugins and an 'Add New' option. Click on 'Add New' to commence the installation of a new plugin.
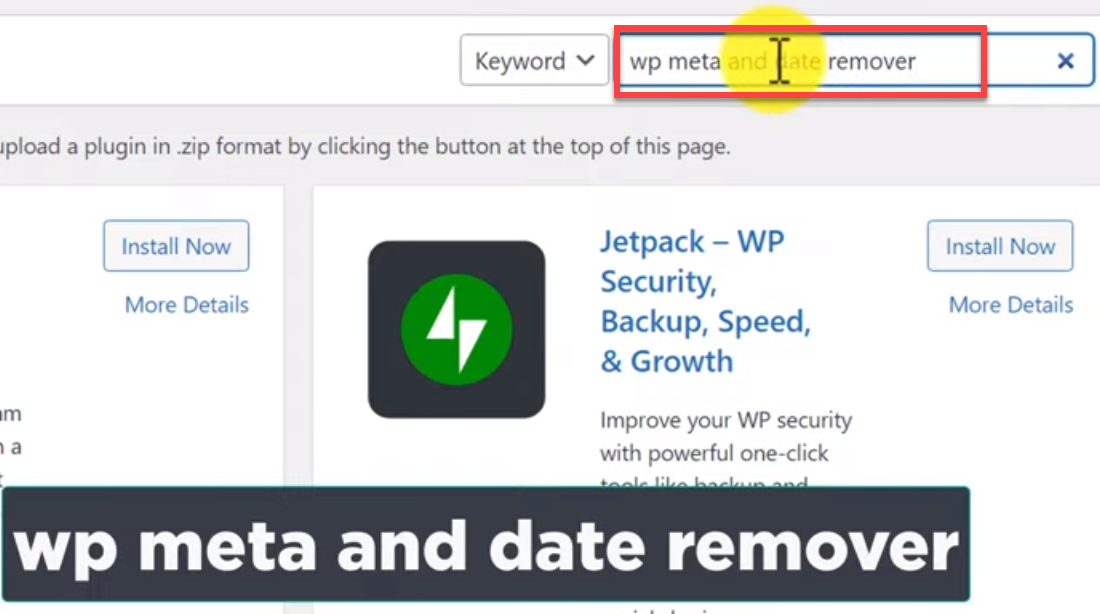
In the plugin search tab, initiate a query by clicking and typing 'wp meta and date remover.' Entering this keyword will generate a display of related plugins on your screen.
This search action will streamline the process, presenting you with plugins pertinent to how to hide author name in WordPress post and manipulating metadata.
Ensure to review the details and ratings of each plugin to select one that aptly suits your website's needs and is compatible with your version of WordPress.
Remember to always back up your site before installing a new plugin to safeguard against any unforeseen issues or data loss.
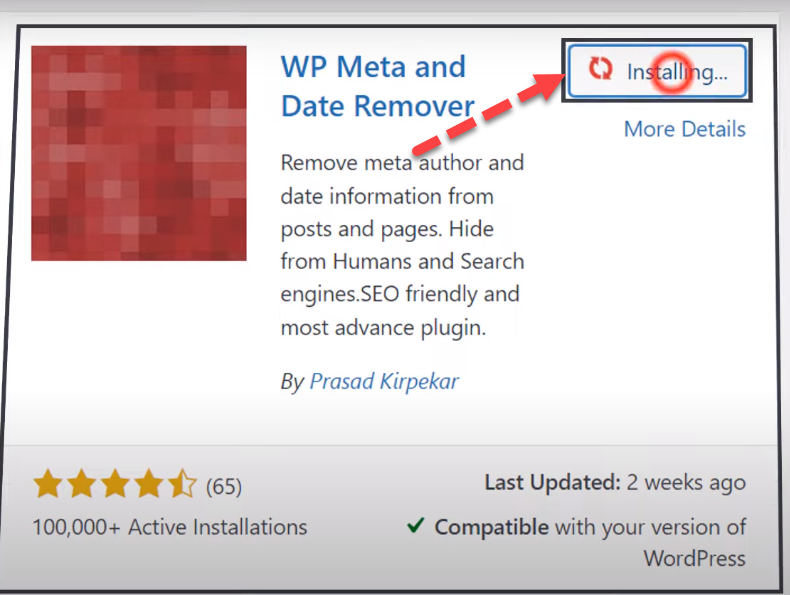
After typing into the search tab, 'WP Meta and Date Remover' should prominently appear as one of the initial results. Upon identifying the plugin, proceed by clicking on its 'Install Now' button.
The installation process will commence automatically, and you might need to wait a few moments for it to complete.
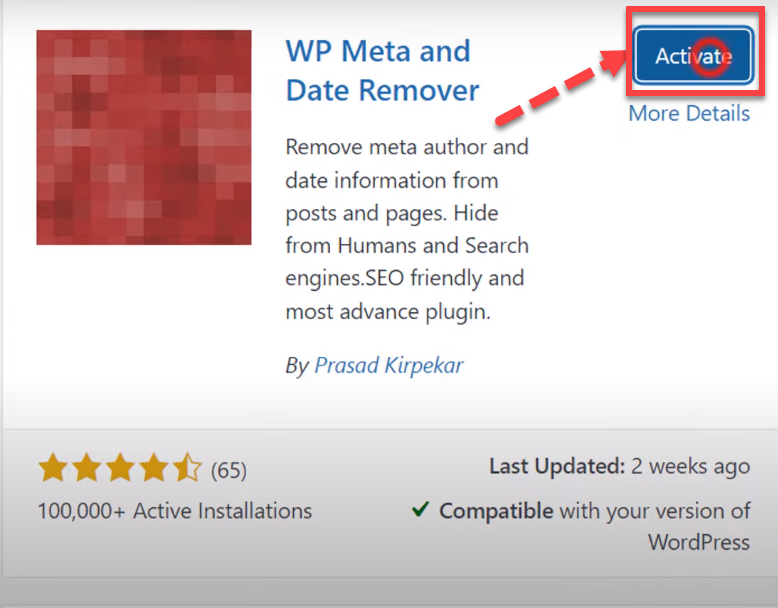
Once the installation has finished, an 'Activate' button will replace the installation one - be sure to click it in order to enable the plugin's functionality on your WordPress site.
Always check your website after activating a new plugin to ensure that it's functioning as anticipated and hasn't inadvertently disrupted other elements of your site.
Once the installation concludes, proceed to click on the 'Activate' button. Following activation, you can utilize this plugin to eliminate data, author names, and meta information from blog posts or any chosen articles.
The plugin provides functionality that enables you to selectively manage and control the visibility of these elements across your WordPress content, ensuring a cleaner and more customized appearance for your readers.
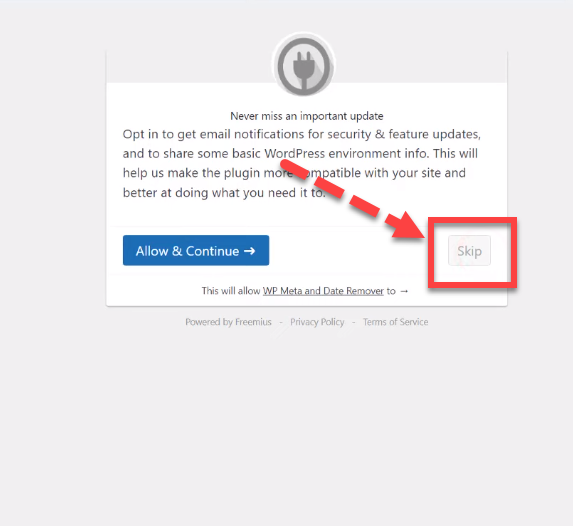
Step 2: Security Features and Updates
In the subsequent step, following the activation of the plugin, you'll encounter a pop-up providing messages regarding security and feature updates.
The recommended action at this juncture is to bypass this step. Consequently, click on the 'Skip' button to proceed without engaging with these notifications.
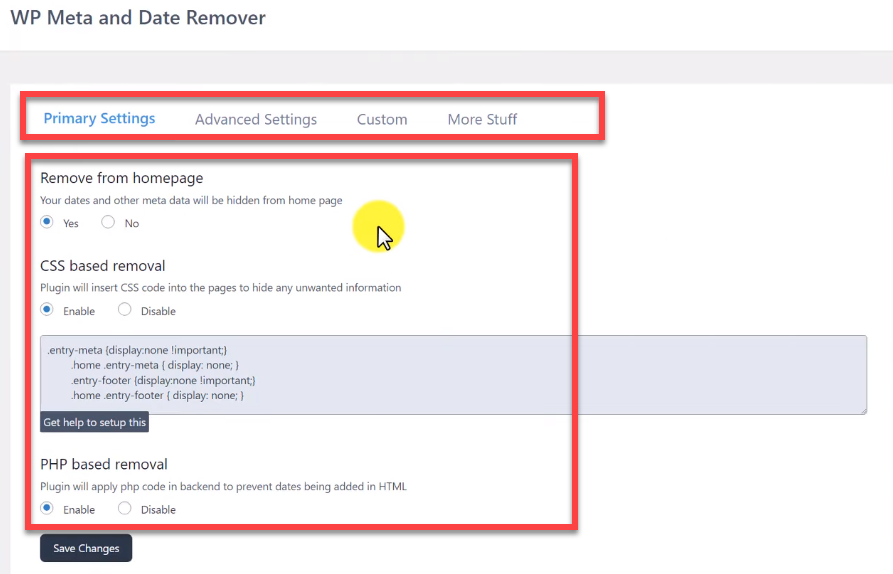
Step 3: Do Setting for the Plugin
Now, it's time to configure the primary settings for the 'WP Meta and Date Remover' plugin. This allows you to manage the removal of specific pages from the homepage.
Additionally, through these initial settings, you can govern CSS-based removals and also establish PHP-based removal settings.
By tailoring these configurations, you gain more control over how and where metadata and date information are displayed or hidden across your website.
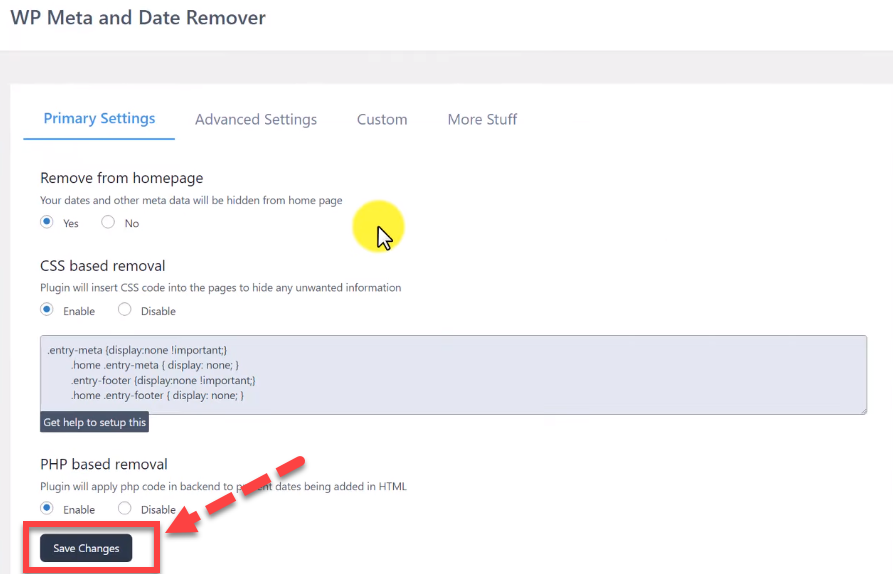
Step 4: Click on Save Changes
Once you've tailored all settings according to your preferences, ensure to click on 'Save Changes' to preserve and implement your configurations.
Method 2: Steps to WordPress Hide Author from Posts Using Schema Markup
Removing the author name from WordPress schema markup is essential for SEO and privacy. It prevents search engines from displaying unwanted author information, enhancing content focus and security.
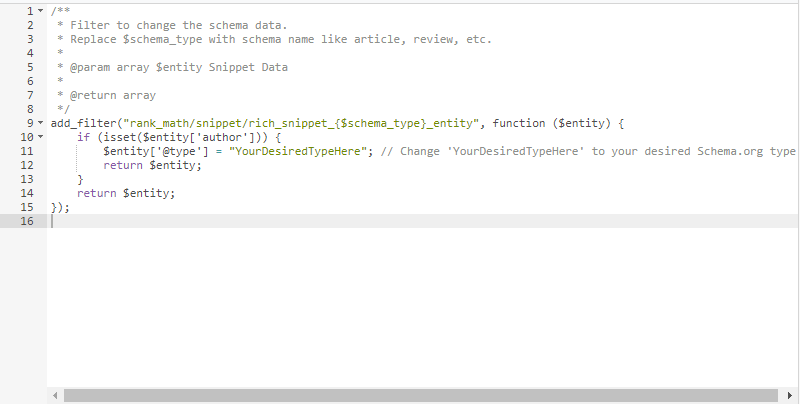
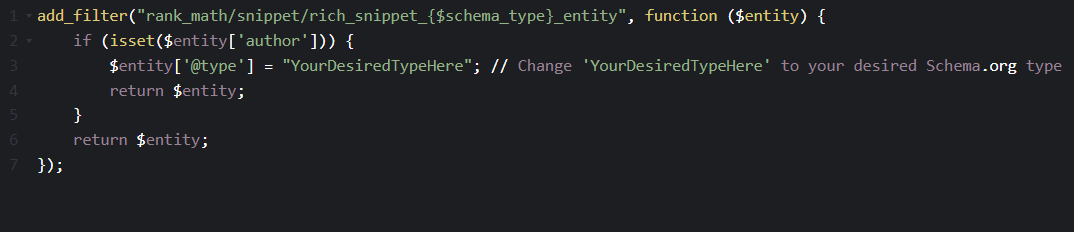
Step 1: Use a Filter to Remove the Author Schema
To eliminate the author's name from a blog post or article, employing a filter is requisite. Utilizing a filter involves inserting a specific code snippet into your theme's function.php file.
This method is another effective way how to hide author name in WordPress posts without relying on plugins.
Always ensure to back up your website and test on a staging environment, if possible, before modifying theme files to prevent any potential issues.
/**
* Filter to change the schema data.
* Replace $schema_type with schema name like article, review, etc.
*
* @param array $entity Snippet Data
*
* @return array
*/
add_filter("rank_math/snippet/rich_snippet_{$schema_type}_entity", function ($entity) {
if (isset($entity['author'])) {
$entity['@type'] = "YourDesiredTypeHere"; // Change 'YourDesiredTypeHere' to your desired Schema.org type
return $entity;
}
return $entity;
});
This code will instruct WordPress to obfuscate or remove the author details from specified posts or articles, ensuring that the authorship information is not visible to your website's visitors.
Step 2: Change the schema_type to the Object Type
It's crucial to comprehend that adjusting the schema type to the object type you aim to modify is a pivotal step. The schema type essentially guides how your data is interpreted and displayed in various contexts, like search engine results.
Therefore, ensuring that you select and apply the correct object type is vital to accurately reflecting your data and maintaining a coherent structure in your content and SEO efforts.
add_filter("rank_math/snippet/rich_snippet_{$schema_type}_entity", function ($entity) {
if (isset($entity['author'])) {
$entity['@type'] = "YourDesiredTypeHere"; // Change 'YourDesiredTypeHere' to your desired Schema.org type
return $entity;
}
return $entity;
});
When you change the schema type to a different object type, you're altering the manner in which the related data is treated and presented.
Method 3: How WordPress Remove Author Name Using a Generic Author Name
Using a generic author name in WordPress helps maintain anonymity and uniformity across posts. It's an easy, effective method to hide individual identities, ensuring content speaks for itself and supports a consistent brand voice.
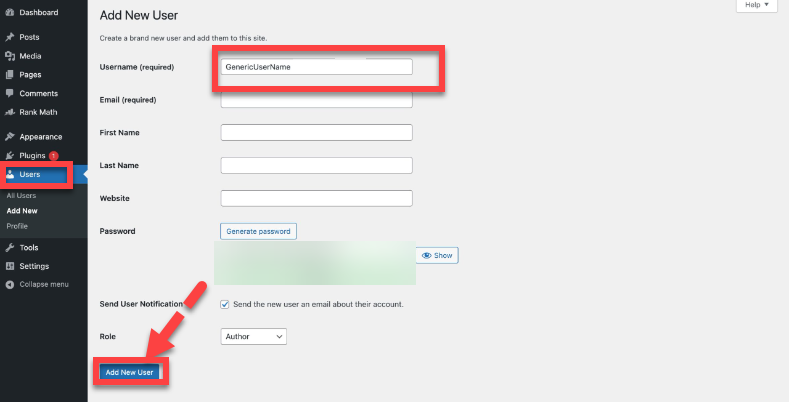
Step 1: Add a New User
If one intends to establish a generic author name for a website, it is a fundamental and frequently employed strategy utilized by numerous website owners. To create a new user, navigate to the 'Users' option located within the plugin settings.
Upon selecting this, a pop-up will appear, where you should click 'Add New User.' A new window will materialize, prompting you to input a username – here, I've entered a generic one. Many users opt to enter their website name at this juncture as a branding strategy.
Subsequently, establish a robust password, ensuring it includes a mix of special characters, symbols, and uppercase letters for enhanced security.
Choose a role from the provided options, such as 'Author' or 'Admin,' and finally, click on the 'Add New User' button situated at the bottom, adjacent to the role options.
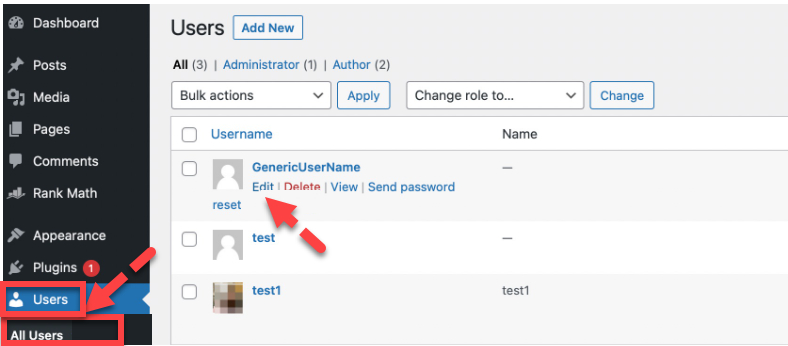
Step 2: Edit the New User
After the user has been created, navigate and click on 'All Users' from the dashboard, where you'll be presented with a list of all the user accounts associated with the website.
Locate the user created in the previous step, and to make modifications, click on the 'Edit' button situated beneath the username of that specific user.
Step 3: Write Nickname for the New User
Now, input an appropriate nickname for the author on your WordPress website. Choose a nickname that can be uniformly applied across all pages and blog posts while also bearing significance for website SEO. This will serve as your branded name.
For example, I've entered 'SEO Team', indicating that blogs or articles are penned by the website's SEO team, which can positively contribute to perceived authenticity.
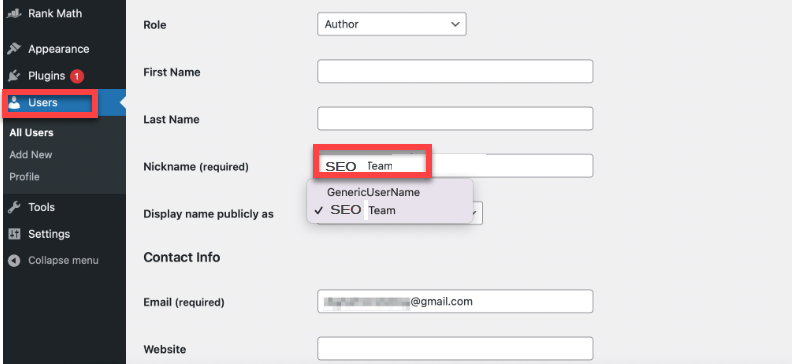
This is a useful alternative when considering how to hide author name in WordPress posts, especially for blogs that prefer to display a company name rather than individual authors.
Method 4: How to Hide Author Name in WordPress Posts Using CSS Code
Hiding an author's name through CSS code in WordPress is a quick fix that doesn't require plugins or altering core files.
It offers a straightforward way to maintain anonymity and streamline the website's design by directly targeting display elements.
Step 1: Check the Author Name for the Blog
Initially, navigate to and open a blog post on your website for which you intend to conceal the author's name. Once opened, verify whether the author's name is visible beneath the title of the blog post or not.
Step 2: Inspect the Code to Remove Author Name
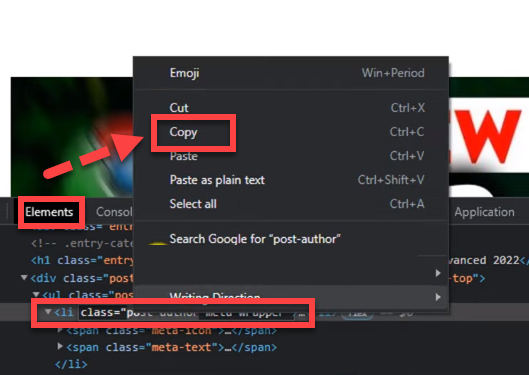
Upon noticing that the author's name is displayed, right-click on the page to trigger a brief contextual window to appear. Select 'Inspect,' found typically at the bottom of this window. Note that occasionally, it might be labeled as 'Inspect Element.' Proceed to click on it.
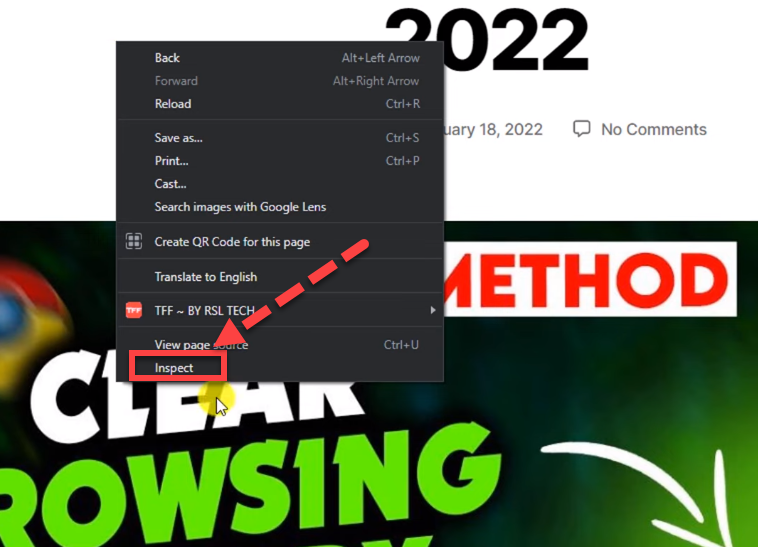
After clicking on the 'Inspect' option, you will uncover the underlying code for the blog post or page you've opened from the website.
Next, click on the left top corner of the code window to enable the selection of the blog part where alterations are desired. Subsequently, click on 'Elements' from the upper options to navigate through the code.
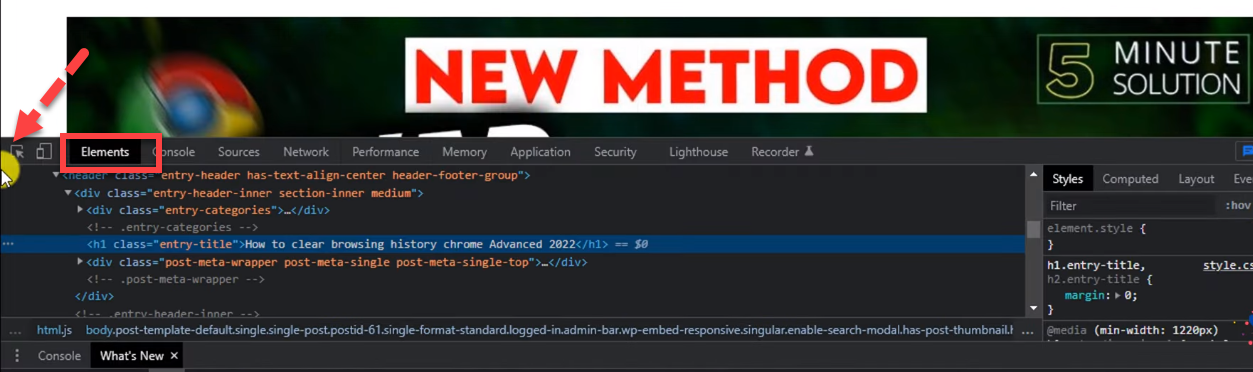
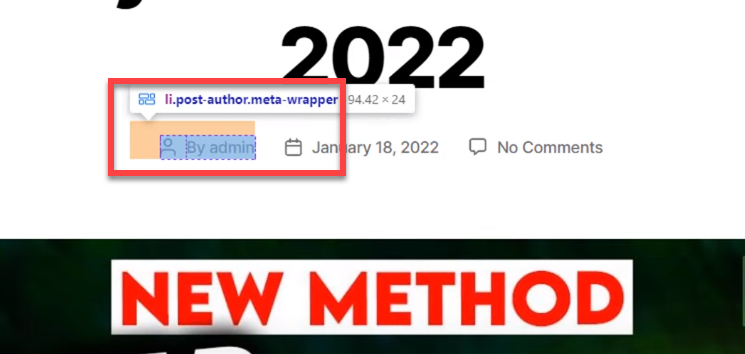
Hence, when we select or click on the author name of the blog post, a segment of code corresponding to the author name will become highlighted in the coding window, providing a clear view of the related HTML or CSS to be modified.
If you're wondering how to hide author name in WordPress post without using plugins, this is one of the simplest approaches.
Step 3: Copy the Related the Code Snippet
At this juncture, right-click on the highlighted code, prompting a pop-up to appear within the same window. Select 'Copy' and subsequently navigate back to the blog post.
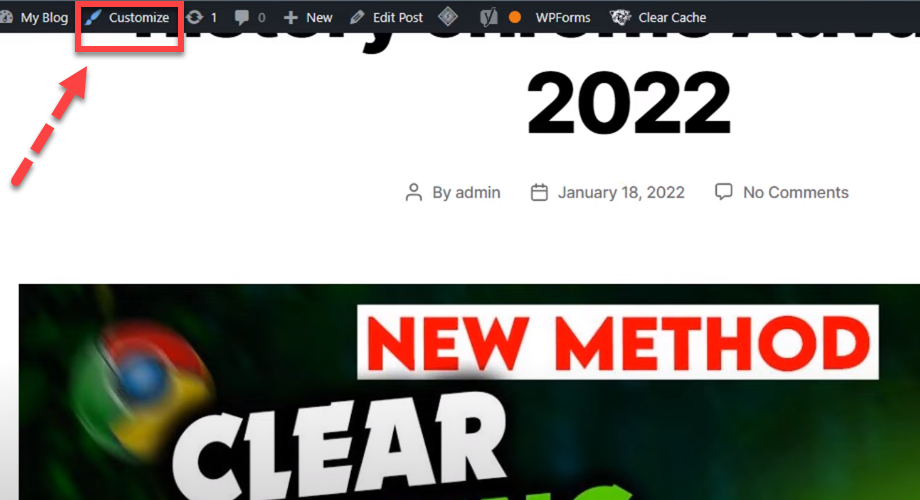
Step 4: Customize the Already Existing Code
You need to perform the following steps after copying the code. Locate the 'Customize' option, which can be found in the black bar at the top of the blog post. This bar becomes visible once you log into the website's admin page.
Its primary function is to provide settings for the website. Therefore, to modify this blog post, you should select the 'Customize' option positioned at the top.
You must select the 'Additional CSS' option, as our discussion centers around concealing author names via CSS code. You will also have the opportunity to learn the name of the currently active theme here.
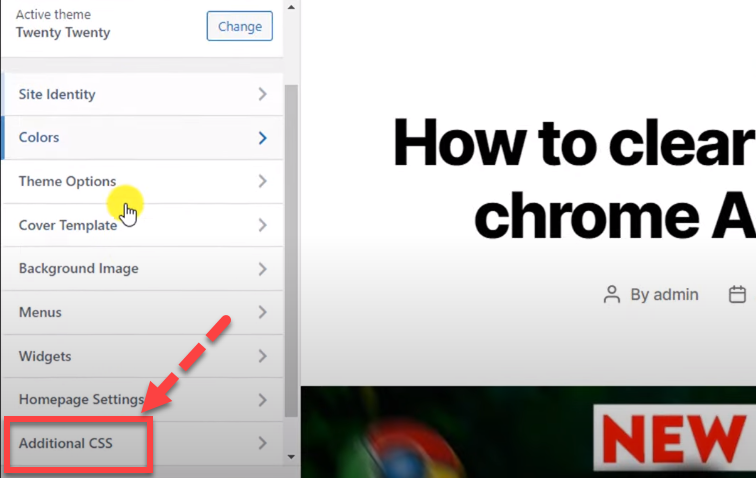
Upon selecting the 'Additional CSS' option, a new page will be displayed on your screen. In the sidebar, you'll notice a brief code snippet. Your task is to delete this existing code from the sidebar code editor.
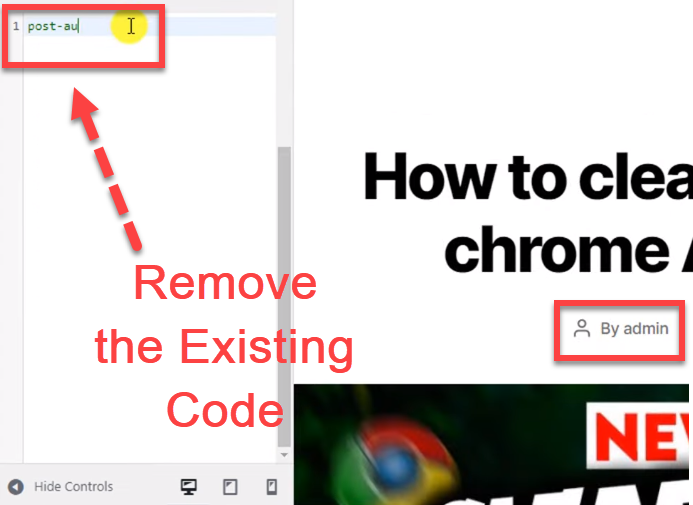
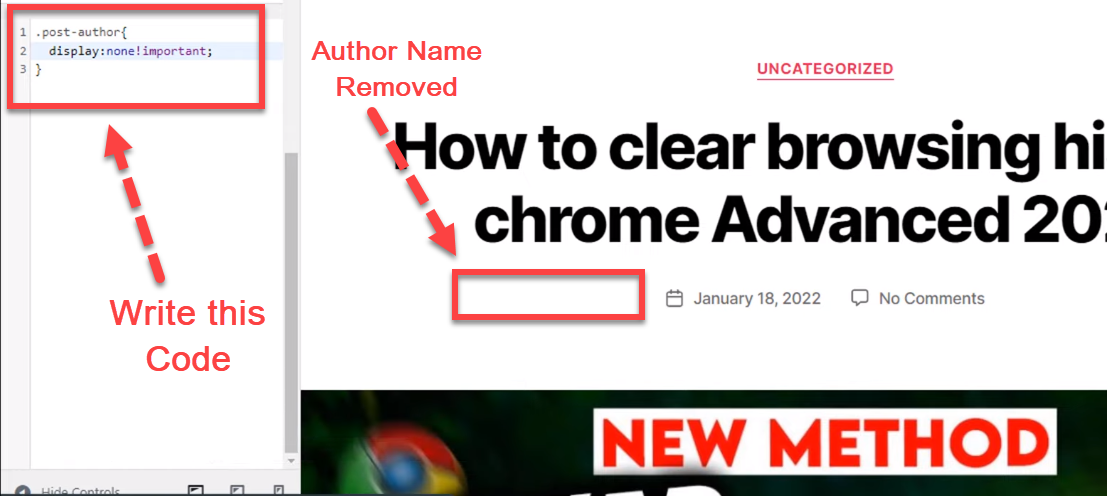
Step 5: Write the Code then Check the Author Name is Removed
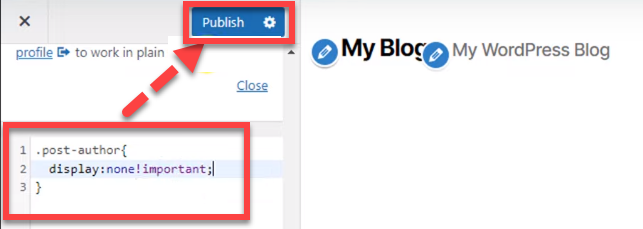
Once you've cleared the pre-existing code, you'll need to input the new code into the sidebar's code editor. If there's any code to be placed,
.post-author{
display:none ! important;
}
This is where you should do it. As you add this code, you'll observe real-time changes in the blog post. Specifically, the author's name, which appears beneath the blog post title, will be removed.
By implementing this method, you've now learned how to hide author name in WordPress post using CSS alone.
Step 6: Click on Publish
We've confirmed that the author's name was successfully hidden through the insertion of CSS code into the additional coding section.
You're now free to either publish or update this post if it's already been published. You'll notice the change takes effect on the blog post upon refreshing the page.
Method 5: Remove Author Name by Editing Theme Files
For those comfortable with code and seeking a permanent solution without relying on plugins or CSS, editing your theme’s template files is a direct approach. This method ensures the author name is not output at all, rather than simply hidden.
Step 1: Identify the Relevant Template File
Navigate to your WordPress dashboard and go to Appearance > Theme File Editor. Common files that display the author name include single.php, content.php, or template parts like content-single.php. The exact file may vary depending on your theme.
Step 2: Locate the Author Display Code
Within the selected file, look for PHP code snippets such as:
php
the_author();
or
php
echo get_the_author();
These functions are responsible for displaying the author name.
Step 3: Remove or Comment Out the Code
Once you find the relevant line(s), either delete them or comment them out by wrapping them in PHP comments:
php
// echo get_the_author();
or
php
/* the_author(); */
This prevents WordPress from outputting the author name on your posts.
Step 4: Save the Changes
After making your edits, click the “Update File” button to save your changes. Visit your site to confirm the author name is no longer visible on your posts.
Note: It’s highly recommended to use a child theme for these modifications to prevent your changes from being overwritten during theme updates. Always back up your site before editing theme files.
Method 6: Remove Author Name Using Block Theme Editor (Full Site Editing Themes)
If you’re using a block-enabled (Full Site Editing) WordPress theme, you can remove the author name directly from the site editor without touching code.
Step 1: Access the Site Editor
From your WordPress dashboard, go to Appearance > Editor.
Step 2: Edit the Post Template
In the editor, select “Templates” or “Template Parts,” then choose the template used for single posts (often called “Single” or “Post”).
Step 3: Remove the Author Block
Locate the “Post Author” block within the template. Click on it to select, then click the three-dot menu and choose “Remove” or simply press the Delete key.
Step 4: Save Your Changes
Click “Save” to apply your changes. The author name will no longer appear on your posts.
Method 7: Hide Author Name via Theme Settings (If Supported)
Some WordPress themes provide built-in options to toggle the display of post meta information, including the author name.
Step 1: Open the Customizer
Navigate to Appearance > Customize in your WordPress dashboard.
Step 2: Locate Blog or Post Settings
Look for sections labeled “Blog,” “Single Post,” or “Post Meta.” The exact location and naming will vary by theme.
Step 3: Disable Author Display
If your theme supports it, you’ll see an option like “Show Author Name” or “Display Author.” Toggle this option off.
Step 4: Publish Changes
Click “Publish” to save your settings. The author name will be hidden across your posts.
Why Do You Need to Hide the Author Name from WordPress?
There are various valid reasons why someone might want to explore how to hide author name in WordPress post. Whether you're running a personal blog, a company website, or a multi-author publication, removing the author's name can help you achieve specific content, branding, or privacy goals. Let's take a closer look at why this might be necessary:
1. Anonymity and Privacy
One of the most common motivations behind searching for how to hide author name in WordPress post is to protect the author's identity. In some cases, writers prefer to remain anonymous due to personal, professional, or safety concerns. By hiding the author name, you can publish content without attaching it to a specific individual, giving authors peace of mind and encouraging more open expression.
2. Multiple Contributors
If your content is created collaboratively by several people, attributing it to just one individual may not be accurate. In such scenarios, knowing how to hide author name in WordPress post becomes essential. Instead of crediting one person, you can remove the author label entirely or replace it with a general byline like "Team" or "Editorial Staff," which better reflects the group effort behind the post.
3. Maintaining a Consistent Brand Voice
Companies and organizations often prefer that all published content aligns with their brand identity rather than that of an individual. Learning how to hide author name in WordPress post can help maintain a unified and professional voice across your website. This approach ensures readers focus on the message and brand rather than on who wrote the piece.
4. Managing Guest Contributions
If you regularly publish guest posts, you may not want to display individual contributor names, especially if they don't have a long-term association with your site. Understanding how to hide author name in WordPress post allows you to streamline the appearance of guest content, making your blog look more cohesive and less cluttered with varying author names.
5. Aesthetic and Design Choices
Sometimes, the decision to hide the author name comes down to visual appeal. Depending on your WordPress theme or layout, the author line may disrupt the flow or make your design look unbalanced. If you're focused on minimalism or want to draw more attention to other elements—like the title, image, or call-to-action—then learning how to hide author name in WordPress post can be a smart move.
How WordPress Author Page Disable
To disable the WordPress author page, you need to modify your theme's functions.php file. By disabling the author page, you prevent access to the page that lists all posts by a specific author, which can enhance privacy and reduce spam.
This change involves adding a snippet of code that redirects visitors away from the author page to another page, such as your website's homepage. This is particularly useful for blogs with a single author or for those who wish to keep their content structure simple.
How to Hide Author Name in WordPress
To hide the author name in WordPress, you can use CSS or edit your theme's files. Hiding the author name can help maintain a consistent voice across posts, especially in a multi-author setup where the focus is on the content rather than the individual contributors.
You can add a simple CSS rule to your theme's style.css file to hide the author name. Alternatively, you can remove or comment out the code displaying the author name in your theme's template files. This ensures the author's name does not appear on posts, pages, or archives.
WordPress Remove Author Link from Post
To remove the author link from a post in WordPress, you need to edit your theme's post template files. Removing the author link helps prevent visitors from clicking through to see all posts by the same author, which can be desirable for privacy reasons or to streamline the design.
This typically involves altering the PHP code in files like single.php or content.php, where the author's name is hyperlinked. By removing the hyperlink, you can still display the author's name without it being clickable.
How to Show Author Name in WordPress Post
To show the author name in a WordPress post, ensure that your theme's settings or the individual post's settings are configured to display author details. This feature is useful for giving credit to authors and for blogs with multiple contributors, where readers might favor certain authors.
You can enable this feature through the WordPress customizer or by checking the settings in your theme options. Some themes also offer widgets or plugins specifically designed to enhance author visibility on posts.
Edit Author WordPress
To edit an author in WordPress, you can navigate to the user section of your WordPress admin panel. This allows you to change details such as the author's display name, biographical information, and profile picture, which are important for personalizing content and connecting with the audience.
By updating an author's profile, you can ensure that the correct information displays on the site and that the author's bio reflects their current roles and achievements. This is particularly important for maintaining the accuracy and relevance of your website.
WordPress Delete Post After Date
To automatically delete a post after a specific date in WordPress, you can use a plugin that allows for post expiration. Automating the deletion of posts can be useful for content that is time-sensitive or promotional in nature, such as events or special offers.
Once configured, the plugin will automatically remove the post on the specified date, ensuring your site remains up-to-date without manual intervention. This is especially handy for keeping your content fresh and relevant without the need to manually track and delete outdated posts.
Wrapping Up
Understanding how to effectively hide an author's name in WordPress posts is essential for maintaining privacy, ensuring a consistent brand voice, and meeting specific design aesthetics.
With WordPress dominating the CMS market, adapting its features to meet your strategic needs can give you an edge.
This comprehensive guide has walked you through four practical methods, from using plugins and editing schema markup to creating generic author names and utilizing CSS.
Implementing these techniques will help you control content presentation, enhance privacy, and ensure that your website aligns perfectly with your strategic intentions.
Whether you're safeguarding identities or streamlining design, these steps are crucial in customizing your WordPress experience to suit your goals. If you want to keep learning useful tips and tricks like these, then check out our other guides on One Smart Sheep.
FAQs
What is the best way to limit authors to their own posts in WordPress admin?
To restrict authors' access to only their posts, use plugins such as "User Role Editor" or "Members" by adjusting user role capabilities. Alternatively, add custom code to the functions.php file to modify author roles accordingly.
How do I hide admin items in WordPress?
Normally, authors are users of WordPress. To display author information without creating user accounts, you might use custom fields or a plugin to display guest author data, like "Co-Authors Plus" or "Molongui Authorship."
How do I hide the author’s bio in WordPress?
To hide admin items, use a role management plugin like "Adminimize" or "User Role Editor" to customize the visibility of admin menu items for different user roles. Additionally, custom coding in the functions.php file or a custom plugin can help with more tailored adjustments.
How to remove a post name from WordPress?
To hide the author bio, you can typically adjust settings within your theme options if available or add custom CSS to your theme to hide the bio section (e.g., .author-bio { display: none; }). Further, you can modify the author.php template file if necessary.
How do I change the author name from WordPress?
To remove a post name, navigate to the posts section in the WordPress admin, find the desired post, and move it to the trash. To remove it from URLs, adjust the permalink settings under "Settings"> "Permalinks" and modify the structure as needed.
How do I add authors without adding users in WordPress?
Change the author name by going to "Users"> "Your Profile" (or "All Users" for other authors) in the WordPress dashboard, and update the "Nickname" and "Display name publicly as" fields. If you want to change the username or create a pseudonym without changing the account, you may use a plugin like "Edit Author Slug."
Can I change the author of a WordPress post?
Yes, you can change the author of a WordPress post. In the post editor, look for the "Author" box under the "Document" tab on the right-hand side. If you don't see it, ensure that your user role has the necessary permissions, or check your screen options to make it visible.
How do I remove the author base in WordPress?
To remove the author base in WordPress, you'll need to use a plugin like "Edit Author Slug" or add custom code to your theme's functions.php file. These methods allow you to change or remove the author slug, effectively removing the author base from your URLs.
How do I hide the author name in WordPress post Astra theme?
To hide the author name in posts using the Astra theme, go to the Customizer > Blog > Single Post. Here, you can disable the "Author" option under the Meta section. This will hide the author name on all single posts.
How do I turn off author link in WordPress?
To turn off the author link in WordPress, you'll likely need to edit your theme's template files or use CSS. To do it with CSS, add custom CSS code to hide the author link. Example: .post-author a { display: none; }. Remember, the class name might vary based on your theme.
How do I change the author of a post?
Change the author of a post by editing the post and selecting a different author from the "Author" dropdown in the "Document" tab on the right-hand side of the editor. Make sure you have the correct permissions to see and edit this setting.
How do I change the author name on a post?
To change the author name on a post, you can either change the user's display name in their WordPress profile (which affects all posts by that author) or manually select a different author for the post as described above. If you want a one-off change for a single post without changing the actual author, you might need to use a custom field or edit the post template.


.svg)