


Most guides about installing WordPress on DigitalOcean create issues in the long term, especially when you’re not a great developer.
Why?
- Software applications get outdated.
- Maintenance becomes a problem.
- Security risks.
- cPanel gets expensive.
In this guide, I’ll tell you the secrets of how to avoid such issues by choosing aaPanel, a free and open-source alternative to cPanel.

What is aaPanel, and Why Is it Better?
The answer is simple. It’s open-source and free like WordPress.
It doesn’t limit your server, unlike other panels like Cyberpanel, allows hosting of a maximum of two websites on its free plan.
Moreover, aaPanel enables you to:
- Install WordPress, Joomla, and Drupal with the one-click software package.
- Free backup creations on Google Drive with hourly, daily, weekly, and monthly frequency.
- Great security built-in.
- Low resources hungry.
- Low maintenance.
- Great user interface.
- Powerful online editor.
And much more.
Do you want to hear the best part?
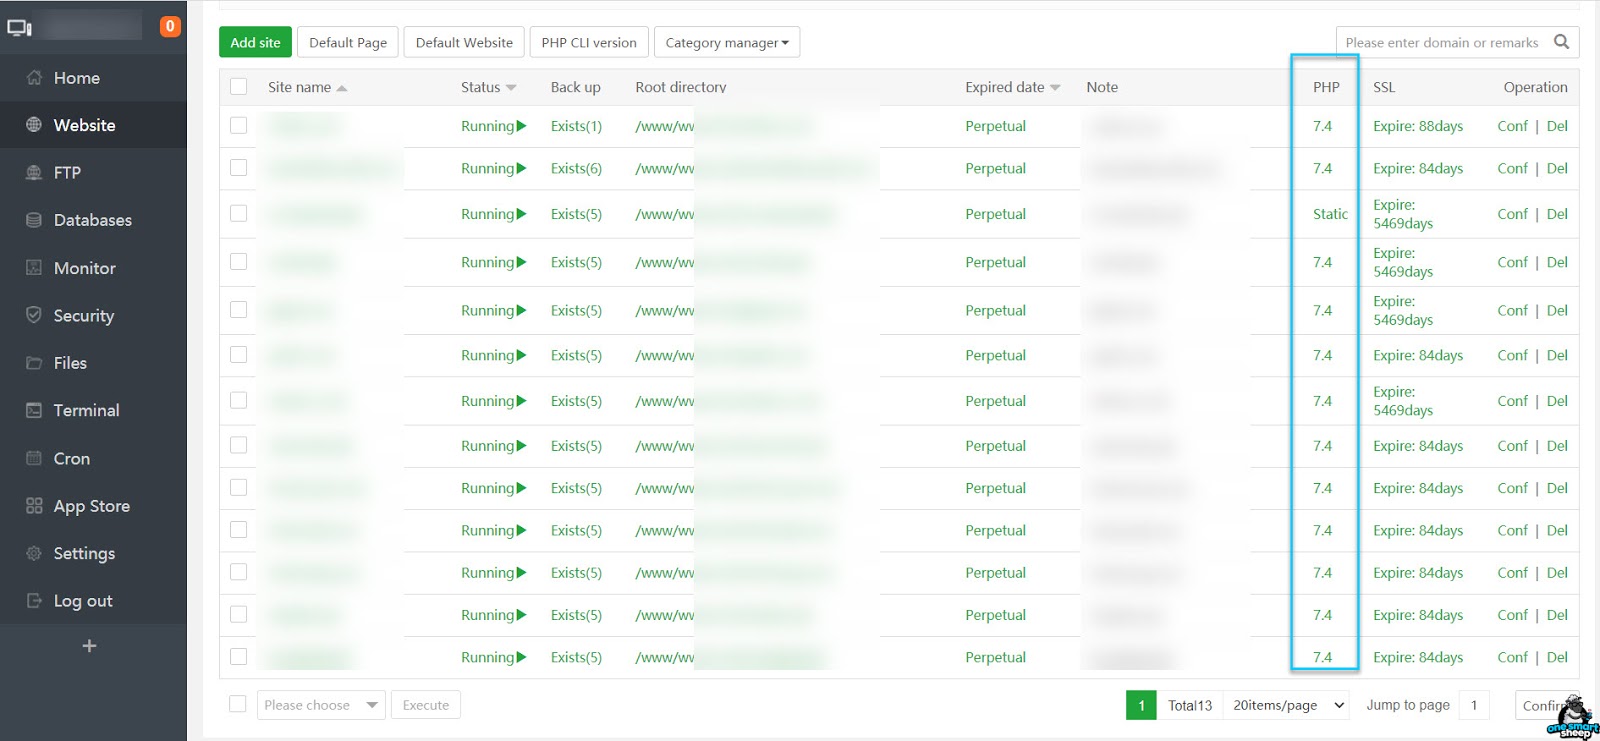
On a $15 Digital Ocean plan with 2CPU, 2GB RAM, and 60GB space, I have hosted one of my clients 13 websites: 12 WordPress and one static. And it runs perfectly.
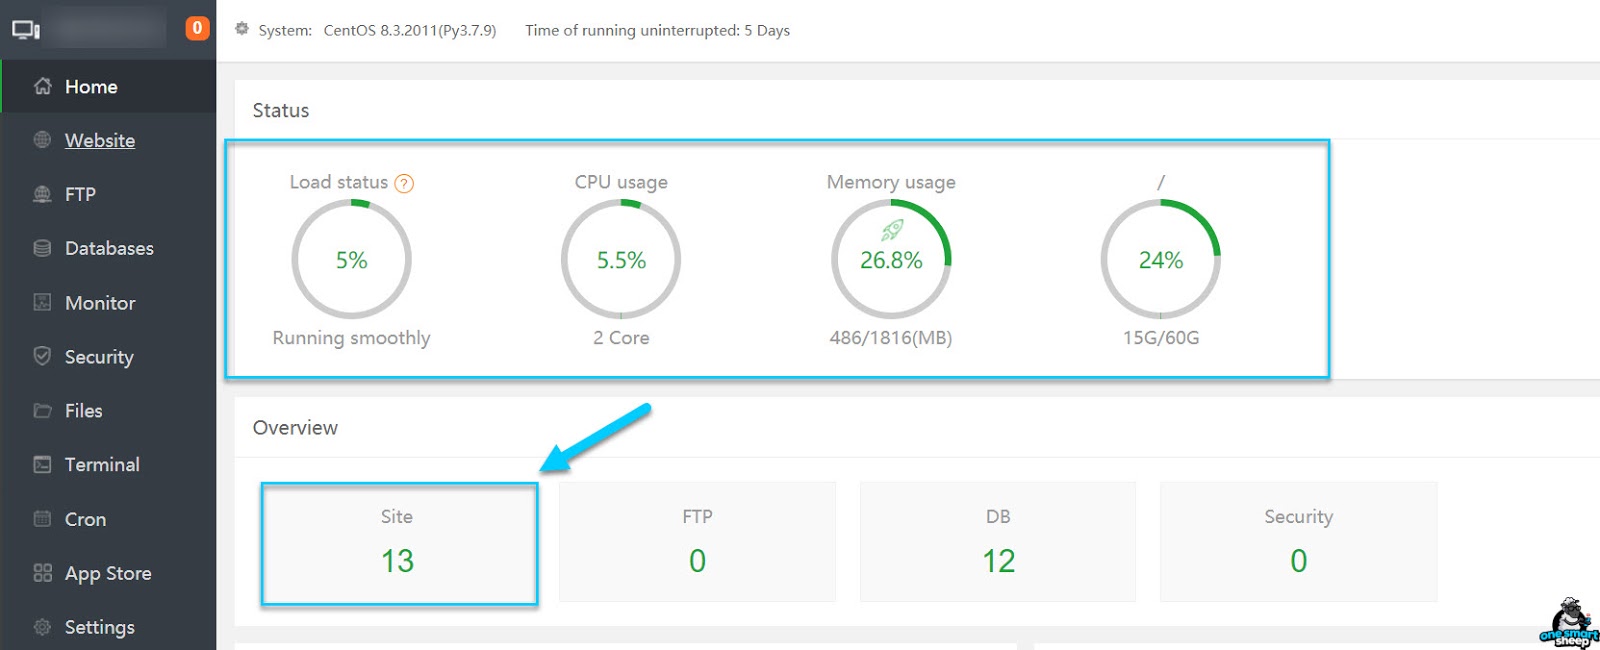
Only 486MB RAM is being utilized, and the server is running correctly without any issue.
Are you excited to get started? But first check out the pros of this hosting.
Overview of DigitalOcean Cloud Hosting
Headquartered in New York City, DigitalOcean has positioned itself as a top cloud infrastructure provider with an expanding global footprint.
Today, its network spans 15 data center regions across 9 countries worldwide. This broad reach enables businesses to deploy cloud servers nearest to their audience base for optimized performance.
At the core of DigitalOcean's offering are Linux-based virtual machines dubbed "Droplets." These provide robust and affordable server hosting with options starting at just $4 a month for the basic package.
In addition, DigitalOcean makes it easy to scale resources on-demand to match web application growth and workload - from smaller startups to larger enterprises with mission-critical needs.
With a proven track record of high reliability since 2011, DigitalOcean aims to give businesses and developers piece of mind while unleashing innovation. Their suite of security safeguards and customer support options help protect against downtime events.
As a result, DigitalOcean has become a go-to for clients like Docker, GitLab, Splice and others demanding stability and tight control within tight budget constraints.
For those seeking even greater convenience in managing their DigitalOcean infrastructure, Cloudways boasts a user-friendly interface for launching and administrating DigitalOcean Droplets and the applications they host.
With point-and-click tools to streamline set up and monitoring, Cloudways reduces development overhead so innovators can focus their energy on creating.
By harnessing DigitalOcean's power and global scale with Cloudways' simplicity, businesses have access to an unbeatable WordPress hosting solution.
This empowers them to achieve blazing site performance, fluid scalability and hardened security - must-haves for growth-oriented web presences today. Both small firms new to managing infrastructure and larger brands with more complex needs can benefit.
Benefits of DigitalOcean
Discover why DigitalOcean is popular among WordPress website owners and how it can grow your business. With its unbeatable combination of scalability, affordability, user-friendliness, and exceptional performance, DigitalOcean offers something for businesses of all sizes. Its steadfast commitment to reliability, uptime, and robust monitoring, alerting, and backup tools make it a top choice for a comprehensive hosting solution.
If you're looking for a platform that provides everything you need to host your WordPress website with ease, look no further than DigitalOcean. Take advantage of the many advantages of DigitalOcean. In this section, you'll discover the key benefits that make it a smart choice for your next hosting needs, including its focus on reliability, integrated tools, and high performance.
Scalability
One of the most significant advantages of DigitalOcean is its scalability. DigitalOcean allows you to quickly scale your infrastructure up or down as your needs change, making it an excellent option for growing businesses.
As your website traffic increases, you can upgrade your droplet to a larger size, and as it decreases, you can scale down to save costs. This scalability means that you can start small and grow as your business grows without worrying about outgrowing your hosting platform.
Cost-Effective
DigitalOcean offers affordable and cost-effective hosting solutions, especially for smaller websites and businesses. With droplet pricing starting at just $5 per month, DigitalOcean provides a low-cost alternative to more expensive hosting options.

This affordability allows you to focus your resources on growing your business rather than on expensive hosting costs.
User-Friendly
DigitalOcean has a simple and intuitive interface, making it easy for even novice users to set up and manage their servers. The control panel provides easy-to-use tools for creating, configuring, and managing droplets and monitoring and scaling your infrastructure.

This user-friendly interface makes it easy for you to focus on running your business rather than managing complex server configurations.
High Performance
DigitalOcean provides high-performance servers with fast disk I/O, low latency, and high network throughput, ensuring that your WordPress website runs smoothly and quickly.
DigitalOcean uses SSDs for all its droplets, which provide fast disk I/O. Its global network ensures low latency and high network throughput, even for visitors far from your server's data center.
Reliable
DigitalOcean strongly focuses on reliability and uptime, ensuring that your website stays online and accessible to your visitors at all times. DigitalOcean uses multiple data centers worldwide, and its infrastructure is designed to be highly available, with automatic failover and self-healing capabilities.
This reliability ensures that your website stays up and running, even during a server failure or other unexpected events.
Community Support
DigitalOcean has a large and active community of users and developers, making it easy to find answers to your questions and get help when needed. Whether you're looking for advice on setting up your server or troubleshooting a problem, the DigitalOcean community is always there to help.
In addition, DigitalOcean provides a comprehensive knowledge base and API documentation, making it easy to find the information you need to get started.
Integrated Tools
DigitalOcean offers a variety of integrated tools, such as monitoring, alerts, and backups, to help you manage and secure your WordPress website. These tools make it easy to keep track of your server's performance, identify potential problems, and ensure that your website and data are always backed up and secure.
DigitalOcean provides a cost-effective, user-friendly, reliable, and high-performance WordPress hosting platform. Its integrated tools and focus on reliability ensure that your website is always up and running and secure. Its scalability, affordability, and community support make it an excellent choice for businesses of all sizes.
Installing WordPress on DigitalOcean (Step by Step)
Installing WordPress on DigitalOcean is the best thing you can do since it costs a lot less money to run.
Step 1 - Sign in to Digital Ocean
We’re not here to promote Digital Ocean with an affiliate link. Go to the official website and sign in.
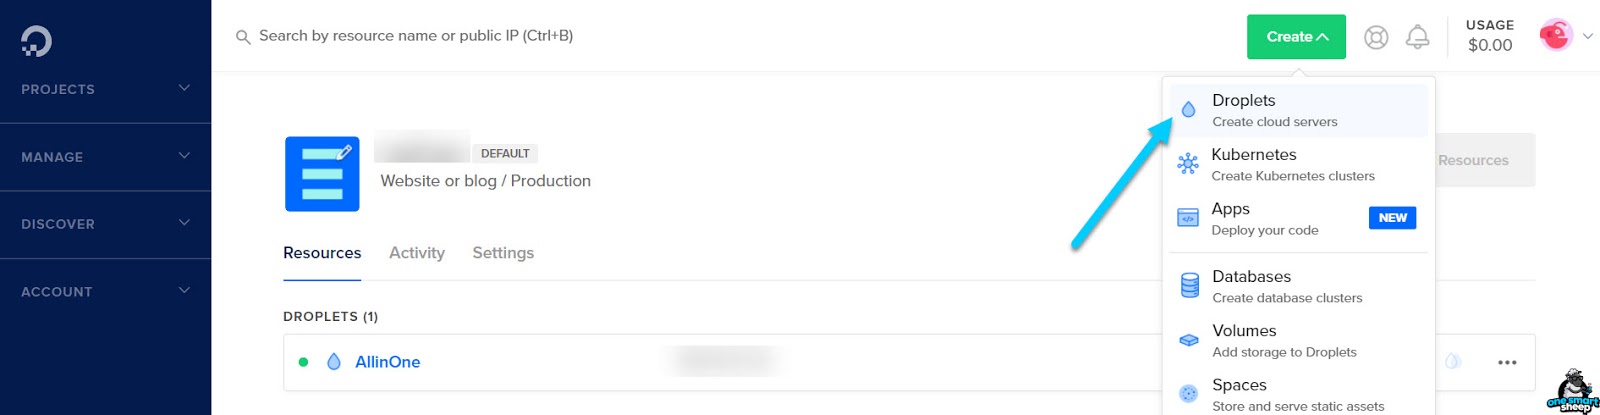
Step 2 - Create a Droplet
The second step is to create a droplet. A droplet is a Linux-based virtual machine, a new server — think of renting a server or buying a plan from a hosting website.
It’s simple to build a droplet. Navigate your mouse cursor to the Create > and click Droplets.
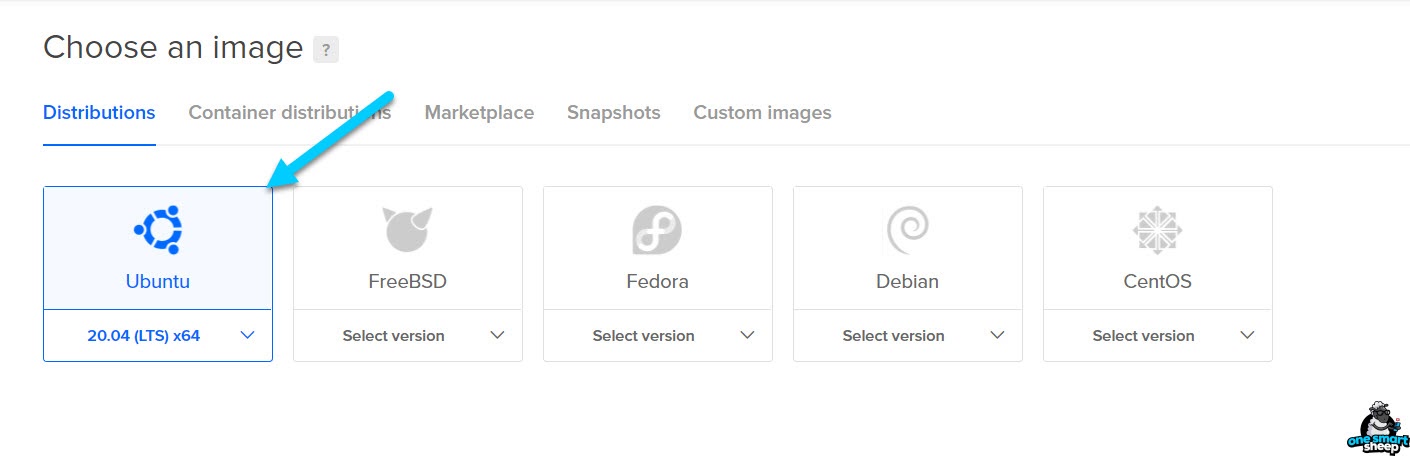
Step 3 - Choose an Image
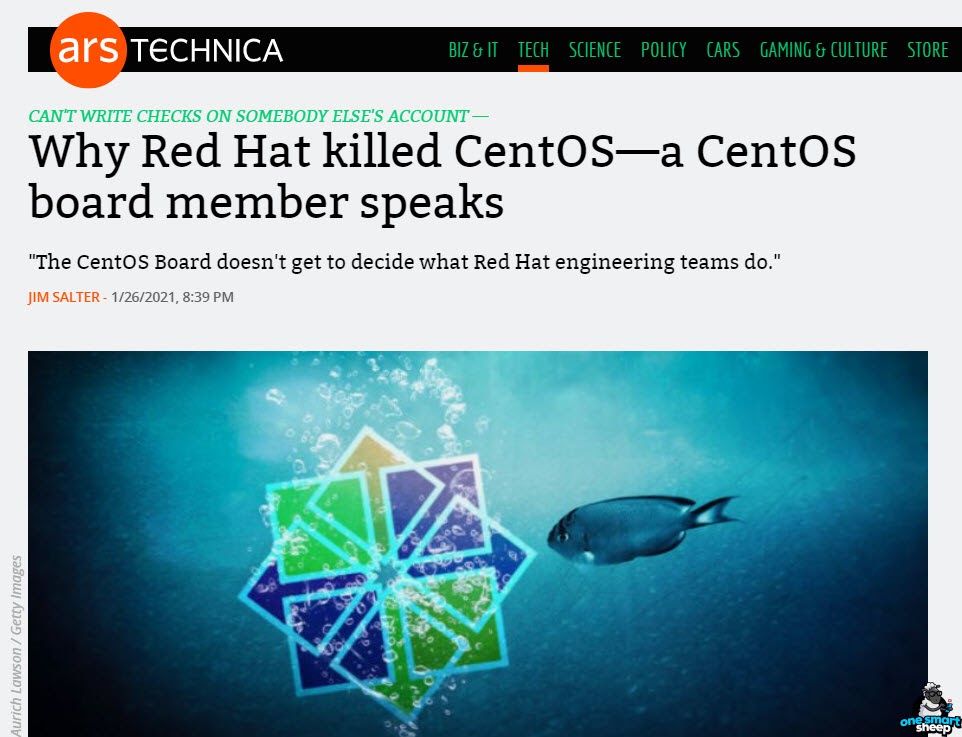
The next step is to choose an image recommended by the developer. aaPanel recommends CentOS, but Red Hat has killed CentOS after IBM purchased Red Hat for 34 billion dollars.
Learn more about the story later on in this article.
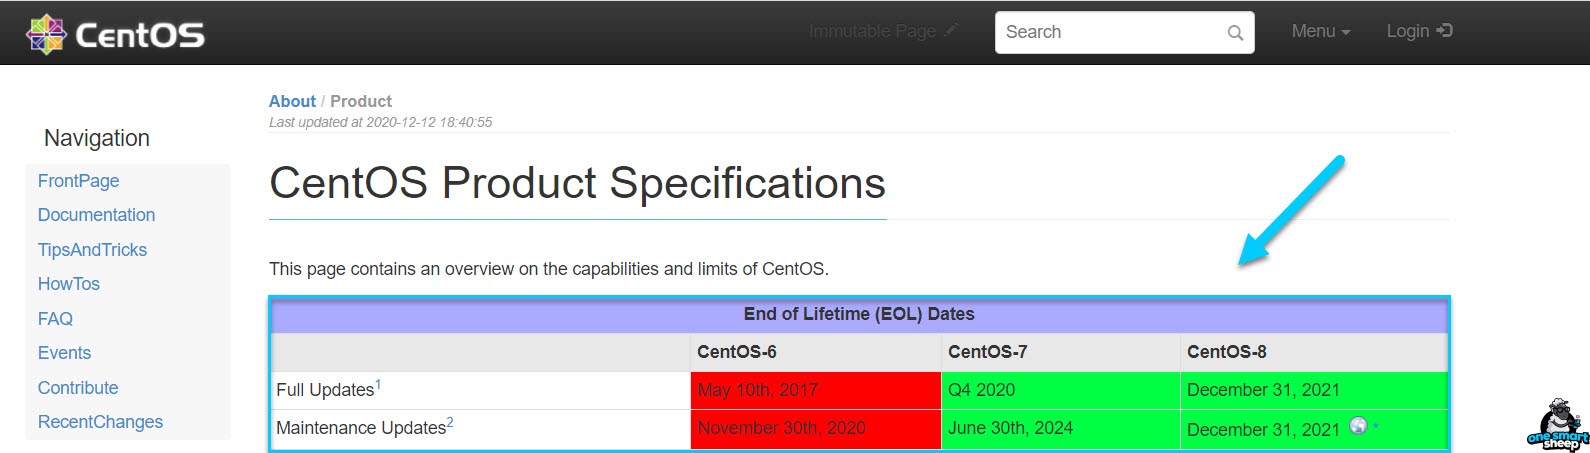
So, choose Ubuntu 20.04 LTS that promises to offer maintenance updates for five years, until April 2025, unlike CentOS 8 until December 2021.
Step 4 - Choose a plan.
Now you need to choose a plan.
It depends on your website that you’re going to host since each website will have its theme, plugins, and widgets.
Generally speaking, you can easily host 5 WordPress websites on the $5 droplet on DigitalOcean if the websites get regular traffic.
For the sake of this tutorial, I’m choosing the $5 plan.

Note: If you’re still unsure how many servers your websites can handle on your website, then the best way is to create a backup of your website and restore it on the server. Then conduct testing using stress tools.
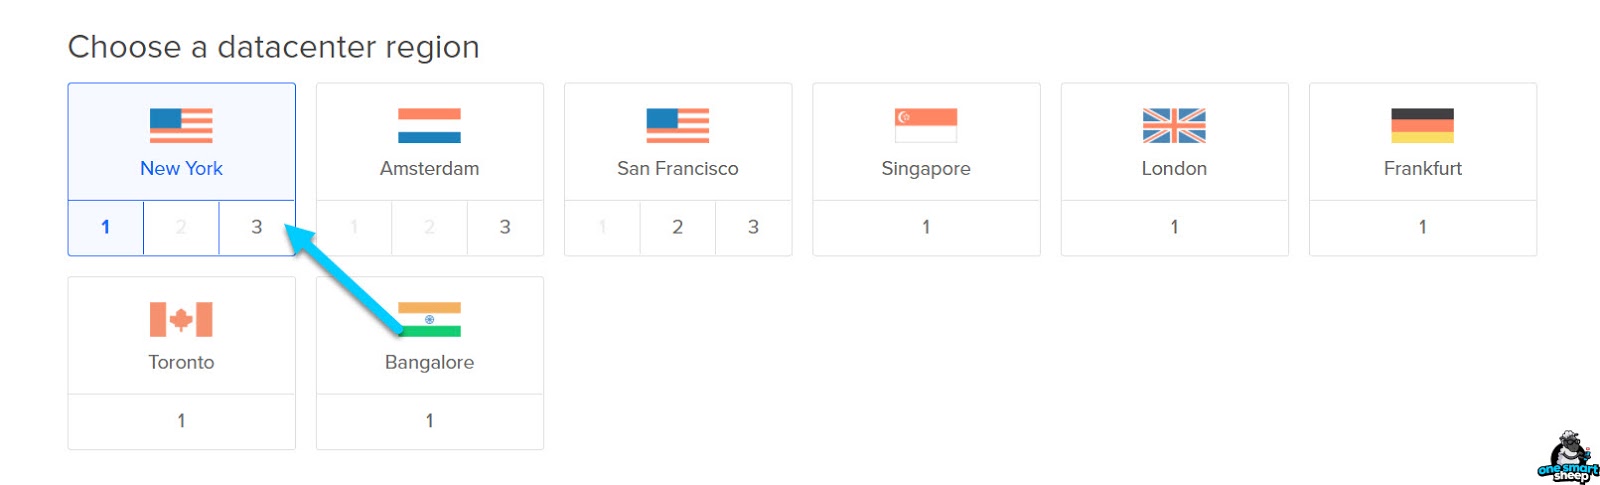
Step 6 - Choosing a Data Center
It’s recommended to choose the data center that is closest to your users. For example, if most of your users come from New York, you should host your website on a server hosted in New York.
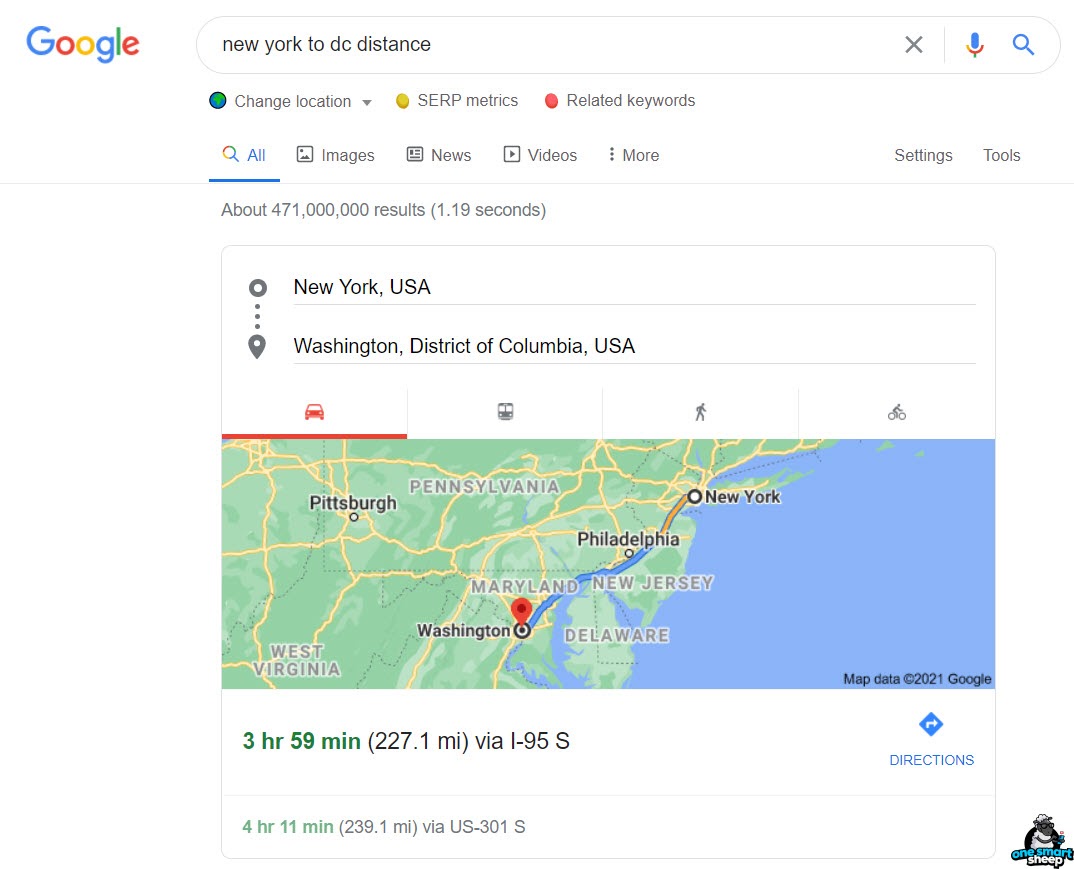
Please try to find out where your users come from. Use Google Analytics’s data about your users’ location and use Google Maps to find the distance between your city and the Digital Ocean data center.
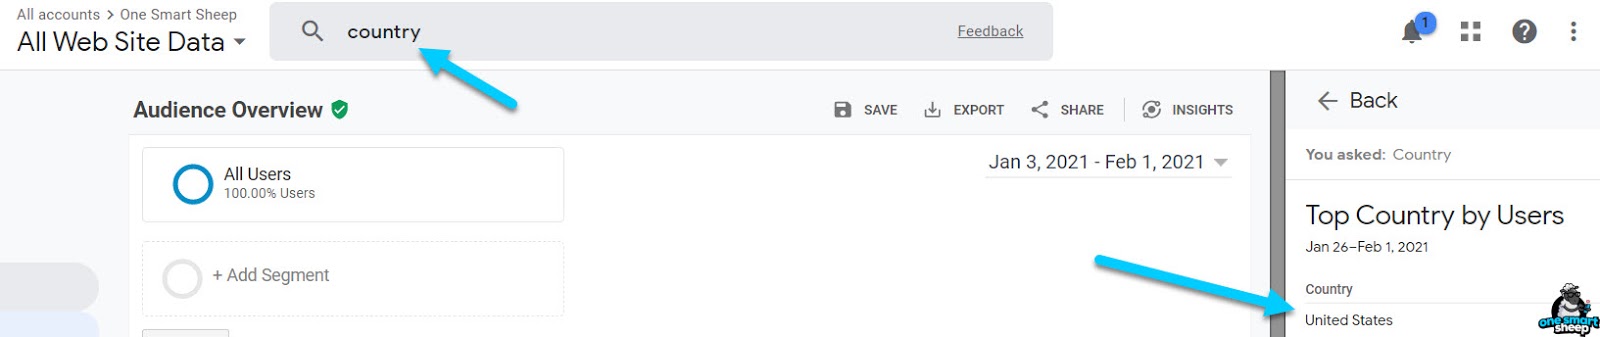
How can you find it in Google Analytics? Just type the term country in the search bar, and it shows you instantly in the Analytics Intelligence window.
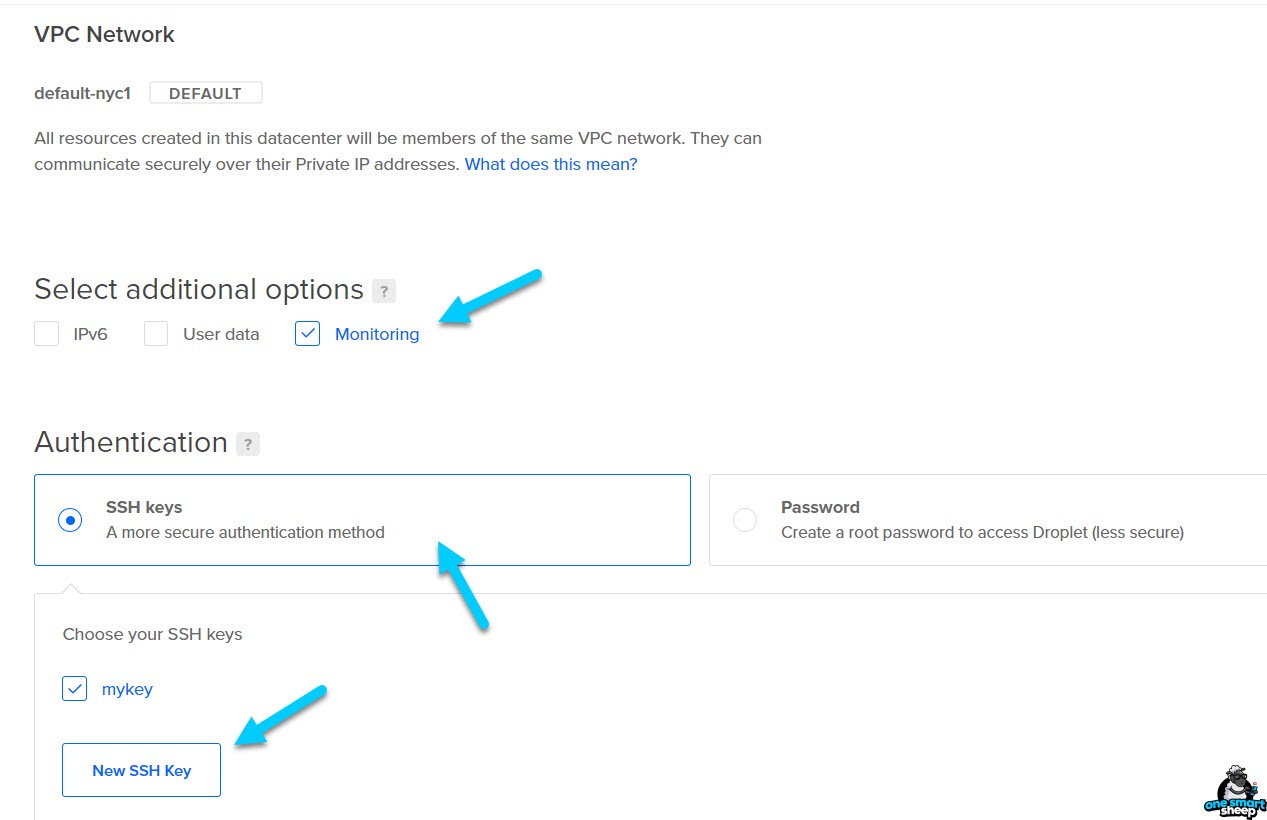
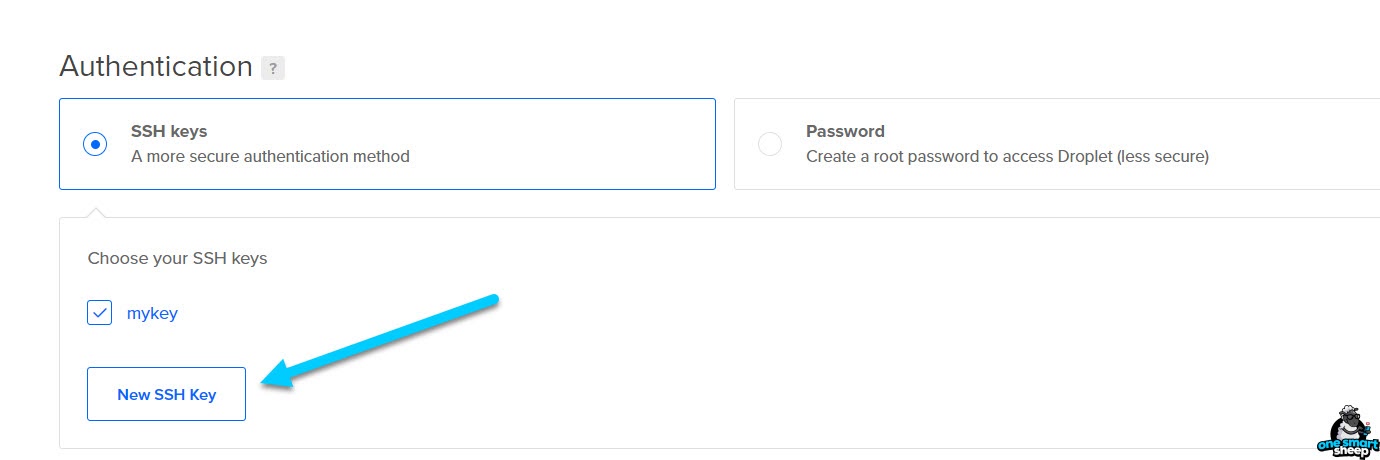
Step 5 - Authentication
It could be the most complicated step for beginners. First, enable Monitoring (optional) that alerts you if something goes wrong.
Secondly, select the SSH keys. If you want to avoid this step, you can set a password and move on to the next step.
If you want to enhance your server’s security, utilizing the SSH keys can make your server security better.
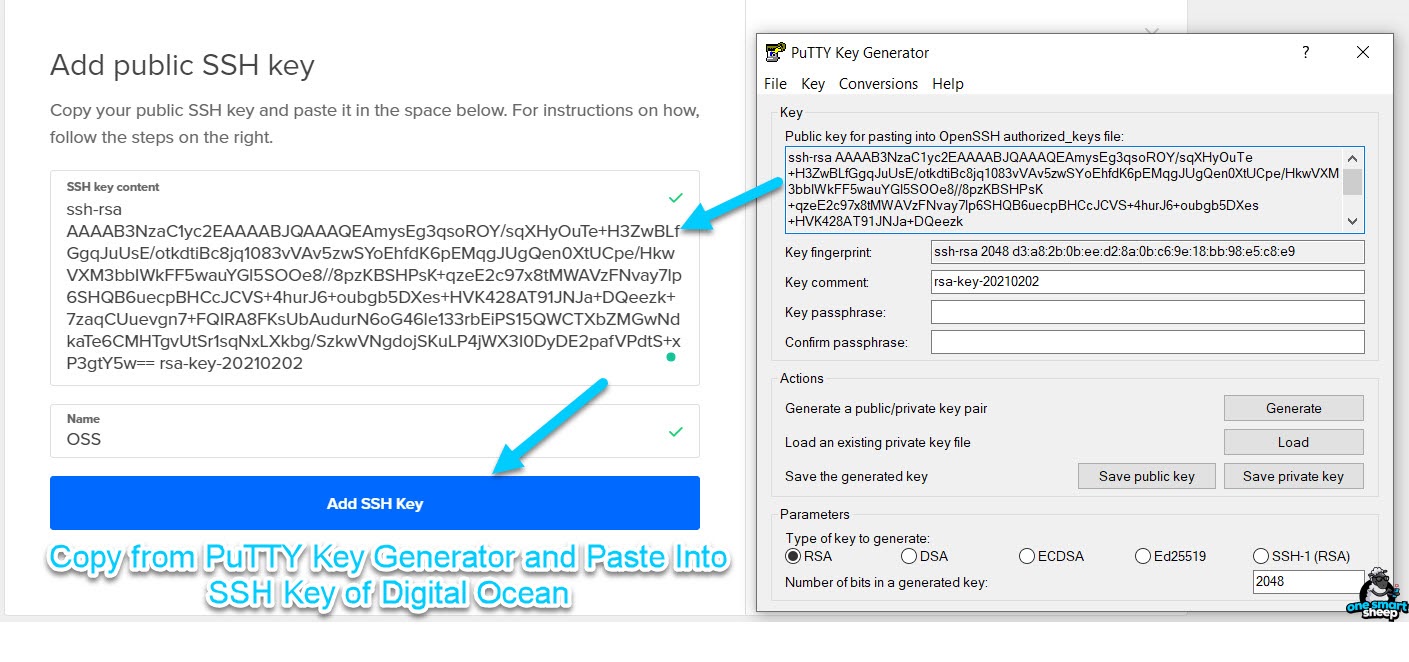
To generate an SSH key, download the simple software, PuTTY — for Windows users.
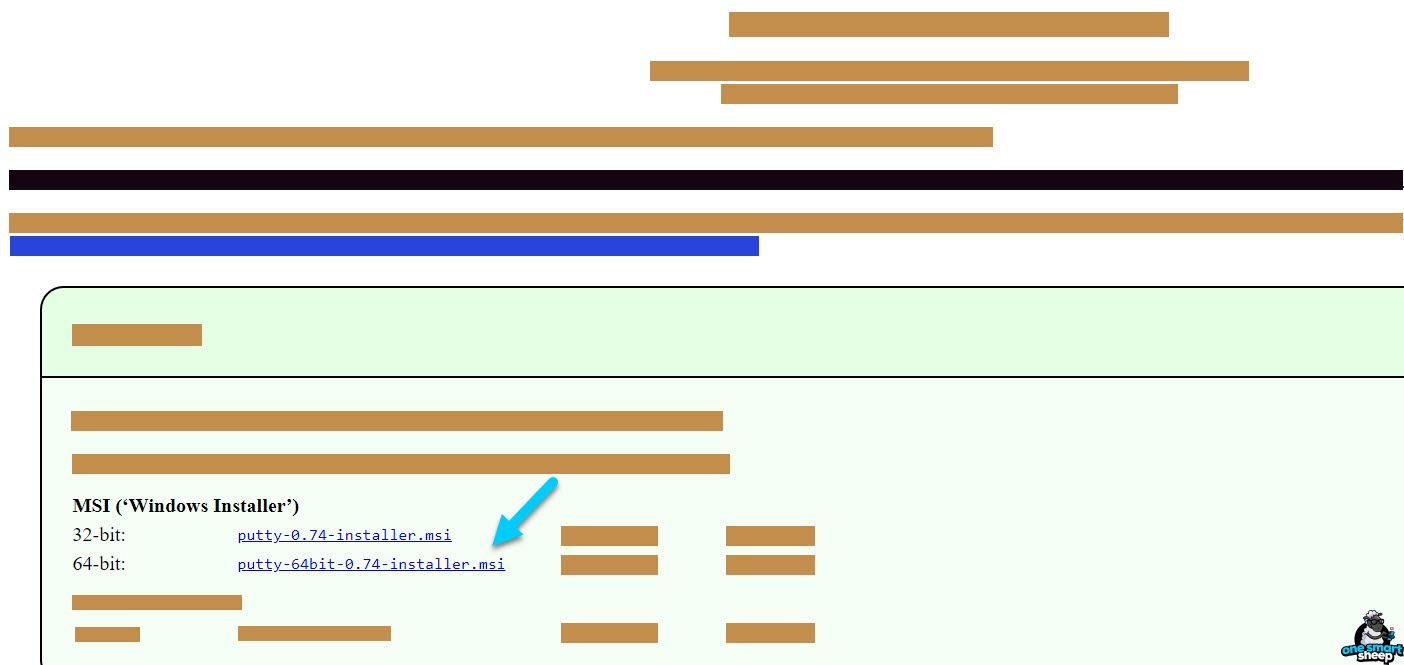
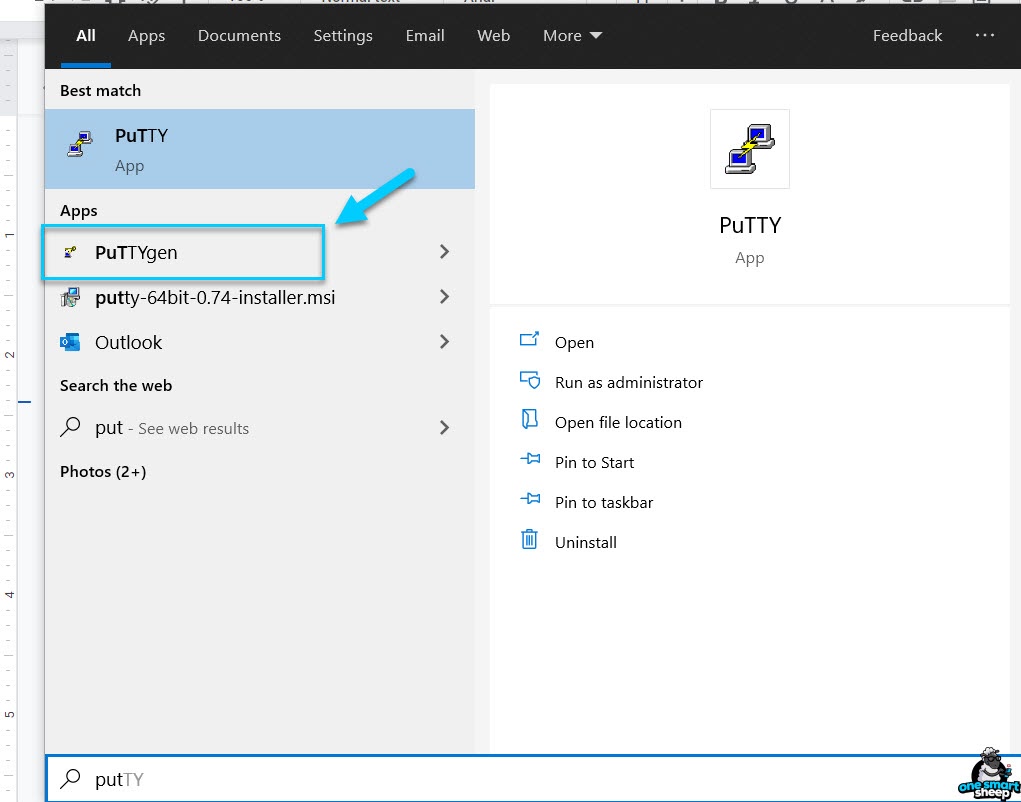
Download it. Install it. Open it. Keep in mind open PuTTYgen, not PuTTY.
It will show you a simple interface.

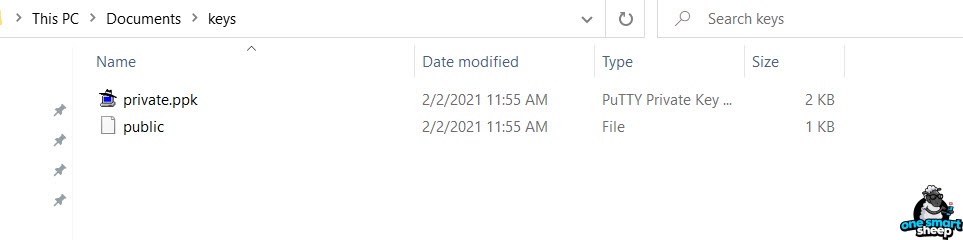
When you hit the button Generate, you should move your mouse courses to generate the key faster. Once done, save both public and private keys on your local machine.

Both saved keys will appear like the screenshot below:
Now go back to Digital Ocean, and click New SSH Key.
Copy the whole code from PuTTY Key Generator and paste it into the public SSH key box. Now click Add SSH Key.
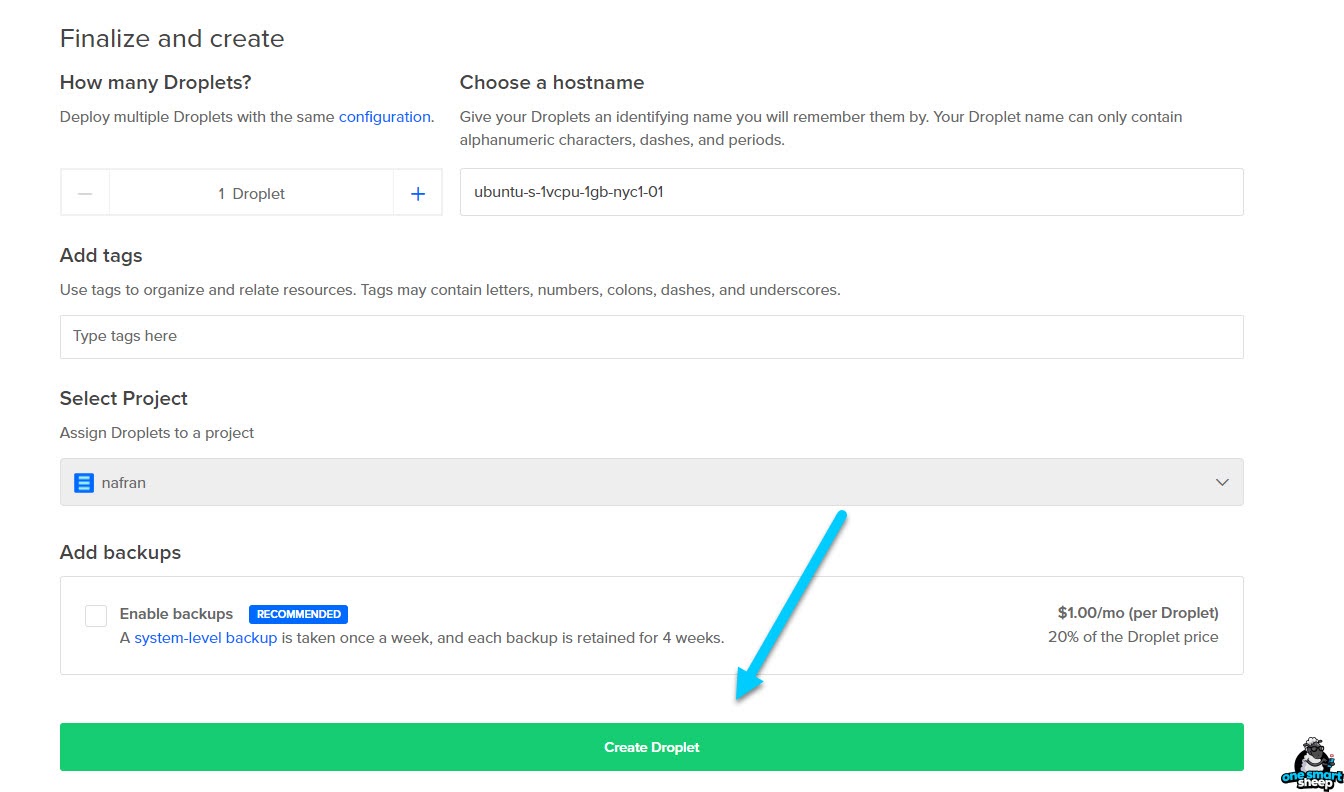
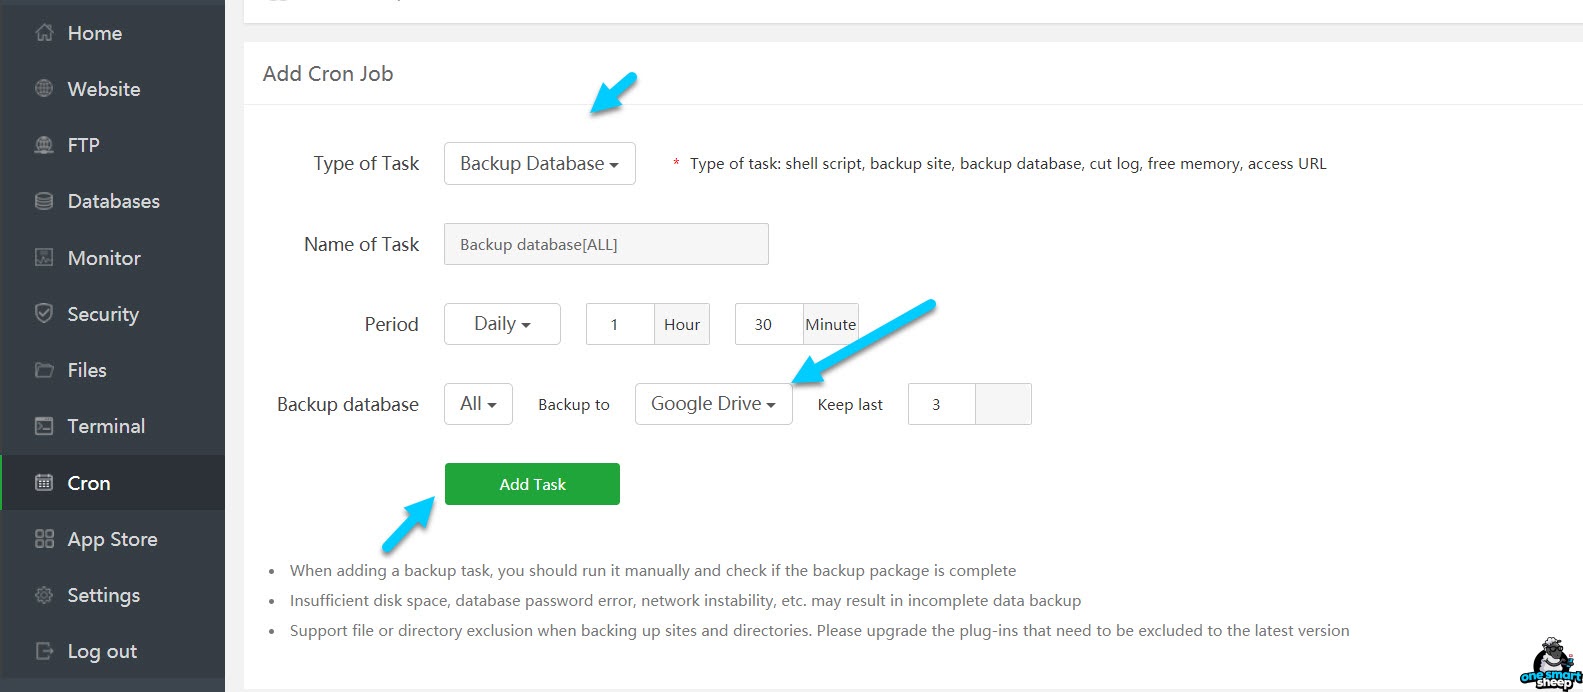
Step 6 - Add Backups
In this step, you can choose a hostname and the VPS name. You can also put a tag. Both are optional steps.
You can also create a backup of your VPS taken once a week and retained for a month with Digital Ocean, but it takes extra charges, 20% of your total plan price.
If you lack a budget, you can leave taking backups since we can use the Google Drive Backup app later on in this article for free.
Step 7 - Installing aaPanel
To install aaPanel, you need a little bit of patience.

After a few seconds, you’ll see the droplet is ready.
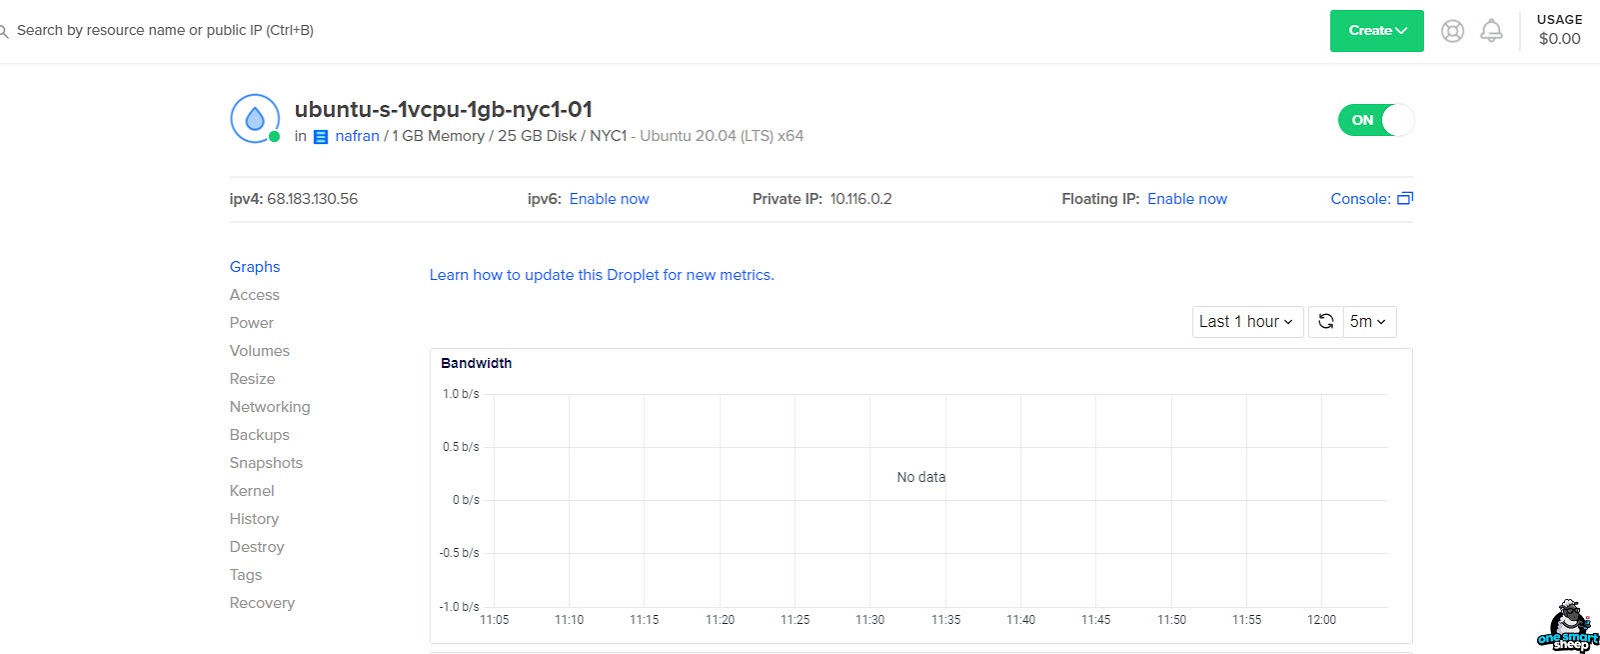
Now run PuTTY if you use Windows. If you’re a Mac or a Linux user, you can use your default terminal.

So copy the ipv4 and paste it into the HostName of PuTTY.
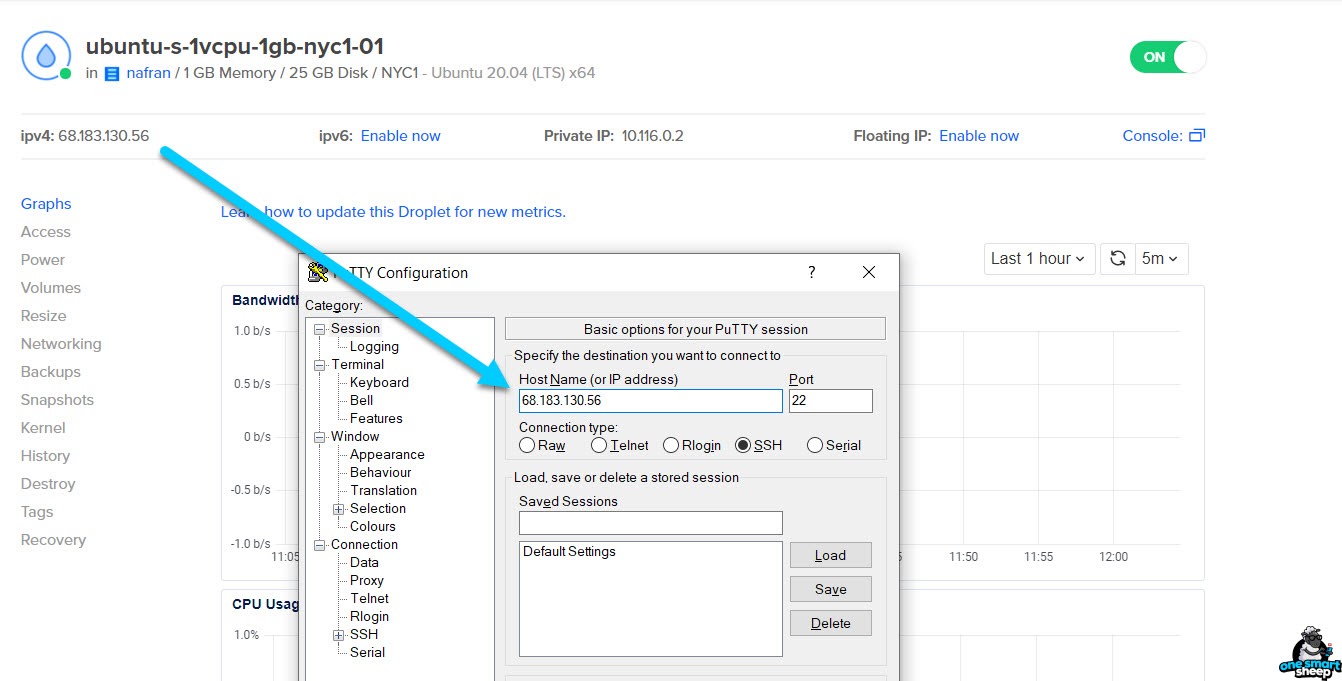
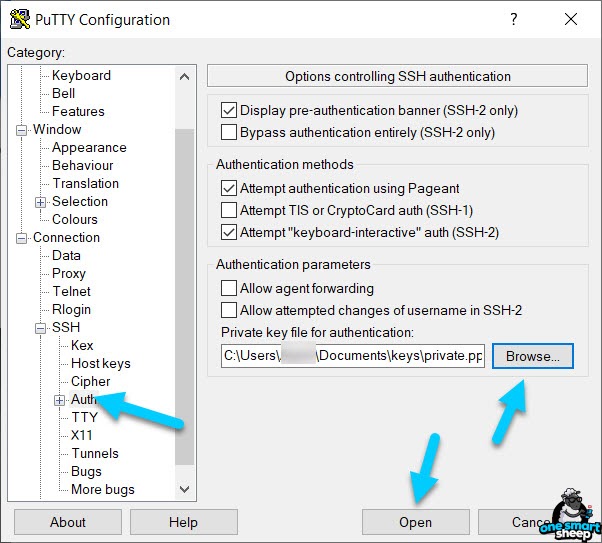
We need to put the SSH key we generated.
Note: If you didn’t generate an SSH key, you could connect directly.
Go to Auth and browser the private key. Click Open.
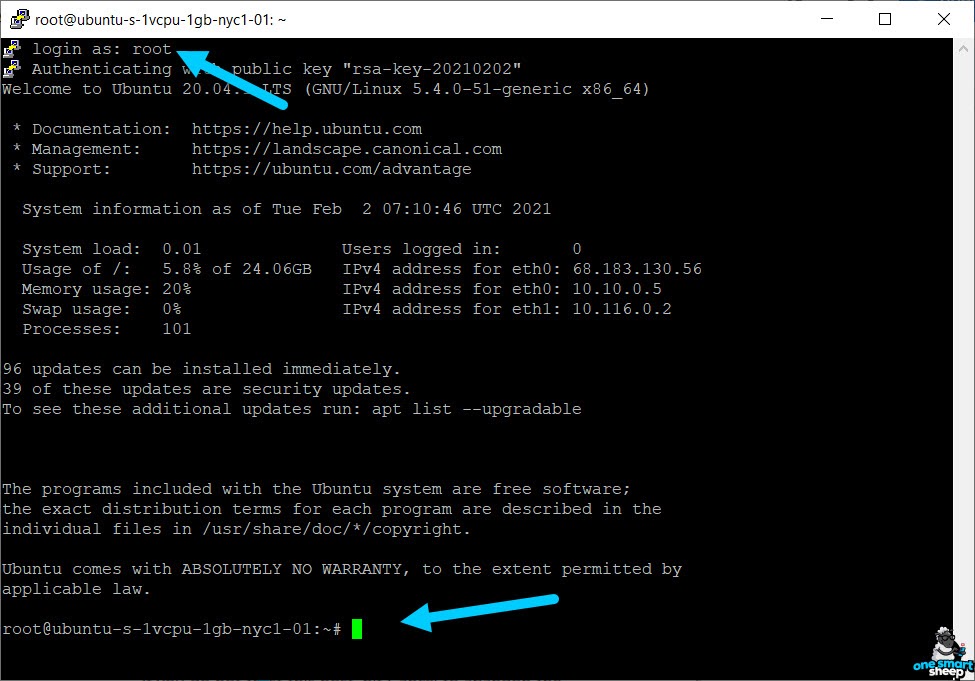
It shows an alert message.

Now type root, it will successfully enter the terminal like this:
Now copy the line as shown below:
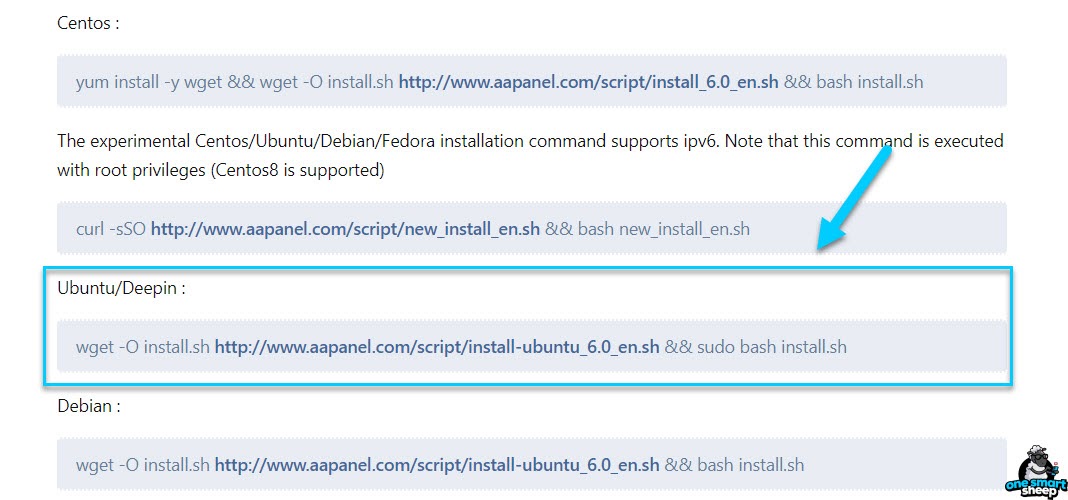
Now paste the Ubuntu line into the Putty.
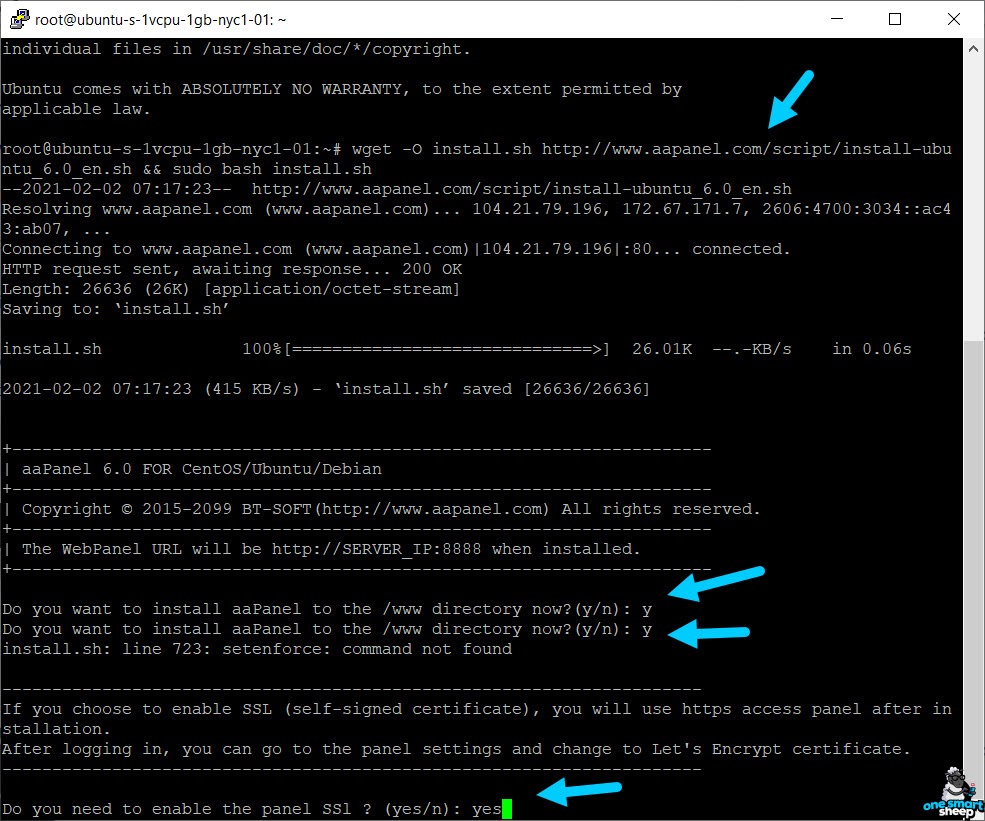
It asks a few questions.
Press y for the question “Do you want to install aaPanel to the /www directory now?”. Press again y.
After type yes to the question, “Do you need to enable the panel SSL?”
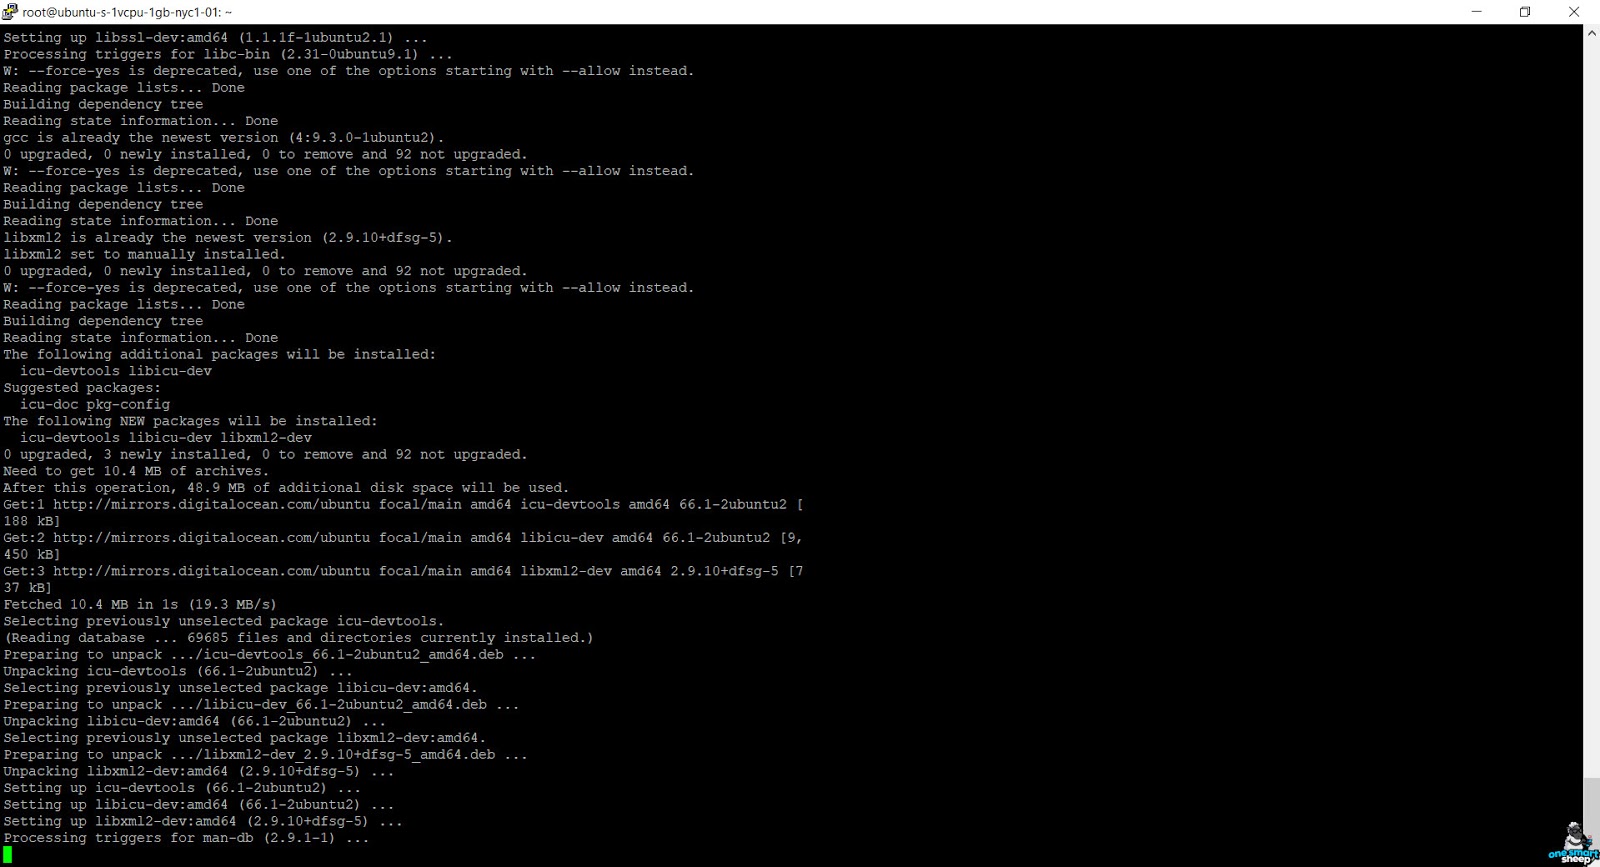
It starts downloading the panel. It might take from 5 minutes to 10 minutes. Have patience.
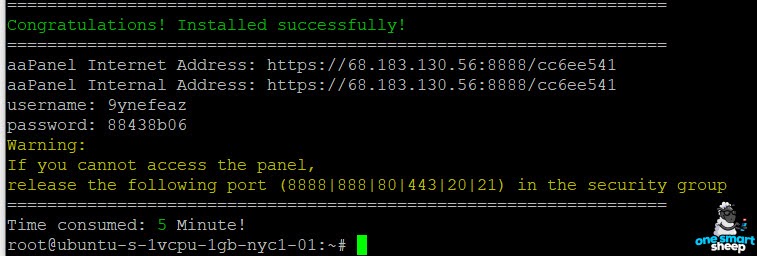
Once it’s installed, you’ll get the aaPanel Internet Address, username, and password. Copy them and paste them into your notepad.

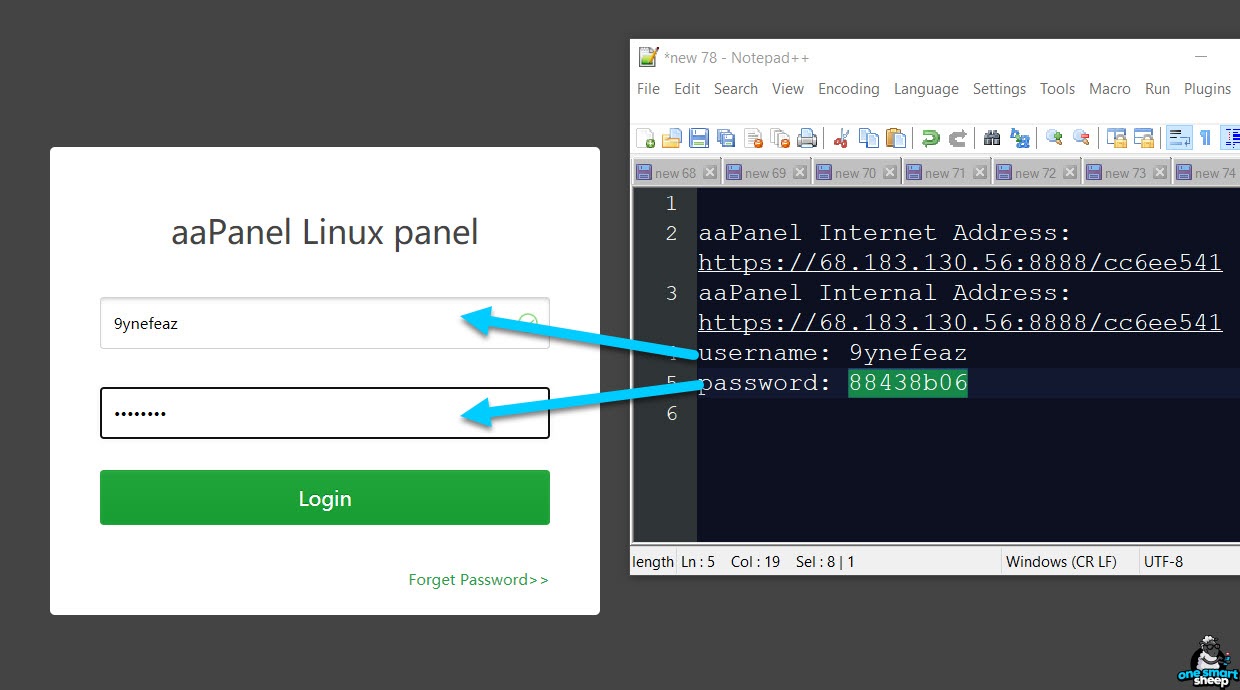
Enter the internet address into the browser, click Advanced on Chrome, and click Proceed to IP (unsafe). It happened as we enabled SSL for our server.

Put the username and password that aaPanel provided in the terminal.
Step 8 - Installing Web Server and Apps
As soon as you type the username and password, you’re prompted to install the recommended software packages.
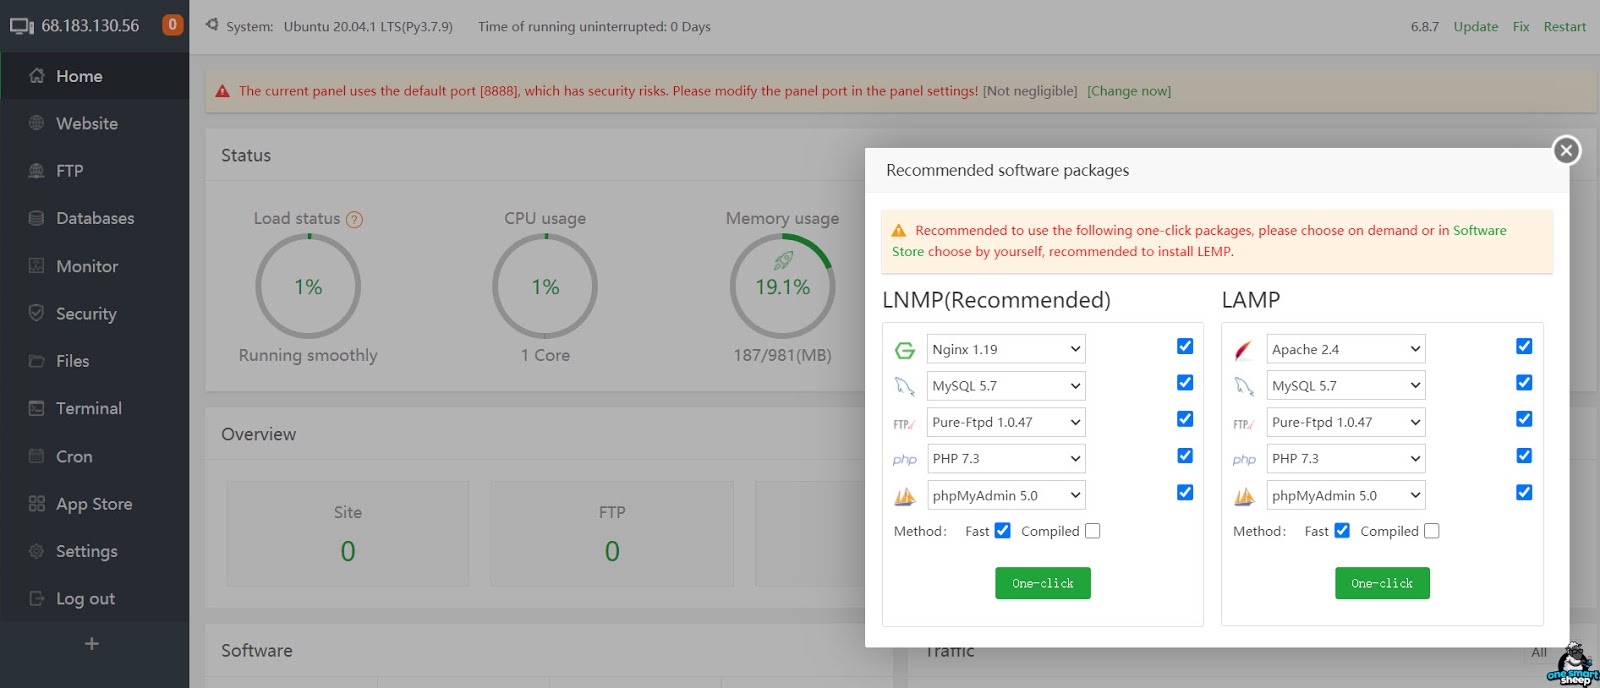
I don’t install Apache and Nginx; instead, I prefer to use Litespeed for numerous reasons, but the main reason is that it’s faster and better than all web servers. It handles requests and users better than Apache and Nginx.

That’s why I install all the software packages except the Nginx web server. I’ll install the webserver OpenLiteSpeed later on.
You can select the following software packages:
- MySQL 5.7
- Pure-Ftpd 1.0.047
- PHP 7.4
- PHPMyAdmin 5.0
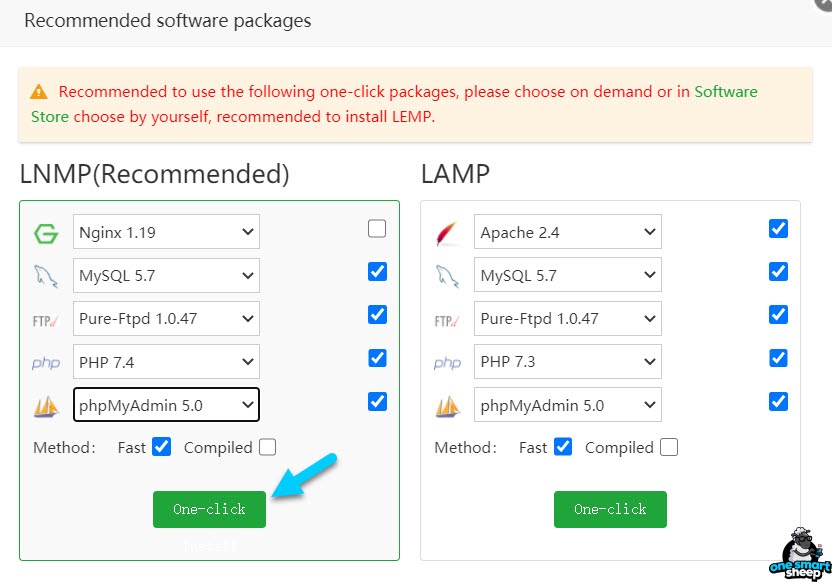
You can install any software packages; you can trust me and follow me along. Once decided, click One-click. You’ll need to wait for a few minutes.
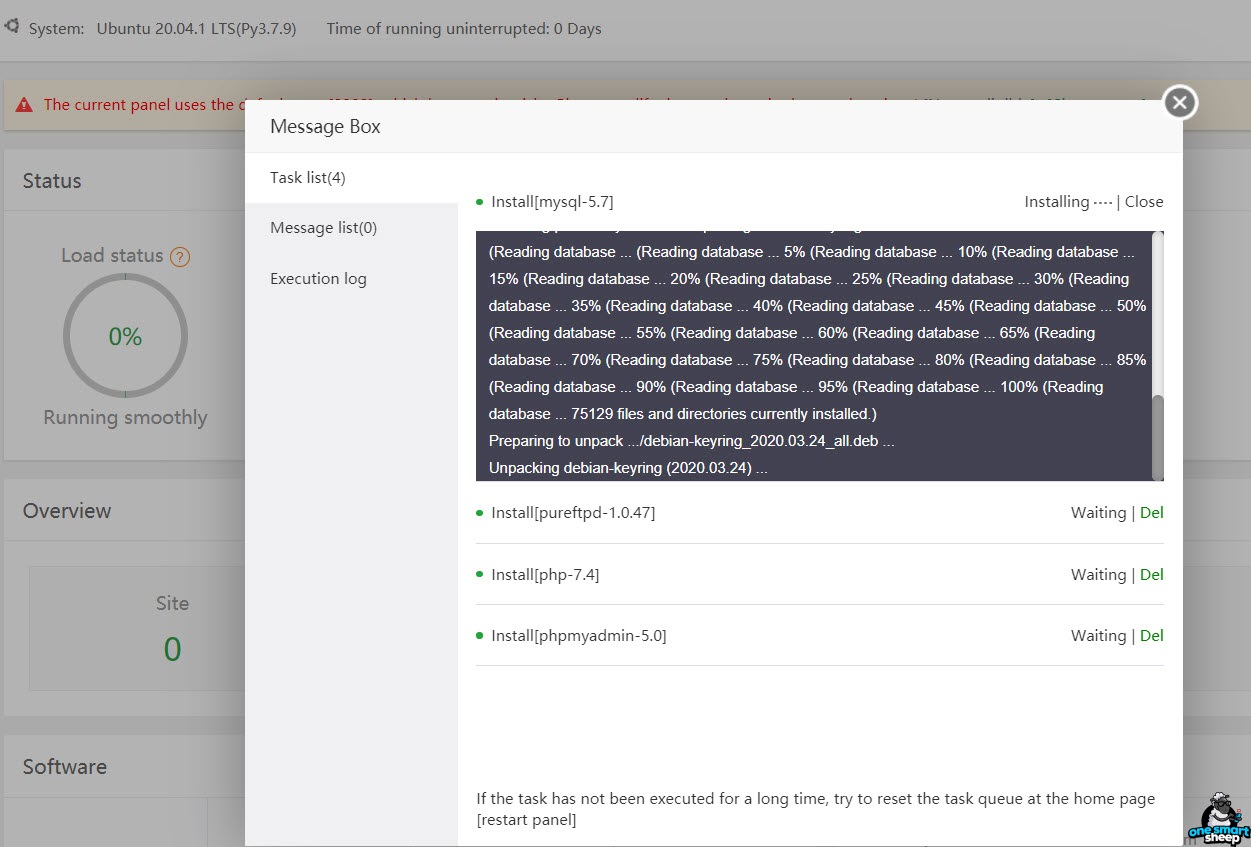
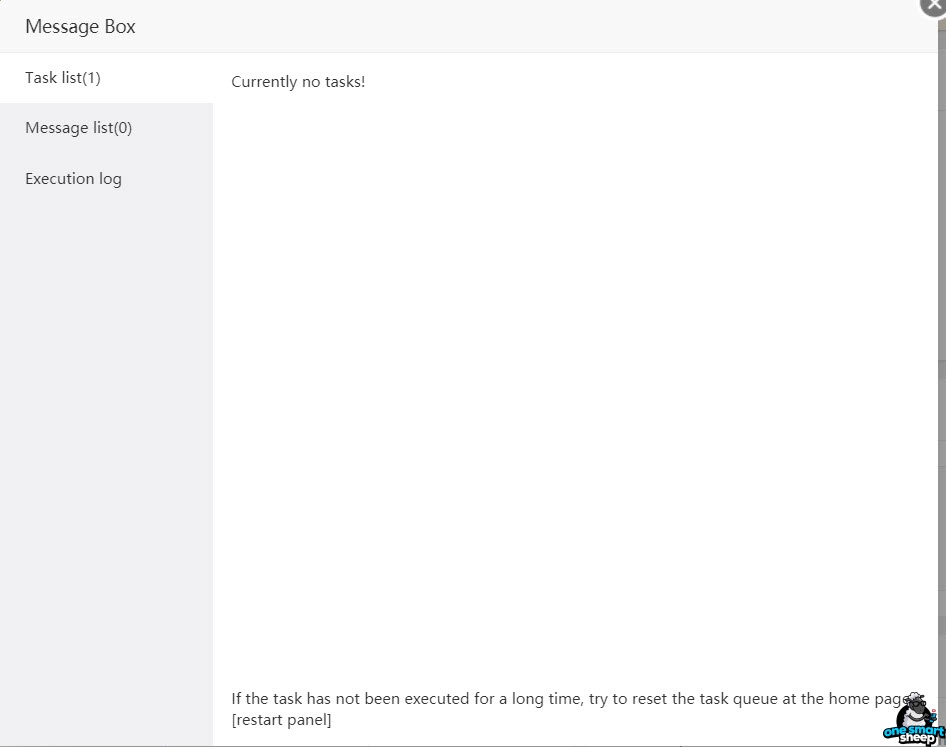
When all the software packages are installed, you’ll see the message.
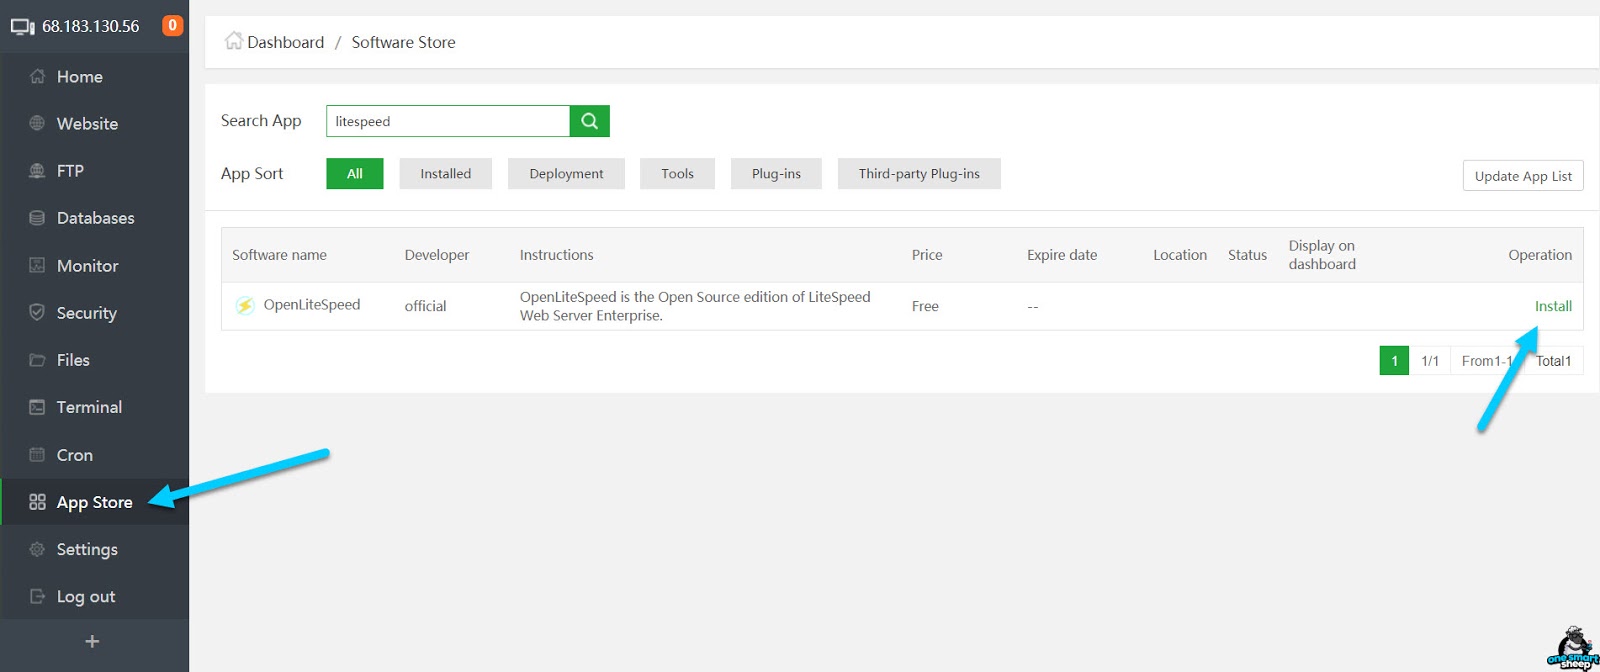
Now it’s time to install the OpenLiteSpeed web server. In order to install it, go to the App Store, search OpenLiteSpeed and install it.
I recommend installing all these software packages:
- MySQL
- Pure-Ftp
- PHP
- PHPMyAdmin
- Memcached
- OneClick Deployment
- Google Drive

Step 9 - Installing WordPress
Let’s come to the tutorial’s most exciting part: installing WordPress on a super-fast web server.
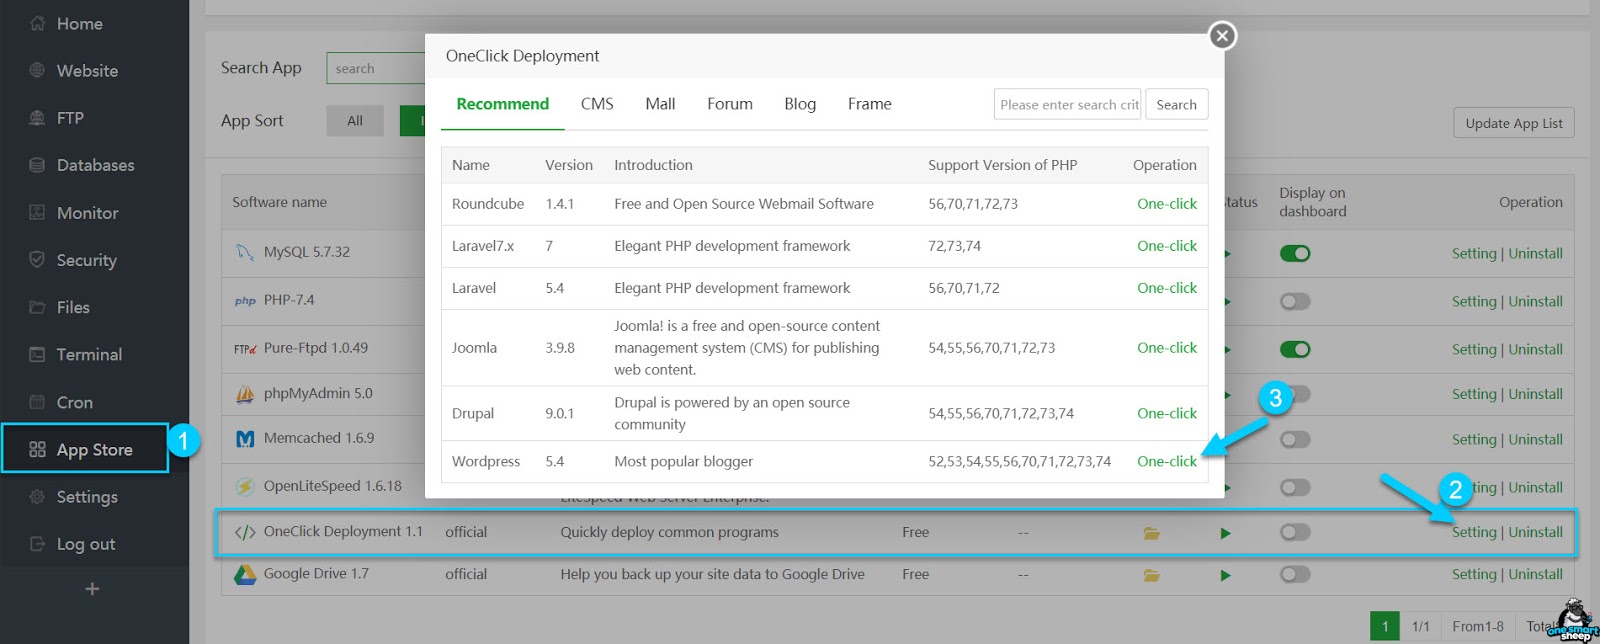
In order to install WordPress, go to the App Store, navigate to OneClick Deployment and click Settings. Find WordPress and press One-click.
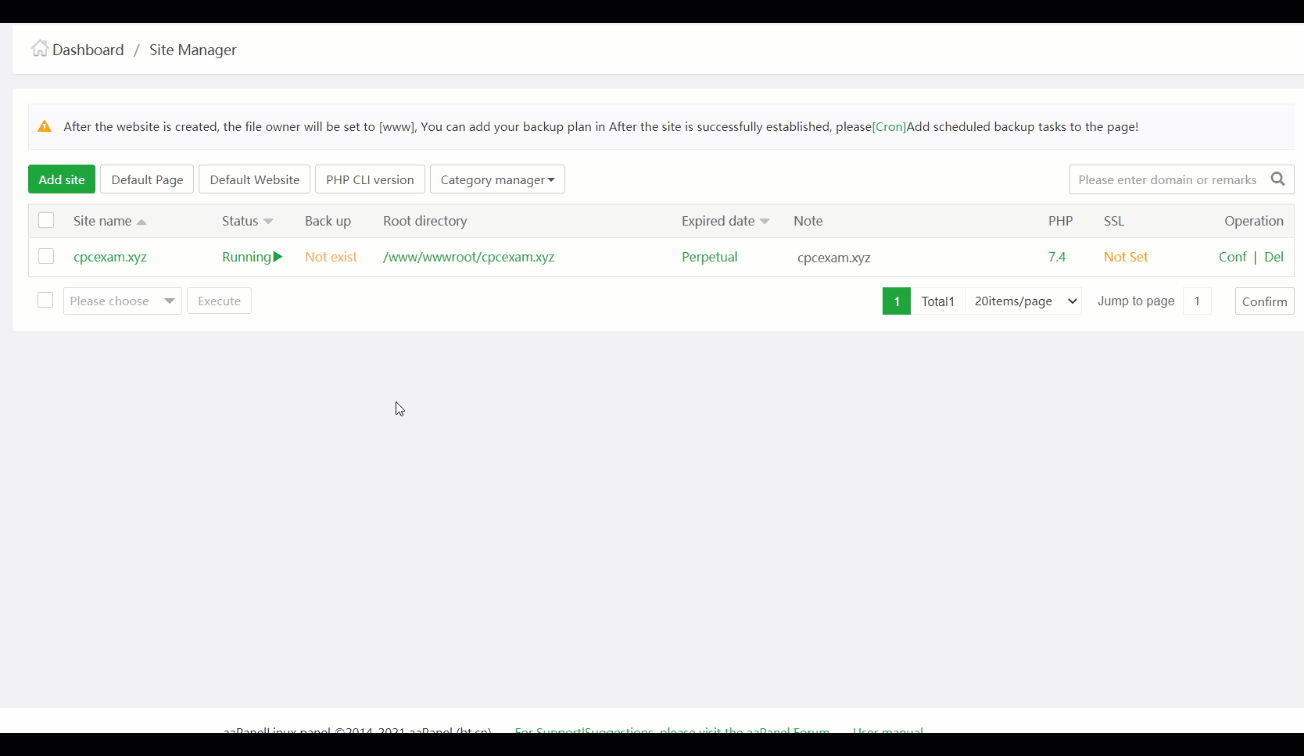
You need to type the domain on which you want to install WordPress. I’ll use the domain cpcexam.xyz as an instance.
Don’t forget to copy the Database username and password into your notepad.
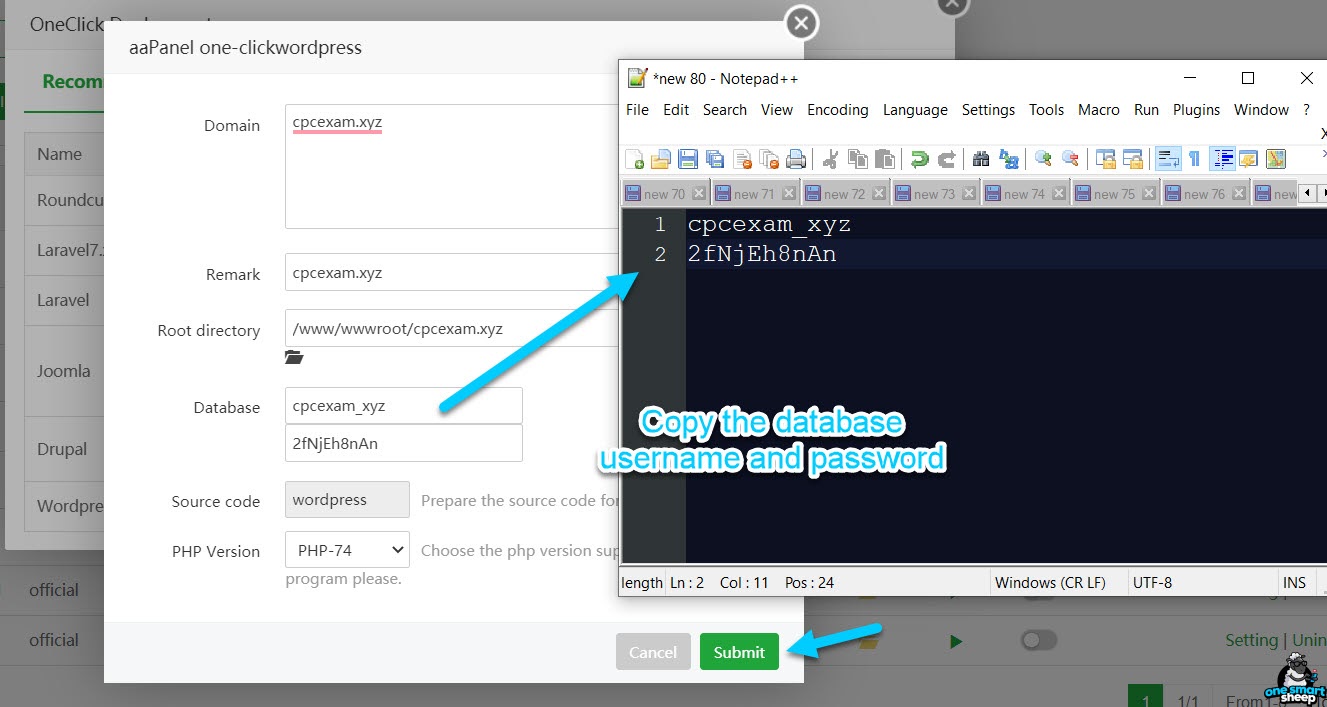
Once done, click Submit.

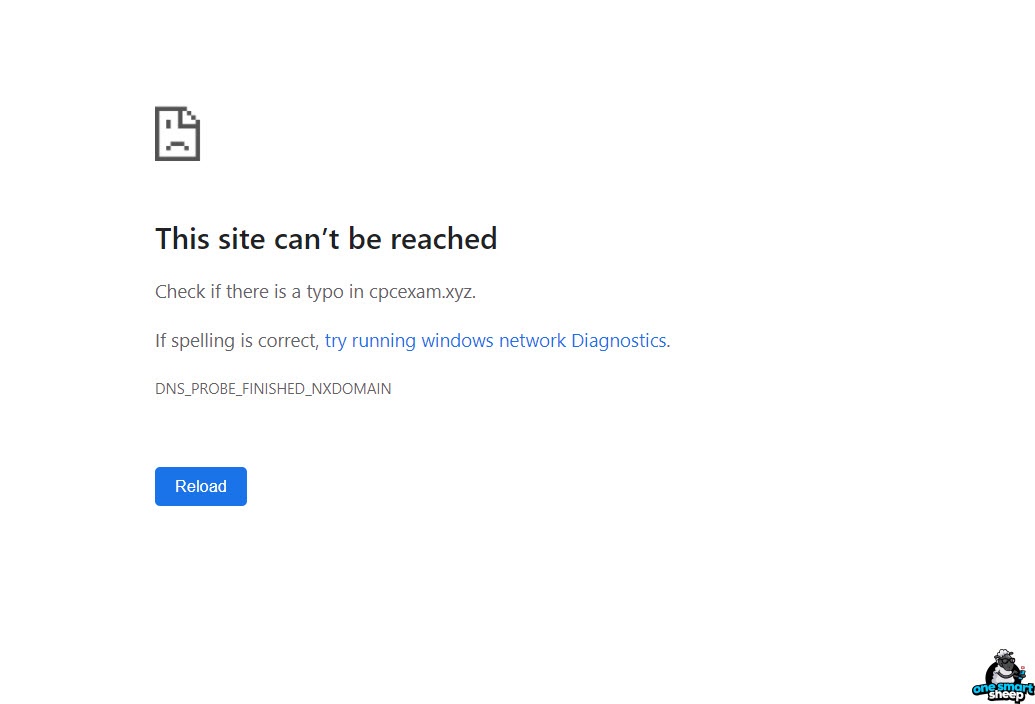
It’s not done yet :D You’ll get an error message if you try to access your website. Make sure you have put the DigitalOcean nameservers into your domain registrar.
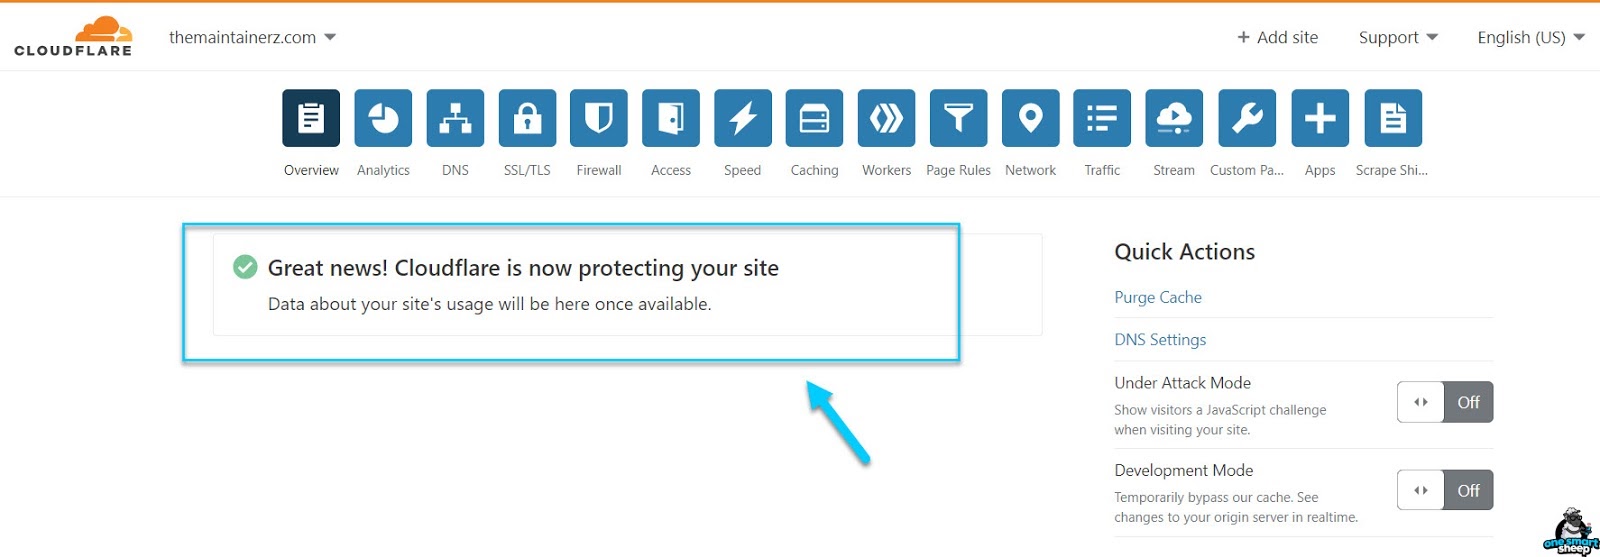
I’ll recommend installing Cloudflare since it protects your server from potential hackers by hiding your server IP and DDOS attacks.
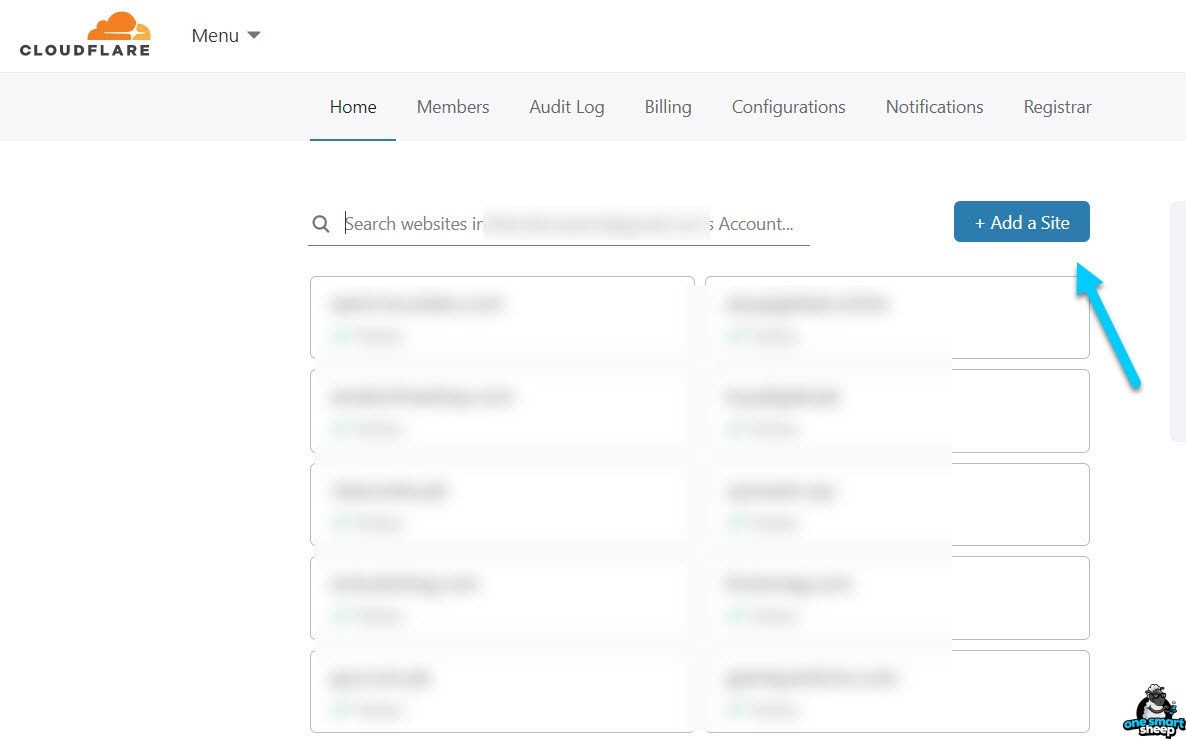
Let’s add a website to Cloudflare.

Once you’ve created your account, click Add a site.
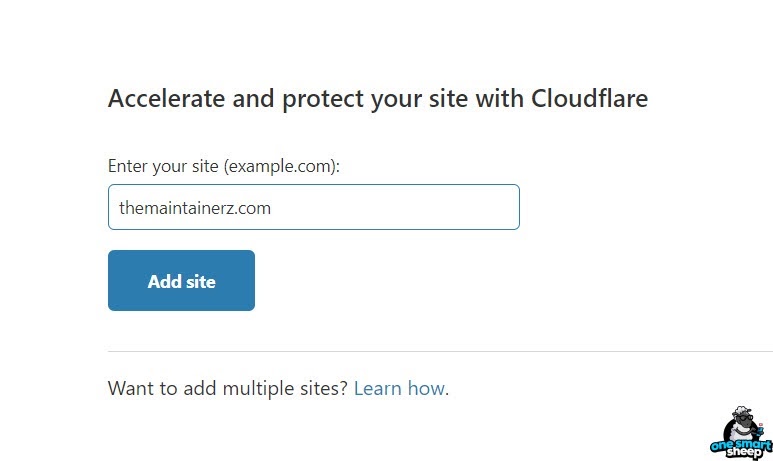
Enter your website to add to the Cloudflare network.
Select the free plan.
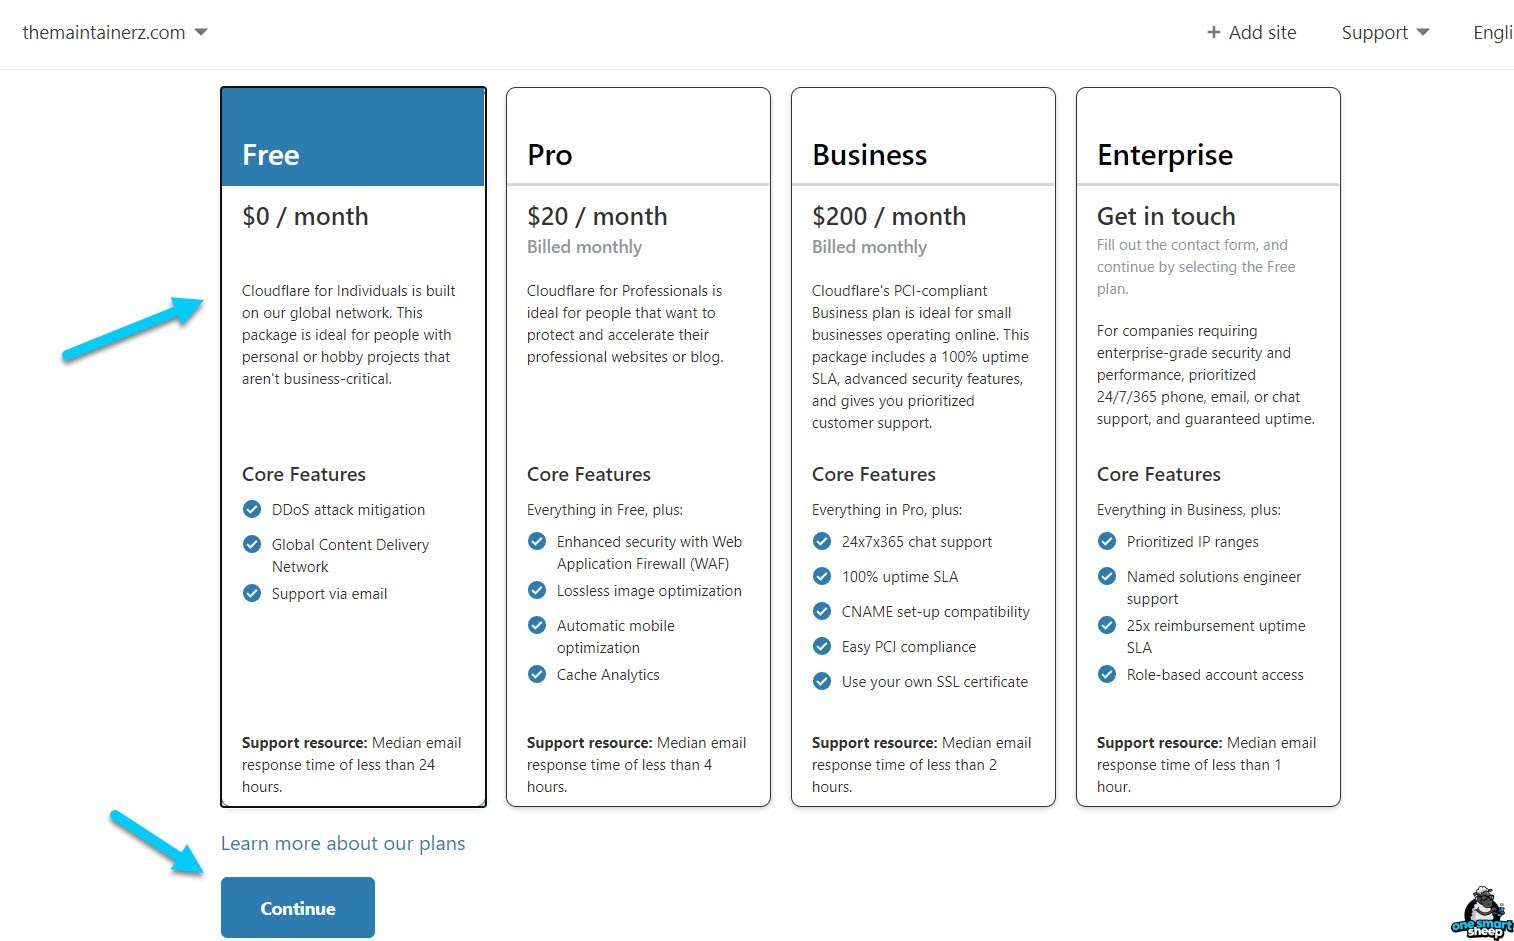
Click Continue.
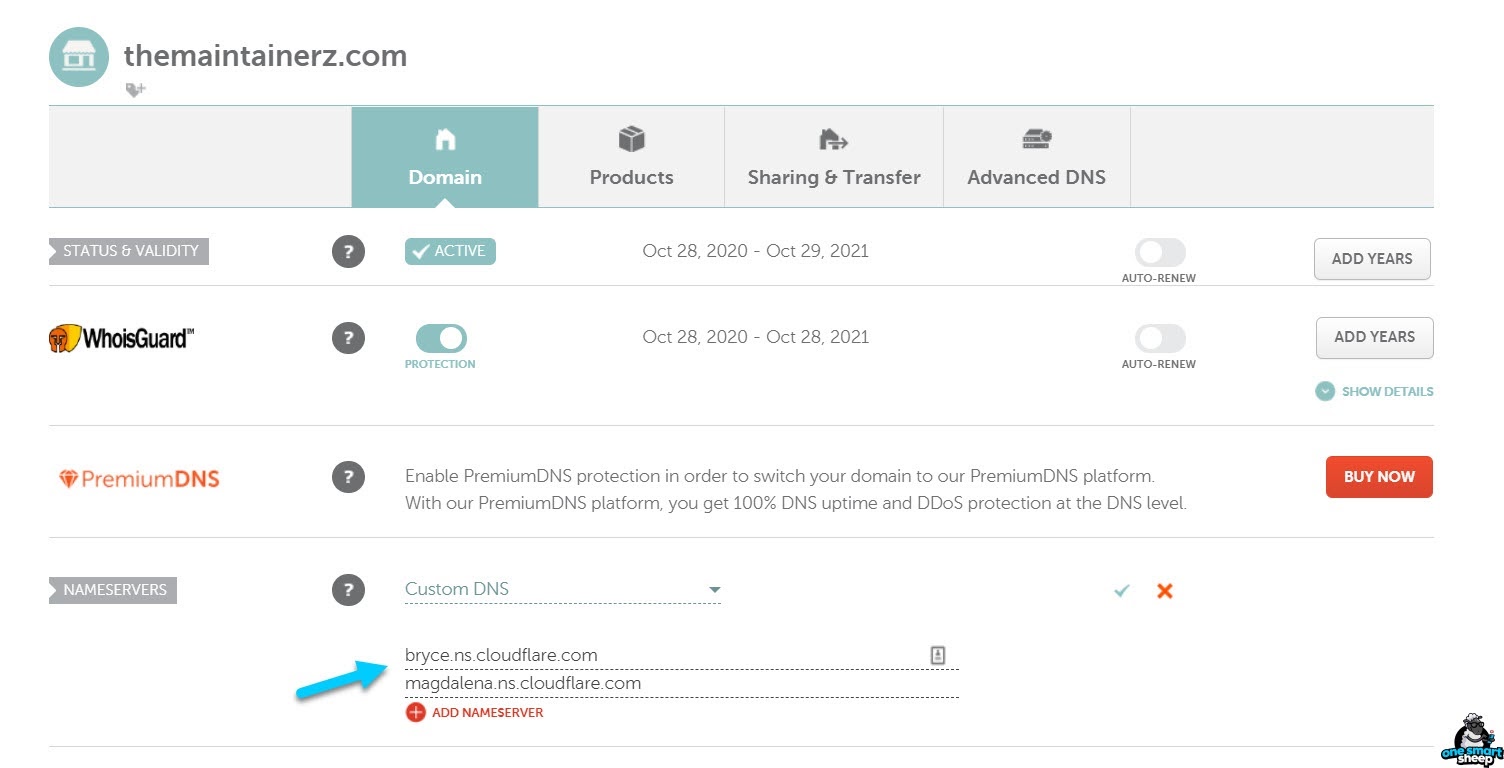
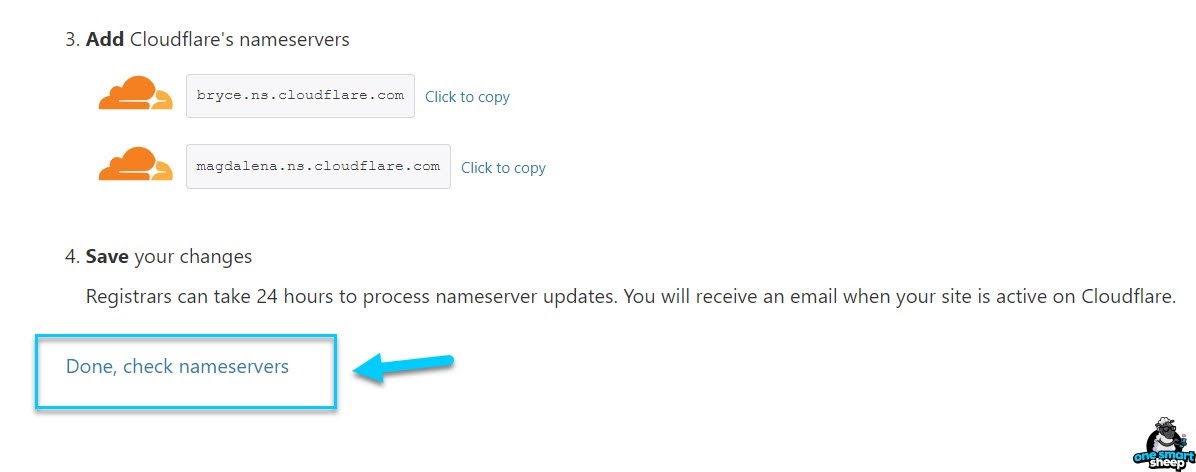
Copy the Cloudflare’s nameservers.
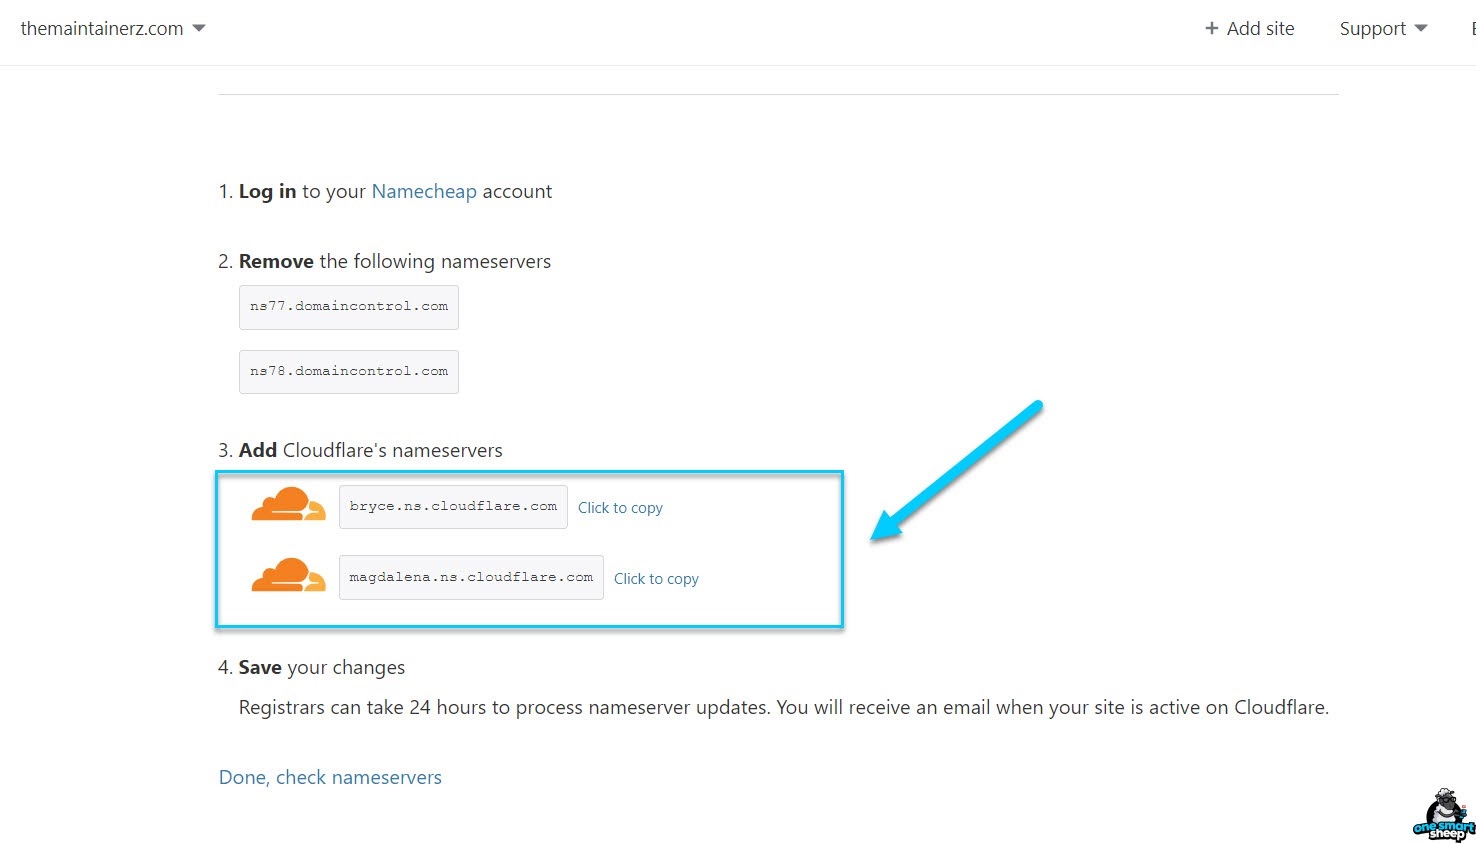
And paste into your domain registrar.
Now go back to Cloudflare, and click Done, check nameservers.
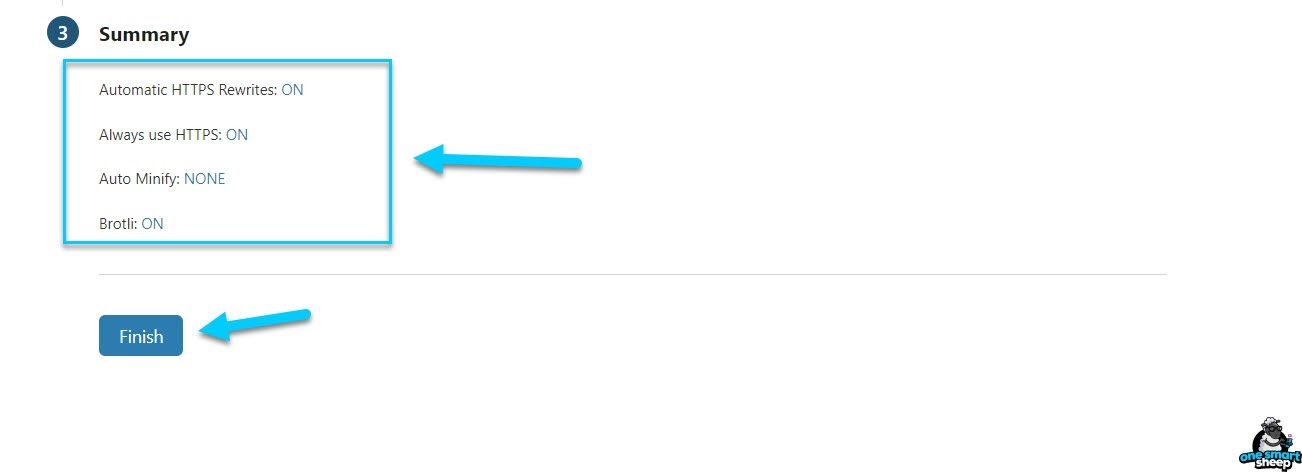
And click Finish.
It takes a few minutes to complete the DNS propagation. Sometimes, it might take an hour too.
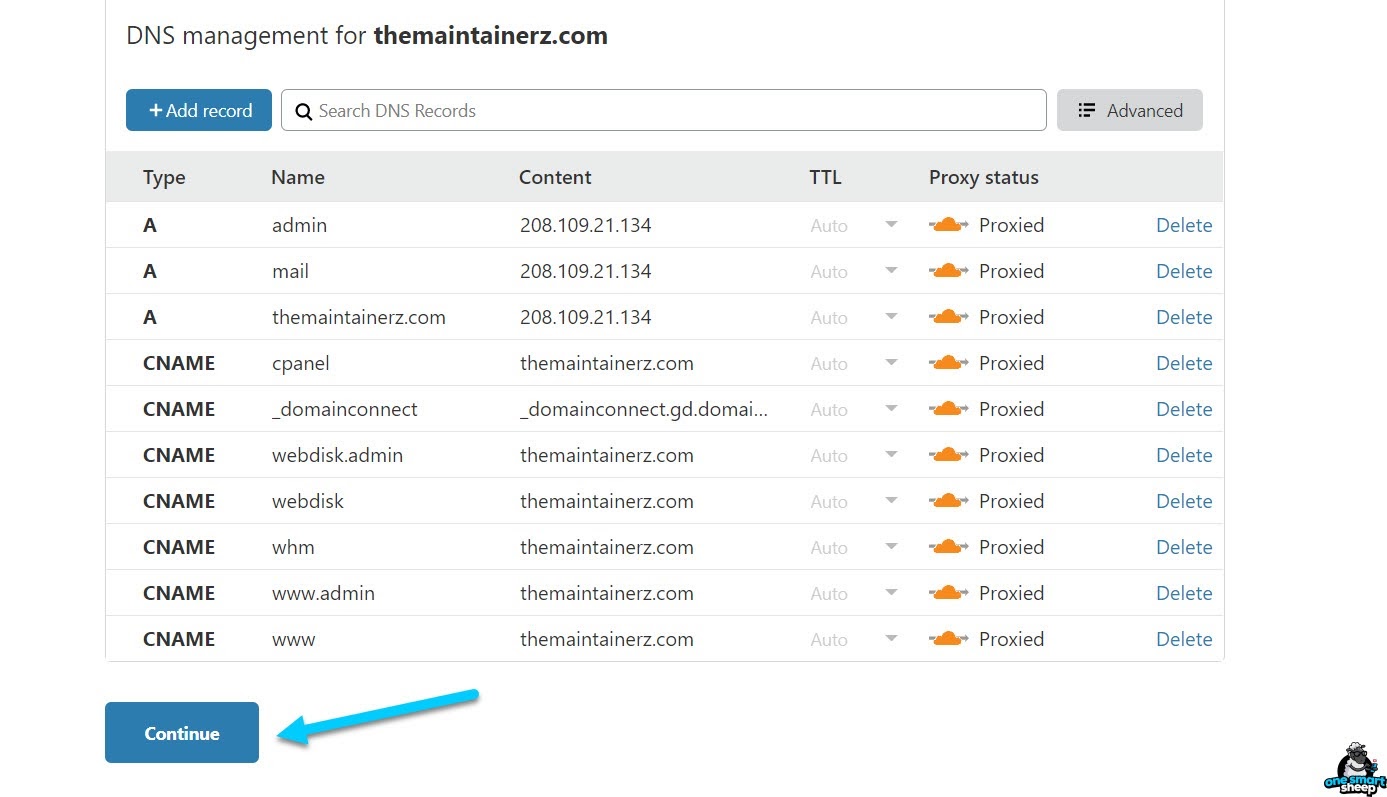
Once done, go to the DNS section and export all your records in case something goes wrong.
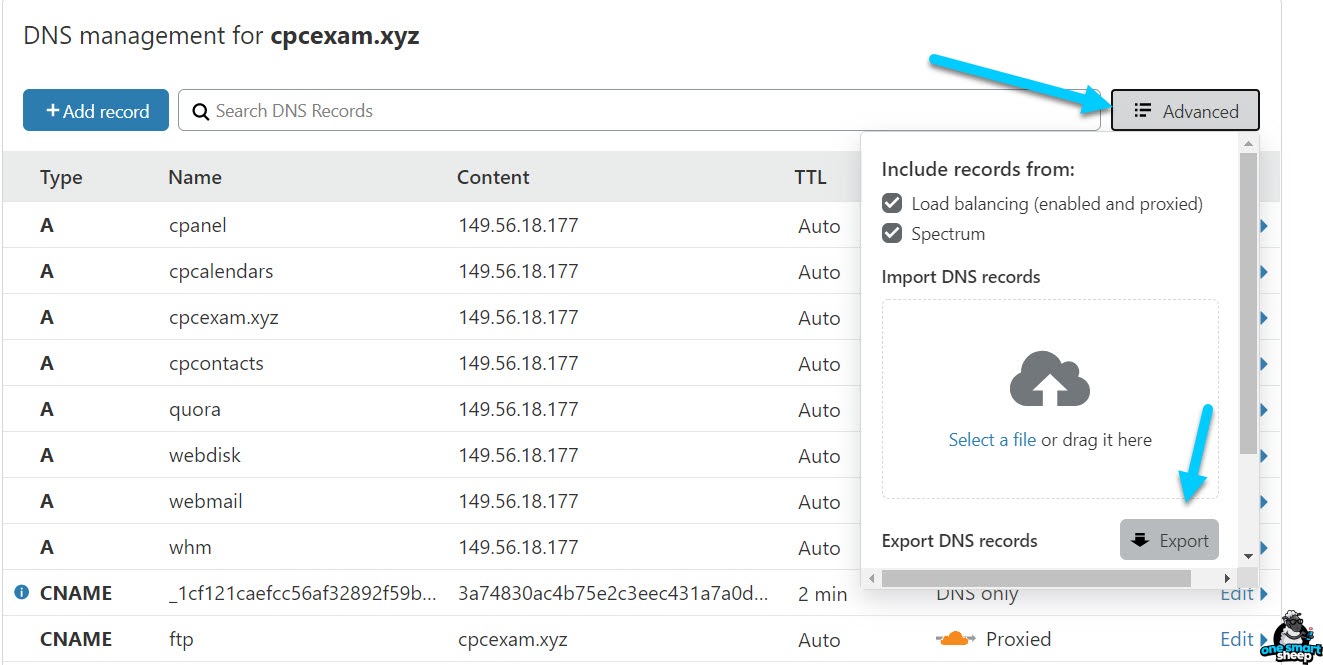
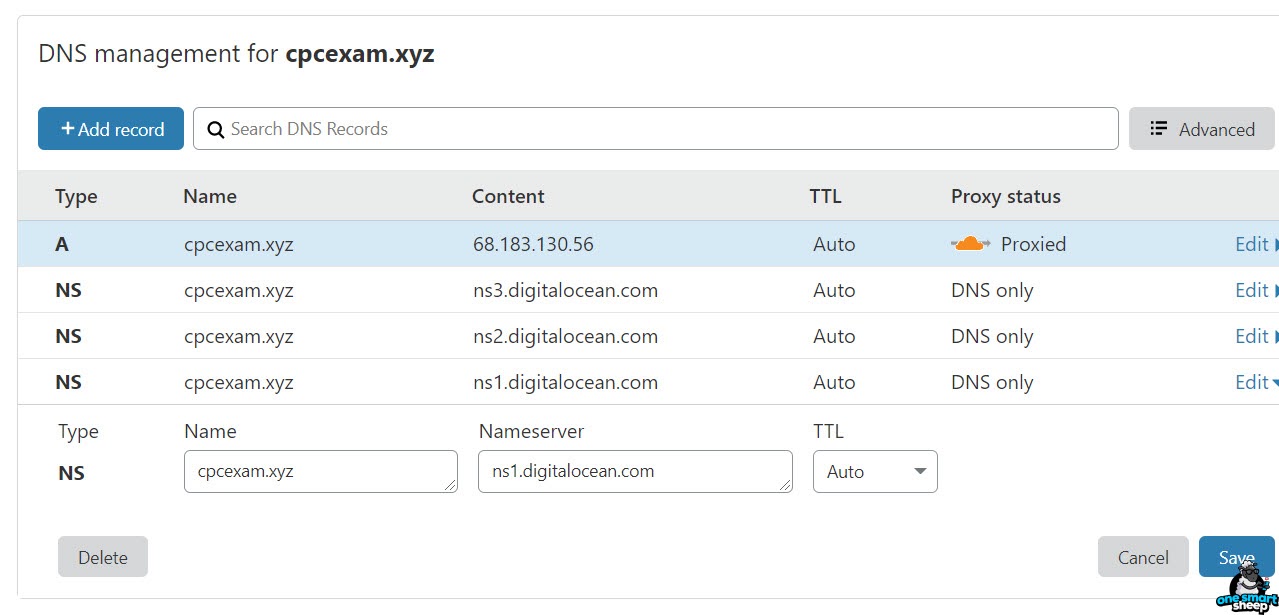
I’m going to delete all the DNS records.
As I have added the website to Cloudflare, I need to put the Digital Ocean’s name servers.
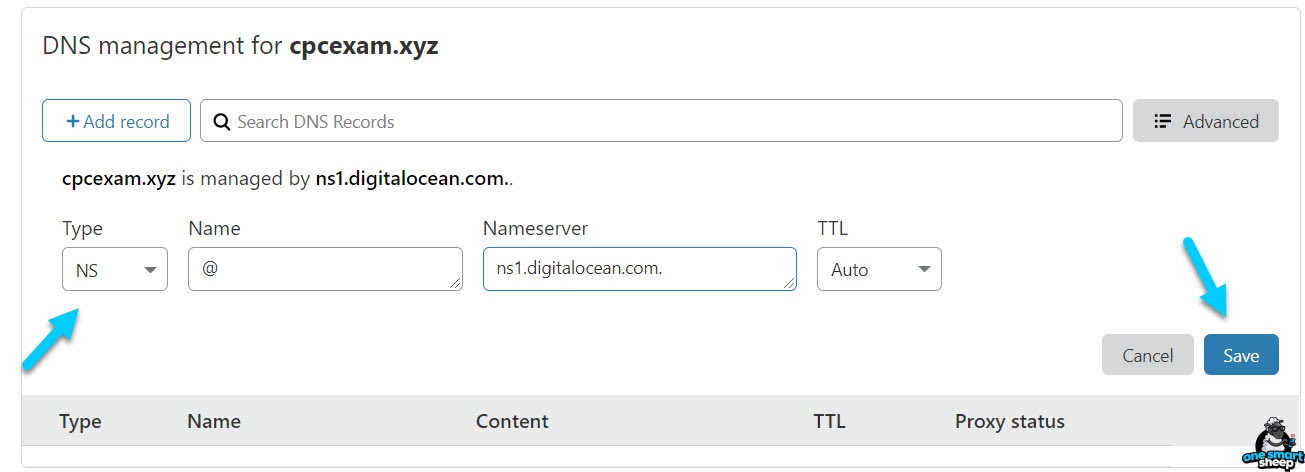
You have to add three name servers like these:

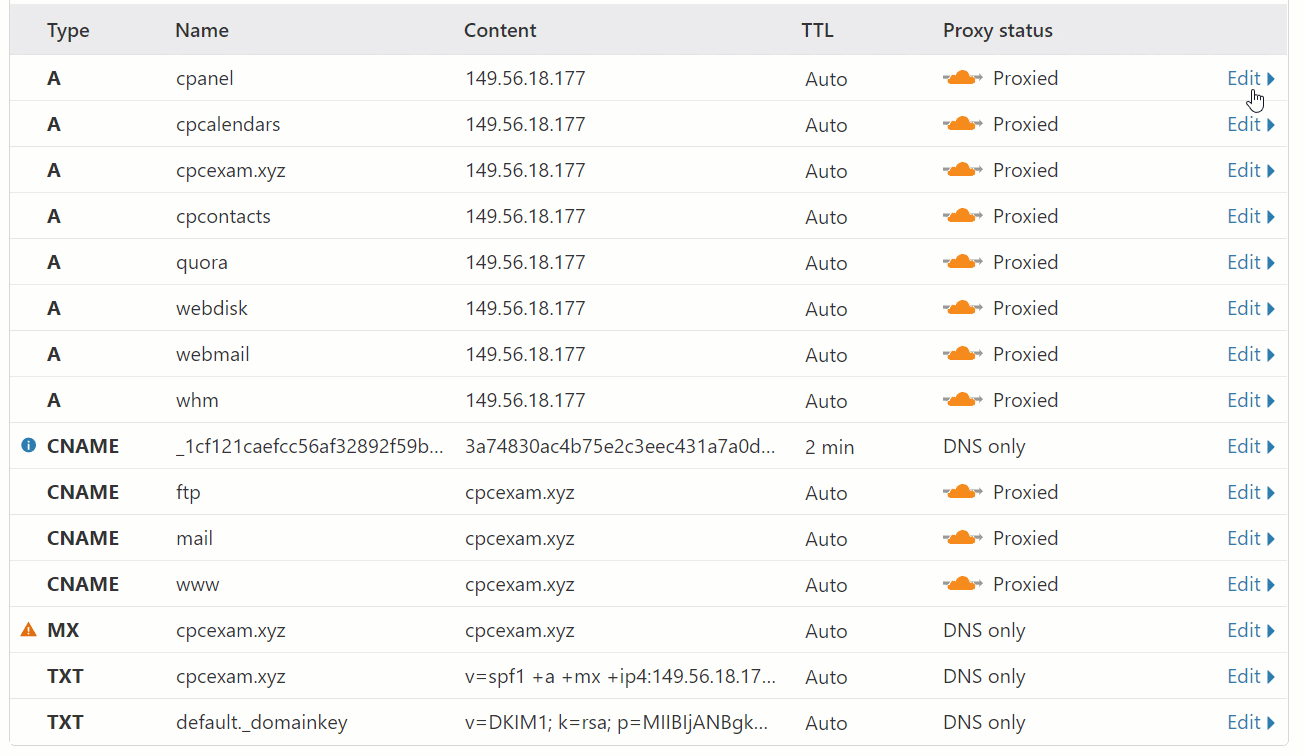
Now we need to add the A Record.

In a nutshell, you have to add four records: 3 nameservers and 1 A Record.
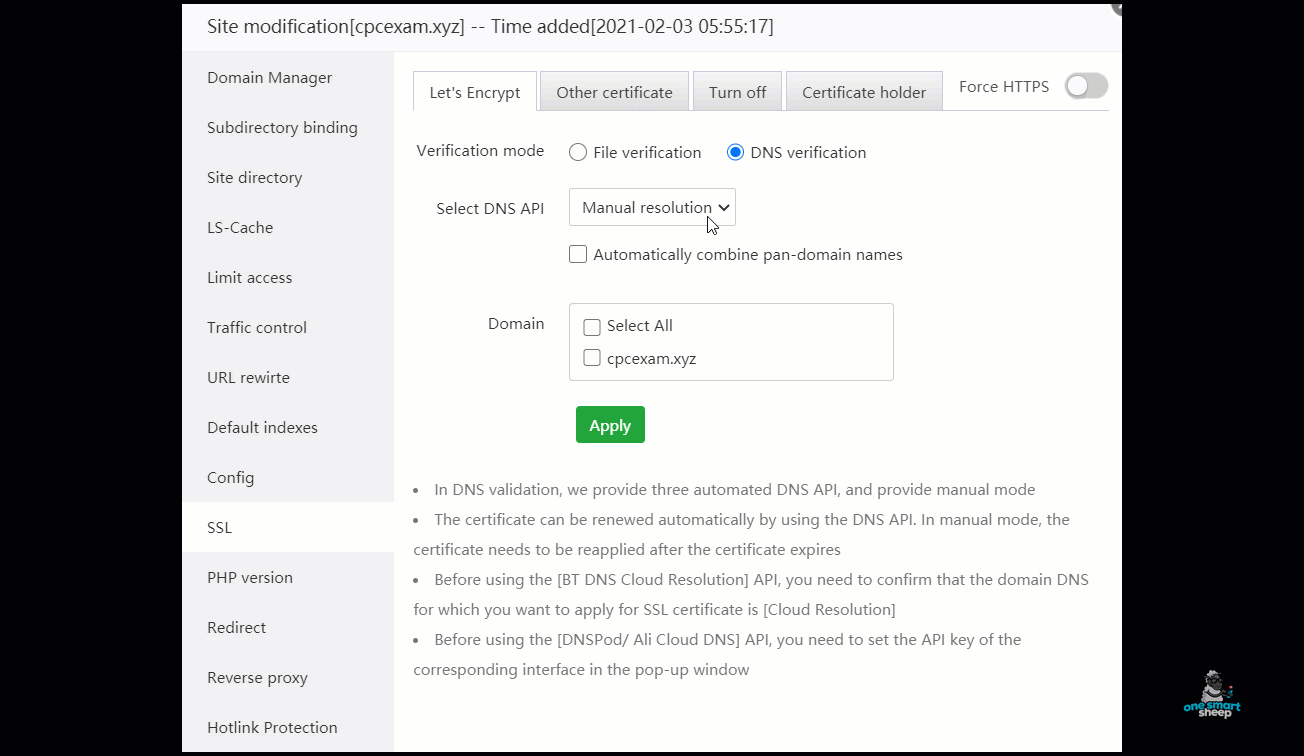
It’s time to install the SSL. Go back to aaPanel > Website and click the website where you want to install SSL. Without SSL, WordPress will not work. You can install an SSL, by the way.
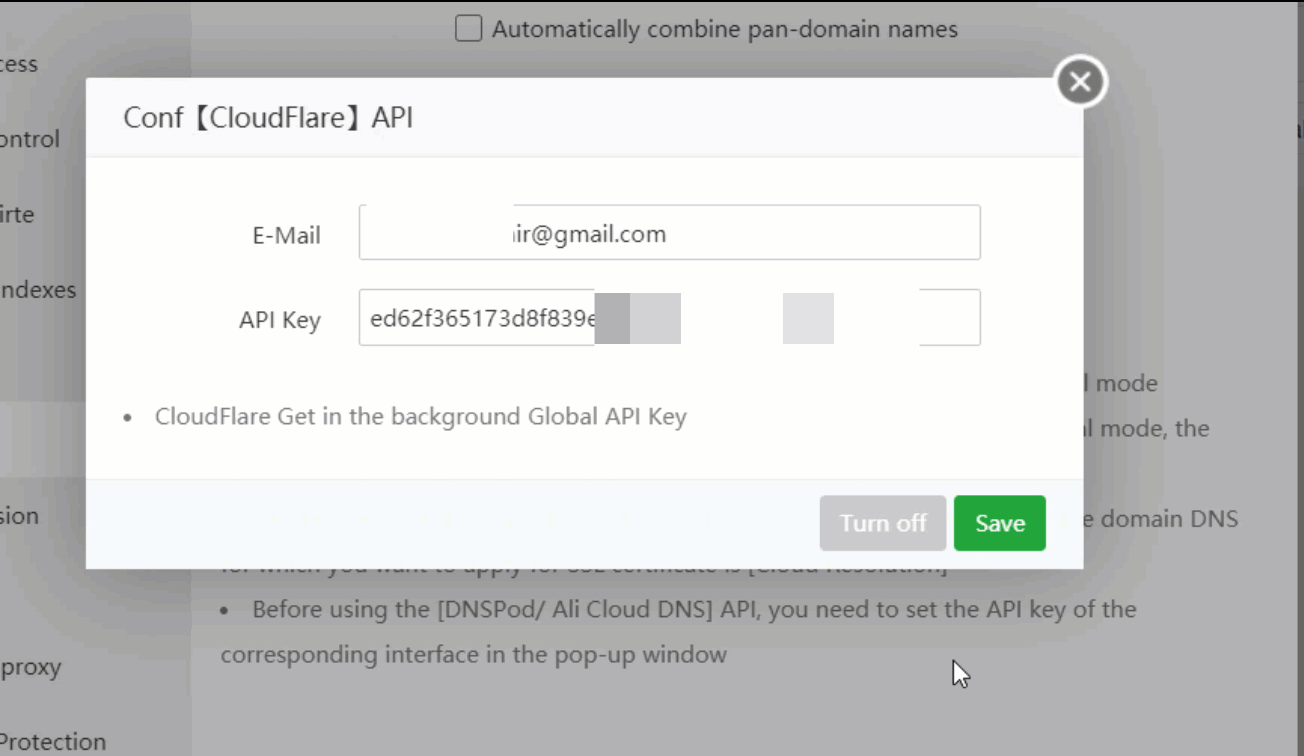
We need to put the email and API into the SSL section of aaPanel.
Go to SSL > Let’s Encrypt > DNS Verification > Cloudflare API and enter the email and the Global API Key.
To get the Global API, click My Profile > API Tokens > View of Global API Key.

As you can see how I set up the API.
The free SSL is being installed, and it’s automatically renewed for a lifetime.
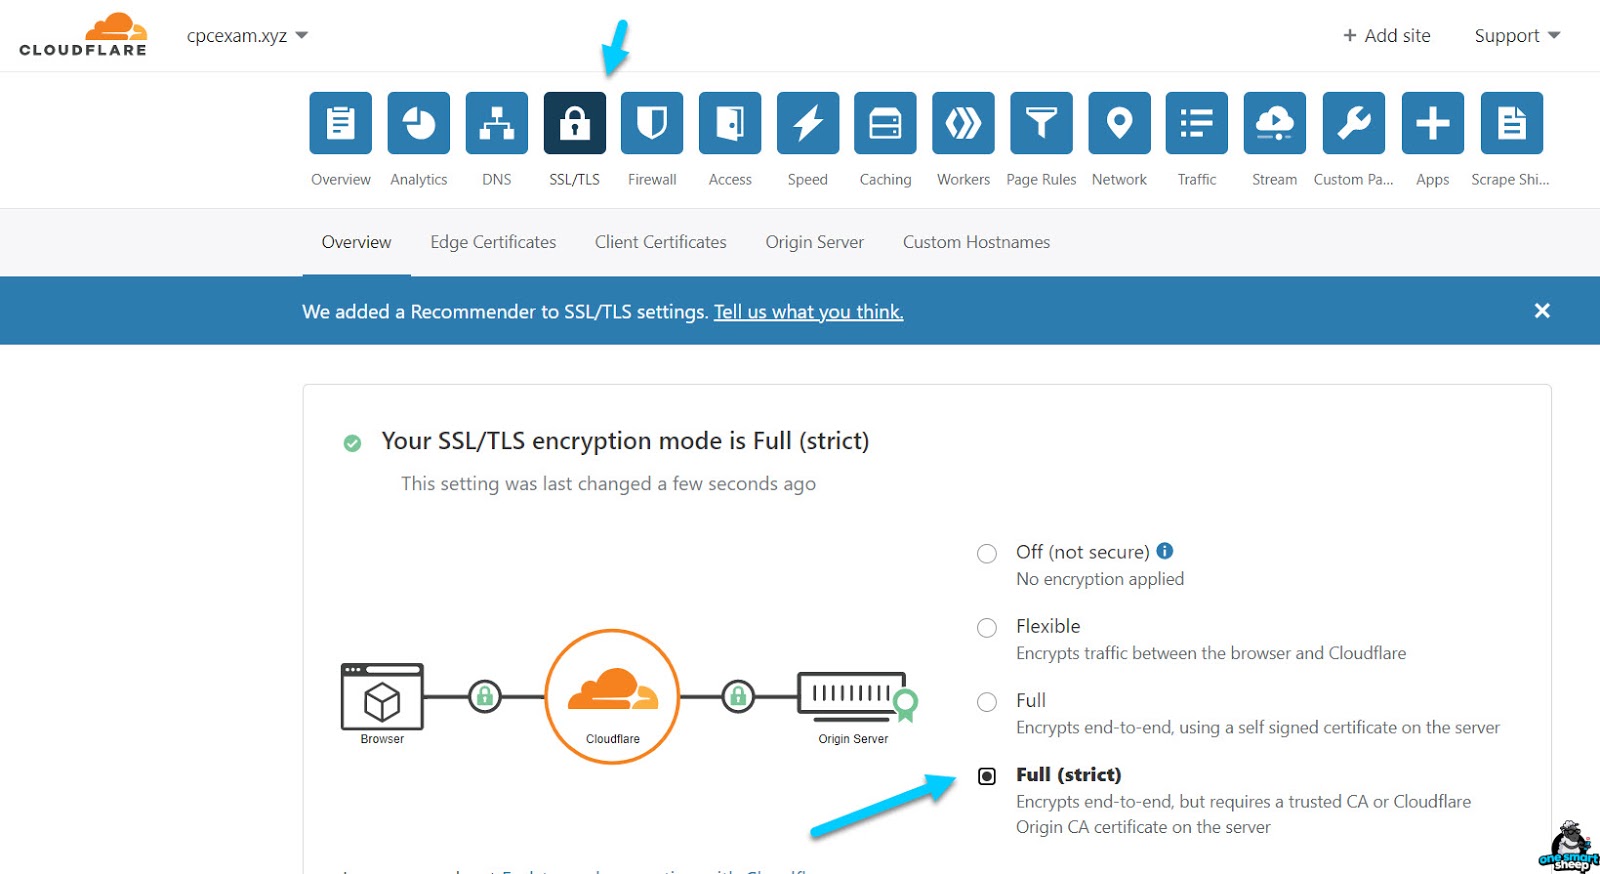
Sometimes your website might give you an error like this:
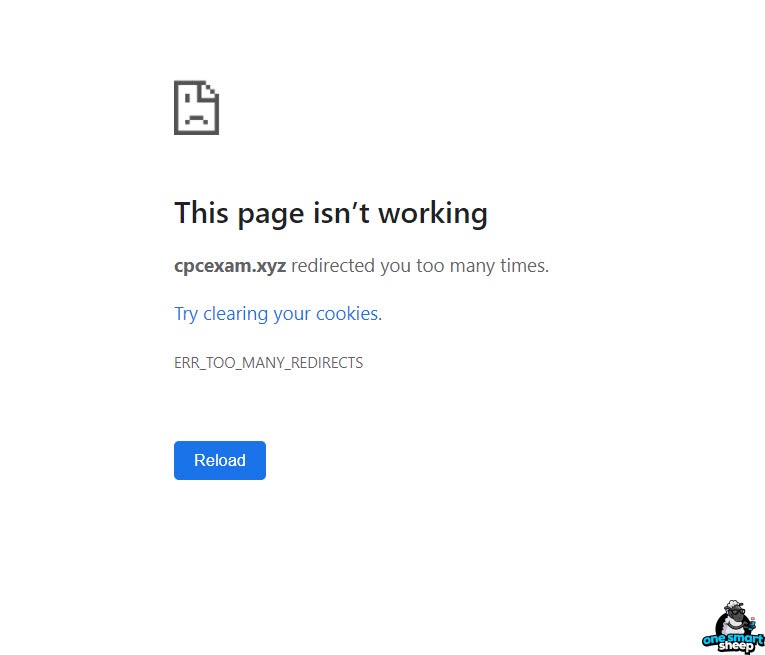
It happens when you don’t put the SSL to full.
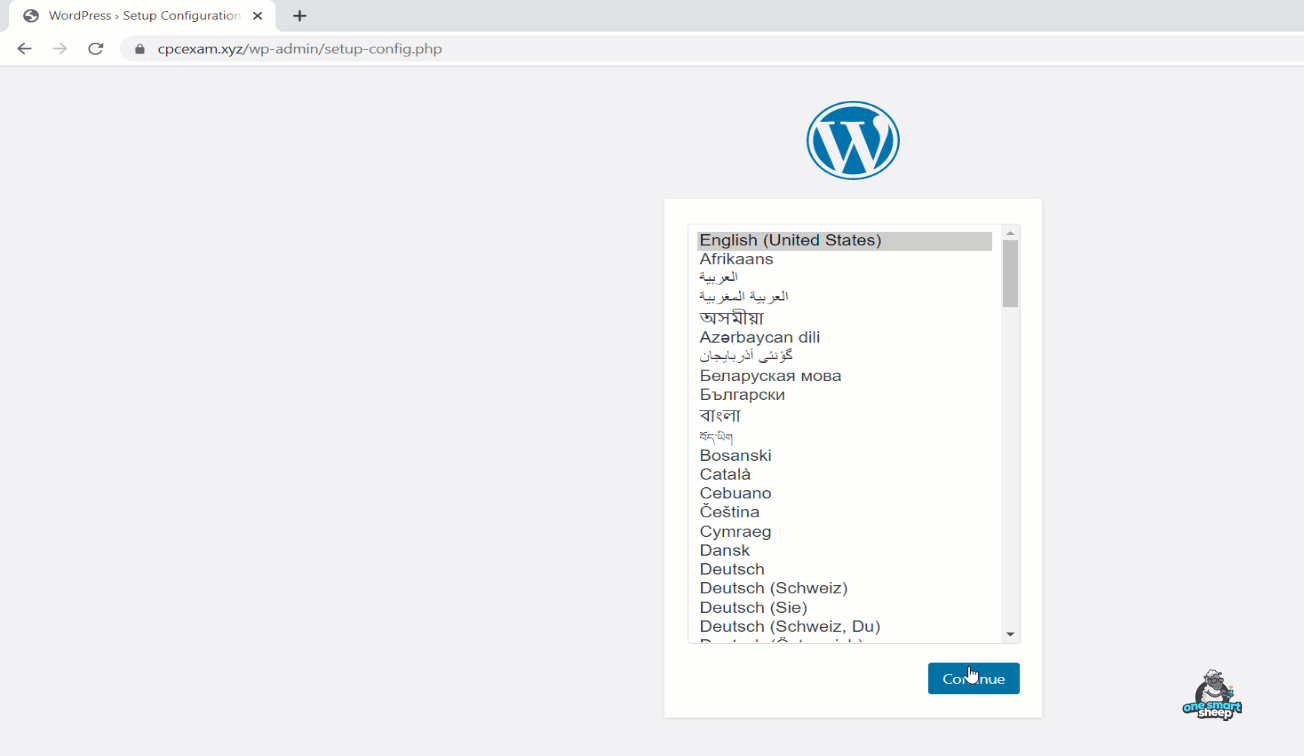
Refresh your website; now you can install WordPress. Put the Database name, Username, and Password that we copied during the One-Click Deployment WordPress installation.
Moreover, put a strong username and password to install WordPress. Congratulations! WordPress has been installed successfully.
Step 11 - Google Drive Daily Backups
You can enjoy the premium features of aaPanel for free. You can create regular backups of your website on Google Drive without taking any space on your server storage drive.
It’s useful to have regular backups if your server gets hacked or your website shows unusual behavior.
Make sure you have installed Google Drive on your server. Go to the App Store and install Google Drive.

Once installed and authenticated with your Google Drive, go to Cron and select Backup site from Type of Task and select any website from the list or create all websites’ backups.
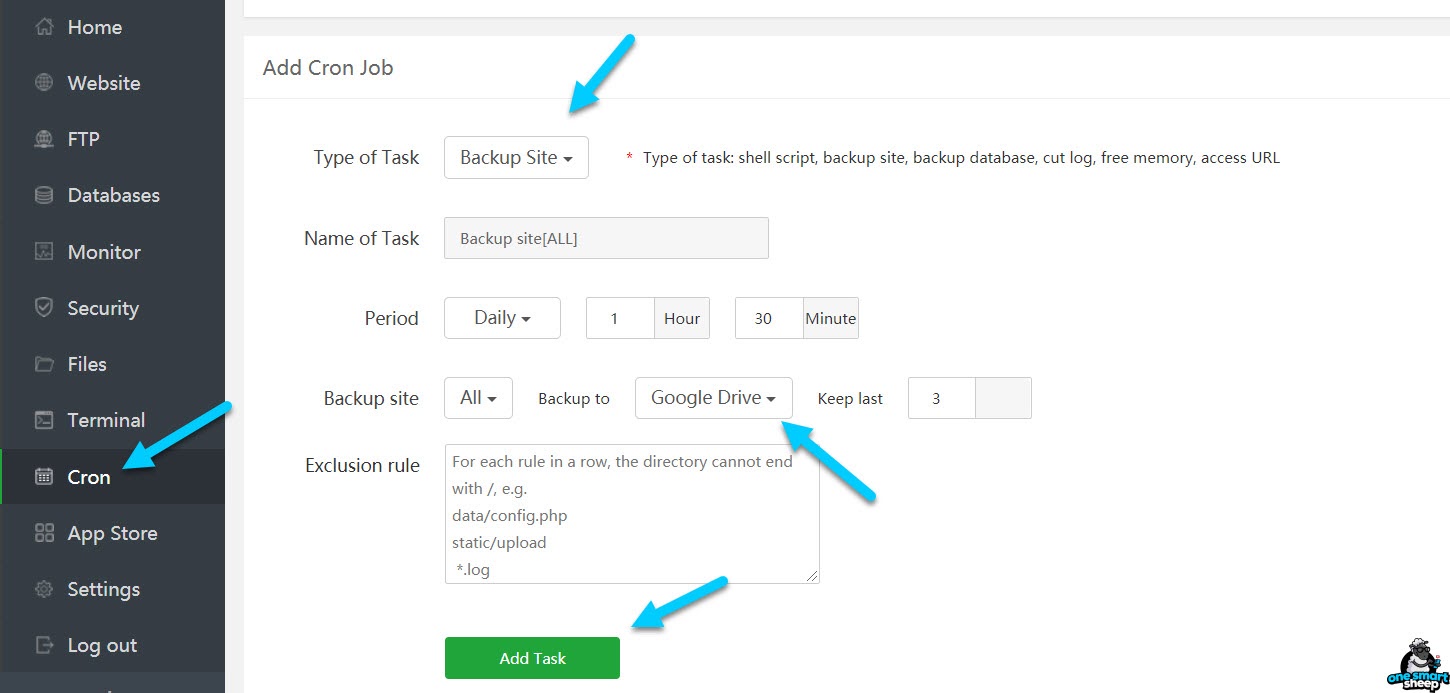
Don’t forget to create backups of your database; otherwise, your backups are useless.
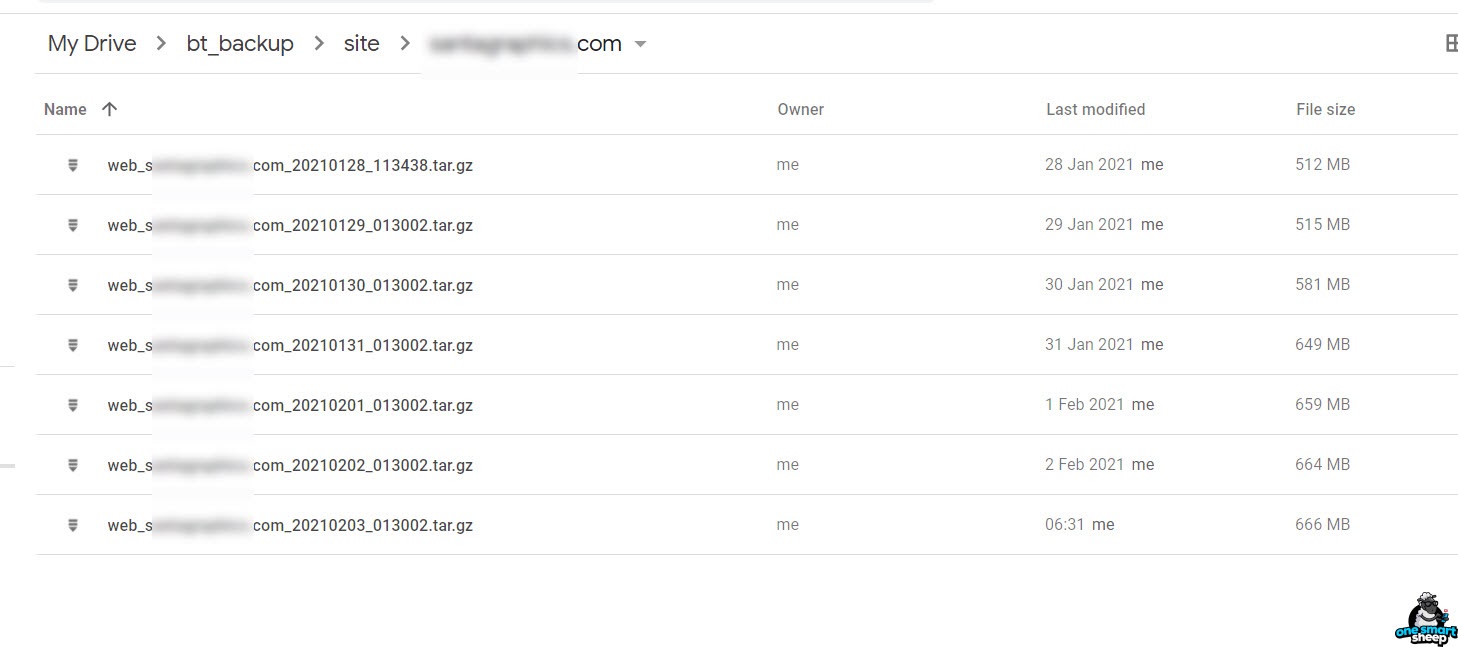
These backups are stored on your Google Drive in your bt_backup folder.
Don’t Install WordPress on CentOS 8
The open-source community got furious when RedHat killed CentOS after IBN purchased RedHat in 2019 for 34 billion dollars.
It means the security upgrades for CentOS 8 will end in 2021 rather than 2029, as users anticipated.
So it’s recommended not to install WordPress on CentOS 8. Of course, you can install WordPress on CentOS 7, whose security upgrades end in 2024.
But the recent move, the date might be changed at no prior notice, as is the case with CentOS 8.
Instead of choosing CentOS 8 or 7, you go after Ubunto.
Why We Love Digitalocean
Since its launch in 2011, DigitalOcean has quickly become a top choice for cloud hosting, now serving over a million clients.
The company offers virtual private servers (VPS) called "Droplets" that provide a simple yet robust hosting solution starting at just $5 per month.
A key ingredient in DigitalOcean's tremendous growth is their commitment to simplicity and ease of use. The intuitive control panel and pre-configured Droplets enable users to be up and running quickly without complex setup.
In addition, DigitalOcean offers extensive tutorials, a responsive support team, and a vibrant community forum.
For those looking to host WordPress sites, DigitalOcean checks many boxes. The affordable and scalable Droplets provide the power and flexibility to handle resource-heavy CMS platforms.
Also, the built-in control panel makes deploying WordPress a breeze. Furthermore, features like block storage and cloud firewalls help secure and fine-tune your WordPress site performance.
DigitalOcean's winning combination of simplicity, great support, and low-cost scalable hosting has fueled their rise to prominence in the cloud hosting arena.
For do-it-yourselfers migrating WordPress sites, DigitalOcean deserves strong consideration. Now let's look at the step-by-step process for getting your WordPress instance set up.
Different Types of DigitalOcean Droplets
- Standard Droplets: These are versatile and offer a balanced CPU-to-memory ratio. They are suitable for a wide range of applications, making them a good choice for general-purpose applications and development environments.
- CPU-Optimized Droplets: These droplets provide high CPU availability and are best for CPU-intensive applications. They are ideal for tasks such as video encoding, continuous integration/continuous deployment (CI/CD), and game servers.
- Memory-Optimized Droplets: Designed with more memory resources, these droplets are suitable for high-memory processes. They are perfect for running in-memory databases and real-time big data processing.
- Storage-Optimized Droplets: These droplets offer high disk I/O performance and are designed for applications that require intense I/O operations. They are excellent for high-performance databases and large data processing tasks.
- General Purpose Droplets: Offering a balance of CPU, memory, and I/O with dedicated vCPU for consistent performance, these droplets are well-suited for production applications and business-critical workloads.
Final Thoughts
DigitalOcean has made WordPress installing easy and straightforward. It offers excellent performance, flexibility, and control, and the tools that make your life easier.
aaPanel, a great cPanel great alternative, has excellent features that enhance your server security and make maintenance simple and affordable. You can host plenty of websites that otherwise might cost hundreds of dollars on other hosting companies.
If you didn’t get any step, don’t hesitate to comment below. I promise you’ll get a reply within 24 hours. We love our clients and website visitors.


.svg)