


Hey, what's up? Today I'm going to show you EXACTLY how to edit header in WordPress. In fact, these are the same techniques I've personally used to boost conversion rates by 27% on my own sites.
Let me be clear: your website header is CRITICAL. It's literally the first thing visitors see, and you know what they say about first impressions...
So if you want to create a header that actually converts visitors into subscribers and customers, you'll love this comprehensive guide.
Let's dive in.
Here are the topics we’ll cover today,
- Why Your WordPress Header Matters
- Understanding WordPress 5 Header Editing Options
- Method #1: Using the WordPress Theme Customizer
- Method #2: Early Block Editor Integration
- Method #3: Header Builder Plugins
- How to Edit Header in WordPress Default Themes
- Header Editing Best Practices
With that said, let’s start with why a header matters in your WordPress website.
Why Your WordPress Header Matters
Here's the deal:
Your website header isn't just some decorative element. It's a POWERFUL conversion tool that:
- Makes a crucial first impression on visitors
- Houses your logo and brand identity
- Contains your main navigation
- Can include critical CTAs and contact info
In my 10+ years of building high-converting websites, I've found that optimizing your header can dramatically impact your site's performance.
The bottom line? Learning how to edit header in WordPress is one of the highest-ROI skills you can develop.

Understanding WordPress 3 Header Editing Options
Before we dive into the step-by-step process of how to edit header in WordPress, let's get something straight:
Your theme is the #1 factor that determines your header customization options.
In WordPress 3 specifically, there are three main approaches to header editing:
- WordPress Theme Customizer - The built-in visual editor
- Early Block Editor Integration - Limited in WP5 but worth knowing
- Header Builder Plugins - For advanced customization
Let me walk you through each method, starting with the most accessible option.
Method #1: Using the WordPress Theme Customizer
The Theme Customizer is WordPress's built-in visual editor, and it's PERFECT for beginners who want to edit header in WordPress without touching code.
Here's exactly how to use it:
Step 1: Access the Customizer
- Log into your WordPress dashboard
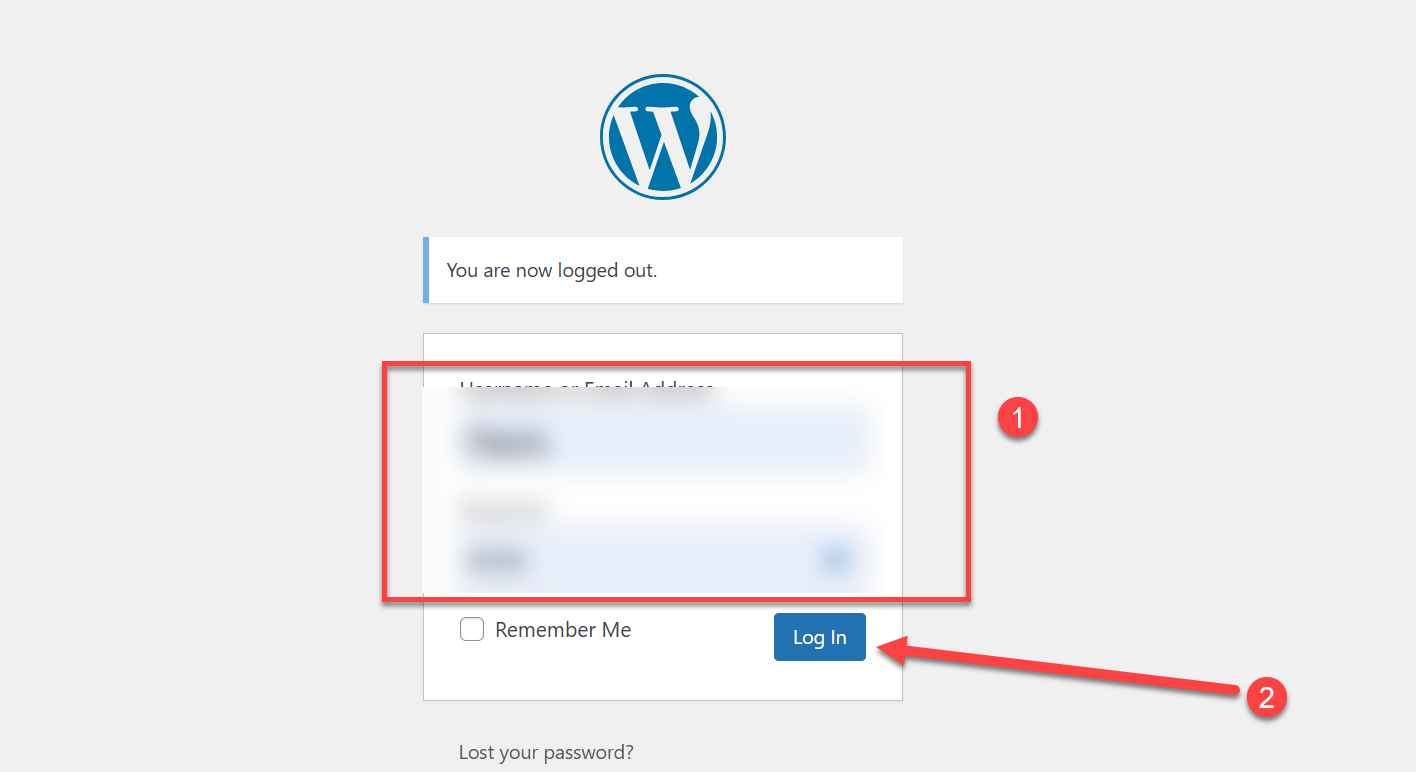
- Hover over "Appearance" in the left sidebar and click "Customize".

You'll now see a live preview of your site on the right with customization options on the left.
Step 2: Find Header Options
Depending on your theme, look for sections labeled:
- "Header"
- "Header Options"
- "Header & Navigation"
- "Site Identity" (for logo options)
Step 3: Customize Logo and Site Identity
Most themes allow you to add a custom logo and adjust site title/tagline:
<!-- Example HTML structure for a WordPress header -->
<header id="masthead" class="site-header">
<div class="site-branding">
<a href="<?php echo esc_url( home_url( '/' ) ); ?>" rel="home">
<?php if ( has_custom_logo() ) : ?>
<?php the_custom_logo(); ?>
<?php else : ?>
<h1 class="site-title"><?php bloginfo( 'name' ); ?></h1>
<?php endif; ?>
</a>
<p class="site-description"><?php echo get_bloginfo( 'description' ); ?></p>
</div>
</header>
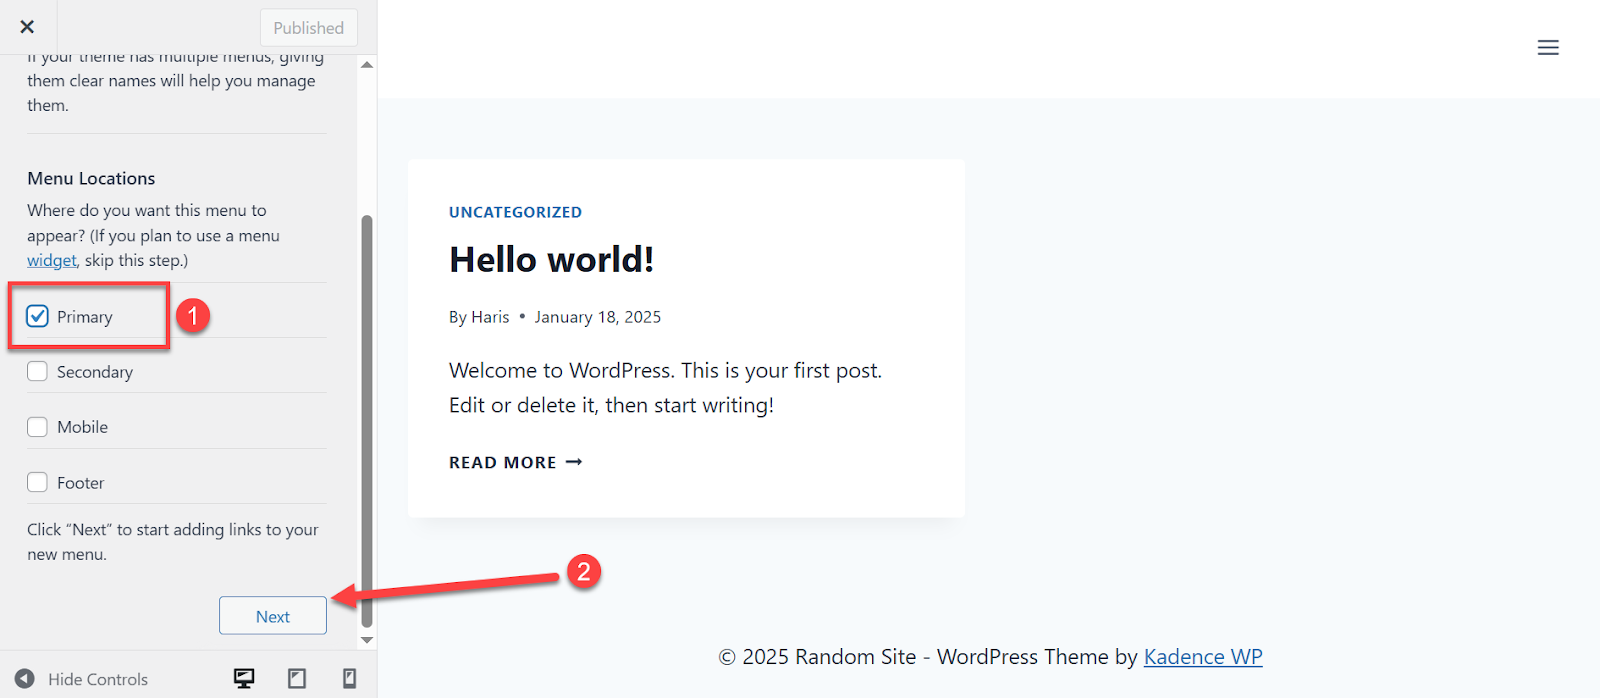
Step 4: Configure Navigation Menu
The navigation menu is a crucial part of how to edit header in WordPress:
- Go to "Menus" in the Customizer
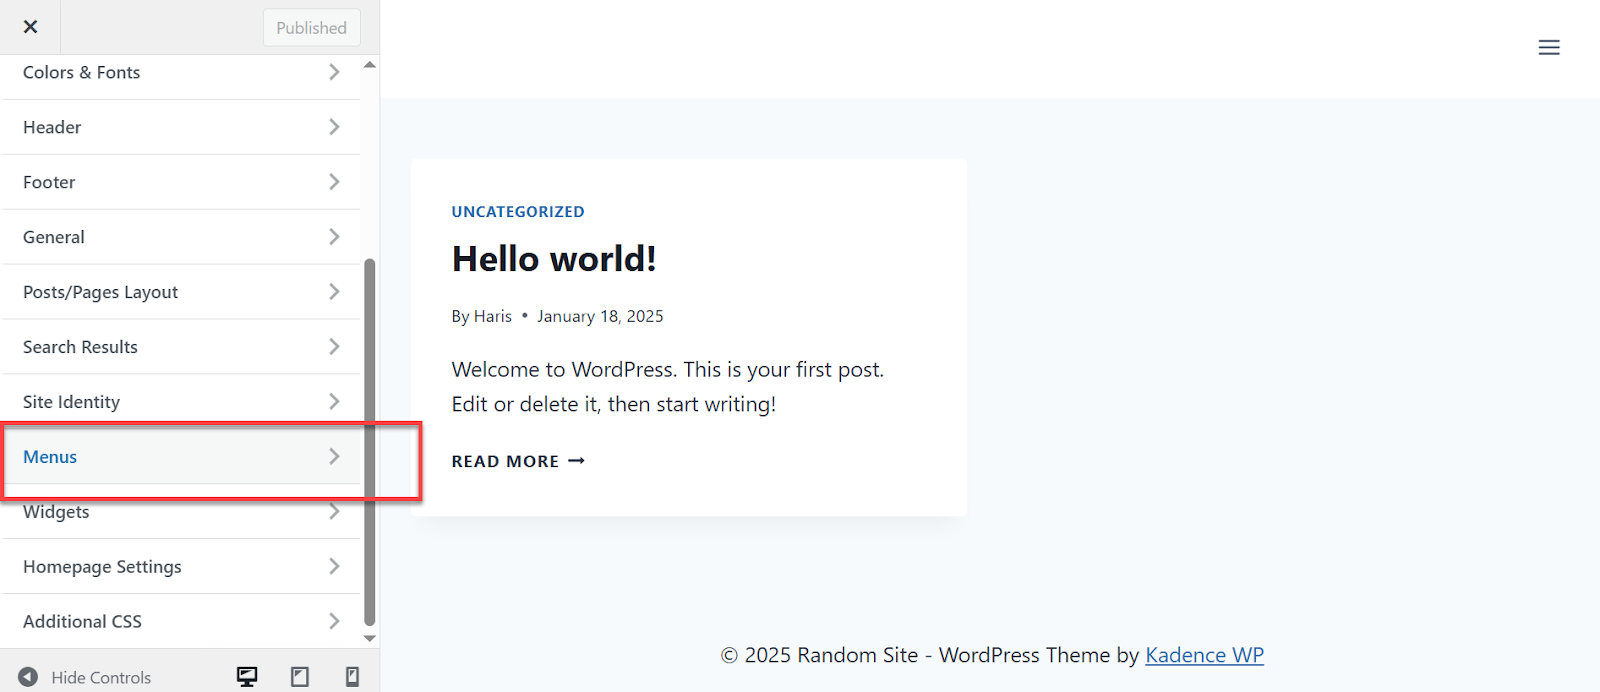
- Select an existing menu or create a new one

- Assign it to the "Primary Menu" or "Header Menu" location
Step 5: Adjust Colors and Typography
Many themes let you customize:
- Header background color
- Text colors
- Link colors
- Basic typography options
This CSS snippet shows how these customizations work behind the scenes:
/* Example CSS for header customization */
.site-header {
background-color: var(--header-bg-color, #ffffff);
padding: 20px 0;
}
.site-title {
font-family: var(--header-font-family, 'Arial, sans-serif');
font-size: var(--header-font-size, 24px);
color: var(--header-text-color, #333333);
}
.main-navigation a {
color: var(--nav-link-color, #555555);
font-weight: var(--nav-font-weight, 600);
}
.main-navigation a:hover {
color: var(--nav-link-hover-color, #000000);
}
Step 6: Header Layout Options
Some themes offer layout variations:
- Centered headers
- Logo left/navigation right
- Full-width vs. contained
- Height adjustments
Step 7: Additional Header Elements
Depending on your theme, you might be able to add:
- Search forms
- Social icons
- Shopping cart (for WooCommerce)
- CTA buttons
Method #2: Early Block Editor Integration
While full Site Editing wasn't available in WordPress 5, some themes started implementing block-based header elements.
Important note: This approach was less common in WordPress 5 and varied significantly between themes.
Here's how to check if your theme supports it:
- Look for theme options panels with terms like "Header Blocks"
- Check the Customizer for block-based header sections
If available, you might be able to use these blocks in your header:
- Site Logo block
- Site Title block
- Navigation block
- Social Icons block
- Button block
Method #3: Header Builder Plugins
Now for the POWER method of how to edit header in WordPress:
Header builder plugins give you drag-and-drop control for COMPLETE customization.
Top Header Builder Plugins for WordPress 5:
- Elementor (+ "Ultimate Addons for Elementor") - My personal favorite
- Divi - Great all-in-one solution
- Beaver Builder (+ Beaver Themer)
- SeedProd - Excellent for landing pages too
- JetBlocks (For Elementor)

How to Use Header Builder Plugins:
- Install and activate your chosen plugin:
Dashboard > Plugins > Add New > Search > Install > Activate
- Access the header builder:
- For Elementor: Templates > Theme Builder > Headers
- For Divi: Divi > Theme Builder > Headers
- For Beaver Builder: Beaver Builder > Theme Builder > Headers
- Create a new header template
- Design your header using the drag-and-drop interface:
- Add logo, menus, buttons, search forms, etc.
- Customize colors, fonts, spacing
- Set up mobile responsiveness
- Configure display conditions to control where your header appears
- Publish your custom header
Sample JavaScript for Sticky Header Functionality:
// Example JavaScript for a sticky header
document.addEventListener('DOMContentLoaded', function() {
const header = document.querySelector('.site-header');
const headerHeight = header.offsetHeight;
const headerOffset = header.offsetTop;
function makeHeaderSticky() {
if (window.pageYOffset > headerOffset) {
header.classList.add('sticky-header');
document.body.style.paddingTop = headerHeight + 'px';
} else {
header.classList.remove('sticky-header');
document.body.style.paddingTop = 0;
}
}
window.addEventListener('scroll', makeHeaderSticky);
});
/* Complementary CSS for sticky header */
.sticky-header {
position: fixed;
top: 0;
left: 0;
width: 100%;
z-index: 1000;
box-shadow: 0 2px 10px rgba(0,0,0,0.1);
transition: all 0.3s ease;
}
How to Edit Header in WordPress Default Themes
If you're using default WordPress 5 themes like Twenty Nineteen or Twenty Twenty, here's what you need to know:
Twenty Nineteen Theme:
Twenty Nineteen offers basic header customization through the Customizer:
- Logo Setup: Appearance > Customize > Site Identity
- Color Options: Appearance > Customize > Colors
- Social Icons: Create a social menu and assign to "Social Links Menu"
Twenty Twenty Theme:
Twenty Twenty's header editing options include:
- Logo and Site Title: Appearance > Customize > Site Identity
- Search Icon Toggle: Appearance > Customize > Theme Options
- Color Adjustments: Appearance > Customize > Colors
Pro Tip: For more extensive customization of default themes, consider using a child theme or a header builder plugin.
Header Editing Best Practices
After helping hundreds of clients optimize their WordPress sites, I've identified these header best practices:
#1: Prioritize Mobile Responsiveness
ALWAYS check how your header looks on multiple devices:
- Desktop
- Tablet
- Mobile phones
#2: Optimize for Performance
- Use compressed images for logos
- Limit animations and effects
- Keep the header clean and focused
#3: Maintain Brand Consistency
Your header should reflect your brand identity through:
- Consistent colors
- Typography
- Overall aesthetic
#4: Focus on User Experience
- Use clear navigation labels
- Place important CTAs prominently
- Consider adding a search bar for content-heavy sites
#5: Know Your Limitations
- Understand what your theme allows
- Be ready to use plugins for advanced features
- Consider custom code for highly specific designs
Conclusion
There you have it — your complete, step-by-step guide on how to edit header in WordPress.
Remember that your header is often the first interaction visitors have with your site, so investing time in optimizing it is absolutely worth it.
Whether you choose to use the Theme Customizer, explore early Block Editor integration, or leverage powerful header builder plugins, you now have all the tools and knowledge to create a header that looks great AND converts.
Want to learn more amazing WordPress guides like this one? Check out One Smart Sheep where you'll find detailed tutorials on everything from making changes to a footer to how to edit WordPress website.
At One Smart Sheep, you'll get access to step-by-step guides that make WordPress mastery simple — even if you're a complete beginner. On top of that, we also provide SEO-related services to make your website one of the best in your niche.
So, why wait? Head over to One Smart Sheep now and take your WordPress skills to the next level!
Now I want to hear from you: Which method of how to edit headers in WordPress are you going to try first? Let me know!


.svg)