


Are you looking for a way to appear more professional and well-organized? The best way to do this is by setting up a business email address. A business email address not only helps you look more professional to clients and partners but also builds trust and credibility.
The world of business is all about first impressions. The email address from which you send out your correspondence plays a significant role in shaping these impressions.
Your business's email address gives your business a professional look and adds legitimacy to your digital interactions.
In this blog post, we will walk you through the step-by-step process of setting up a business email address. This guide is also packed with visual aids to ensure that even the less tech-savvy among us can follow along with ease.
So let's explore different methods to set up business Email.
How to Create a Business Email Address
There are a few different ways to set up a business email address. Here are two of the most popular methods:
- Create a Business Email Address With Google Workspace
- Create a Business Email Address With Bluehost
Method 1: Create a Business Email Address With Google Workspace
Google Workspace, formerly known as G Suite, is a popular choice for businesses looking to set up a professional email address. It's user-friendly and reliable and comes with a host of other useful tools like Google Drive, Calendar, and Meet.
Here's a step-by-step guide on how to create a business email address with Google Workspace.
Step 1: Sign Up for Google Workspace
Visit the Google Workspace website (https://workspace.google.com/). Click on "Get Started."

Fill out the form with your business name, number of employees, and country. Click "Next."

Fill in your contact details and current email address. Click "Next."

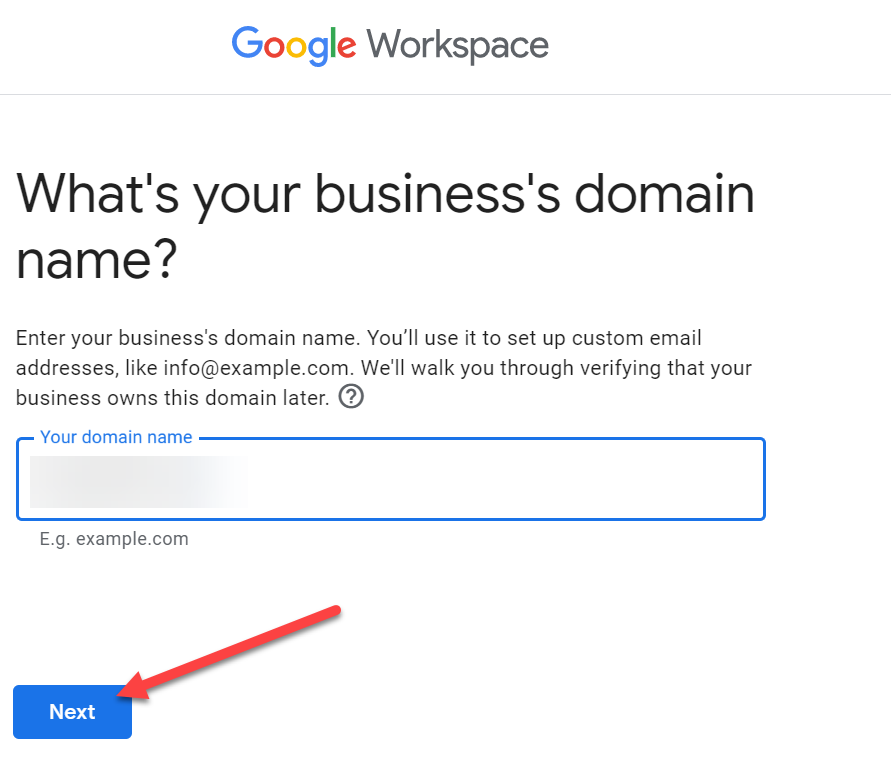
Step 2: Choose Your Domain
You will be asked if you already have a domain. If you do, enter it. If you don't, you can click on “No, I need one.” Follow the prompts to buy one directly from Google.
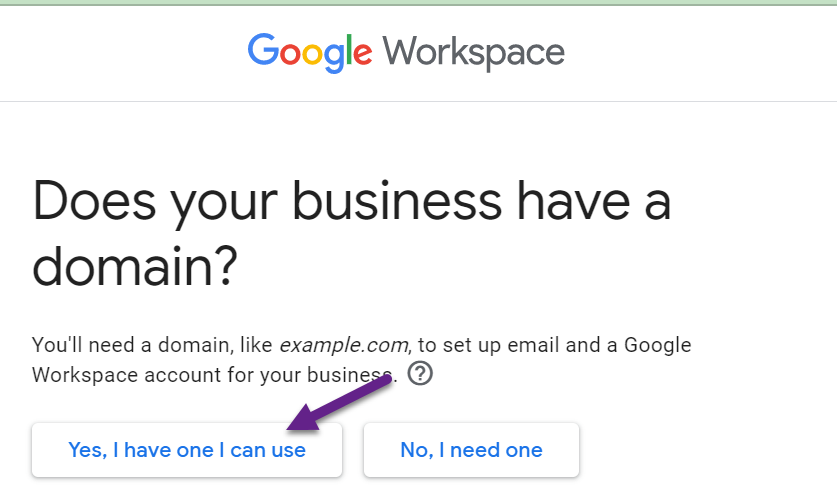
The cost will depend on the domain you choose. After entering your domain, click "Next."
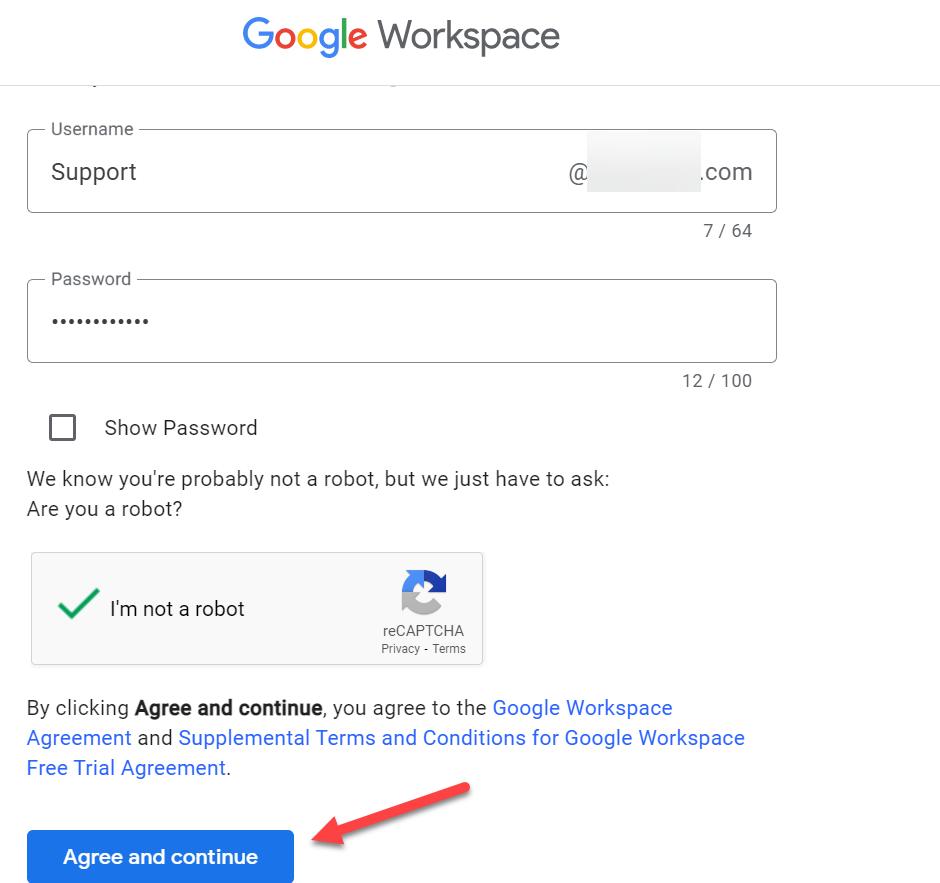
You will need your username to sign into your Google Workspace account and create a professional email address for your business. Fill out your information and click on “Agree and Continue.”
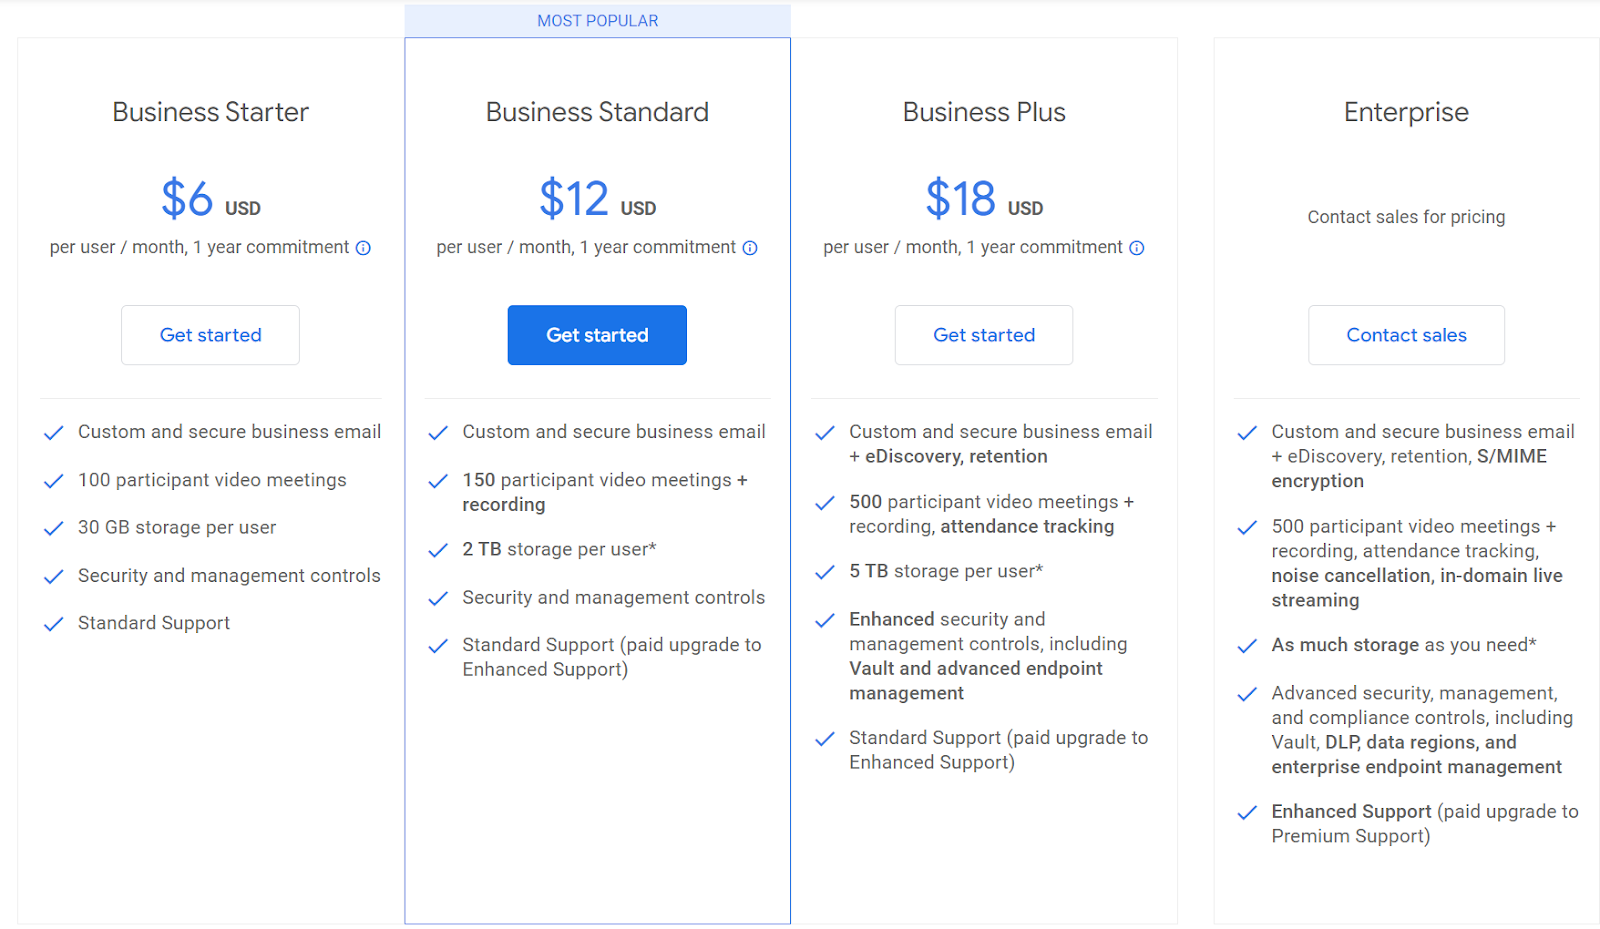
At this stage, you'll be prompted to choose a Google Workspace plan that best aligns with your specific needs. Google Workspace offers a variety of plans to cater to businesses of all sizes, each with its own unique set of features and benefits.
Carefully review each plan's offerings to ensure it meets your business requirements.
However, if you're still uncertain about the right fit, or if you wish to explore the platform before committing, Google Workspace offers a 14-day free trial. This trial allows you to test the suite of tools and services without any financial obligation.

Please note you can cancel your trial within the 14-day period at no charge. Doing so provides a risk-free opportunity to determine whether Google Workspace is indeed the right solution for your business communication and collaboration needs.
Upon choosing the 14-day free trial option, you will be seamlessly guided to the checkout page. Fill out all the necessary details and click on “Agree and Continue”

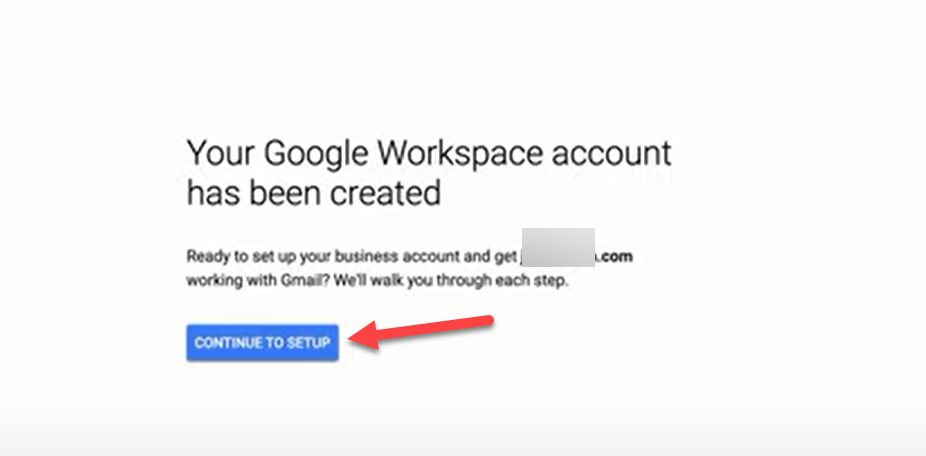
Now you have successfully created a Google Workspace account. After setting up account click on “Continue to Setup”
Step 3: Verify Your Domain
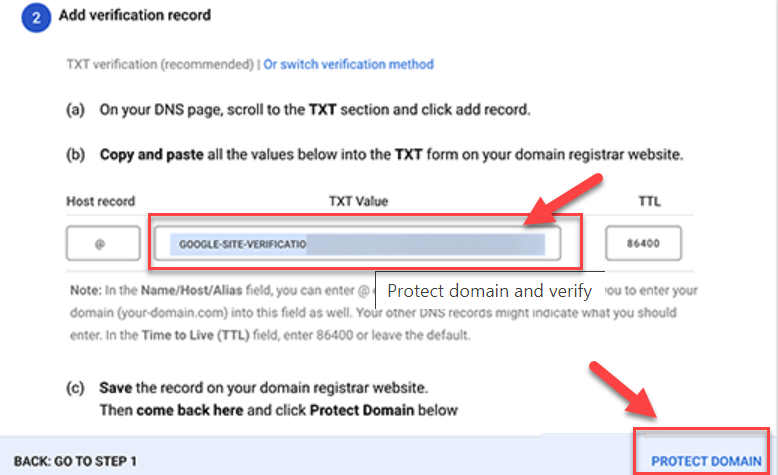
If you didn't buy your domain from Google, you'll need to verify that you own the domain you're setting up email for. Click on “Protect”

Google will provide you with a verification record to add to your domain's DNS settings. This process will differ depending on your domain provider.
Follow the instructions provided by Google and your domain provider. Once you've added the verification record, click "Protect Domain."
After verification, you'll be directed to your Google Workspace account dashboard.
Click on "Users," then select "Add New User." Here, you can create additional email accounts for your business if needed.
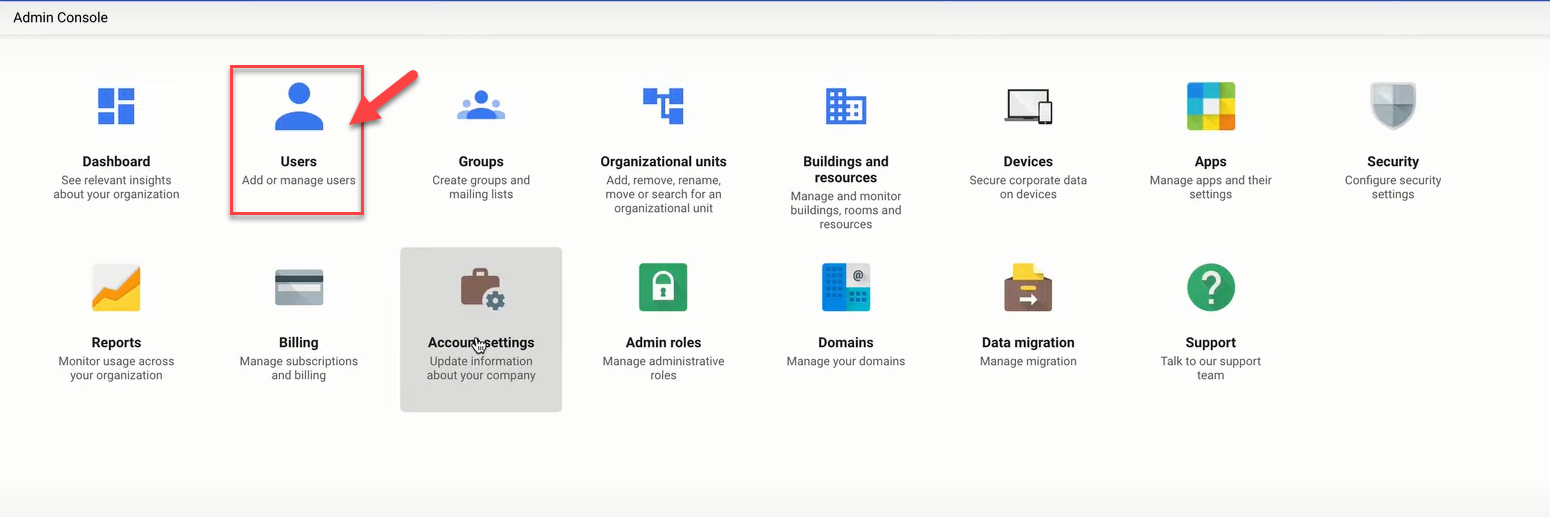
Each new user will get a new email address, so repeat this step for each employee or department in your business.
Why Add an MX Record in Google Workspace
MX (Mail Exchanger) records are essential components of your domain's DNS settings. They direct your domain's email to the servers hosting the email accounts. In simpler terms, MX records specify the mail servers responsible for accepting emails on behalf of your domain.
When you set up a business email with Google Workspace, you need to update your MX records in your domain's DNS settings to point to Google's mail servers.
This step ensures that your emails are correctly routed through Google's email infrastructure, allowing you to receive emails at your new business email addresses.
Step 4: Add an MX Record in Google Workspace
The exact steps to add an MX record can vary depending on your domain host. However, the following steps provide a general guide:
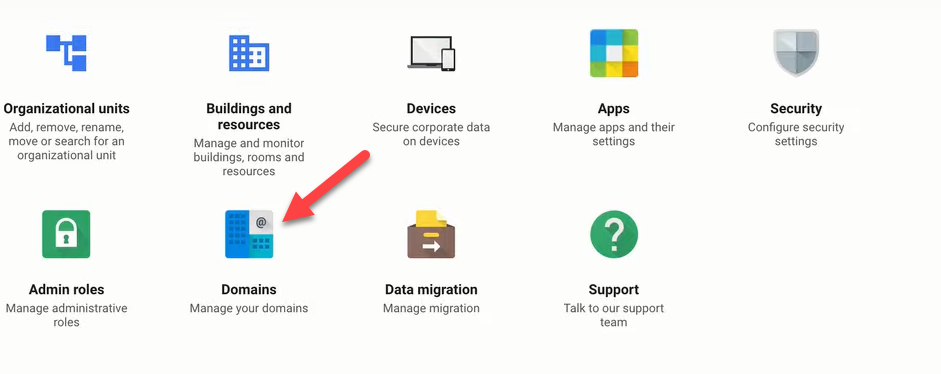
Use your Google Workspace email address and password to sign in. From the Admin console home page, go to “Domains”.
You will see a list of your domains. Click on 'Manage domains'. Next, you'll see a section for managing your domain. Click on 'Add/Remove MX records'. Google will provide you with the values for your new MX records. You'll need to add these to your domain's DNS settings.
Now, Sign in to your domain host's website. Find where to update the MX records (it might be under a section like 'DNS Management,' 'Mail Settings,' or 'Advanced Settings'). Delete any existing MX records before entering the new Google MX records.
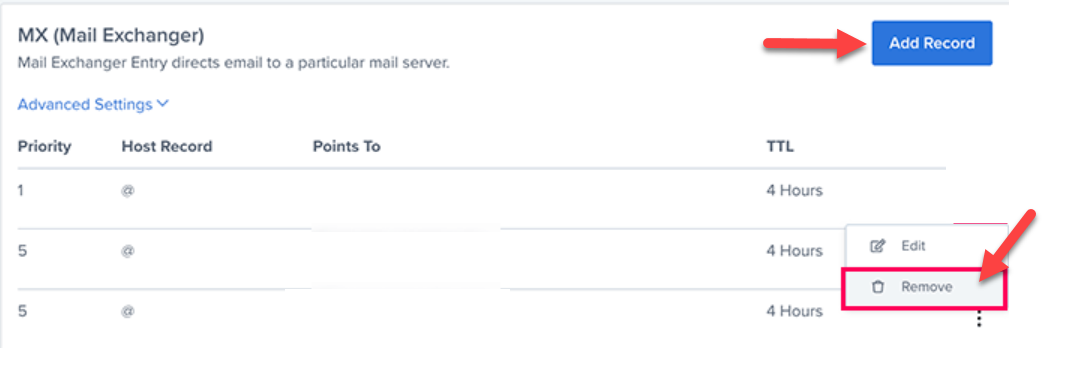
Remember, MX records often include a “priority” number. The lower the number, the higher the priority. Make sure to add all MX records provided by Google and assign the correct priority numbers.
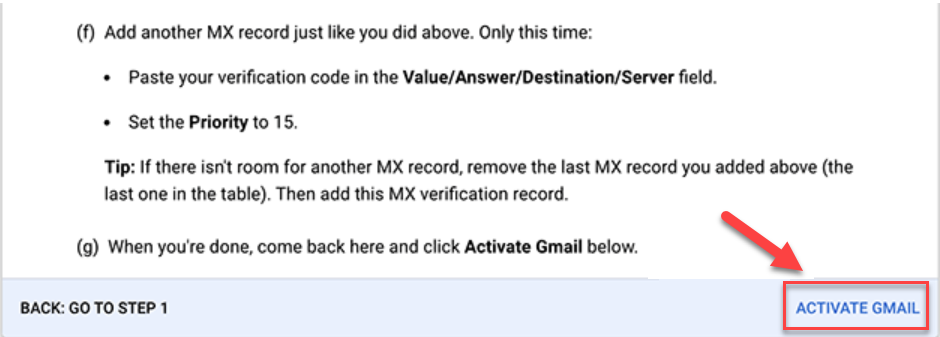
After you've updated your MX records, return to the Google Admin console and click “Activate Gmail”. It can take up to 48 hours for the changes to propagate across the internet.
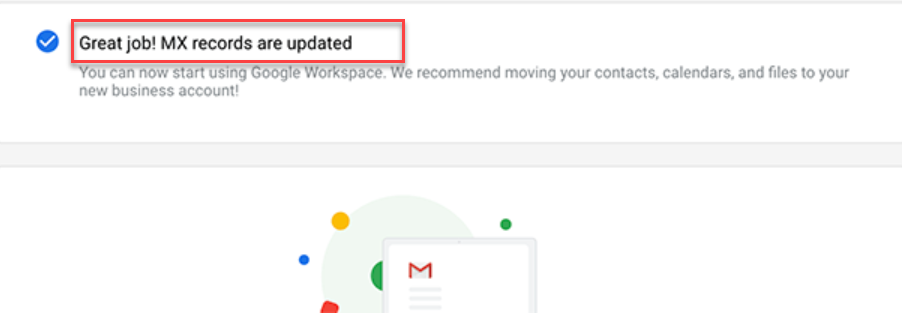
Google Workspace is now in the process of verifying your MX records configurations. Once you have completed these steps, you will have successfully created a business email address with Google Workspace.
It's important to note that changing MX records won't affect your website or other DNS records. It only changes where your email is delivered.
Step 5: Manage Emails
Google Workspace provides a simple and user-friendly interface for managing your email account. You can access your inbox from the Gmail website or from the official Gmail apps on your mobile devices.
To log in, use your business email address as your username.
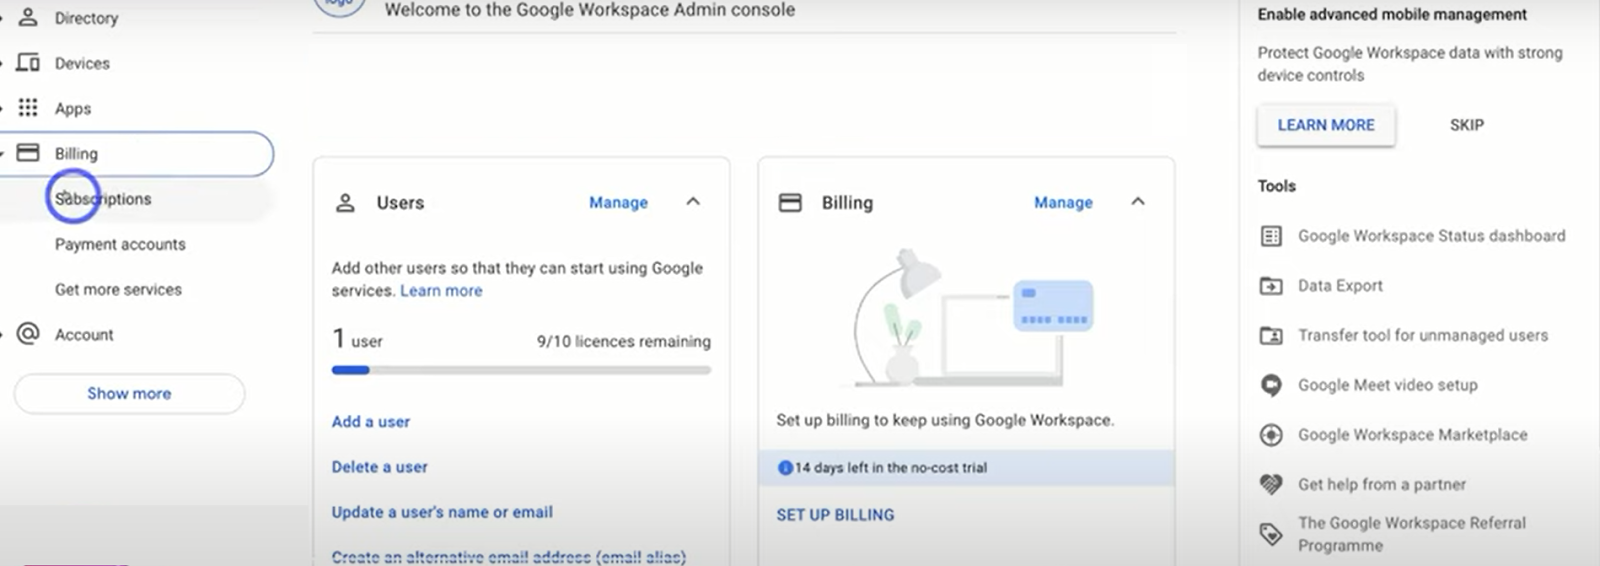
If you need to create more business email addresses, you can do so in the Google Workspace Admin console. From here, you can also add new users, increase your email storage capacity, make payments, and change your Google Workspace settings.
Method 2: Create a Business Email Address With Bluehost

Bluehost is a leading web hosting provider that not only offers excellent hosting solutions but also gives you the ability to create professional business email addresses. If you are looking to set up a professional email address for your business, its user-friendly platform and dedicated support make the process smooth and easy.
As we take you through this step-by-step guide, remember that if you decide to choose Bluehost for your business email and hosting needs, using our affiliate link will help support our work at no additional cost to you. So, let's get started.
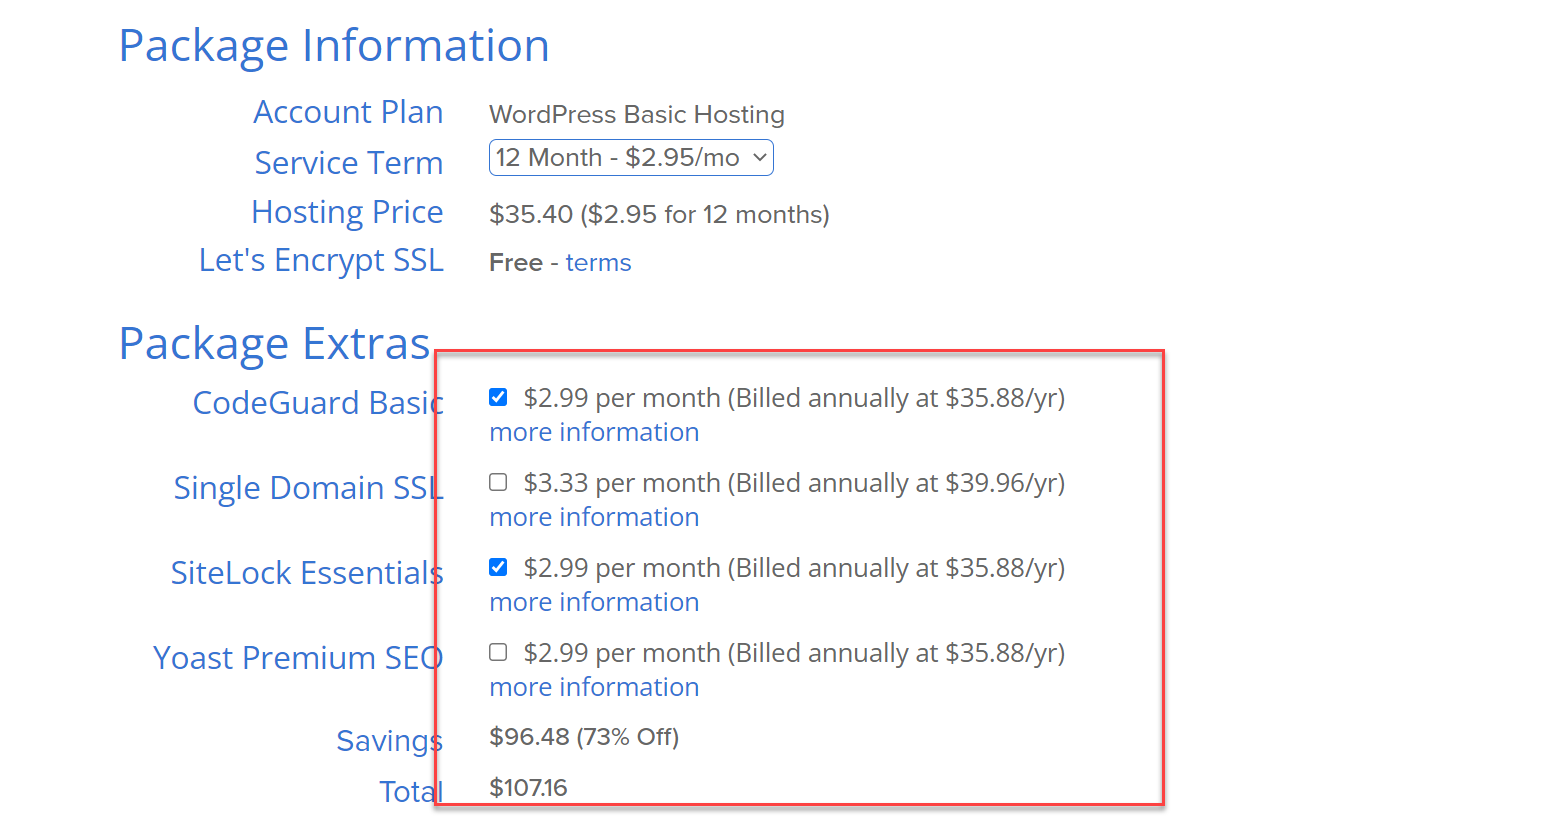
Step 1: Choose Your Hosting Plan
First, you'll need to visit the Bluehost website. If you're starting from scratch, you'll need a domain name and a hosting plan. Bluehost offers a variety of hosting plans to suit businesses of all sizes.
Each plan comes with free business email addresses, a domain name for the first year, SSL certificate, and plenty of website storage.
You can view the different plans here. Choose the one that best fits your business needs.

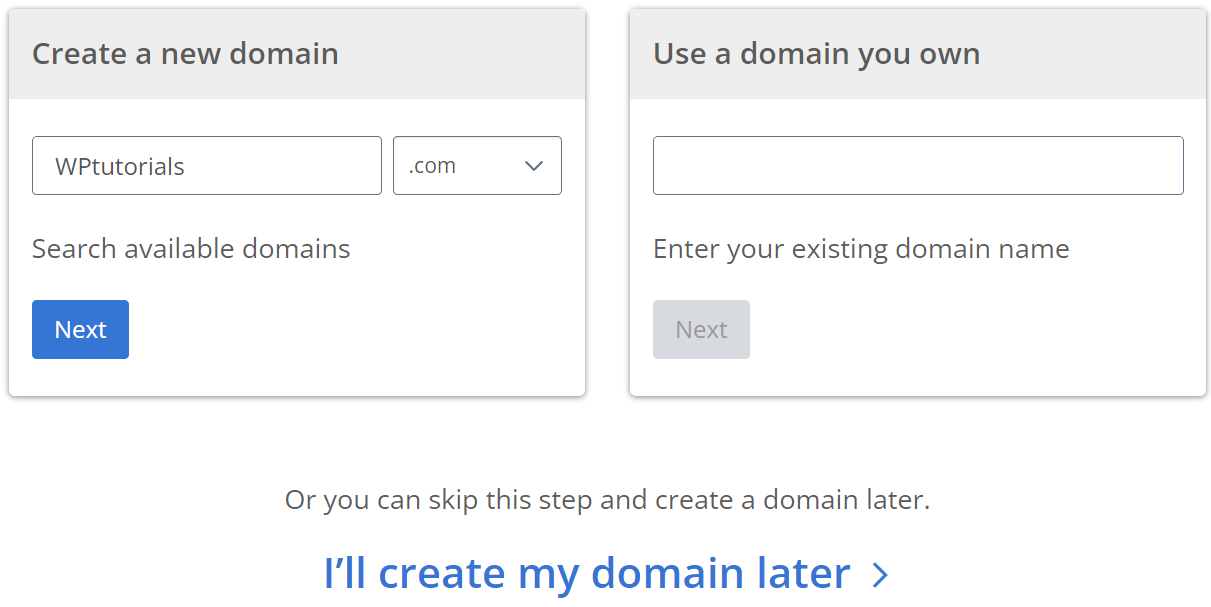
Step 2: Choose Your Domain
During the sign-up process, you'll choose your domain name. This will become part of your business email address (like 'yourname@yourdomain.com'). Think carefully about your domain, as it will be a key part of your online identity.
Step 3: Create Your Account
Fill in your details to create your new Bluehost account. You'll also select the terms for your hosting package and any add-on services.
Step 4: Set Up Your Email Account
Once you've completed the sign-up process, log in to your Bluehost account. On the dashboard, click on “Advanced” in the sidebar menu. Under the “Email” section, click on “Email Accounts.”

Click on the “Create” button.

Fill in the username you want for your email address. This will be the part before the '@' symbol.
Enter a strong password and click on “Create.”
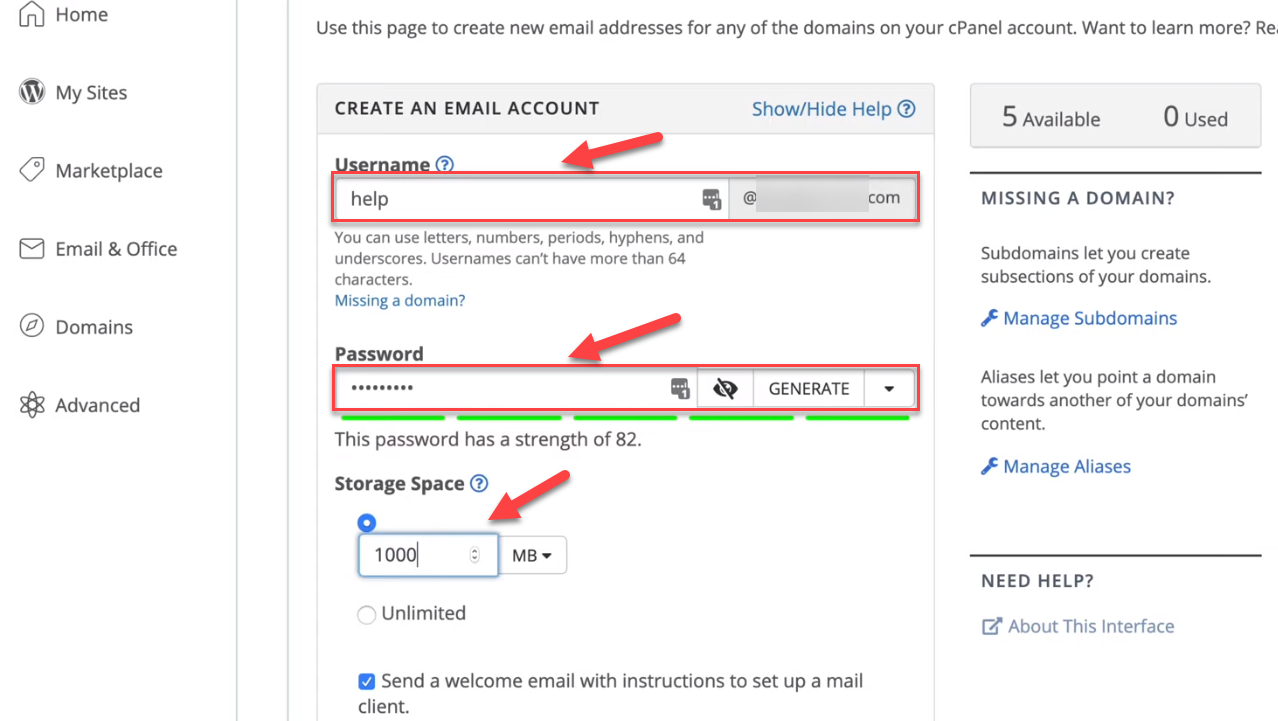
Congratulations! You now have a professional business email address through Bluehost. You can create more email addresses.

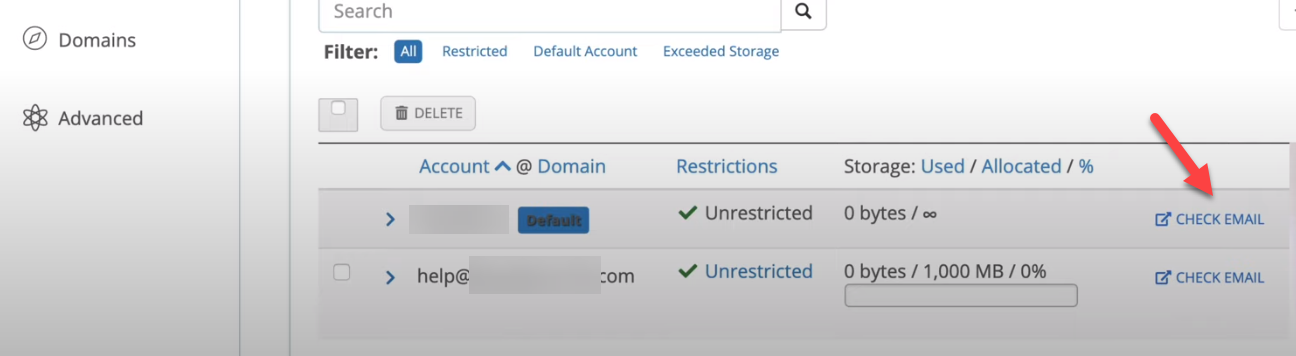
You can access your new business email through Bluehost's webmail service. Just click on “Check Email” next to the account you want to access in the “Email Accounts” section.
Step 5: Connect it with Gmail
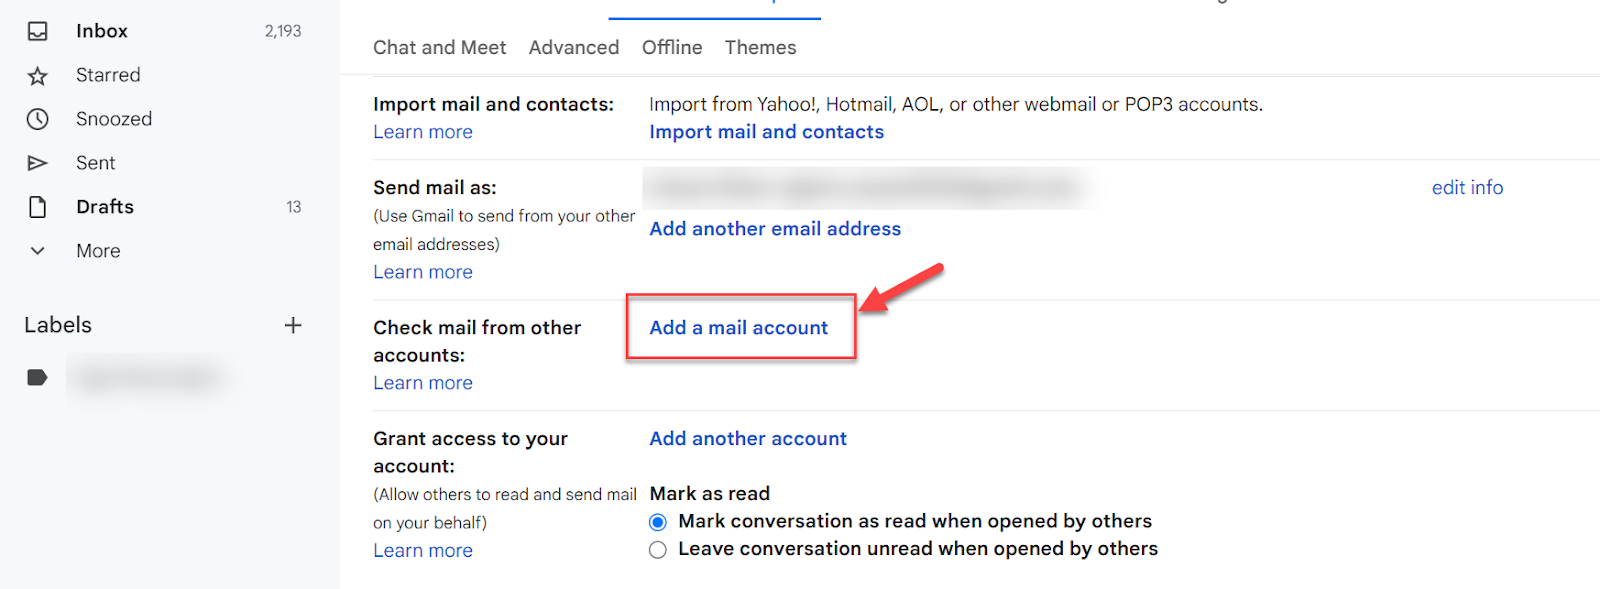
Now, we will connect it to Gmail. To do this, simply log into your Gmail account and click on “settings.” And then “Accounts and Import” tab.

Scroll down to check “email from other accounts” and click on “add a mail account”
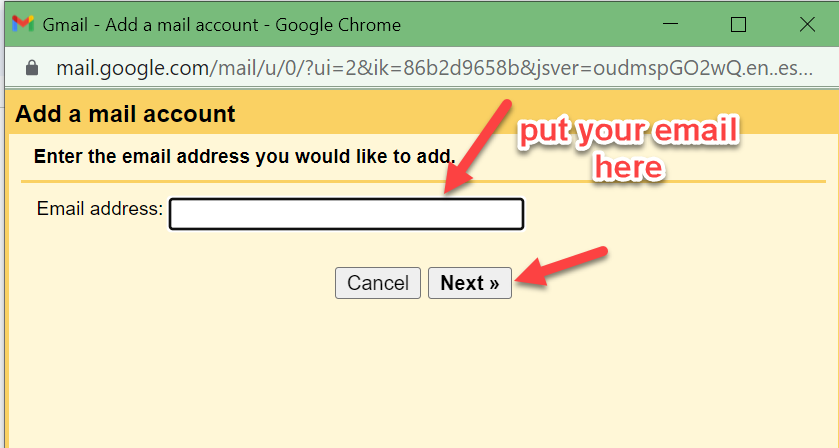
Now copy the email address that you created on Bluehost and paste it in the text box below.
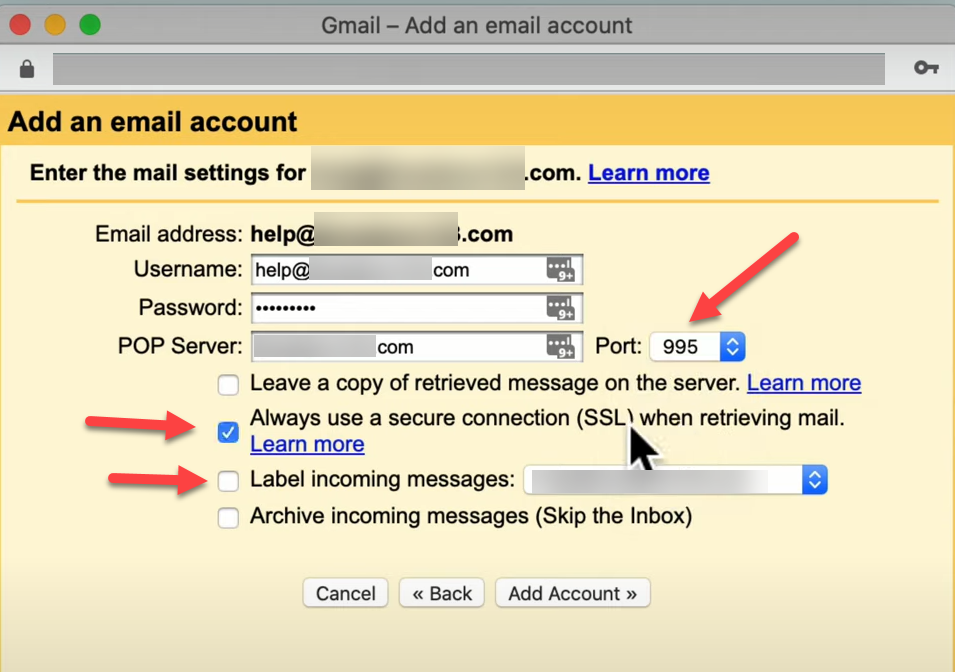
Your username it's exactly the same as your email address. Put your password and for “POP Server” place your domain name. After that select the port as “995” and always check mark secure connection SSL.
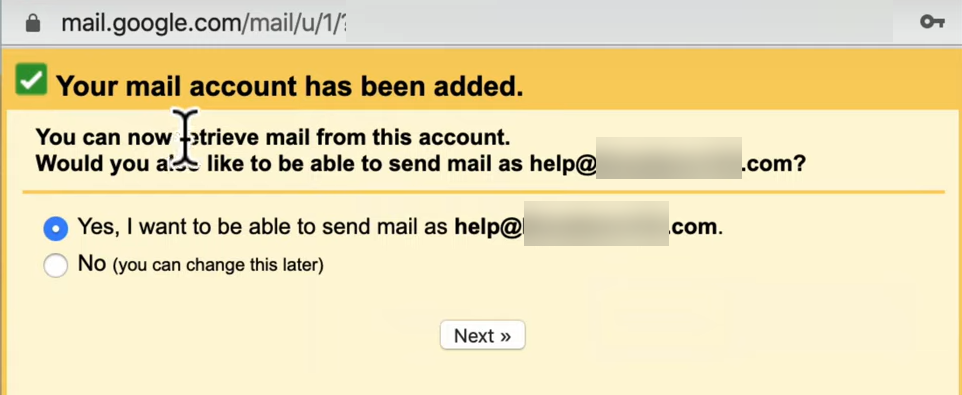
Just check the first option “Yes, I want to be able to send mail as “help@xyz.com” and Click on “Next”
It will direct you to set up your SMTP server. Write your domain name in the text field next to “SMTP sever,” your username will be your email that you created with bluehost. Also enter your password. Select the port as “465.”

After that it will ask you for verification. Enter the verification code you received on the email you wanted to add.
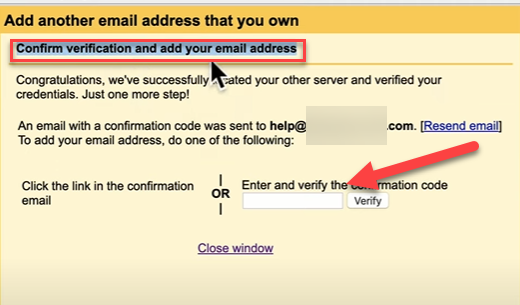
You have successfully added the email account and it has fetched one email too.

Bluehost's reliable hosting services, along with its capacity to create professional business email addresses, make it an excellent choice for businesses looking to establish a robust online presence.
Wrapping Up
In this visual guide, we have walked you through two popular methods of setting up a business email address – Google Workspace and Bluehost. Both platforms are user-friendly and come with their own unique benefits.
Google Workspace, the productivity suite from Google, is an excellent option for businesses looking for an all-encompassing solution that includes email, storage, and collaborative tools like Google Docs and Google Meet. It's especially suitable for businesses that often collaborate on documents or require regular virtual meetings.
On the other hand, Bluehost is a leading web hosting provider that also offers the ability to set up business email addresses. It is an excellent choice if you're starting a new website and require hosting services in addition to professional email addresses.
Bluehost's affordable plans and robust customer support make it an attractive option for small to medium-sized businesses.
Remember, the choice between Google Workspace and Bluehost depends on your specific business needs and preferences. We recommend that you evaluate the features, costs, and benefits of each before making a decision.
We hope this visual guide has provided you with clear, easy-to-follow steps to set up your business email address. If you have any questions or run into any issues during the setup process, don't hesitate to seek help from Google Workspace or Bluehost's customer support.
With your new business email address, you're now ready to communicate with your clients and stakeholders in a more professional and organized manner.


.svg)