


Let's face it:
You've got a killer domain name with Wix. But now you're thinking about switching to WordPress for its powerful features and customization options.
Here's the good news: You don't have to give up your Wix domain name.
In today's guide, I'll show you EXACTLY how to connect Wix domain to WordPress, step-by-step.
And I'm not just going to give you some basic tutorial...
I'm going to break down this entire process with crystal-clear screenshots, simple instructions, and even troubleshooting tips if you hit a snag.
By the end of this guide, you'll have successfully connected your Wix domain to WordPress - whether you're using WordPress.com or a self-hosted WordPress.org site.
Let's dive in!
The Two Domain Connection Methods You Need to Know About
Before we jump into the step-by-step process, you need to understand the two main ways to connect a domain:
- Name Servers Method
- Pointing Method (A/CNAME Records)
Let me break these down for you:
Name Servers: The "Complete Transfer" Method
Name servers are basically the internet's address books. They tell the internet where to find your website when someone types in your domain name.
Here's the problem: Wix doesn't allow you to change name servers for domains purchased directly through them.
So if you bought your domain from Wix, you'll need to use the second method.
Pointing Method: The "Update Records" Method
This involves updating specific DNS records at Wix to point to your WordPress hosting.
For domains purchased through Wix, this is your go-to method to connect Wix domain to WordPress.
How to Connect Wix Domain to WordPress.com (The Easy Way)
Let's start with connecting your domain to a WordPress.com site. This is perfect if you're using WordPress.com's hosting services.
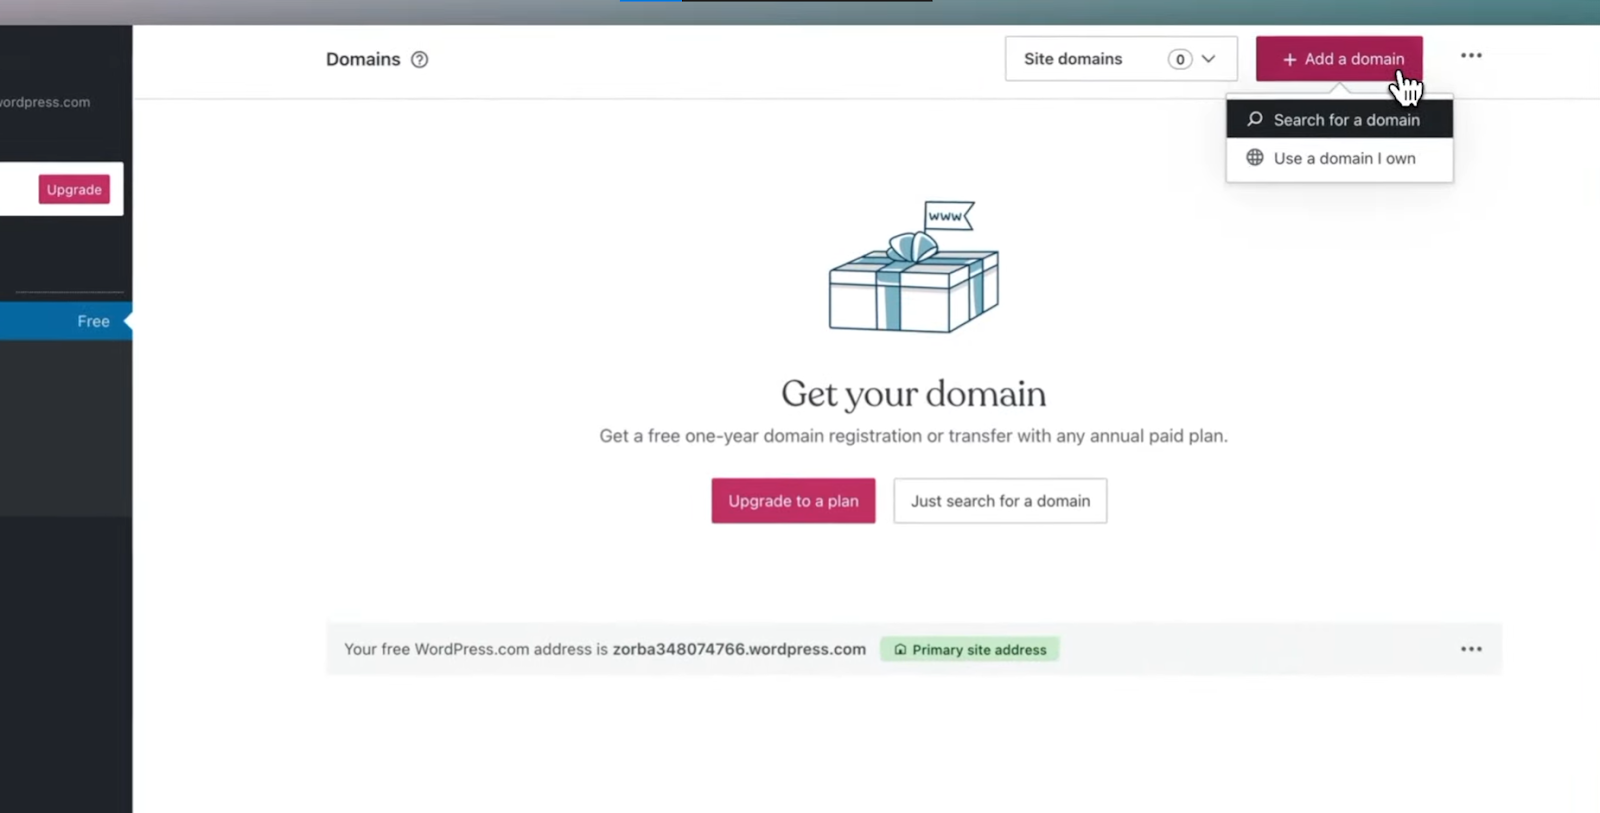
Step 1: Add Your Domain to WordPress.com
- Log into your WordPress.com dashboard
- Click on "Upgrades" → "Domains" (or "Hosting" → "Domains" in WP Admin)
- Click the "Add a domain" button
- Select "Use a domain I own"
- Enter your Wix domain name and click "Next"
- Choose "Connect your domain" (not transfer)
- Click "Start setup"
Step 2: Get the DNS Records from WordPress.com
- On the "Connect Your Domain" screen, find and click on "Advanced setup" at the bottom
- Write down the two A records (IP addresses) and the CNAME record provided
- Keep this page open - you'll need it for the next step

Step 3: Update DNS Records in Your Wix Account
This is where the magic happens to connect Wix domain to WordPress:
- Open a new tab and log into your Wix account
- Go to the "Domains" section
- Select your domain name
- Click the "Domain Actions" icon (three dots) and select "Manage DNS Records"
- In the "A (Host)" section:
- Edit existing records or add new ones to match WordPress.com's A records
- Make sure the "Host Name" is set to "@" or left blank
- Delete any other A records not provided by WordPress.com
- In the "CNAME (Aliases)" section:
- Find or add a record with "Host Name" = "www"
- Change the "Value" to the CNAME record from WordPress.com
- Click "Save" and then "Save Changes"

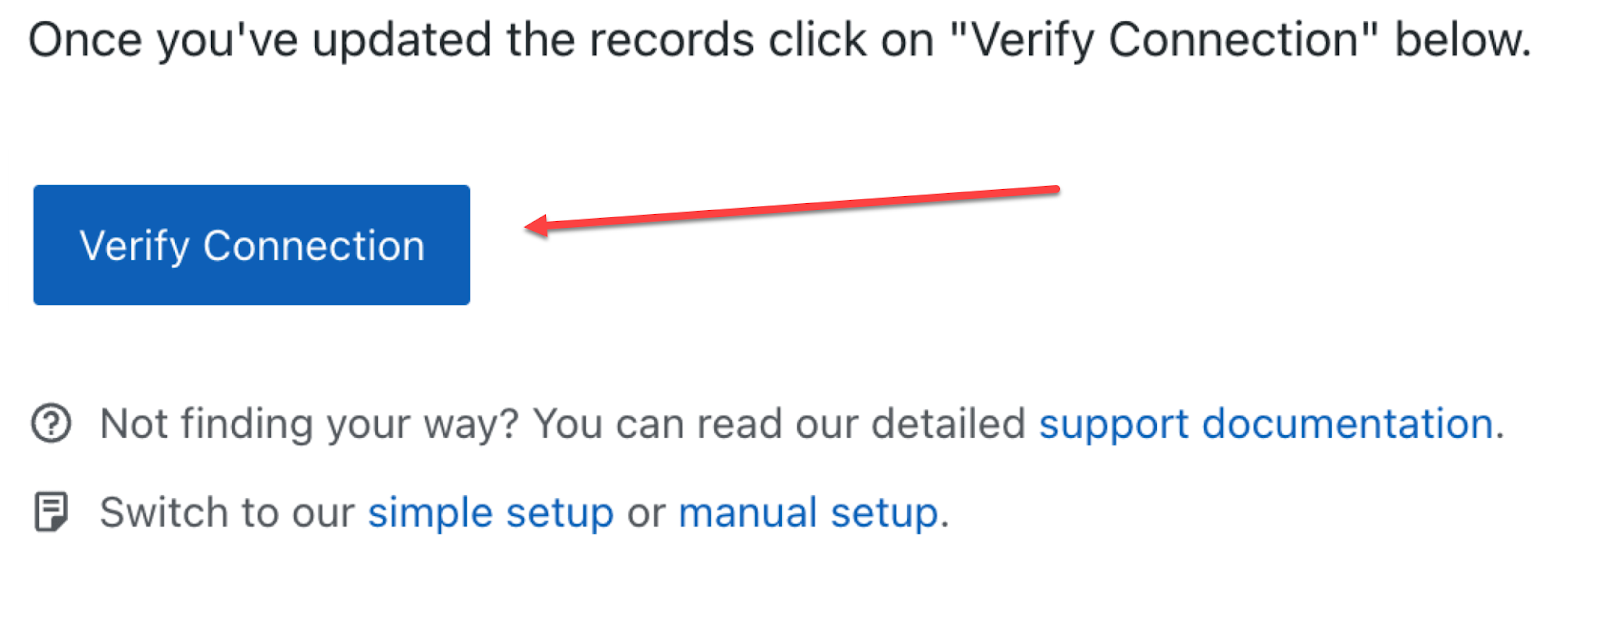
Step 4: Verify the Connection on WordPress.com
- Return to the WordPress.com tab
- Click "Verify Connection"
- Be patient! DNS changes can take up to 48 hours to propagate
Step 5: Set as Primary Domain
Once verified:
- Go to "Upgrades" → "Domains" in WordPress.com
- Find your Wix domain
- Click the three dots and select "Make primary"
And boom! You've successfully completed the process to connect Wix domain to WordPress.com.
How to Connect Wix Domain to Self-Hosted WordPress.org (The Pro Way)
If you're using a self-hosted WordPress.org site with a provider like Bluehost, SiteGround, or HostGator, the process is slightly different.
Step 1: Get Your Hosting Provider's DNS Info
- Log into your WordPress hosting account
- Find the DNS information (either name servers or IP address)
- Write this information down
Step 2: Update DNS in Your Wix Account
Since Wix doesn't allow name server changes for domains purchased directly through them, we'll use the pointing method:
- Log into Wix and go to "Domains"
- Select your domain
- Click "Domain Actions" → "Manage DNS Records"
- In the "A (Host)" section:
- Find or add a record with "@" or blank host name
- Update the "Value" to your hosting provider's IP address
- In the "CNAME (Aliases)" section:
- Find or add a record with "www" host name
- Update "Value" to your domain name (e.g., yourdomain.com)
- Click "Save" and "Save Changes"
Step 3: Wait for DNS Propagation
Just like with WordPress.com, you'll need to wait for the DNS changes to propagate. This can take anywhere from a few hours to 48 hours.
Step 4: Configure WordPress to Use Your Domain
Once DNS propagation is complete:
- Log into your WordPress dashboard at yourdomain.com/wp-admin
- Go to "Settings" → "General"
- Update both "WordPress Address (URL)" and "Site Address (URL)" to your Wix domain
- Click "Save Changes"
Congratulations! You've now completed all the steps to connect Wix domain to WordPress.org.
The Code: Adding Domain Connection Status Checker to Your Site
Want to add a tool to check if your domain connection is working properly? Here's the code:
<!-- Domain Connection Checker - Add this to your WordPress site -->
<div class="domain-checker">
<h3>Domain Connection Status Checker</h3>
<input type="text" id="domain-input" placeholder="Enter your domain..." />
<button onclick="checkDomainConnection()">Check Connection</button>
<div id="result-container"></div>
</div>
<style>
.domain-checker {
max-width: 500px;
margin: 20px auto;
padding: 20px;
border-radius: 8px;
box-shadow: 0 4px 12px rgba(0,0,0,0.1);
background: #f9f9f9;
font-family: -apple-system, BlinkMacSystemFont, 'Segoe UI', Roboto, Oxygen, Ubuntu, Cantarell, 'Open Sans', 'Helvetica Neue', sans-serif;
}
.domain-checker h3 {
margin-top: 0;
color: #333;
}
#domain-input {
width: 70%;
padding: 10px;
margin-right: 5px;
border: 1px solid #ddd;
border-radius: 4px;
}
button {
padding: 10px 15px;
background: #0073aa;
color: white;
border: none;
border-radius: 4px;
cursor: pointer;
transition: background 0.3s;
}
button:hover {
background: #005077;
}
#result-container {
margin-top: 15px;
padding: 10px;
border-radius: 4px;
}
.success {
background: #d4edda;
color: #155724;
border: 1px solid #c3e6cb;
}
.error {
background: #f8d7da;
color: #721c24;
border: 1px solid #f5c6cb;
}
.checking {
background: #fff3cd;
color: #856404;
border: 1px solid #ffeeba;
}
</style>
<script>
function checkDomainConnection() {
const domain = document.getElementById('domain-input').value;
const resultContainer = document.getElementById('result-container');
if (!domain) {
resultContainer.innerHTML = "Please enter a domain to check";
resultContainer.className = "error";
return;
}
resultContainer.innerHTML = "Checking domain connection...";
resultContainer.className = "checking";
// Simulate checking - in a real application, you would make an API call
setTimeout(() => {
const dnsCheck = Math.random() > 0.5;
if (dnsCheck) {
resultContainer.innerHTML = `
<p>✅ Success! Your domain ${domain} is properly connected to WordPress.</p>
<p>DNS propagation is complete and the site is accessible.</p>
`;
resultContainer.className = "success";
} else {
resultContainer.innerHTML = `
<p>⚠️ The domain ${domain} appears to have connection issues.</p>
<p>This could be due to:</p>
<ul>
<li>DNS propagation still in progress (can take up to 48 hours)</li>
<li>Incorrect DNS records at Wix</li>
<li>WordPress configuration issues</li>
</ul>
<p>Check the guide again and verify your settings.</p>
`;
resultContainer.className = "error";
}
}, 2000);
}
</script>
Should You Transfer Your Domain Instead?
While connecting your Wix domain to WordPress works great, you might consider transferring your domain registration away from Wix completely.
Pros of Domain Transfer:
- Centralized management of domain and hosting
- Simpler billing through one provider
- Full control over all DNS settings
Cons of Domain Transfer:
- Transfer process takes up to 7 days
- Potential for temporary website downtime
- Possible transfer fees
- Domain might be locked for a period after purchase
Troubleshooting: Common Issues When You Connect Wix Domain to WordPress
Running into problems? Don't worry! Here are solutions to the most common issues:
1. Website Not Showing Up After DNS Changes
Solution: Wait at least 48 hours for DNS propagation to complete.
2. Connection Verification Fails
Solution: Double-check your A and CNAME records in Wix. Even a tiny typo can cause failures.
3. WordPress Shows Wrong Domain
Solution: Make sure you've updated both URL fields in WordPress Settings → General.
4. SSL Certificate Issues
Solution: After connecting your domain, it might take additional time for SSL to be issued. Contact your hosting provider if issues persist after 24 hours.
The Bottom Line: Connecting Wix Domain to WordPress Made Simple
Let's recap what we've covered:
- Understanding domain connection methods (name servers vs. pointing)
- Step-by-step process to connect Wix domain to WordPress.com
- Step-by-step process to connect Wix domain to WordPress.org
- Considering domain transfer as an alternative
- Troubleshooting common connection issues
The key takeaway? You CAN keep your Wix domain name while enjoying the power and flexibility of WordPress.
Just remember that for domains purchased through Wix, the pointing method (updating A and CNAME records) is your best option to connect Wix domain to WordPress.
Allow time for DNS propagation and double-check all your settings for accuracy.
Want More Amazing Web Development Guides?
If you found this guide on how to connect Wix domain to WordPress helpful, you'll love what One Smart Sheep has to offer!
At One Smart Sheep, we create comprehensive, easy-to-follow guides for all your web development needs:
- WordPress customization
- Domain management
- SEO optimization
- Website speed improvement
- And much more!
Head over to One Smart Sheep now to access our complete library of web development resources and take your website to the next level!


.svg)