


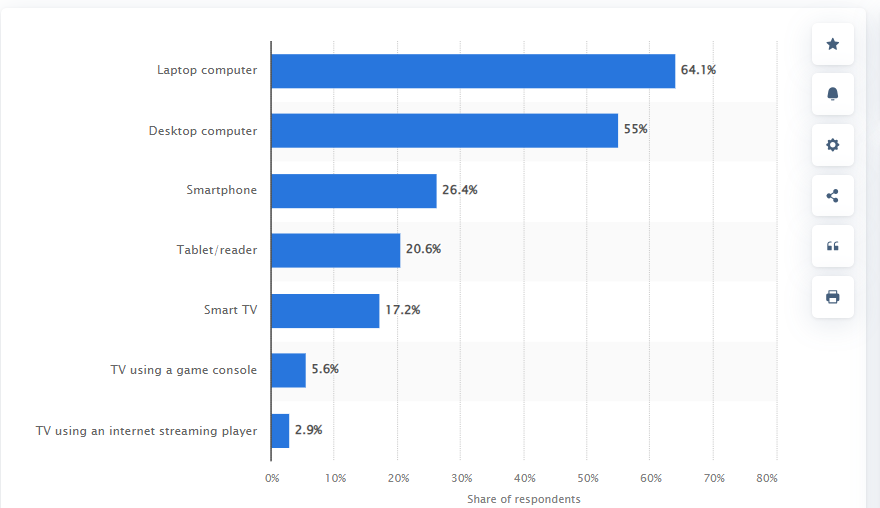
Have you ever felt the frustration of trying to embed the perfect animated GIF into your WordPress site? You're not alone in this struggle. Interestingly, a 2014 Popsugar poll found that 64.1% of American women prefer using laptops to view GIFs, suggesting a keen interest in this visual content.
This article will teach you how to upload animated GIFs to WordPress in two ways: using the Gutenberg editor and using HTML embed code. We will walk you through each method in five steps, with screenshots to help you along the way.
First, we will show you how to add a GIF using the Gutenberg editor. Then, we will show you how to add a GIF using HTML embed code, specifically from the Giphy website.
By the end of this guide, you will be able to add GIFs to WordPress to illustrate complex ideas and find GIFs that match your needs online.
Discover the secrets to effortlessly embedding those captivating GIFs and transforming your WordPress content. Read on, and let's make the complex simple.
Method #1: How to Add A GIF in WordPress with Gutenburg
GIFs play a pivotal role in WordPress posts. They add dynamic visuals, capture readers' attention, and convey complex ideas quickly. Moreover, they enhance user engagement and provide a break from lengthy text, making content more digestible and appealing.
Gutenberg, WordPress's block editor, revolutionizes content creation. It offers a more intuitive and flexible layout, enabling users to craft posts with ease and precision.
Now, let's delve into the 5-step guide, complete with detailed screenshots, to seamlessly integrate GIFs into your WordPress posts. Ready to dive in?
Step #1: Login to WordPress Dashboard
Accessing your dashboard is essential for effectively handling your WordPress site without losing data. It serves as your primary access point for all backend tasks, granting you insights and mastery over your site's content, look, and operations.
To get to this dashboard, head to the WordPress Admin Section by adding /wp-admin to your site's URL. So, for a site named example.com, you'd go to example.com/wp-admin.
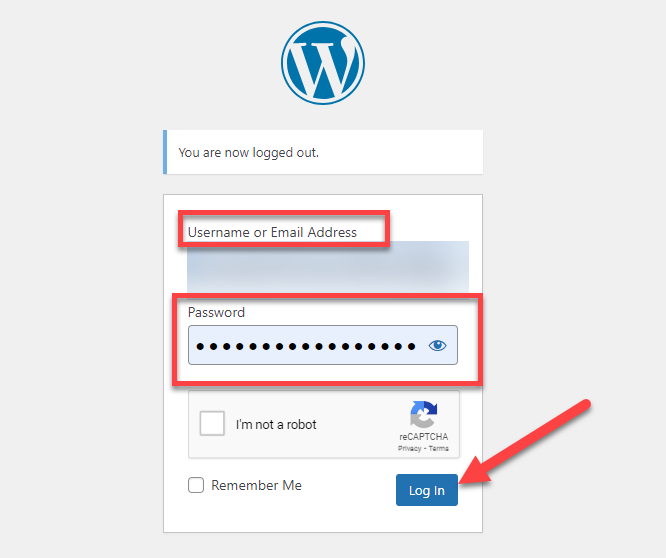
When you land on this page, a login screen awaits. Input your assigned username and password, ensuring accuracy to prevent login hiccups.
After entering these details, hit the 'Login' button. A successful login leads you straight to your dashboard.
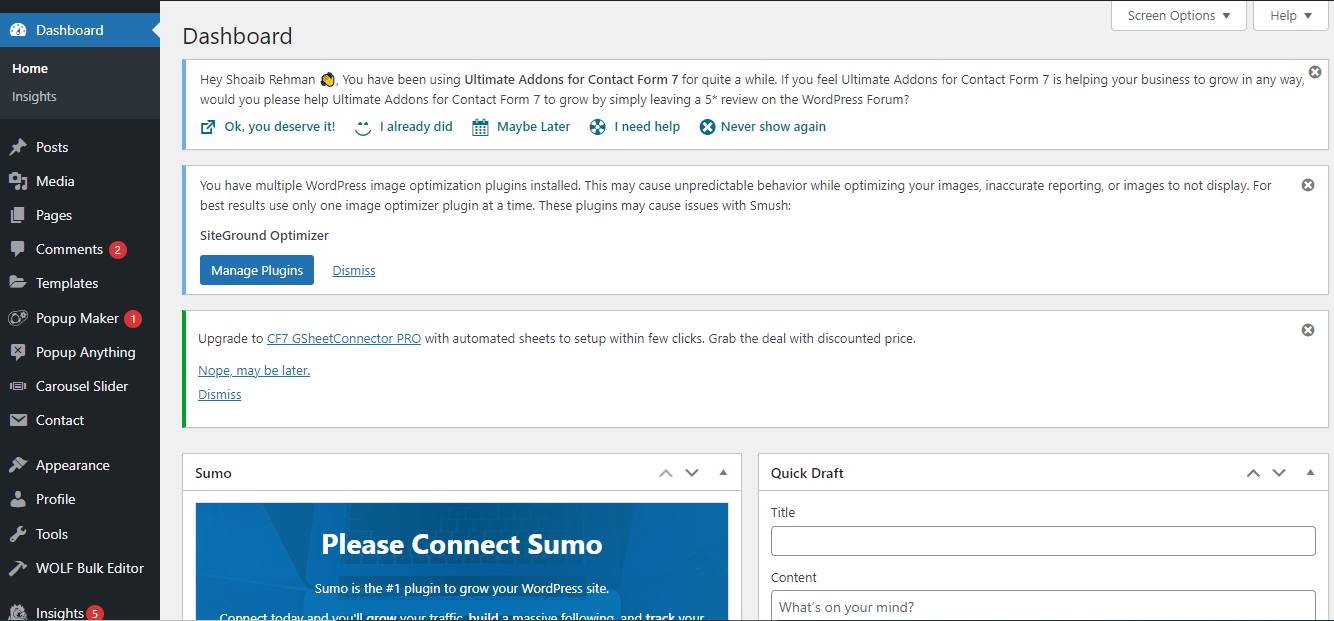
Now, you're set to explore the rich assortment of features and adjustments that WordPress offers, enabling thorough site management and tailoring.
Step #2: Add New Page
Adding GIFs to your WordPress site can significantly enhance the visual appeal and engagement level of your content. You have the flexibility to either embed a GIF into an existing post or page or integrate it into a brand-new post. Here, we'll focus on the latter.
To begin the process of embedding a GIF into a fresh post, follow these steps:
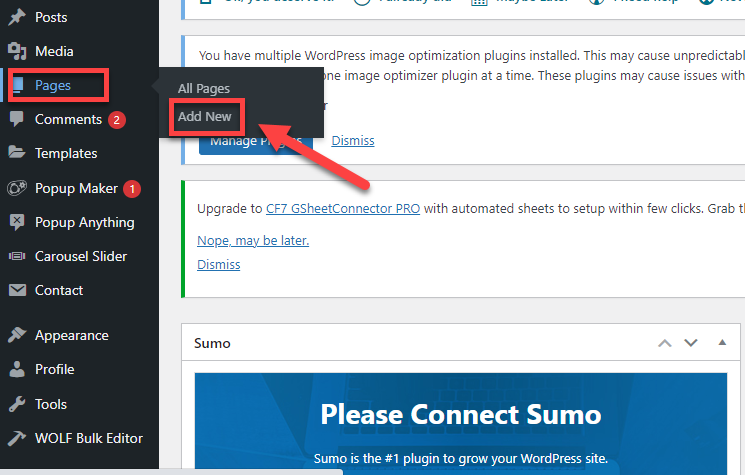
From your WordPress dashboard, navigate to the 'Posts' option. This is where all your previous articles are cataloged and where you can initiate the creation of a new one.
Once you click on 'Posts,' a dropdown or popup menu will present itself. This menu will typically display options such as 'All Posts' and 'Add New'. For the purpose of creating a new post with a GIF, you'll want to select the 'Add New' option.
This action will usher you into the post editor, ready for your new content and the GIF you wish to showcase.
Step #3: Select the Image Block
We've now reached a pivotal juncture in the process. At this stage, your action will dictate how the content appears and how seamlessly the GIF integrates into your post.
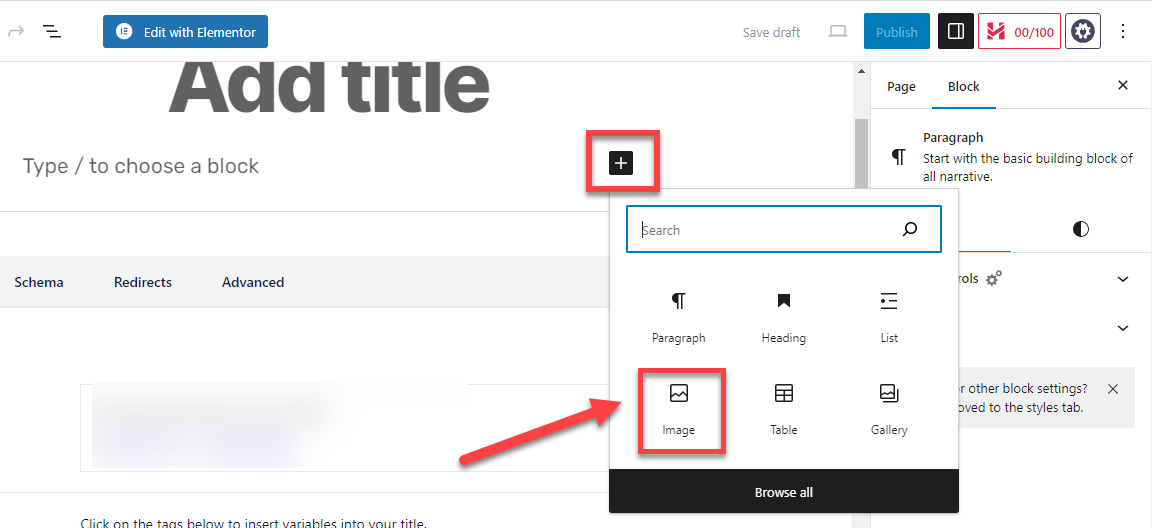
Begin by locating and clicking on the "+" button, often referred to as the 'block inserter.' This action prompts the opening of a pop-up or dropdown menu, presenting a palette of content options.
Within this menu, you'll encounter a variety of content blocks tailored for different types of additions, from headings and paragraphs to lists and tables.
For the purpose of embedding a GIF, your focus should be on the 'Image' block. Clicking on this option will pave the way for you to seamlessly integrate the desired GIF into your post.
Step #4: Add the GIF to Image Block
Upon selecting the 'Image' block, you'll be presented with three methods to introduce your GIF into the post. Each option is tailored to cater to different sources and preferences for GIF integration.
- Upload
- Media Library
- Insert from URL
Ideal for those who have a specific GIF file saved locally on their device. If you've recently downloaded or created a GIF and wish to introduce it directly from your device, the 'Upload' option is your go-to.
You can upload your saved GIF by clicking the 'Upload' button and navigating to its location to select and introduce it.
This option comes in handy if you've previously uploaded the desired GIF (or any image) to your WordPress site. By selecting 'Media Library,' you can conveniently pick from any of the visuals you've previously used or uploaded, eliminating the need for redundant uploads.
For those who have identified a GIF online and possess its direct link or those aiming to embed a GIF using HTML code, the 'Insert from URL' option is apt.
By clicking on this option and providing the necessary link or code, you can effortlessly showcase the GIF within your post.
This method bypasses the need for local storage or prior upload, directly sourcing the GIF from the internet.

Step #5: View Is it Published on Website
Once you've successfully utilized the upload feature to incorporate your chosen GIF, you're just a few clicks away from seeing it in action on your website.
Locate the 'Update' button, typically found at the upper right corner of your screen. By clicking on this, you ensure that any modifications you've made, including the addition of the GIF, are saved.
It's always prudent to see how the newly added GIF melds with your site's overall design. By updating and then previewing, you can experience firsthand the aesthetic uplift the GIF brings, harmonizing with the theme and enhancing the visual allure of your content.

Method #2: How to Add A GIF in WordPress through Embed Code
While GIFs can be a delightful addition to any website theme, they hold particular appeal for certain niches.
For instance, if you're operating under a travel blog WordPress theme, the dynamic nature of GIFs can vividly bring to life your travel tales, making them an excellent tool in your content arsenal. Consider experimenting with them across various themes to discover their true potential.
Here's a step-by-step guide, with detailed screenshots, to seamlessly integrate GIFs into your WordPress existing posts online through embed code. Ready to dive in?
Step #1: Visit the Giphy Website
Venturing into the world of GIFs begins with sourcing high-quality and relevant visuals. Giphy, a renowned platform in this arena, provides a vast collection tailored to diverse needs.
Start by navigating to the official Giphy website. This reputable platform is home to a vast array of GIFs spanning various genres and themes.
Giphy offers a user-friendly search function, allowing you to pinpoint GIFs that resonate with the content or mood of your site. Input relevant keywords or phrases to curate a selection of GIFs tailored to your specific requirements.
One might wonder about the implications of sourcing GIFs from external platforms on their WordPress website's security.
With Giphy, you can rest assured. Integrating GIFs from Giphy won't compromise the robust security of your WordPress site. This ensures a seamless blend of dynamic visuals without any associated risks.
Step #2: Search the GIF You Want to Add
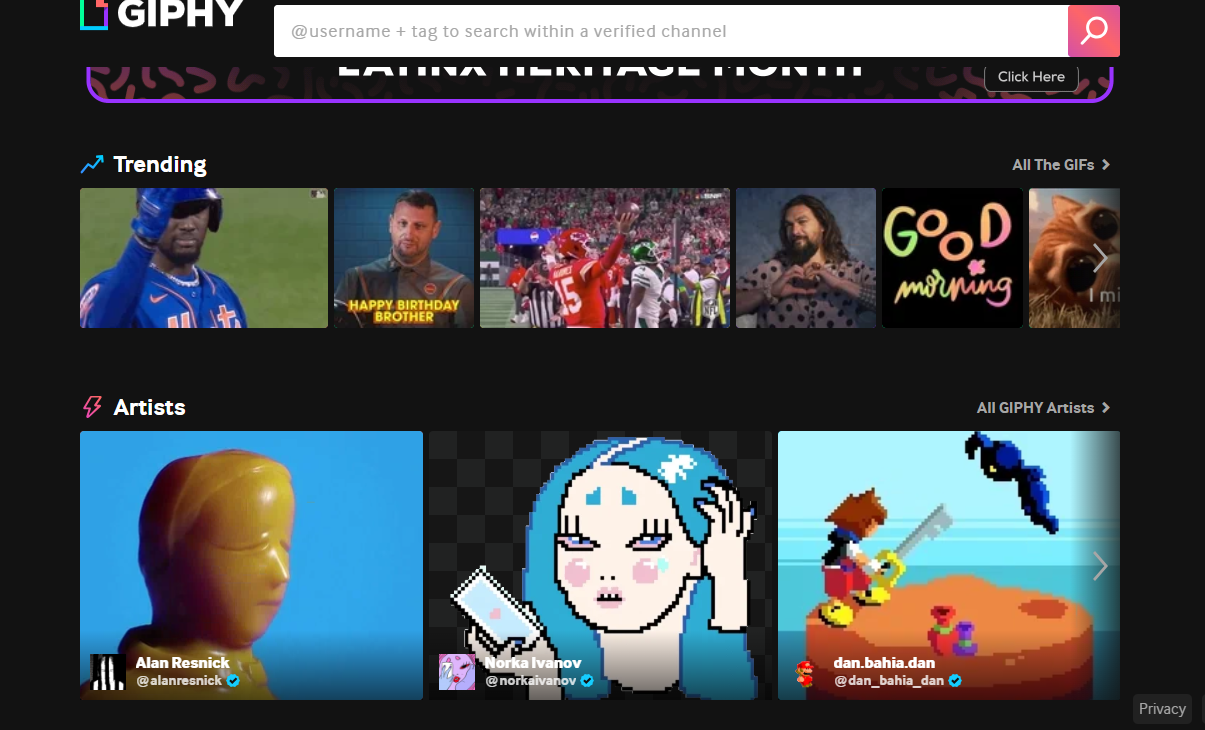
Giphy, renowned for its expansive GIF collection, offers users an intuitive search experience tailored to help find the perfect visual complement for their needs.
Giphy's interface includes a prominently placed search bar at the top of its screen. This is your gateway to accessing a vast array of GIFs. By entering specific queries or keywords into this bar, you can narrow down the offerings to suit your particular requirements.
Think of the primary theme or mood you're aiming to capture with the GIF. For instance, if you're keen on finding a GIF related to the sport of cricket, simply type "cricket" into the search bar.
This action will curate a selection of GIFs that resonate with the world of cricket, giving you a spectrum of options to choose from.
The beauty of Giphy's platform lies in its versatility. Whether you're seeking something niche or more generic, adjusting your search queries can help you navigate through the extensive library, ensuring you find the ideal GIF to enhance your content.

Step #3: Select the GIF and Copy Embed Code
Once you've zeroed in on the perfect GIF that resonates with your content, the integration process is straightforward, ensuring a seamless blend of dynamic visuals within your WordPress site.
After conducting a search and sifting through the results, click on the GIF that you've identified as the ideal match for your content.
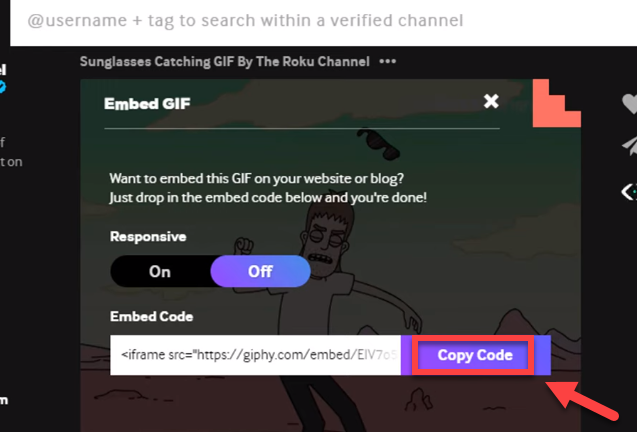
Positioned strategically, usually to the right and just below the share button, you'll find the 'Embed' option. This feature is designed to generate an HTML code that facilitates the GIF's integration into various platforms, including WordPress.
Upon clicking the 'Embed' button, an HTML code specific to the chosen GIF will be displayed on your screen. This code is your key to embedding the GIF within your WordPress content.
One of the perks of this method is its simplicity. Contrary to some other media additions, there's no need to activate or rely on membership plugins or additional tools within WordPress.

With the HTML code copied to your clipboard, return to your WordPress dashboard, ready to paste and position the GIF as desired within your post or page.
Step #4: Select the Post to Add GIF
From your WordPress dashboard, head over to 'Pages' and then select 'All Posts.' This will display a list of all your existing pages.
Identify the specific page where you wish to display the GIF. Adjacent to each page title, you'll find an 'Edit' button; click on it to enter the page's editor.

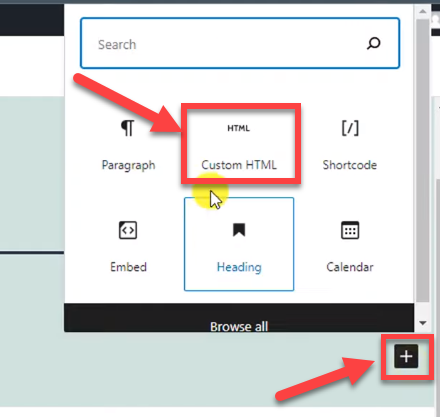
Within the page editor, locate and click on the "+" button, commonly known as the block inserter, to introduce new content blocks.
Given that you're aiming to embed a GIF using an external code, search for 'Custom HTML' within the block inserter's search bar. Once you find it, click on 'Custom HTML' to proceed.
Step #5: Paste the Embed Code and Update
Paste the previously copied HTML code into the designated space within the Custom HTML block.
To finalize the integration, click on the 'Update' button. Once updated, your GIF will be live, enhancing the visual appeal and dynamism of your WordPress page.

Wrapping Up
Enhancing your WordPress posts with animated GIFs has never been simpler. These dynamic visuals breathe life into your content, break the monotony of long texts, and make your messages more engaging.
Whether you're utilizing the innovative Gutenberg block editor or directly embedding codes from platforms like Giphy, the process is straightforward.
By following our step-by-step guides, you can seamlessly blend GIFs into your site, ensuring an interactive and visually appealing experience for your readers.
So, why hold back? With just a few clicks, elevate the aesthetic of your WordPress pages and posts with captivating GIFs.
FAQs
How Do I Add a downloaded GIF to HTML?
To add a downloaded GIF to HTML, use the <img> tag. Suppose your GIF is named "example.gif" and is in the same directory as your HTML file. Your code would look like: <img src= "example.gif" alt= "Description of GIF">. Ensure the GIF's path is correct and its folder permissions are set appropriately.
Can you use animated GIFs on a Website?
Yes, you can use animated GIFs on a website. They're popular for adding dynamic visuals, showcasing short animations, or highlighting brief tutorials. Use the <img> tag in HTML to embed them, just like static images. Animated GIFs can enhance user engagement when used judiciously.
Why is my GIF file not working?
If your GIF isn't working, it could be due to several reasons:
- The file might be corrupted.
- Incorrect file path in the HTML or CMS.
- The hosting platform might not support animated GIFs.
- The GIF's file size is too large, causing slow loading or failure to display.
- Browser compatibility issues. Always check the file integrity path and test across different browsers.


.svg)