


In this guide, I'll explain all the possible ways to fix the error "WordPress permalinks not working" with screenshots for clear understanding.
I know WordPress has weird issues.
But don't worry, you'll never face the issue as we have done the homework for you.
Let’s discuss the basics first.
Here are the topics we’ll cover today,
- What are the permalinks in WordPress?
- Why are permalinks important?
- What causes 'permalinks links not working' error?
- How to fix WordPress permalinks not working
- Troubleshooting common permalink issues in WordPress
- Fixing the WordPress postname permalink not working error
Before we begin, please support One Smart Sheep by checking out our network partner, SiteGround WordPress Hosting 😀
What are the Permalinks in WordPress?
The permalinks in WordPress are the permanent URLs of your posts, pages, tags, and categories that exist on your WordPress website.
URL stands for Uniform Resource Locator, a mechanism to retrieve resources from a computer network or hosting where your WordPress is stored.
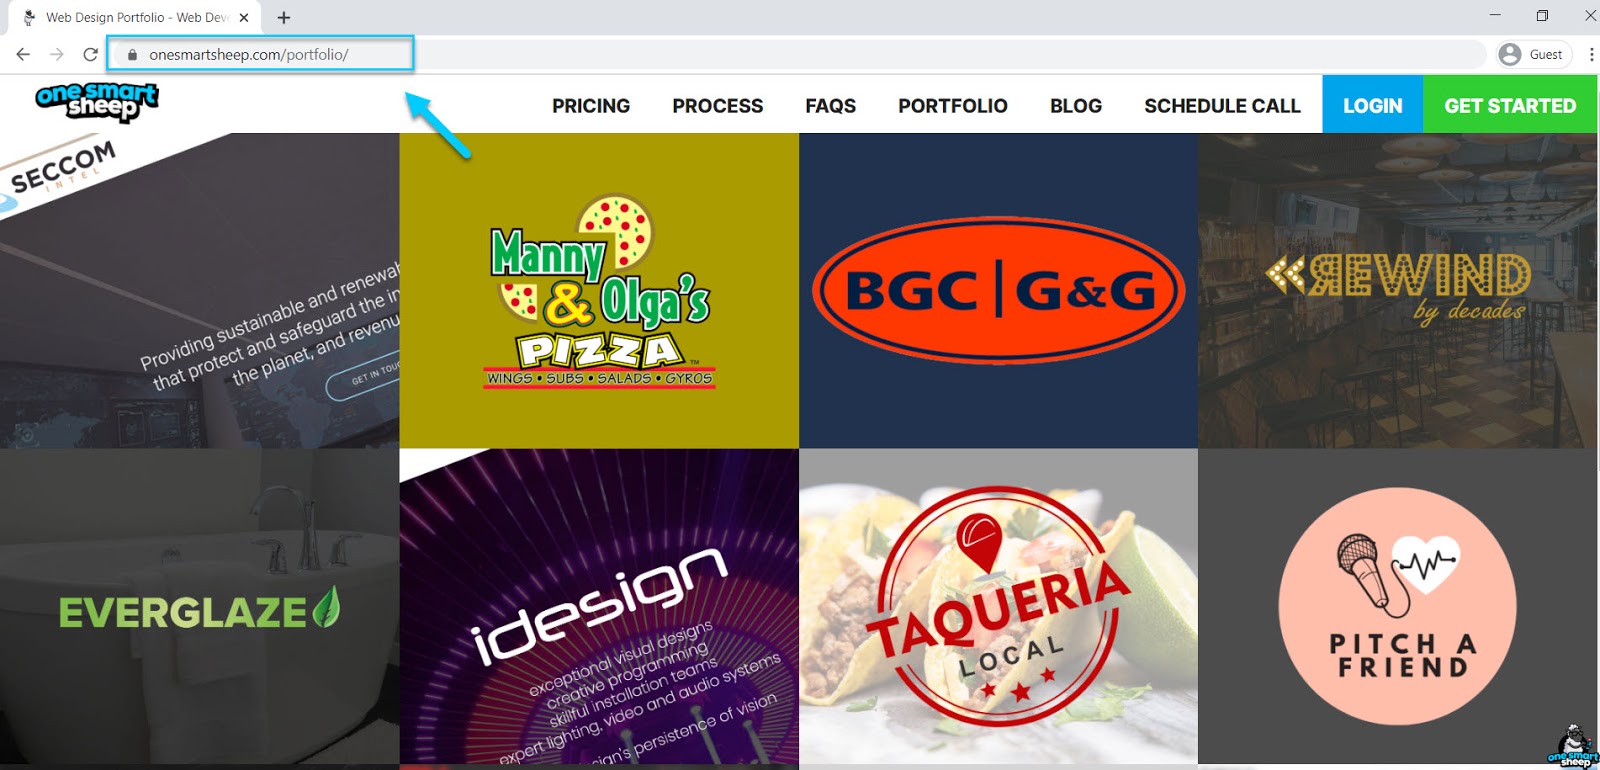
For example, the permalinks of our pricing and portfolio are https://onesmartsheep.com/#Pricing and https://onesmartsheep.com/portfolio/.
Why are Permalinks Important?
Permalinks are the foundation of any successful website on the internet; your blog has no existence without them.
Here are the few reasons why permalinks are crucial:
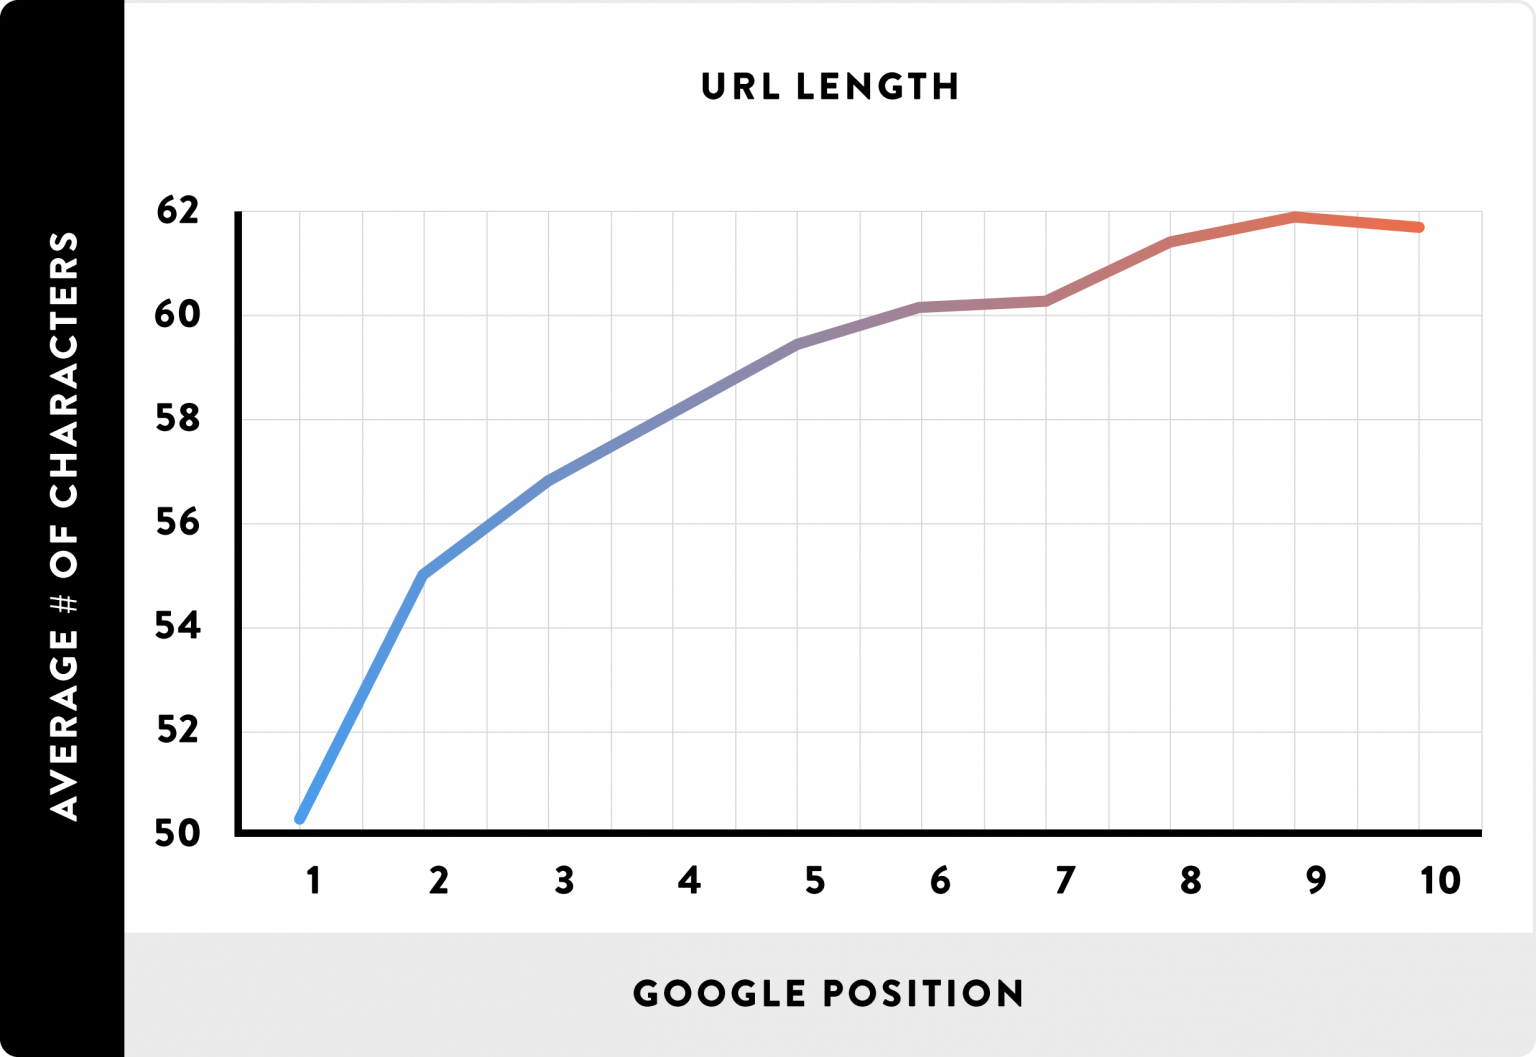
- Better Ranking. Did you know that shorter permalinks tend to rank higher on Google? A study conducted by Backlinks that prove shorter URL length enjoys a better ranking on Google.
- Google indexes your content using the permalinks. You should keep a descriptive permalink like yourblog.com/fix-wordpress-permalink that clearly shows the blog post is about fixing the broken permalink issue.
- Permalinks help in link building. You get backlinks from other websites when they link back to you using your permalink.
- Permalinks make it easy to share. You can send an email to your colleague about the article you just wrote on your blog and can share on social media like Facebook, Twitter and Reddit.
What Causes 'Permalinks Links Not Working' Error?
There are several reasons why WordPress permalinks not working issues occur, returning a 404 error (broken permalinks):
1. Installing Security Plugins
When you install a new plugin, your WordPress might be ending up with broken permalink links on your WordPress site provided it deals with .htaccess directly or indirectly.
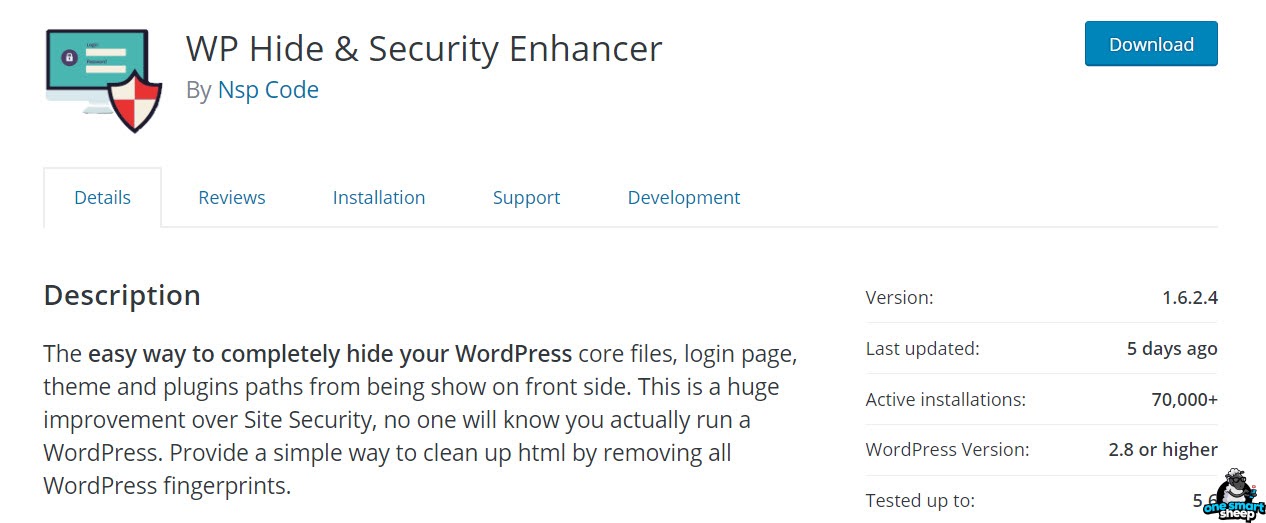
I have seen the issue arising when a security plugin is activated that tightens your WordPress site’s security.
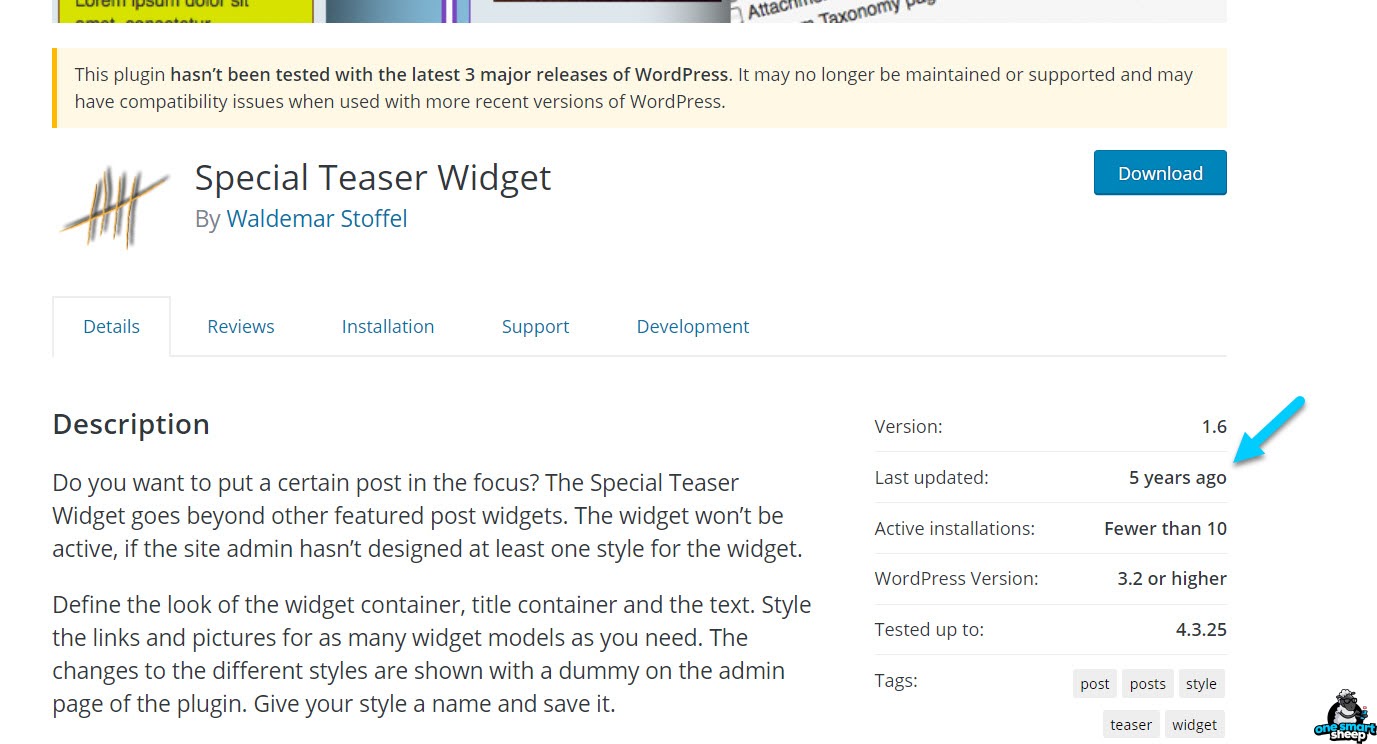
The best way is to read the plugin’s description to learn how the plugin works under the hood. Most plugins warn if they might interfere with something that can break your entire website.
2. Updating the Core, Plugins, or Themes
WordPress frequently releases updates, and sometimes, they conflict with your theme or plugins, causing WordPress permalinks not working 404 errors.
Not all developers are committed to ensuring to keep their plugins and themes updated.
Similarly, it happens when you update your plugin or WordPress theme. That’s why it’s recommended to trust the developer who keeps their plugins and themes updated and have no shocking stories in their reviews.
3. Migrating & Restoring
If you've recently migrated your site or restored a backup, you might notice WordPress permalinks not working errors.
One hosting might be using one server configuration, and the other hosting has different configurations. Moreover, web server software might be different, as well.
Three major web servers dominate the internet market:
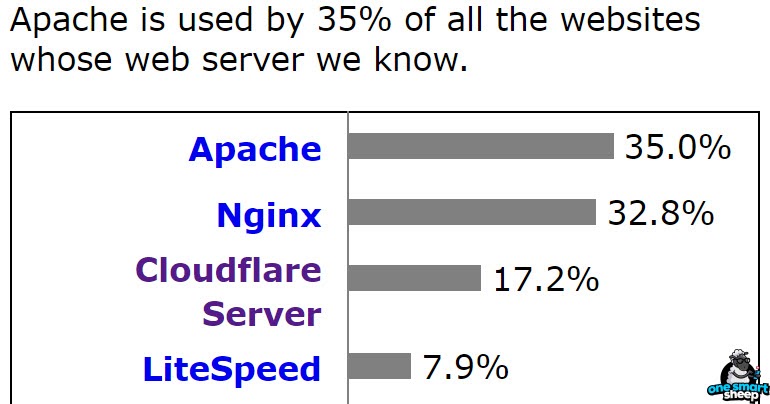
- Apache
- Nginx
- Cloudflare Server
- LiteSpeed
Similarly, when you try to back up your website and restore it to another hosting server, you might get the same issue.
So make sure you have the same web server configuration and web server software. If not, you're more likely to get an error.
Don’t worry; I’ll explain how to fix it.
4. Broken .htaccess and Permission
A corrupted .htaccess file can cause WordPress permalinks not working issue. For example, yourblog.com/.htaccess. The user cannot see or download it.
Here is how the default file of .htaccess looks like:
Did you know?
.htaccess decides the fate of your permalinks. You cannot edit your permalink provided you enable the mod_rewrite module.
In some cases, .htaccess permission is disturbed. Make sure the default permission is set to 644.
How To Fix WordPress Permalinks Not Working [10 Ways]
The things you need to fix WordPress permalinks not working issues are:
- Access to your WordPress
- FTP confidential
- Patience
Let’s discuss the first way
1. WordPress Reset Permalinks
The fastest way to fix WordPress permalinks not working is to reset the permalinks.
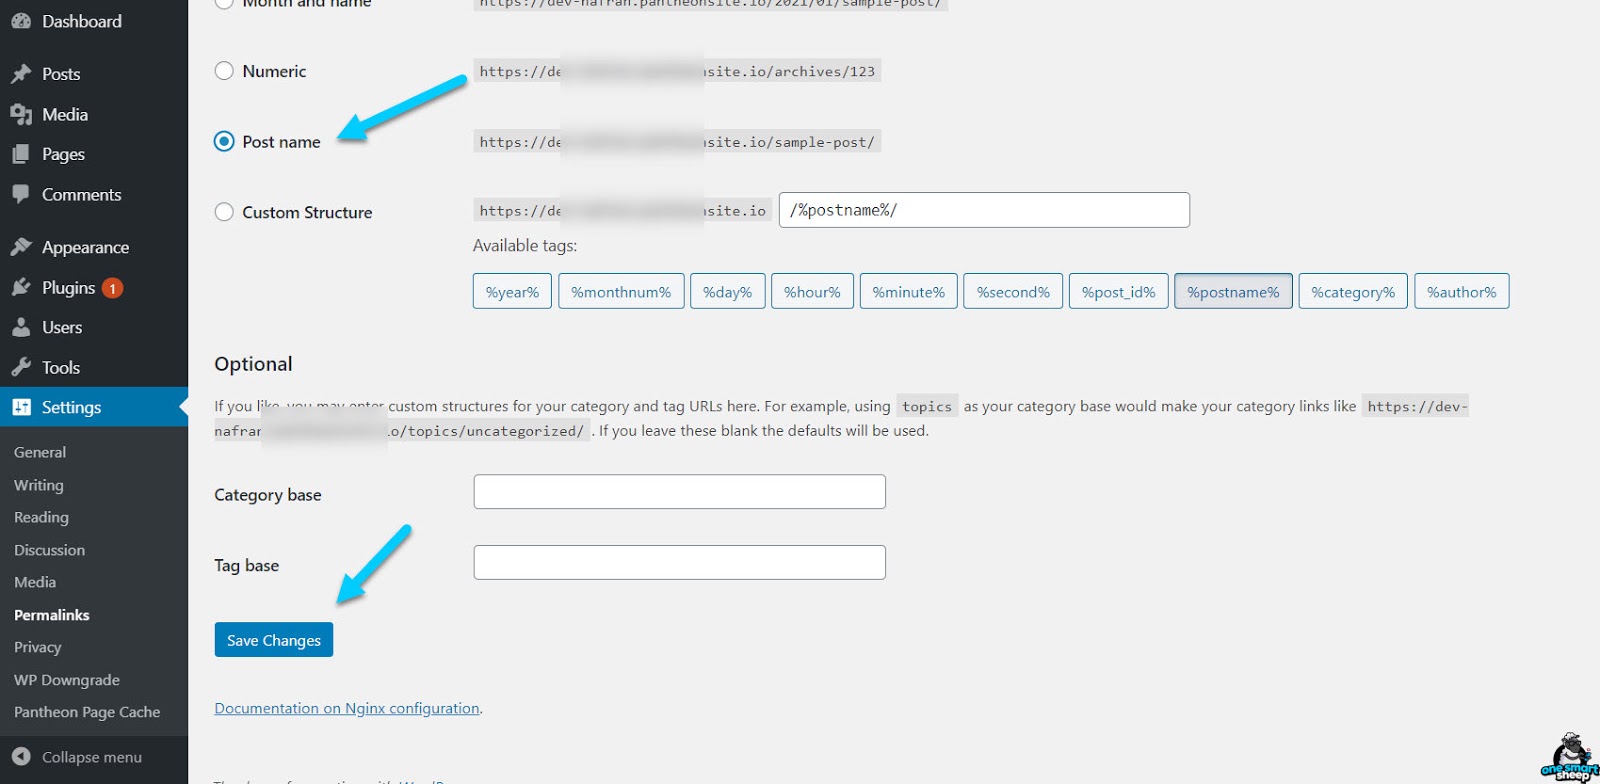
Sign in to your WordPress, navigate to Settings > Permalinks. Set any “Common Settings” recommended is “Post name” and hit “Save Changes.”
In most cases, the setting fixes the issues.
How to see it worked?
Simply visit your website and open any page or post. If it opens without any error, congratulations, you have successfully fixed the issue.
If the method doesn’t fix your 404 URLs, move on to the next fix.
2. Deactivating the Culprit Plugin
A conflicting plugin might be causing WordPress permalinks not working issues. This can help hackers compromise your websites.

The broken permalink error is mainly provoked by a WordPress site that uses plenty of plugins, you might have no idea which plugin caused the issue.
It’s better to deactivate all the plugins and check either your permalinks are working or not.
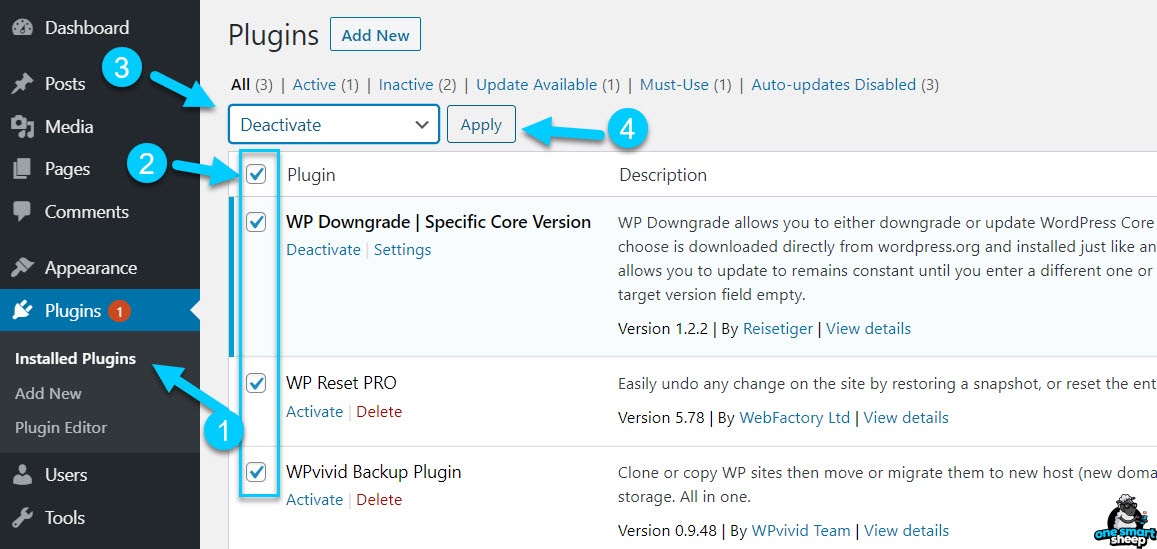
Go to Plugins > Installed Plugins > select all the plugins > choose Deactivate > Apply.
Now visit your website and check the URLs if working properly. If not, you should try the next method.
Some people might not have access to the WordPress Dashboard. In this case, you should try cPanel or FTP.
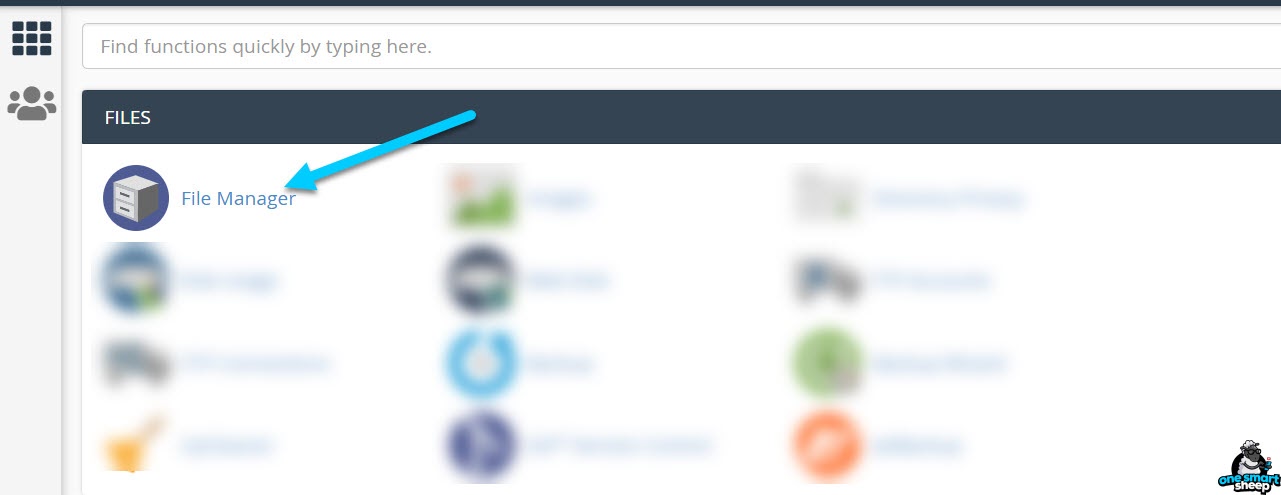
If you use cPanel hosting, sign in to your hosting account. Find the cPanel link and click it.
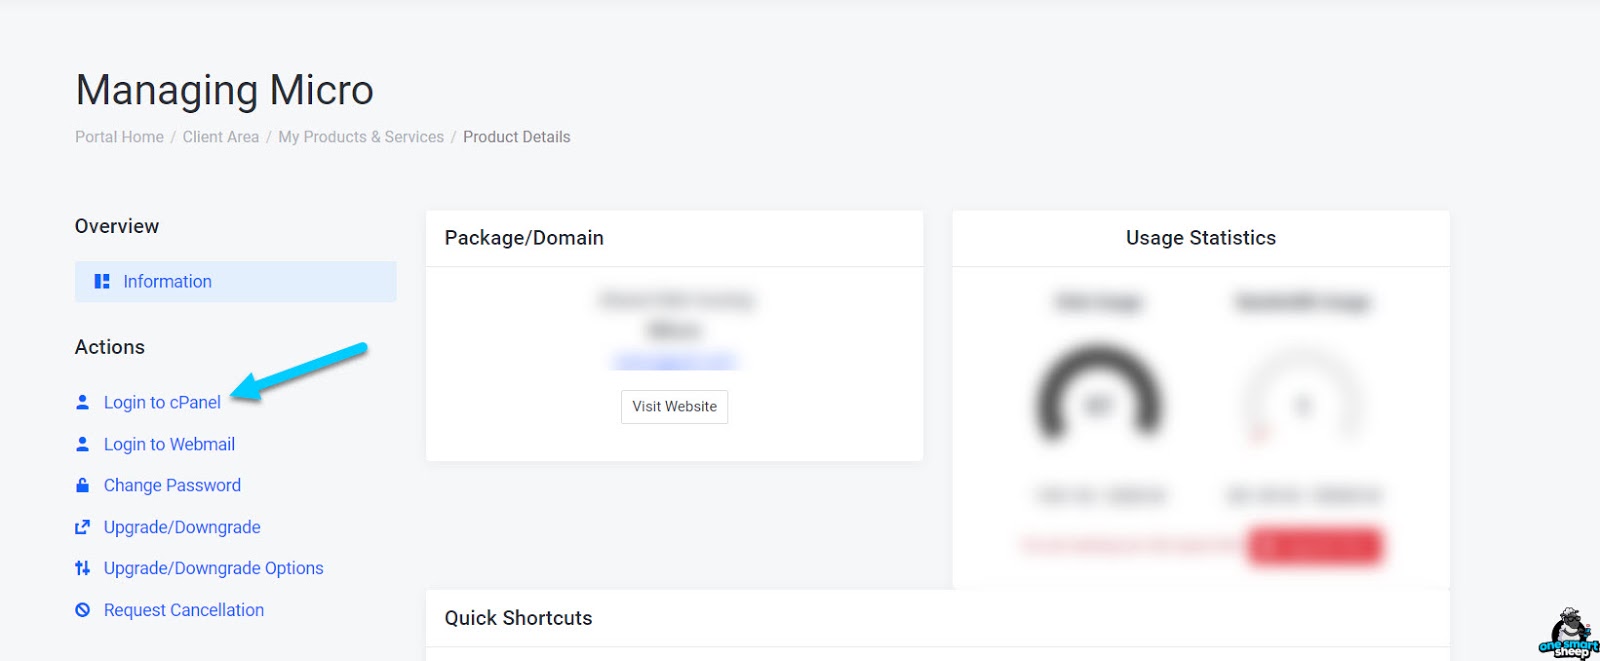
It opens your cPanel and finds File Manager.

If only one website is installed on your hosting, you’ll see your WordPress is located in public_html. If you own plenty of websites, you’ll notice a folder on the left side of the File Manager.
Once you dive into the folder, find wp-content, and open it.
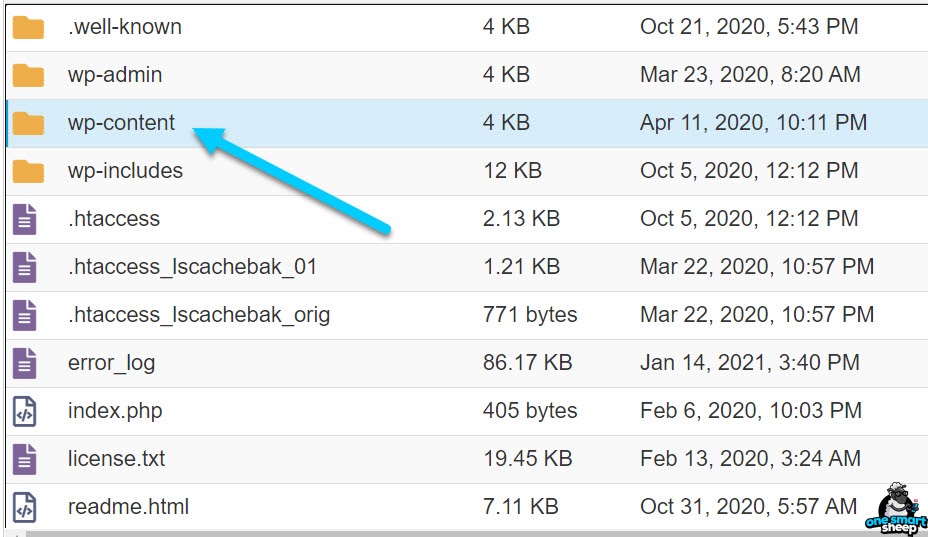
You’re just a few clicks away from solving your issue. Open the plugins folder.
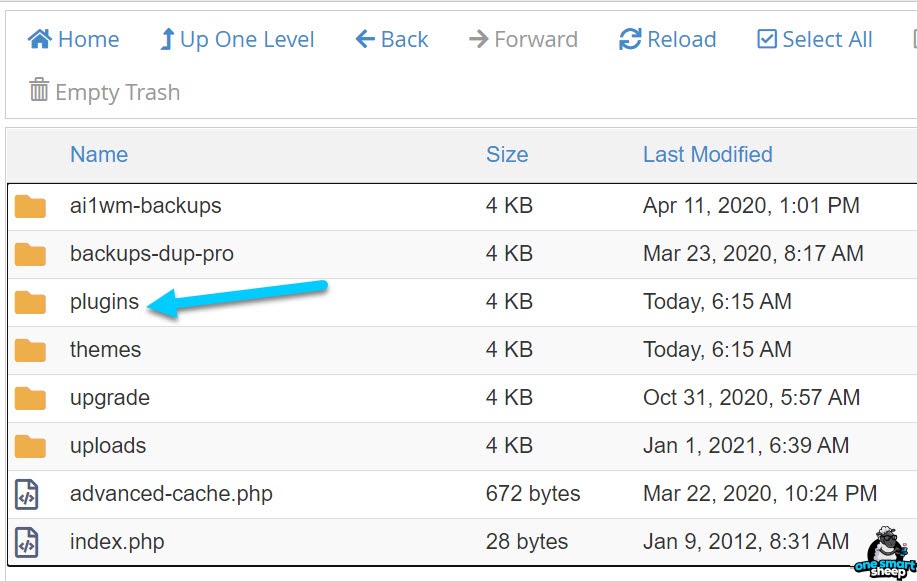
In order to deactivate the plugin, all you need is to rename the folder name. It automatically deactivates the plugin instantly upon renaming it.
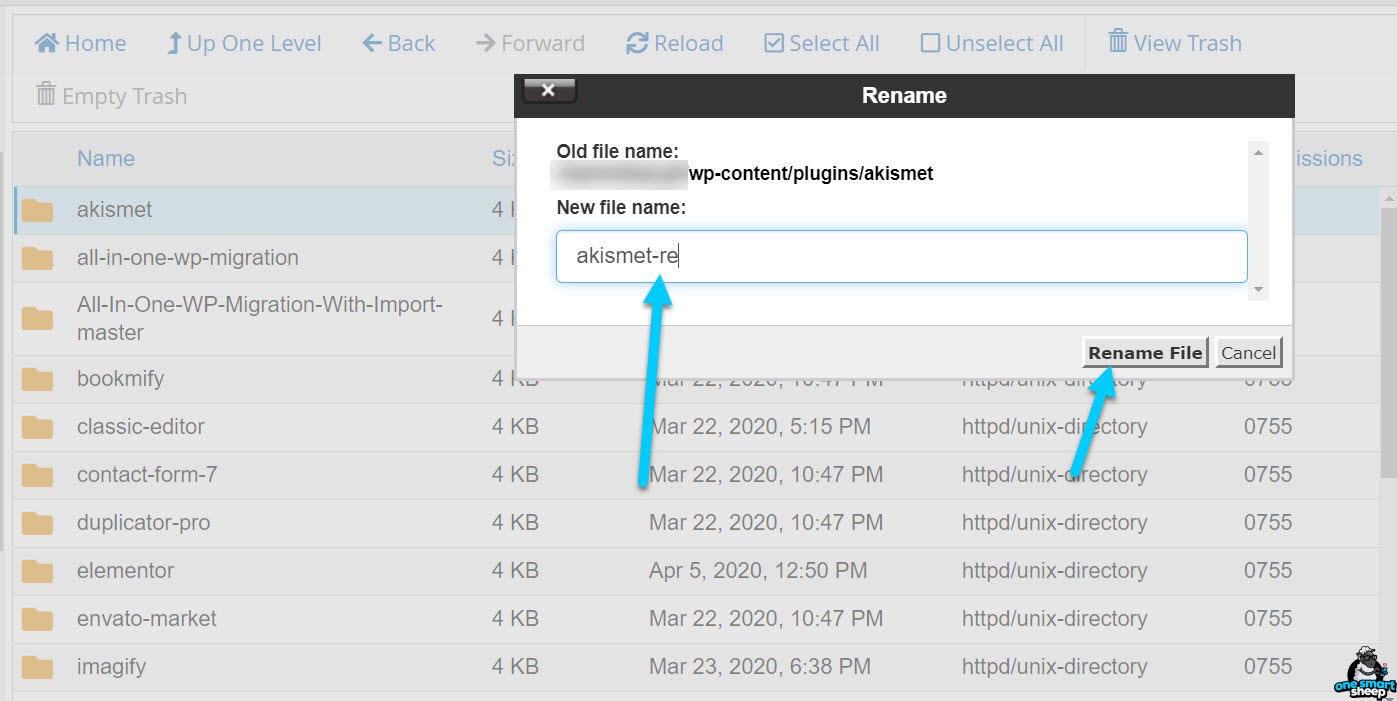
It cannot be automated, so you need to change all the plugins’ folder names manually.
In order to activate a plugin, you should re-name the plugin as exactly before.
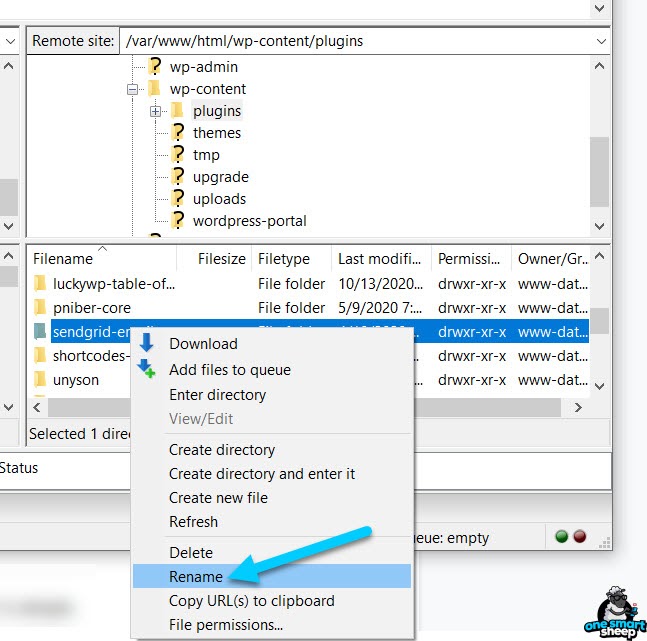
The same process can be executed using the FTP client, mainly with Filezilla. Type your hostname, username, and password.

If you use DigitalOcean, Vultr, or Linode, you should put /var/www/html/wp-content into the Remote site box in order to access the plugin folder.
Just right-click the folder and choose rename. You can put any number or alphabet in the end in order to deactivate a plugin. Please take a note of the original folder name.
When you find the plugin that causes the issue, you have two options:
- Permanently delete the plugin.
- Send a support ticket to the plugin owner.
Do you want to send a support ticket to the plugin owner? It’s simple.
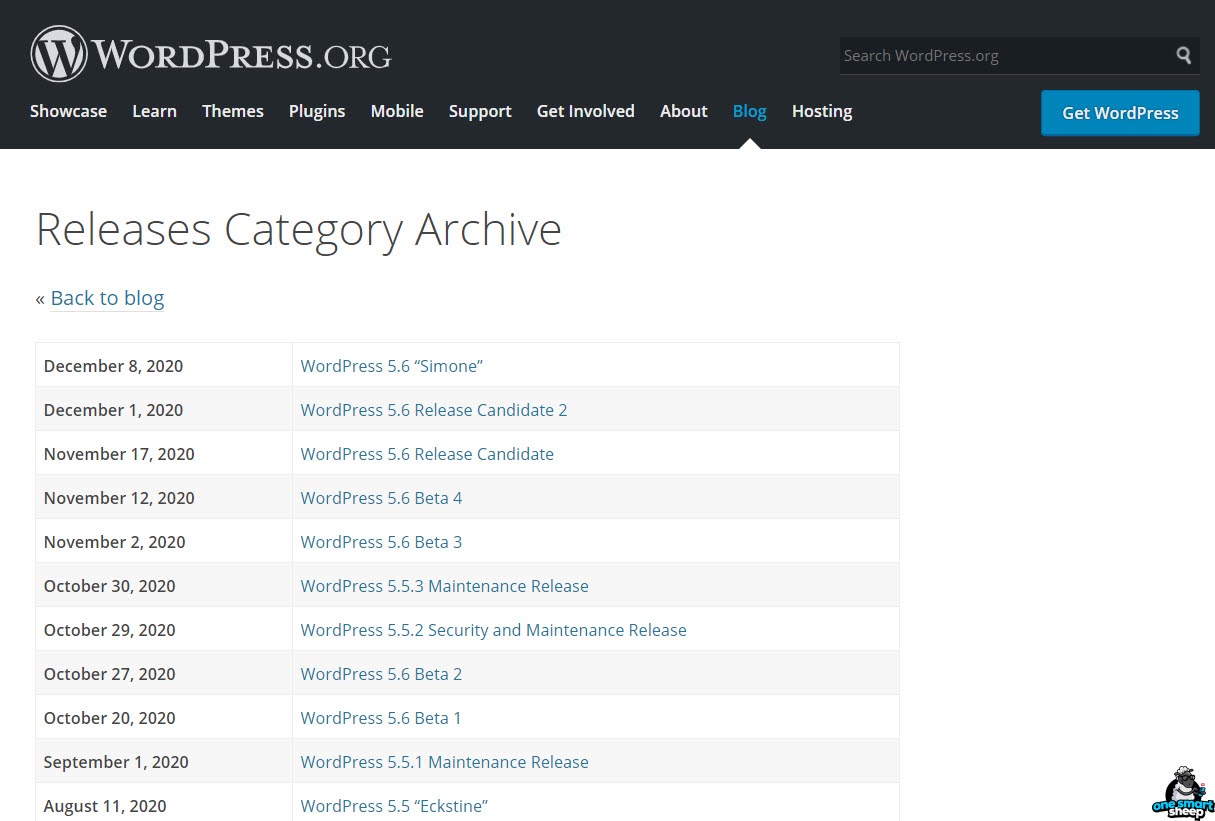
Go to WordPress.org, and search the plugin and open it.
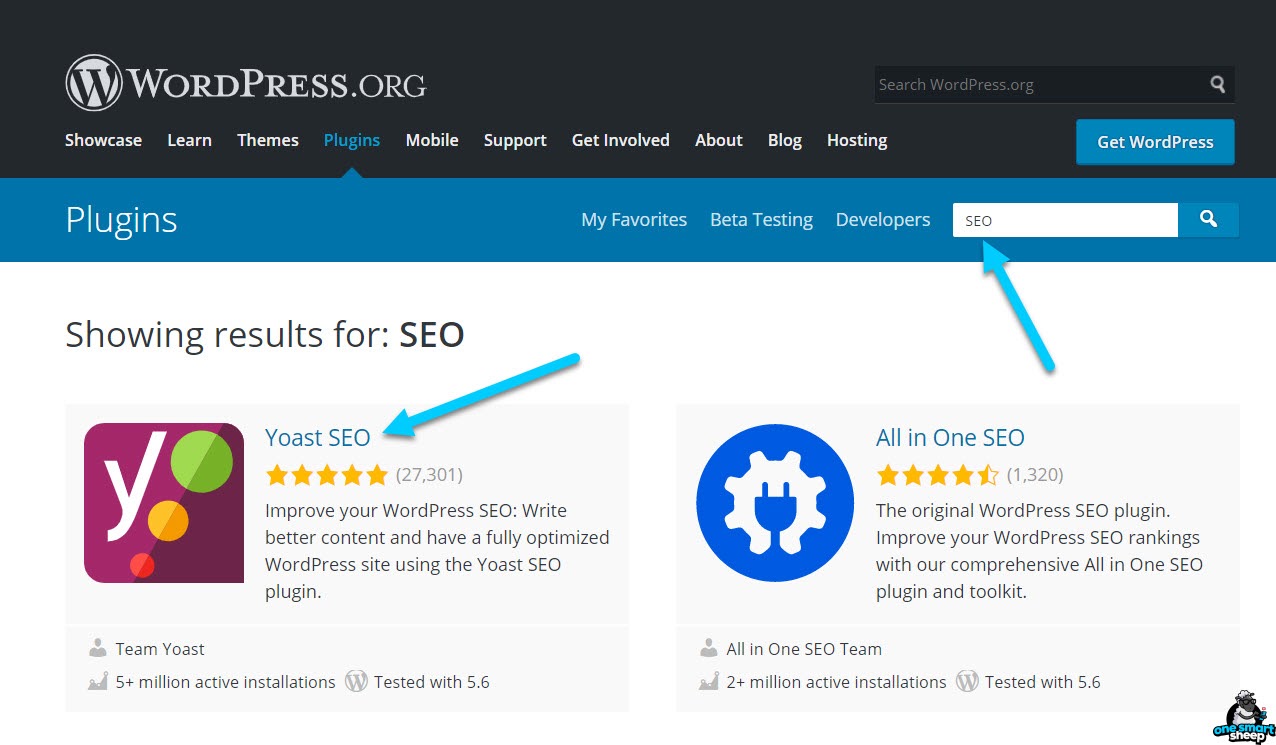
Click the Support section.
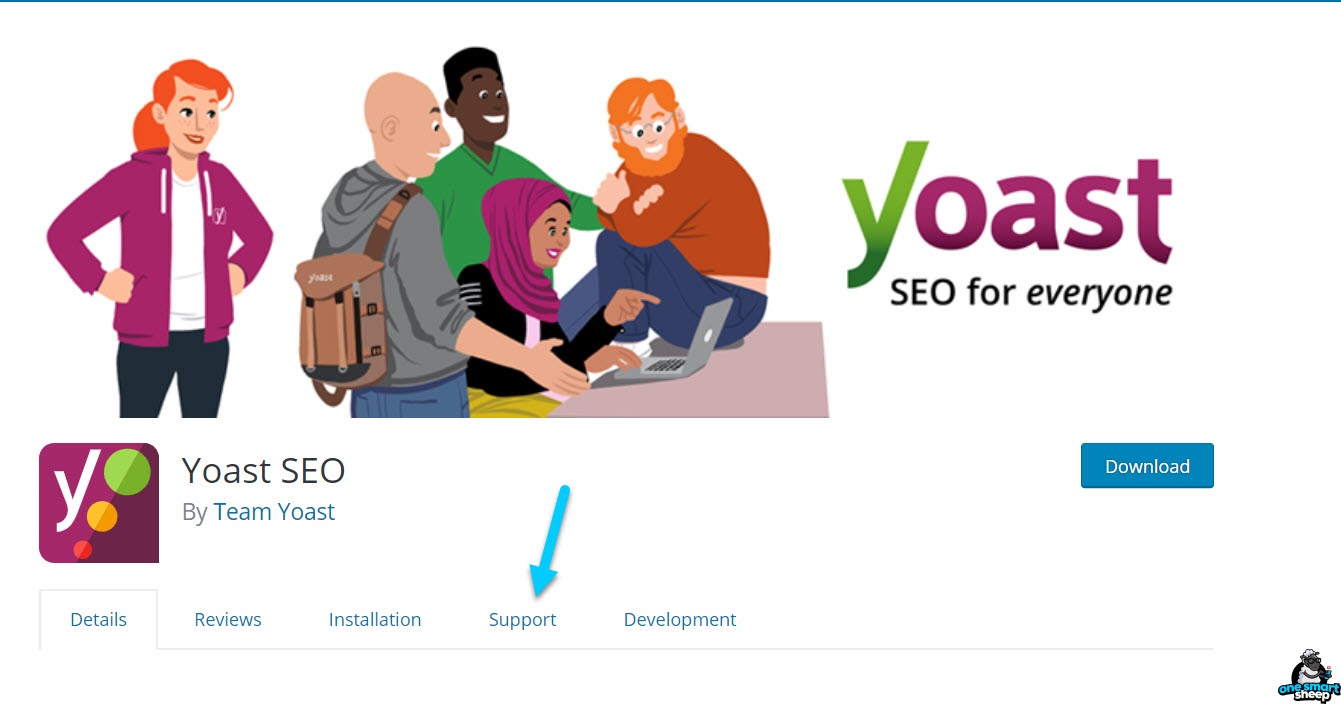
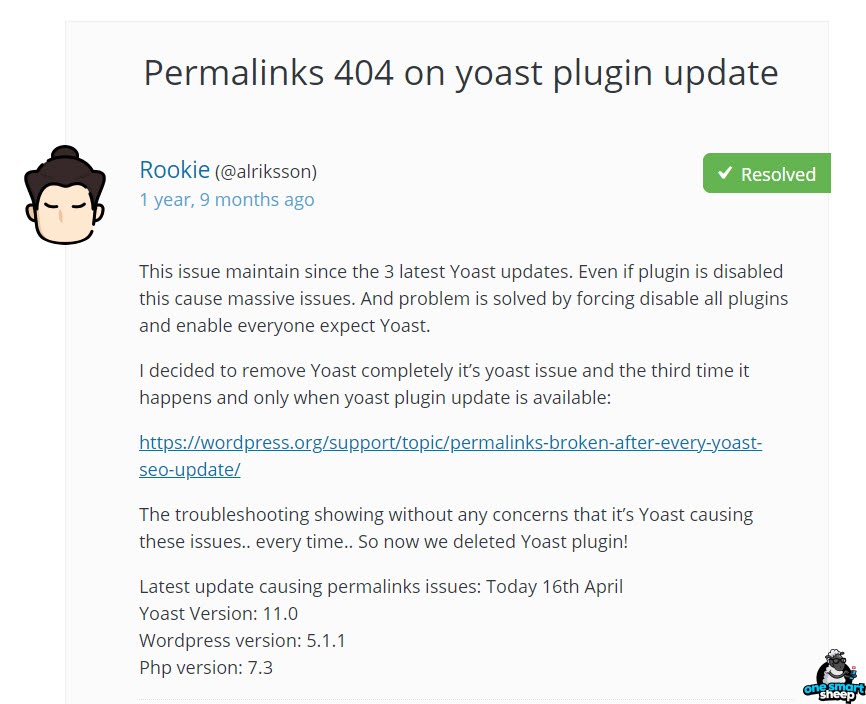
Now create a free account and post a topic that addresses your issue. Before you type your issue, you should explore for a similar problem with the search box’s help.

For example, the SEO Yoast plugin has caused 404 errors in permalinks and the developers provided its simple solution.
3. Fixing the .htaccess File
.htaccess is a tiny file but can break your entire website. A corrupted .htaccess file often causes WordPress permalinks not working errors. It is utilised to redirect URLs, create custom permalinks, enable password protection on your website, and show custom 404 pages.
To fix the broken .htaccess file, you must have access to your cPanel or FTP. Let’s assume you own a cPanel hosting. Sign in to your hosting account and go to the cPanel and choose File Manager.
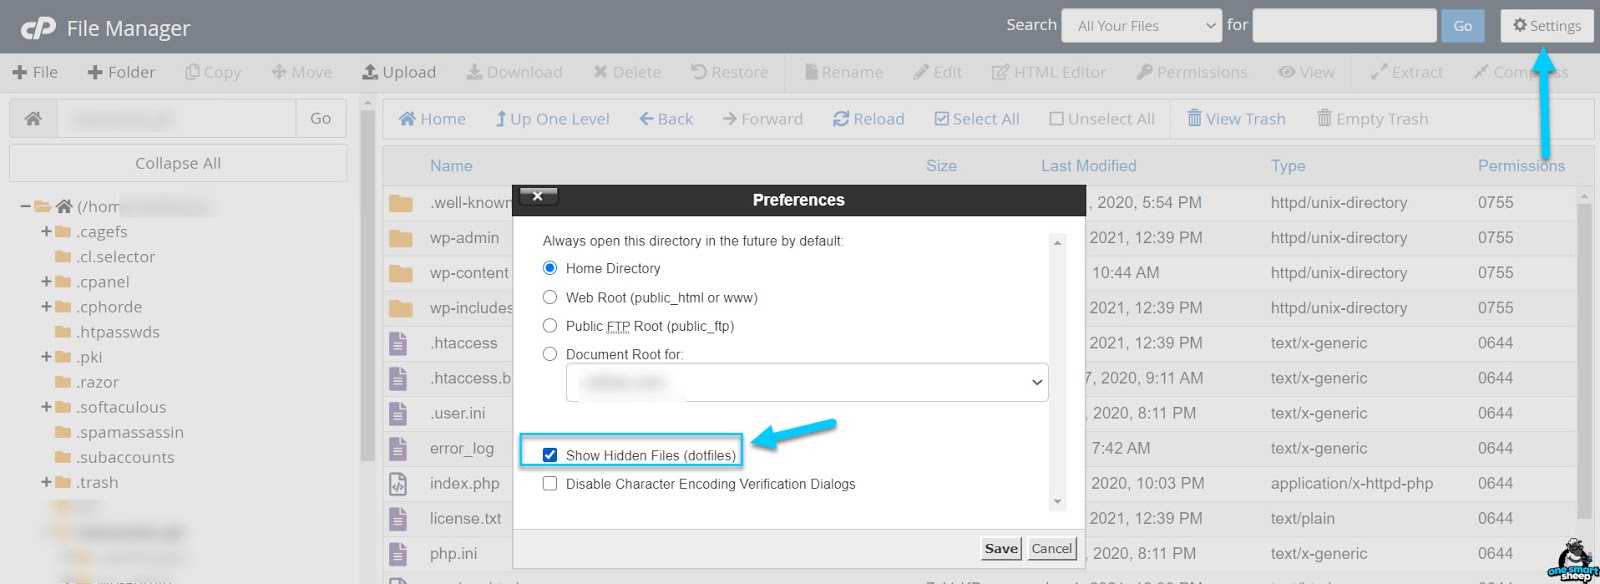
If it’s your first time, you cannot see .htaccess since the .htaccess is hidden for security reasons.
Can’t see the .htaccess file? Don’t worry; click the Settings button and enable “Show Hidden Files.”
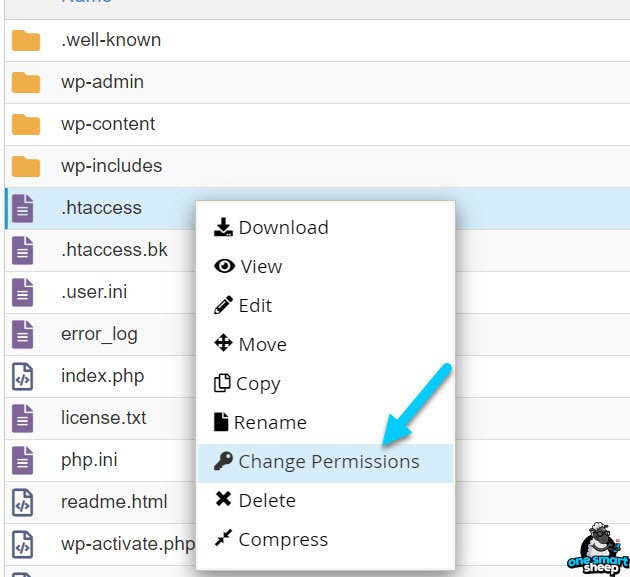
Firstly, we need to check either the .htaccess has the true permissions code. Right-click the .htaccess file and choose the option “Change Permissions.”
The default code of the .htaccess file should be set to 644.
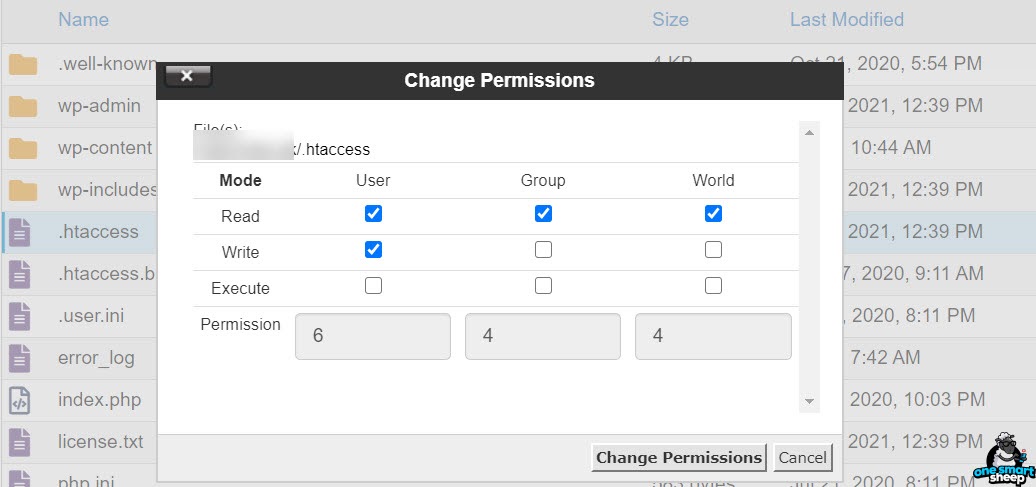
It means the .htaccess file has the ability to be read and written by your website, but the world — the users, browser, and bot — can only read it.
Secondly, you need to view the access to inspect the code written inside that is causing the conflict.
Sometimes many plugins interfere with .htaccess and break your site, creating especially the SEO and security plugins.
Right-click on the .htaccess file and choose Edit.
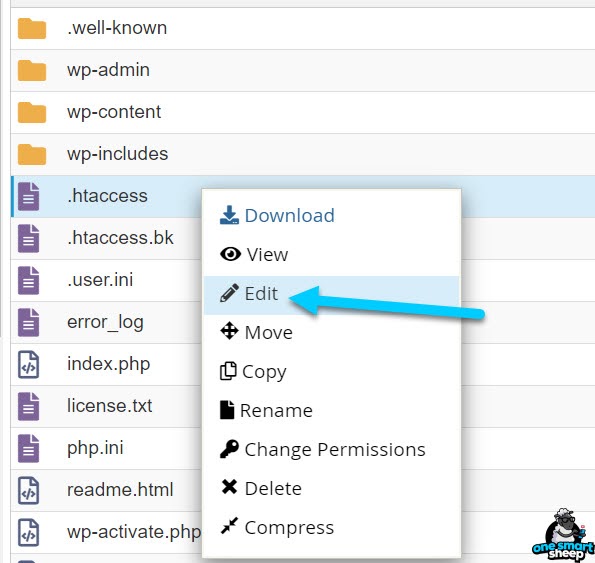
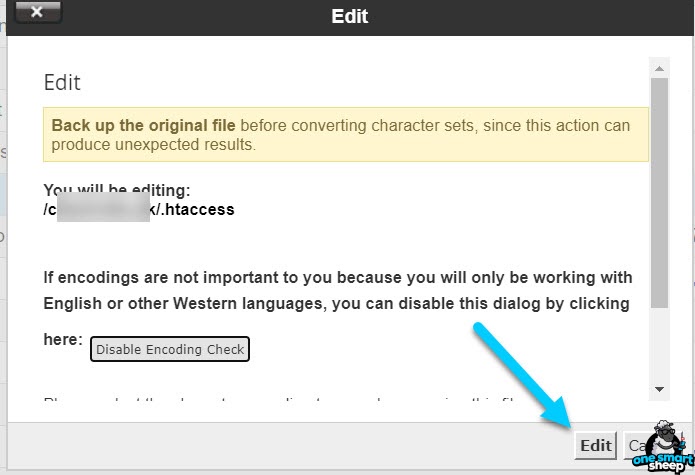
It warns you to back up the file before you make any changes. It’s a good practice creating a backup before making any significant changes, especially when you deeply have no idea about the code. Just click Edit.
Here is the complete overview of my .htaccess file. Your file may look totally different than mine.
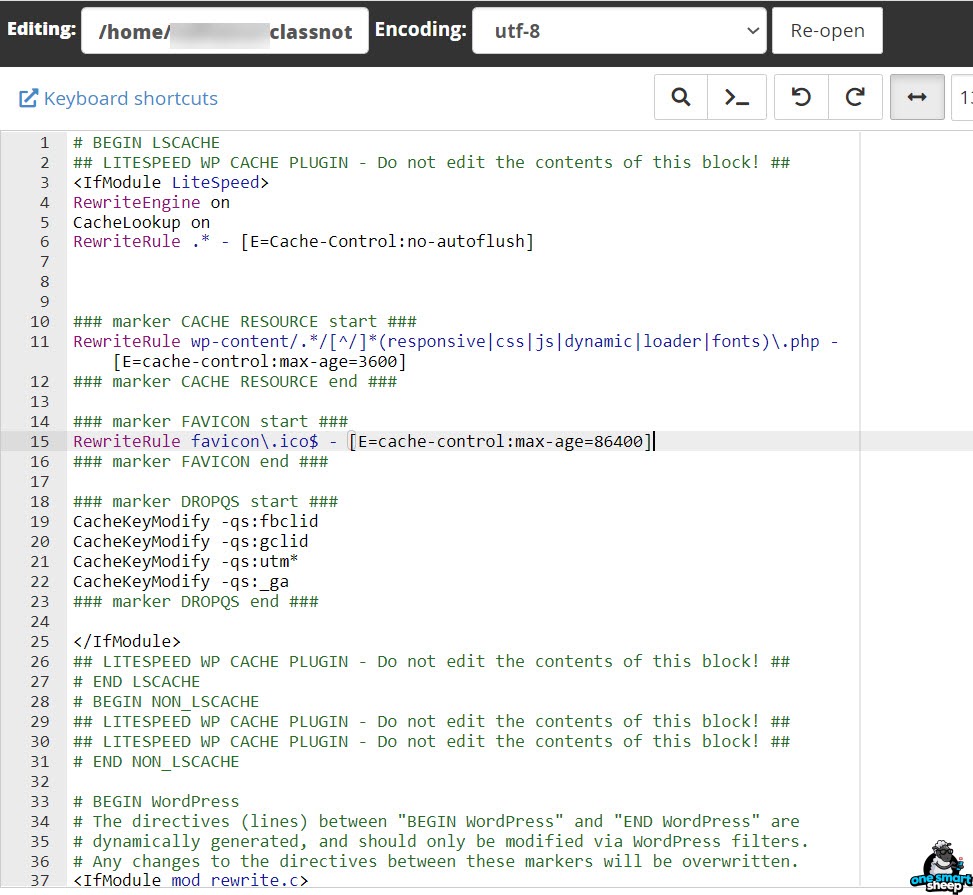
Delete everything and paste the below code:
[su_note]# BEGIN WordPress
# The directives (lines) between "BEGIN WordPress" and "END WordPress" are
# dynamically generated, and should only be modified via WordPress filters.
# Any changes to the directives between these markers will be overwritten.
<IfModule mod_rewrite.c>
RewriteEngine On
RewriteRule .* - [E=HTTP_AUTHORIZATION:%{HTTP:Authorization}]
RewriteBase /
RewriteRule ^index.php$ - [L]
RewriteCond %{REQUEST_FILENAME} !-f
RewriteCond %{REQUEST_FILENAME} !-d
RewriteRule . /index.php [L]
</IfModule>
# END WordPress[/su_note]
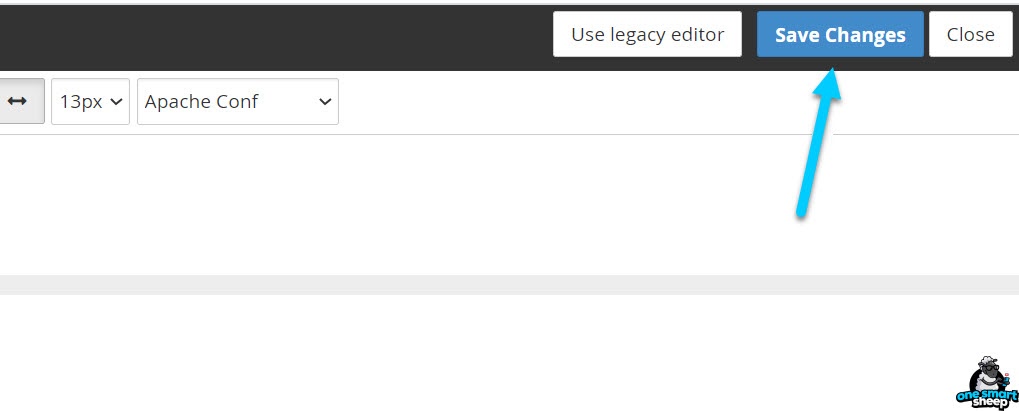
Don’t forget to make Save Changes.
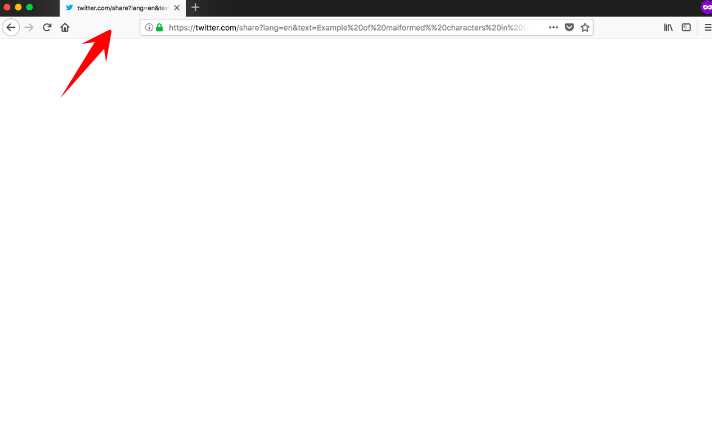
The process is the same for FTP as well. Put the confidential as shown in the screenshot below.
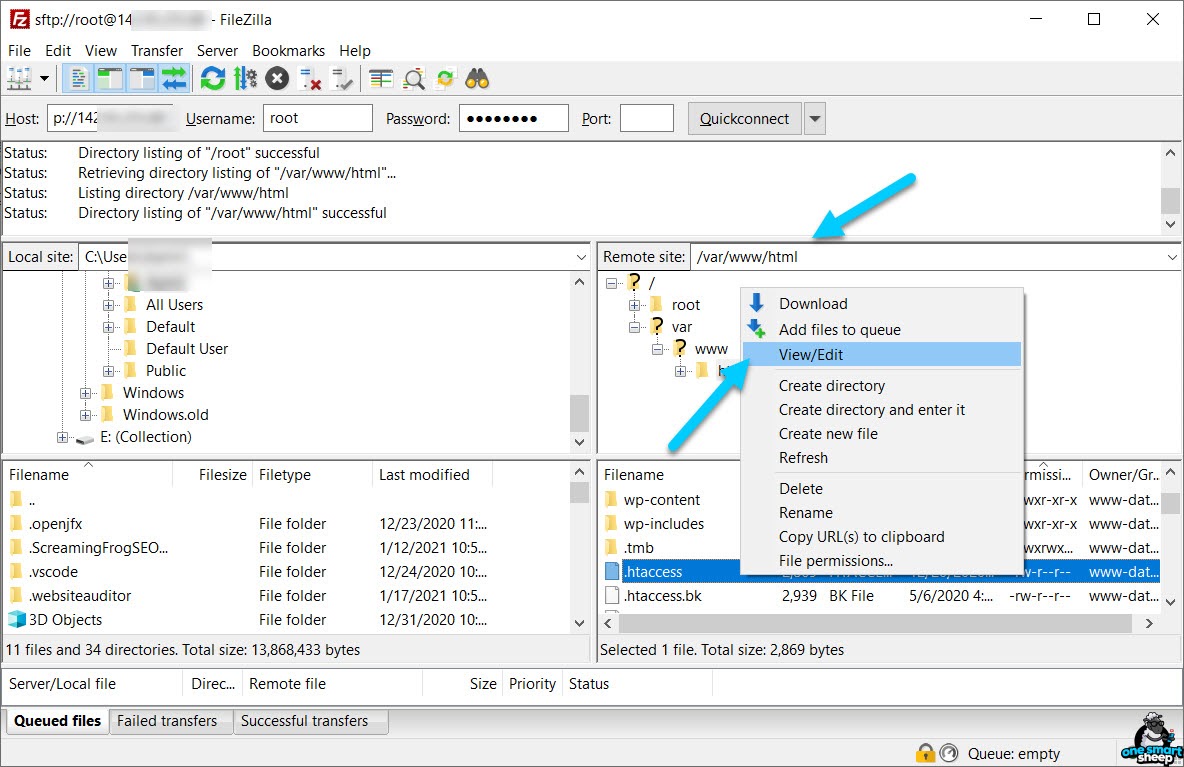
As the site is hosted on a cloud computing platform, you may need to type “/var/www/html” into the remote site area to access your WordPress website.
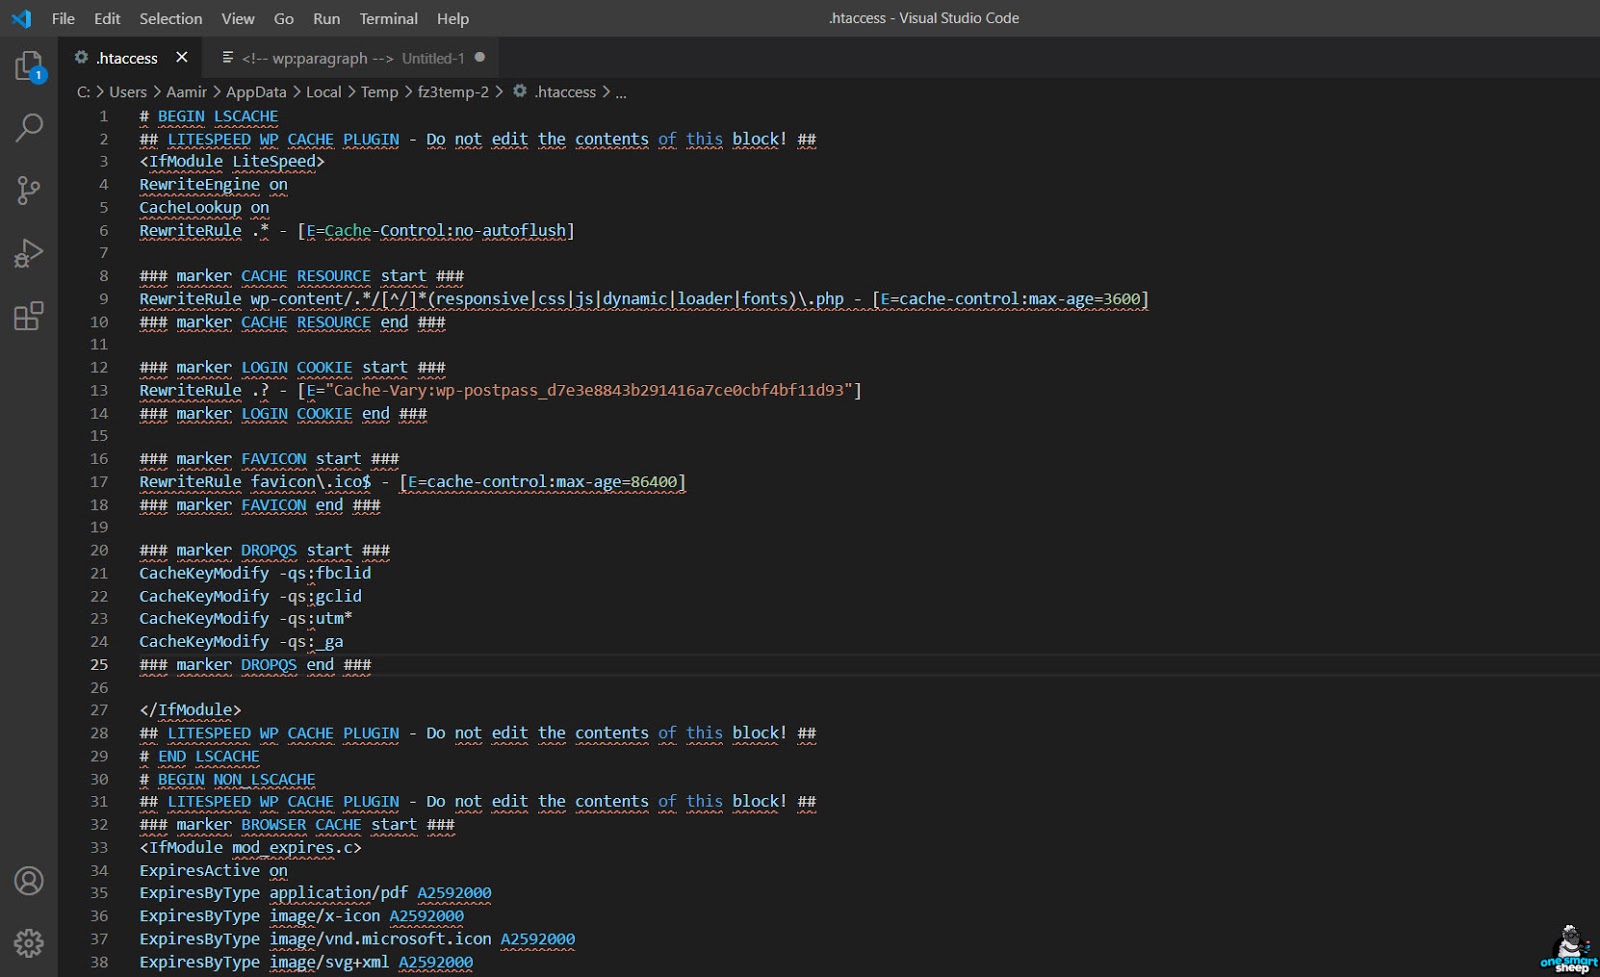
I use Microsoft Visual Code Editor; here is the look of the .htaccess file when I opened the file.
I deleted everything and pasted the code.
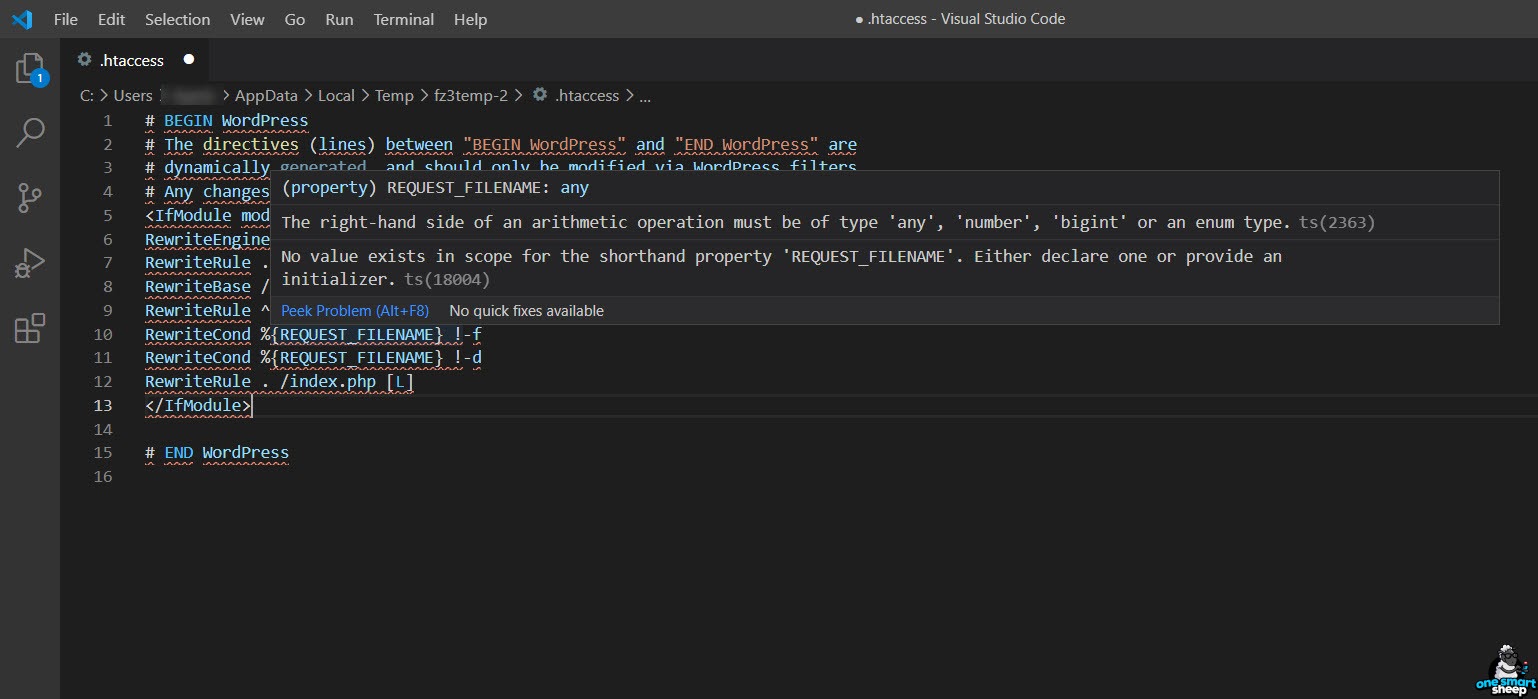
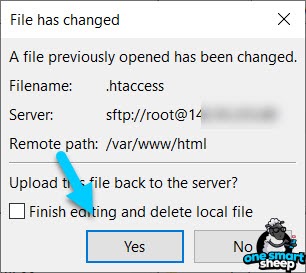
Now save the file with Ctrl+S in Windows and Control+S on Mac. Once saved, exit it. Filezilla will automatically detect the changes. Click Yes in order to keep the file on your hosting server.
That’s it.
If it doesn’t work, delete the .htaccess file and try again. Make sure you download it for backup purposes.
4. Enabling mod_rewrite
In some cases, the above three methods might not work since the directive mod_rewirte is missing to function correctly.
In order to allow the Mod_write module, type the following in the terminal:
[su_note]sudo a2enmod rewrite[/su_note]
This will trigger the module or alert you that the module is currently permitted. To place these changes into effect, restart Apache.
[su_note]sudo systemctl restart apache2[/su_note]
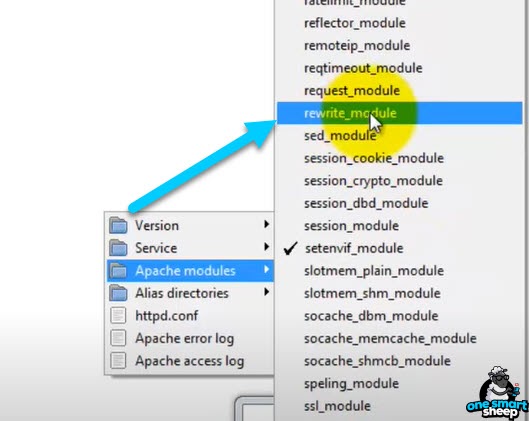
Mod_rewrite is currently fully enabled. At the next step, we'll set a .htaccess document that we will use to specify rewrite rules for redirects.
If you’re using any other service, make sure to enable rewrite_module in Apache.
Didn’t work yet? And in some cases, make sure to set the following directives:
[su_note]Options Indexes FollowSymLinks
AllowOverride All
Require all granted[/su_note]
Don’t forget to restart the service or the VPS. Without restart, your changes might not take any effect.
It’s better to discuss to your hosting provider about the rule they have set up for the mod_rewrite. Good hosting companies have experts who have dealt with this kind of issue and enable the module by default.
5. Fixing File Permissions for WordPress Directories and Files
Sometimes, incorrect file or directory permissions can prevent WordPress from updating the .htaccess file or handling permalinks correctly. This often happens after migrating your site or changing hosting providers.
To fix this, you need access to your cPanel or FTP client. Navigate to your WordPress root directory (usually public_html). Right-click on the folders and select "Change Permissions." Set the following permissions:
- All folders: 755
- All files (including .htaccess): 644
After updating the permissions, try resetting your permalinks again from the WordPress dashboard. If the issue was due to permission errors, your permalinks should now work correctly.
6. Clearing Website and Browser Caches
Occasionally, caching plugins or server-level caching can serve outdated versions of your site, causing permalink changes not to reflect. This is especially common if you use plugins like W3 Total Cache, WP Super Cache, or server-side caching provided by your host.
To resolve this, clear your WordPress cache by navigating to the plugin’s settings and selecting the option to purge or clear all caches. Additionally, clear your browser cache or try accessing your site in incognito mode to ensure you’re seeing the latest version of your URLs.
7. Checking for Custom Code or Theme Conflicts
Custom code snippets added to your functions.php file or a poorly coded theme can interfere with WordPress permalink structure. If you recently added custom code or updated your theme, try reverting those changes.
Switch to a default WordPress theme (like Twenty Twenty-Four) via Appearance > Themes, and check if your permalinks are working. If the issue resolves, your theme or custom code is the culprit. You can then debug further by gradually reintroducing your customizations.
8. Updating WordPress Core, Themes, and Plugins
Outdated WordPress core files, themes, or plugins can sometimes cause permalink issues due to compatibility problems. Head to Dashboard > Updates and make sure everything is up to date. After updating, reset your permalinks again to see if the issue is resolved.
9. Checking Server Configuration (Nginx Users)
If your site is hosted on Nginx instead of Apache, the .htaccess file won’t have any effect. Instead, you need to update your Nginx configuration file to handle permalinks. Add the following block to your server configuration:
location / {
try_files $uri $uri/ /index.php?$args;
}
After saving the changes, reload the Nginx server. This will ensure pretty permalinks work as expected on Nginx servers.
10. Reviewing Site URL Settings
Incorrect settings for “WordPress Address (URL)” and “Site Address (URL)” in Settings > General can also break permalinks, especially after a migration or domain change. Double-check that both URLs are correct and match your actual domain (including https if you use SSL). Update them if necessary and save changes.
Troubleshooting Common Permalink Issues in WordPress
As I mentioned above permalinks are an essential component of any WordPress website as they provide permanent URLs to your individual pages and blog posts, making them more readable and SEO-friendly. However, sometimes issues may arise with permalinks, such as
- 404 errors: This occurs when a page cannot be found on your website. This can be caused by a number of factors, including incorrect permalink settings, a missing .htaccess file, or plugin conflicts. To fix this issue, you can try resetting your permalink settings, regenerating the .htaccess file, or disabling and re-enabling plugins.

- Broken links: This happens when a link on your website leads to a page that doesn't exist. This can be caused by moving pages or posts, or by incorrect permalink settings. To fix this, you can update the link to point to the correct URL, or update your permalink settings.
- Post name permalink not working: This can happen if you change the permalink structure after you've already published some posts. You can fix this by resaving your permalink settings and updating your .htaccess file.
- Permalinks not working on a new install: this can happen if the mod_rewrite module is not enabled in your server, you can check with your hosting provider if it is enabled or not, if not you may ask them to enable it.
- Changing permalink structure and losing traffic: this can happen if you change the permalink structure and didn't redirect the old URLs to the new ones, you can use a plugin like "Redirection" to redirect the old URLs to the new ones.
By following the solutions outlined in this troubleshooting guide, you can quickly and easily resolve any issues related to permalinks on your WordPress website. Remember that always make a backup of your website before making any changes, this will help you to restore your website to a previous version in case anything goes wrong.
Fixing the WordPress Postname Permalink Not Working Error
If you encounter the "WordPress postname permalink not working" error, it's often due to a misconfiguration in the permalink settings or a corrupted .htaccess file. This issue can cause your posts to return a 404 error, making them inaccessible to visitors.
To resolve this, first navigate to your WordPress dashboard, go to 'Settings' > 'Permalinks', and select 'Post name' as your permalink structure. Click 'Save Changes' to reset the permalinks. If the problem persists, check your .htaccess file or consider disabling any recently installed plugins that might interfere with permalinks. This fix is crucial for maintaining the accessibility and SEO health of your site.
Final Thoughts
Broken permalinks are frustrating, mostly when you have acquired a new client or moved to new hosting to speed up your site.
Not only it might destroy your reputation, but it also hurts your SEO rankings. URLs are a significant ranking factor; even a slight change in the URL might lose link juice.
The easiest fix is to re-enable the permalinks from the settings in WordPress. If it doesn’t work, you might need to find a plugin that interferes with your server configuration, especially a security plugin like Wordfence.
Fixing the .htaccess file can solve the majority of the issues, but in extreme cases, enabling mod_rewrite fixes everything.
Let us know in the comment section if any of the methods work for you. We’ll be glad to know about it. We’ll be glad to know about it. And if you want to learn more tips and tricks, we’ve got all sorts of guides on One Smart Sheep.
FAQs
How do I clear the permalinks cache in WordPress?
To clear the permalinks cache in WordPress, go to your WordPress dashboard, navigate to "Settings" > "Permalinks," and without making any changes, click on the "Save Changes" button. This action will flush and regenerate the permalink structure. If you use a caching plugin, also clear the cache from that plugin's settings.
Why can't I change the permalink in wordpress?
- If you're unable to change the permalink in WordPress, it's likely due to one of these reasons:
- Permissions: Your user role might not have the necessary permissions to edit permalinks.
- Lockdown by Plugins: A security or SEO plugin might be restricting changes to maintain URL consistency.
- Server Configuration: Issues with your .htaccess file or server settings can prevent permalink changes.
- Permalinks Frozen in Settings: Occasionally, settings in the WordPress dashboard under Settings > Permalinks may be locked due to previous configurations or errors.
Is it true wordpress permalinks not working after migration?
Yes, it's common for WordPress permalinks to stop working after migrating a site to a new server. This issue usually arises because the .htaccess file needs updating or the permalink settings need to be reconfigured. To fix this, simply go to Settings > Permalinks in the WordPress dashboard and click "Save Changes" to reset the permalink structure. This process often resolves the problem by updating the .htaccess file with the correct configuration for the new server environment.
Do Wordpress permalinks keep breaking?
WordPress permalinks typically do not keep breaking on their own. However, if you frequently encounter issues with permalinks breaking, it could be due to several factors like updates to WordPress core, themes, or plugins that affect the .htaccess file, conflicts from improperly configured plugins, or server configuration issues. Ensuring that your themes and plugins are compatible and correctly configured, along with regular maintenance of your .htaccess file, can help prevent permalinks from repeatedly breaking.
What does “wordpress mod_rewrite not working” mean?
When the mod_rewrite” module in WordPress is not working, it typically means that the Apache web server's rewrite rules, which WordPress uses for its permalinks structure, are not being applied correctly. This issue can lead to problems such as the inability to access posts and pages through their set permalinks, often resulting in 404 errors.
The mod_rewrite issue can be due to several reasons:
- Incorrect .htaccess file configuration: The .htaccess file may not be set up correctly, or it might be missing necessary rewrite rules.
- Apache configuration: The Apache server might not have mod_rewrite enabled, or the AllowOverride directive may be set incorrectly, preventing the .htaccess rules from being executed.
- File permissions: The .htaccess file may not have the correct file permissions to be read and executed by the server.
To resolve this issue, you might need to check that mod_rewrite is enabled in Apache, ensure that the .htaccess file has the correct WordPress-generated rules, and that file permissions are set correctly.
What is the difference between links and permalinks?
Links are a general term referring to any URL or web address that points to a specific webpage or file on the internet. Permalinks, on the other hand, are specific to content management systems like WordPress and refer to the permanent URLs assigned to individual posts, pages, or other content types. They are consistent and unchanging, ensuring that the content can be reliably accessed over time.
What is 404 after the permalink change?
A 404 error after a permalink change means that the server could not find the requested page or post. This often happens because the URL structure of your content has changed, and the old URLs are no longer valid. Search engines, bookmarks, or links pointing to the old URL will result in 404 errors if redirects are not in place.
How do I fix my 404 URL?
To fix a 404 URL:
- Check if the URL is correct.
- If you've changed permalinks, set up redirects from the old URLs to the new ones using plugins like "Redirection."
- Ensure that the content still exists on your website.
- If using WordPress, go to "Settings" > "Permalinks" and click "Save Changes" to flush the permalinks.
- Clear your website's cache if you're using a caching plugin.
- If none of the above solutions work, check for issues with your .htaccess file or consult your hosting provider.


.svg)