


Have you ever thought about launching your own WordPress website but been held back by the seemingly complex process? Fear no more.
This guide will illuminate your path, walking you through the seamless installation of WordPress on three of the top-notch hosting platforms: Bluehost, SiteGround, and HostGator. Also, we'll navigate the world of cPanel and its auto-installers like Fantastico.
Whether you're a beginner taking your first steps or a seasoned webmaster looking to refresh your knowledge, this comprehensive walkthrough is designed to ensure you can smoothly set up your WordPress site.
Let's delve into this exciting journey toward establishing your digital presence.
What Are the Requirements Before Installing WordPress
First and foremost, you'll need a web hosting service. It's crucial to pick a dependable one that is WordPress-friendly. Luckily, many hosting providers simplify things with one-click WordPress installations.
Next up is your domain name. Simply put, it's your unique web address, something along the lines of www.youruniquewebsite.com. Make sure you've registered your domain name before moving on with WordPress installation.You must visit to learn how to register domain name.
In terms of server requirements, your server should fulfill certain criteria:
- It should run on PHP version 7.4 or above, ideally PHP 8.0 or higher.
- You'll need MySQL version 5.6 or greater or MariaDB version 10.1 or above.
- And, of course, HTTPS support is a must.
Also, you'll require access to your web server for uploading files and creating databases. This could involve FTP or SSH credentials, which you can get from your hosting provider.
WordPress officially recommends Bluehost for its outstanding services. Why? Bluehost offers robust performance, 24/7 customer support, and a one-click WordPress installation feature. With free domain names you can also get off their hosting plan (special for one smart sheep users).
Moreover, they ensure excellent site speed, secure SSL certificates, and free domain name registration for the first year. This makes them an excellent choice for WordPress hosting.
Don't forget about your browser. Ensure you're using a browser that plays well with WordPress. The rule of thumb is to stick with the latest browser versions for top-notch security and performance.
For editing specific files such as wp-config.php, a text editor like Notepad or TextEdit comes in handy.
Finally, remember that setting up a WordPress website isn't necessarily a speedy process, especially if you're new to it. So, arm yourself with a bit of time and patience.
Method 1: How to Install WordPress on Bluehost
Bluehost is a top provider of web hosting services. It is renowned for its comprehensive solutions for beginners and established businesses.
WordPress.org officially recommends it and excels in performance, customer support, and security. Bluehost integrates robust security measures like Spam Experts, Hotlink Protection, and Secure Shell Access, ensuring a secure hosting environment for your website.
Note: Once you decide to get started with Bluehost, the process is relatively straightforward. After signing up with your chosen domain name, you'll be delighted to find that Bluehost automatically takes care of the WordPress installation.
That's right, Bluehost's streamlined setup allows for automatic WordPress installation, removing the hassle of manual installation. This means you can build and customize your website, saving time and effort. It's one of the many reasons why Bluehost is highly recommended, especially for those new to website building.
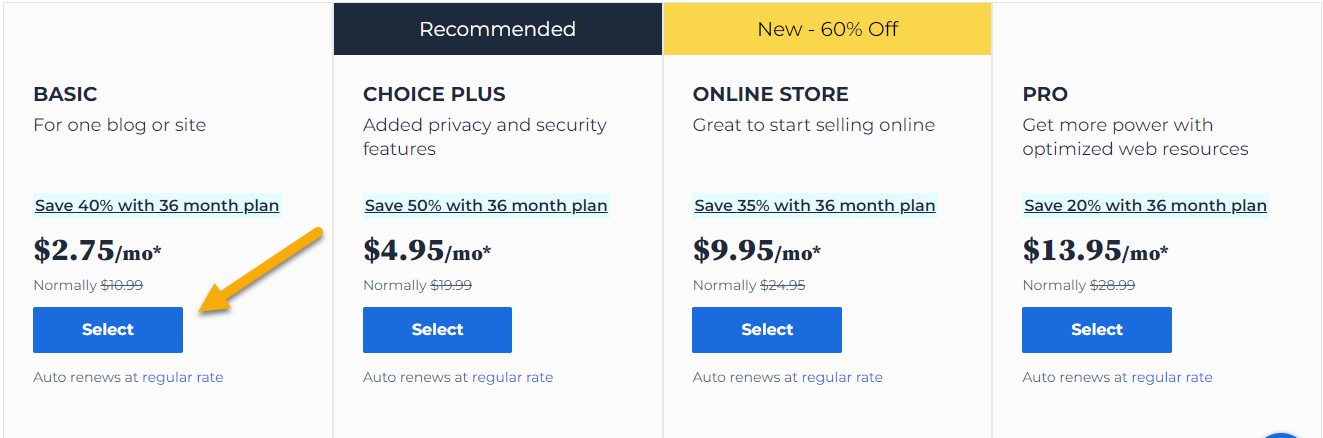
Let's get started with selecting a plan that suits your needs. First things, head over to the Bluehost website. Once you're there, look for the 'Get Started' button and give it a click. This will lead you to an overview of their pricing plans, allowing you to choose the one that fits your specific requirements best.
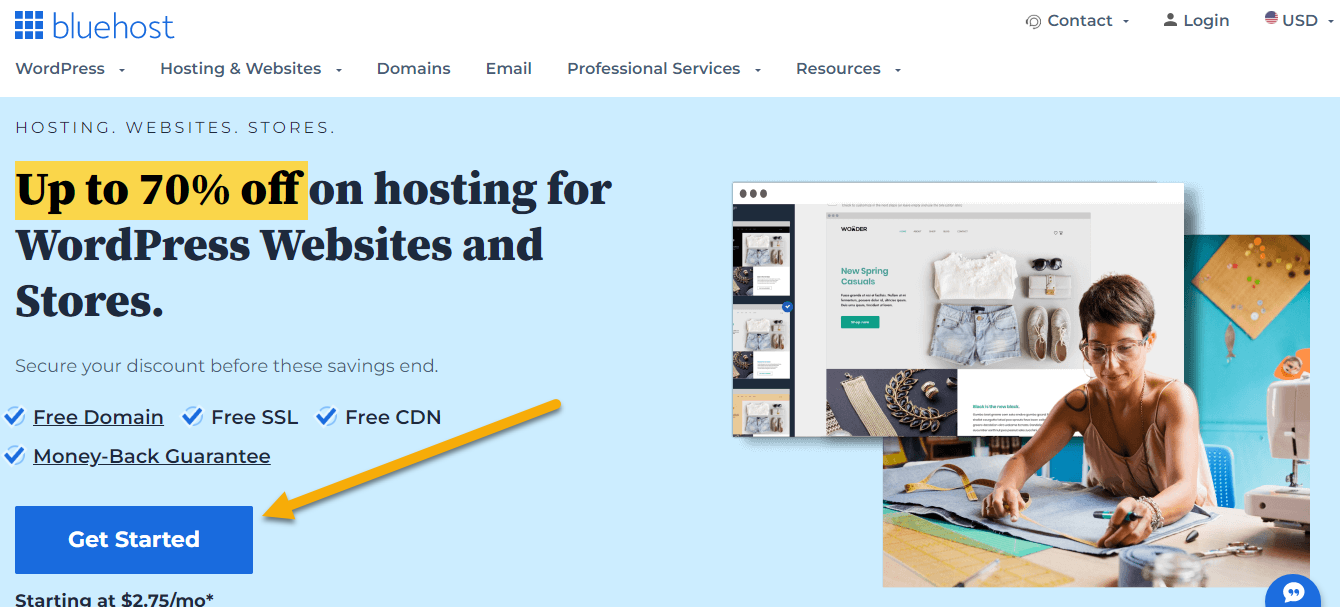
At this point, you'll be presented with Bluehost's range of pricing plans. Take your time to explore these options and pick the one that suits your specific needs best.
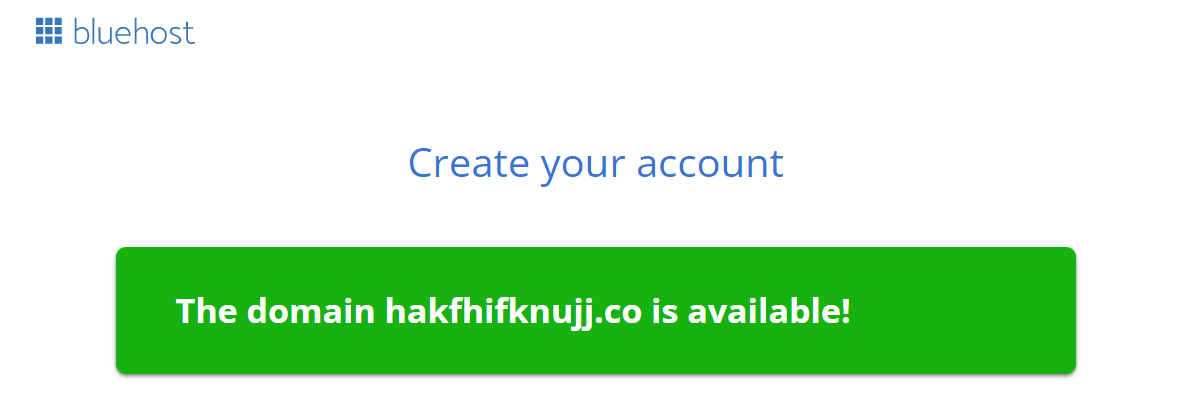
At this stage, you have a choice. You can either craft an entirely new domain name or bring along a domain name you already own. It's entirely up to you.
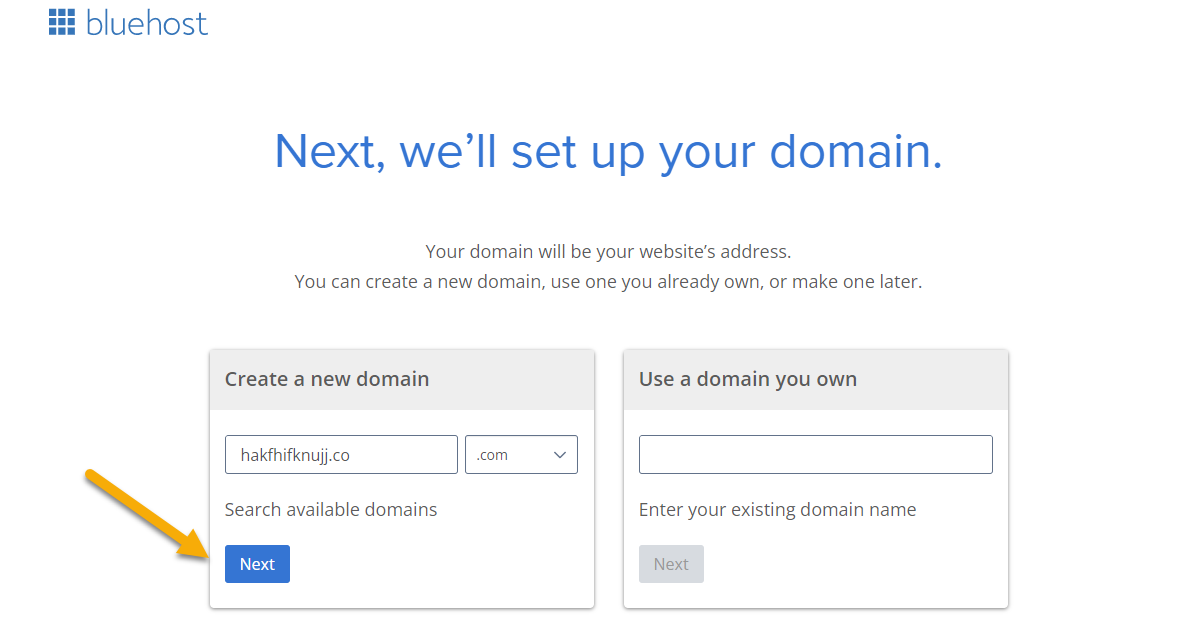
If the domain you're keen on is available, you only need to hit the "Next" button. You'll then be greeted by a green message confirming its availability.
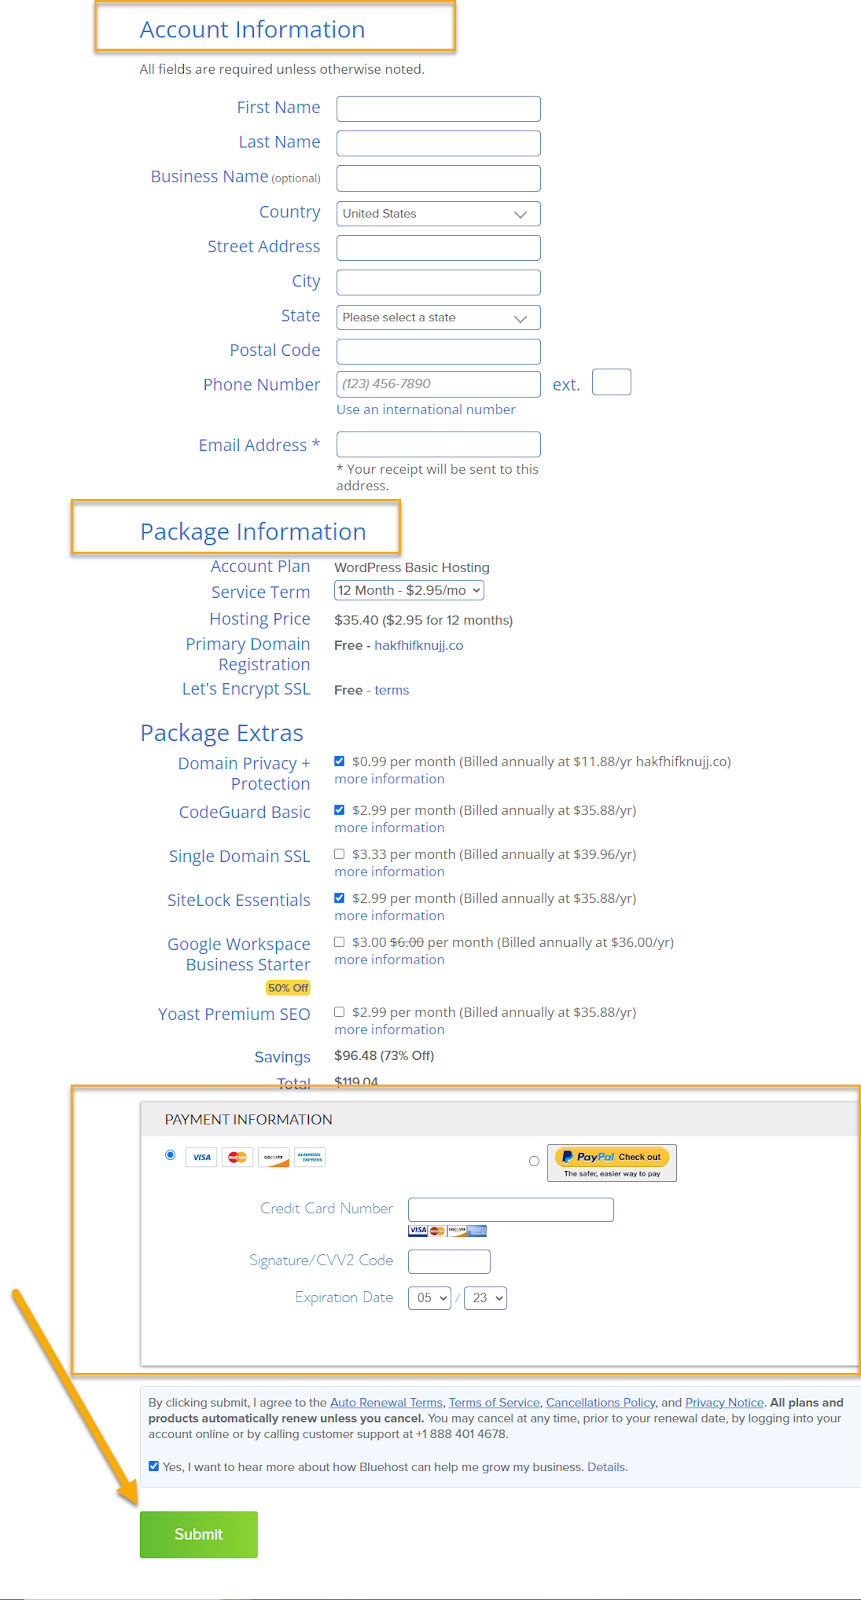
Once you've filled out your account information, chosen your package, and input your card details, what's next? Simply scroll down, and you'll find the "Submit" button. Give that a click.
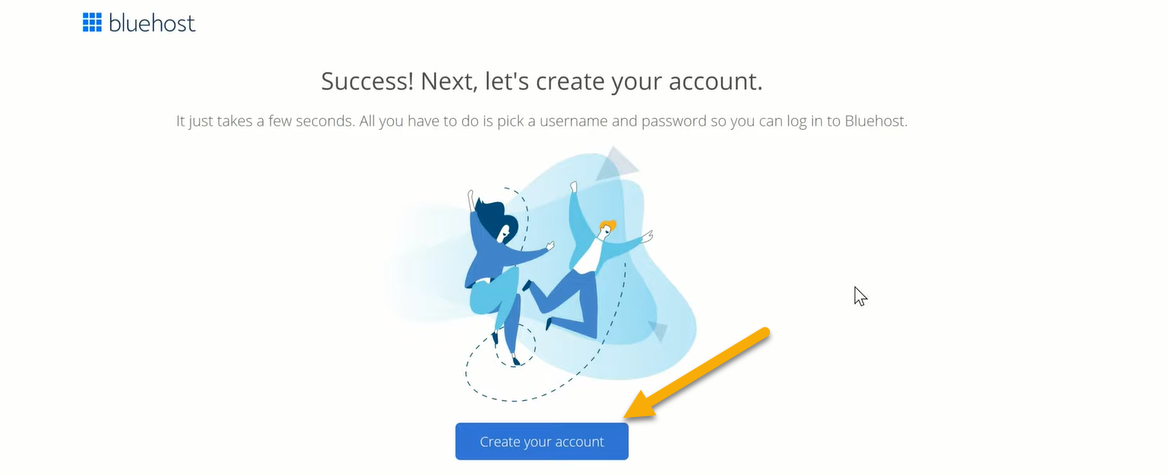
You'll now see a message prompting you to create a new account. It's pretty straightforward - you just need to find the button marked 'Create Your Account' and give it a click. By doing so, you can effortlessly establish your new account and get logged in.
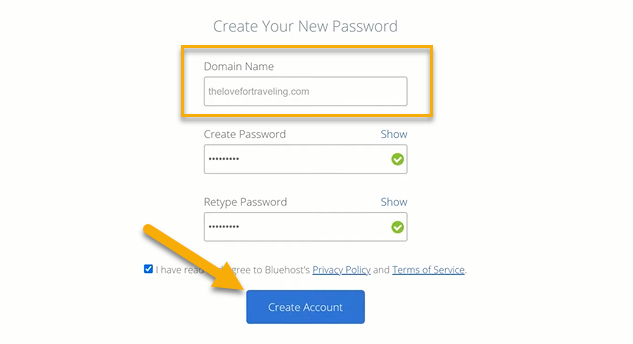
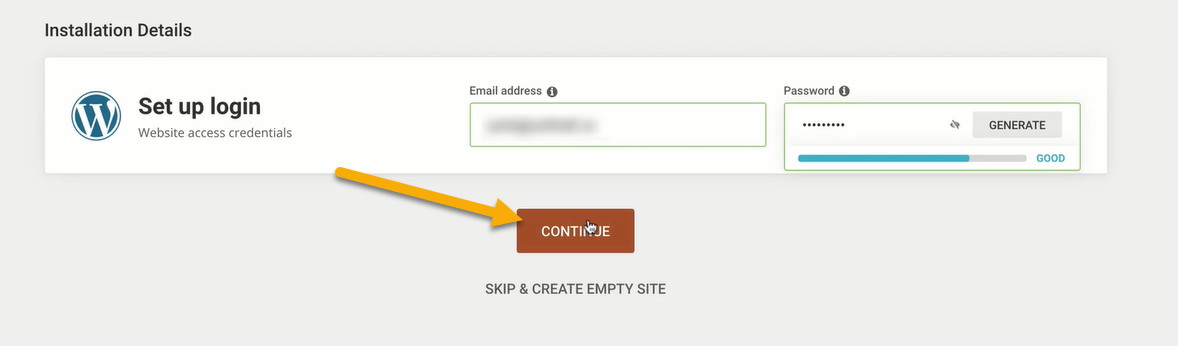
You'll be prompted to input your domain name, make sure it's the one you want. After that, it's crucial to create a strong, secure password. Remember, your password is a significant part of your site's security.
You're now logged into your Bluehost account. It's time to take the next exciting step, creating your WordPress website. Let's proceed to install it on Bluehost and get your site up and running.

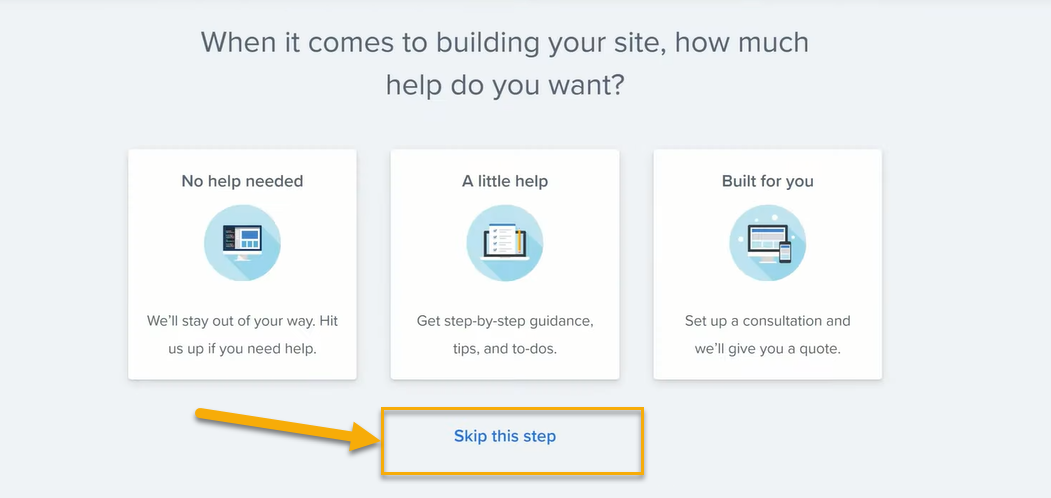
The system is currently inquiring about the level of assistance you require. If you feel this is unnecessary, you have the option to proceed without responding.
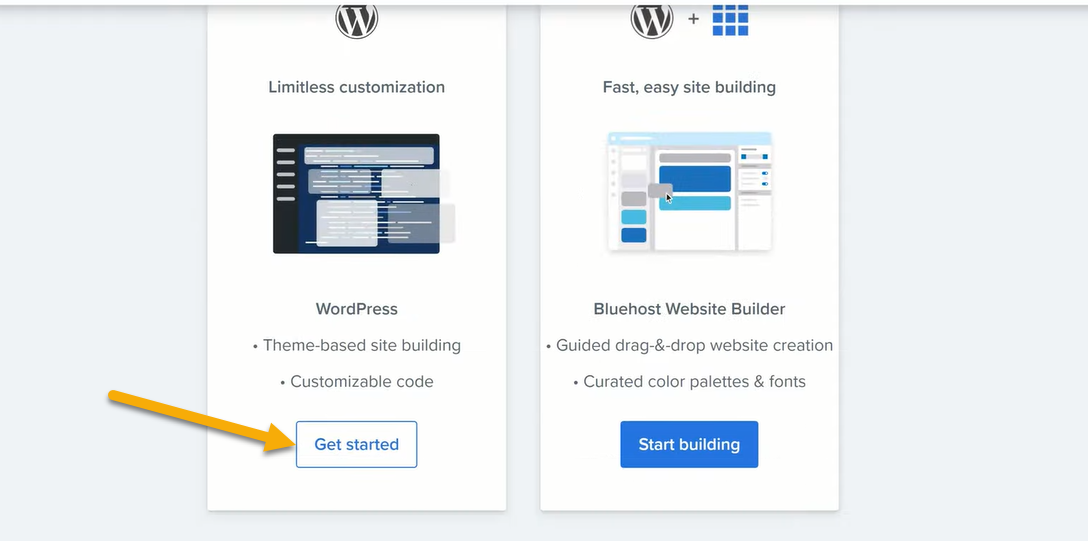
The platform currently prompts you to choose between limitless WordPress installation or utilizing the Bluehost WordPress builder. To proceed, you simply select the 'Get Started' button under the 'Limitless Customization' section.
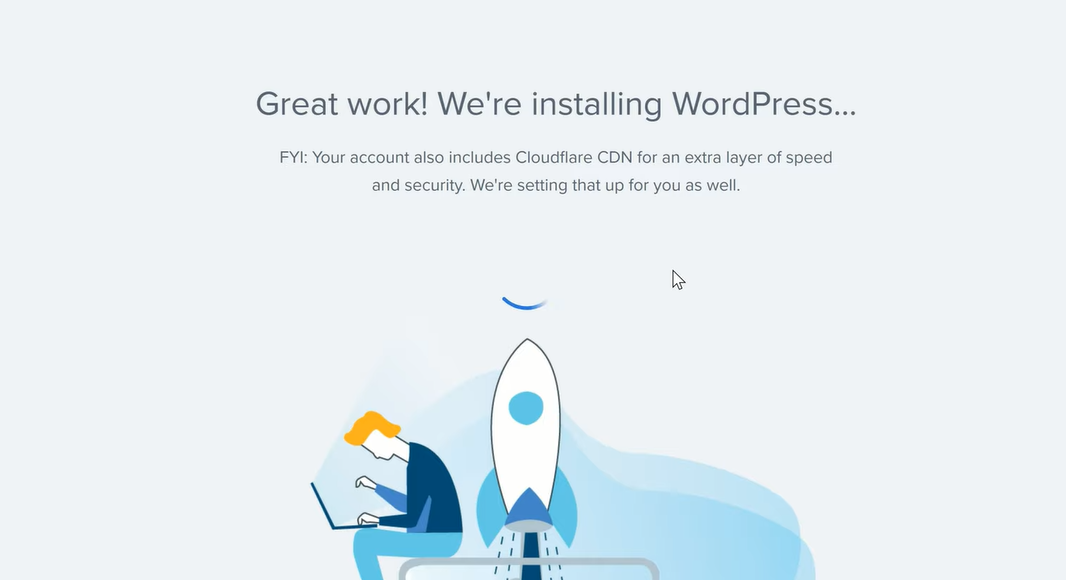
The installation process for WordPress has now commenced on your Bluehost account.
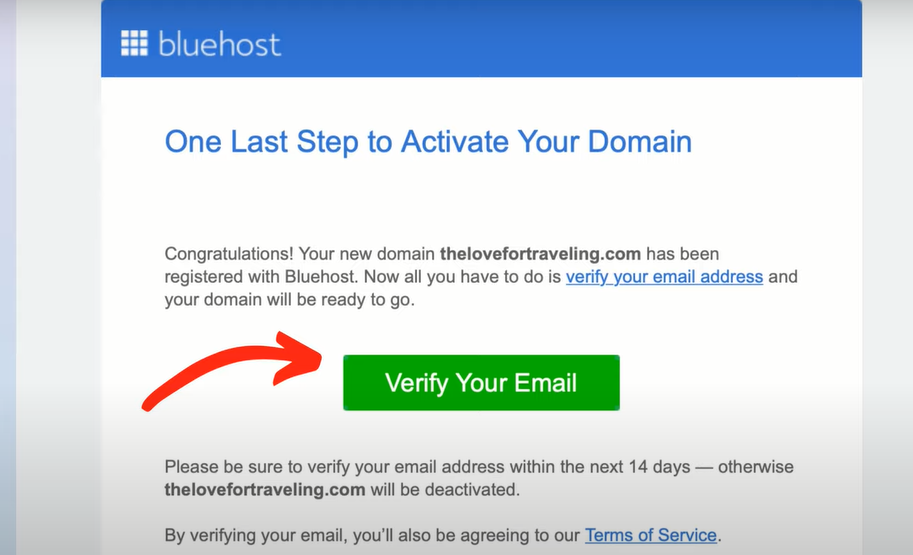
To proceed, please validate your email address by clicking the 'Verify Your Email' button. Are you looking for how to set up a business email?
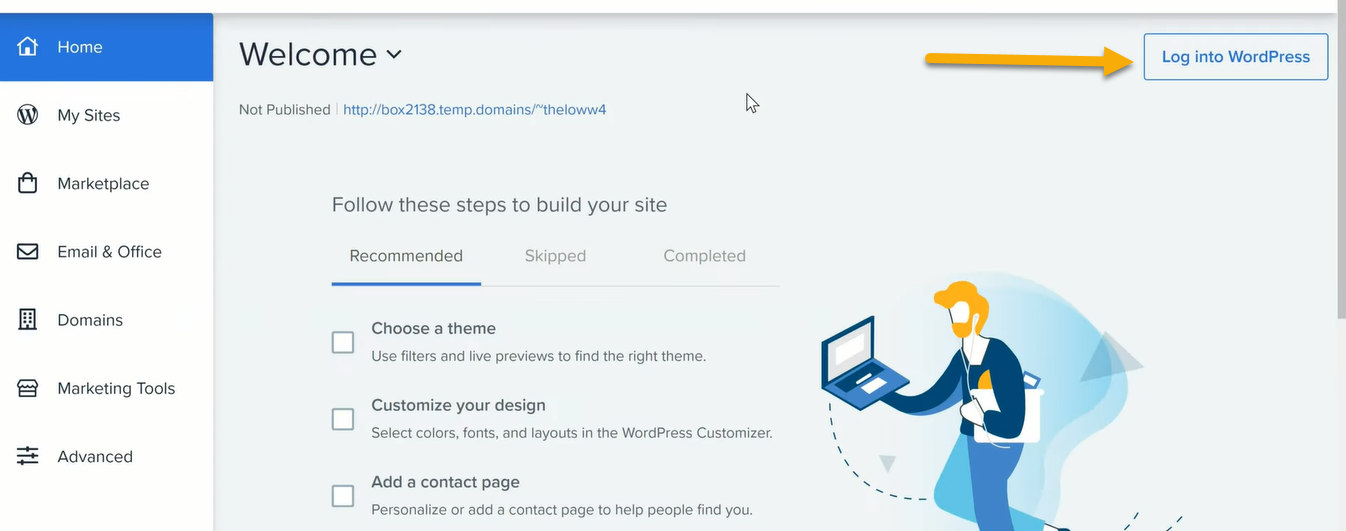
Please select the "Login to WordPress" option in the upper right-hand corner of your Bluehost dashboard interface.
You will now receive a welcoming message akin to the following.
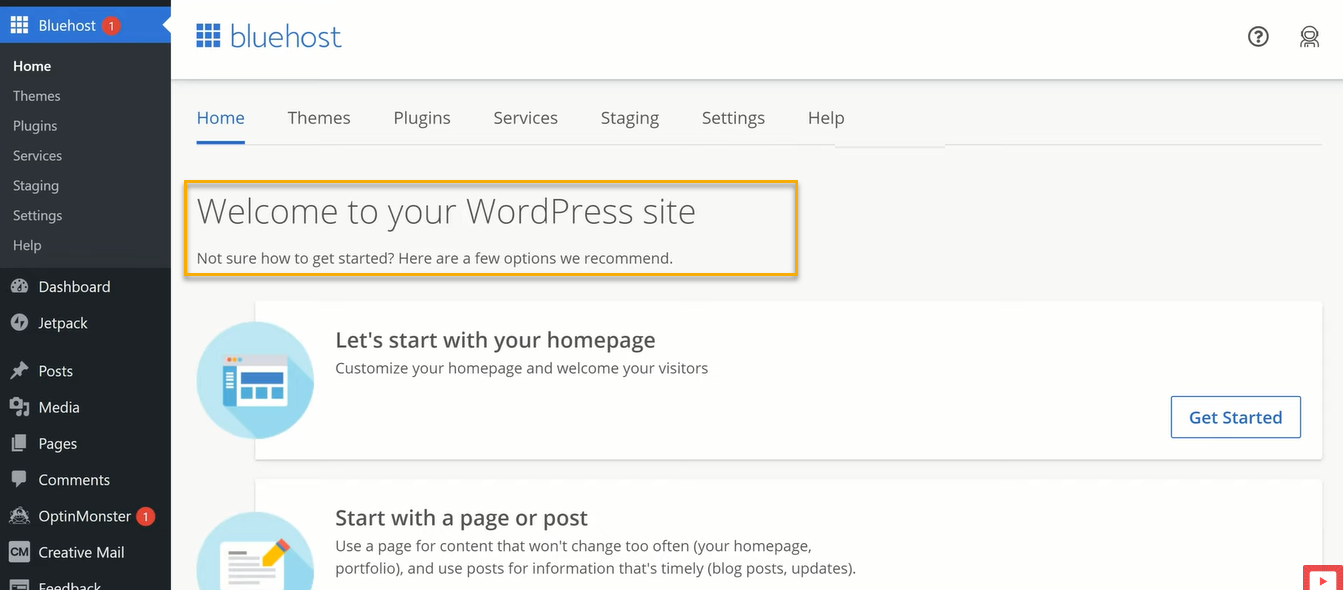
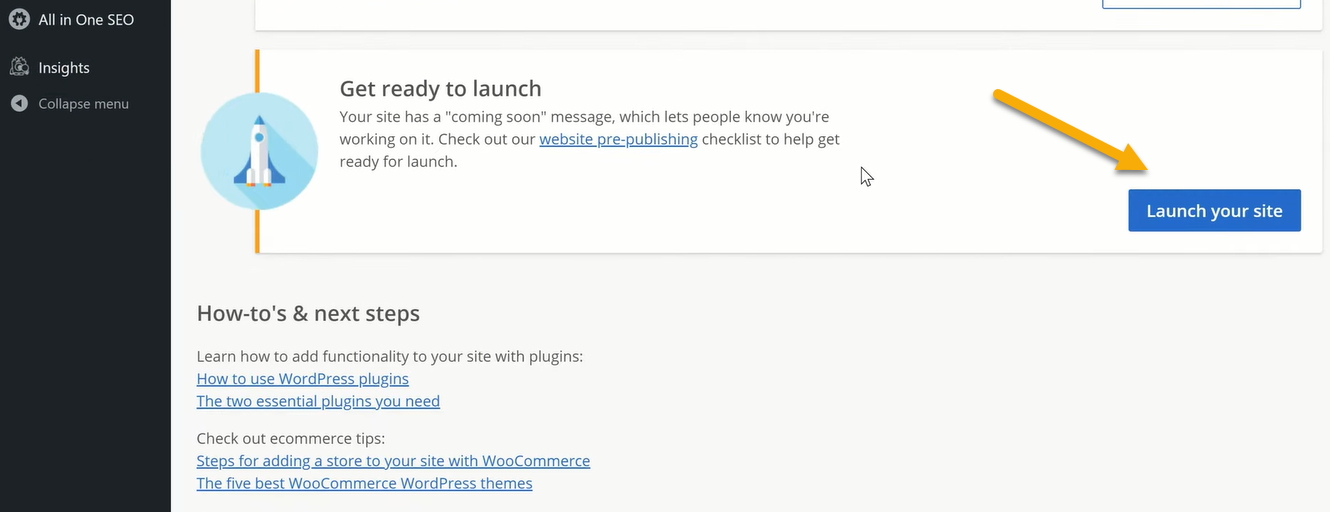
You may now proceed with integrating your website with WordPress. Please, follow the necessary steps to launch your site by selecting the corresponding option.
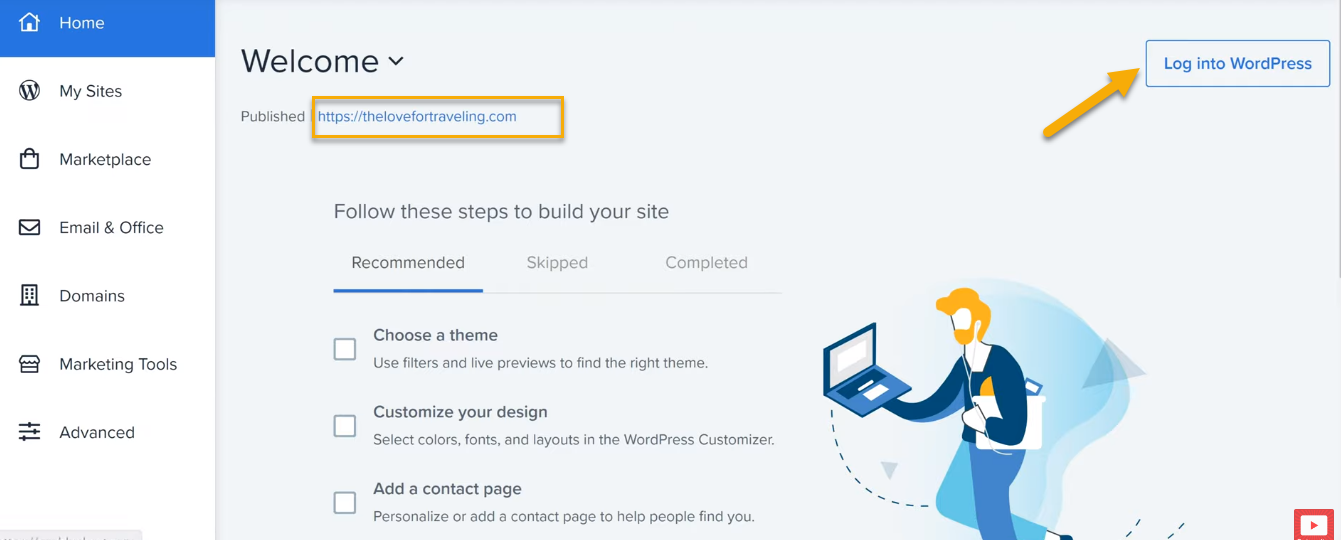
To proceed, select the provided URL and subsequently choose the option for 'WordPress login.' This will navigate you directly to the dashboard interface for your WordPress site, which is currently hosted via Bluehost.
Method 2: How to Install WordPress on SiteGround
SiteGround is a highly-regarded web hosting provider that offers a range of hosting services, including shared hosting, cloud hosting, and dedicated servers.
Renowned for its remarkable features, it supports a multitude of website platforms such as WordPress, Joomla, Magento, and Drupal, among others.
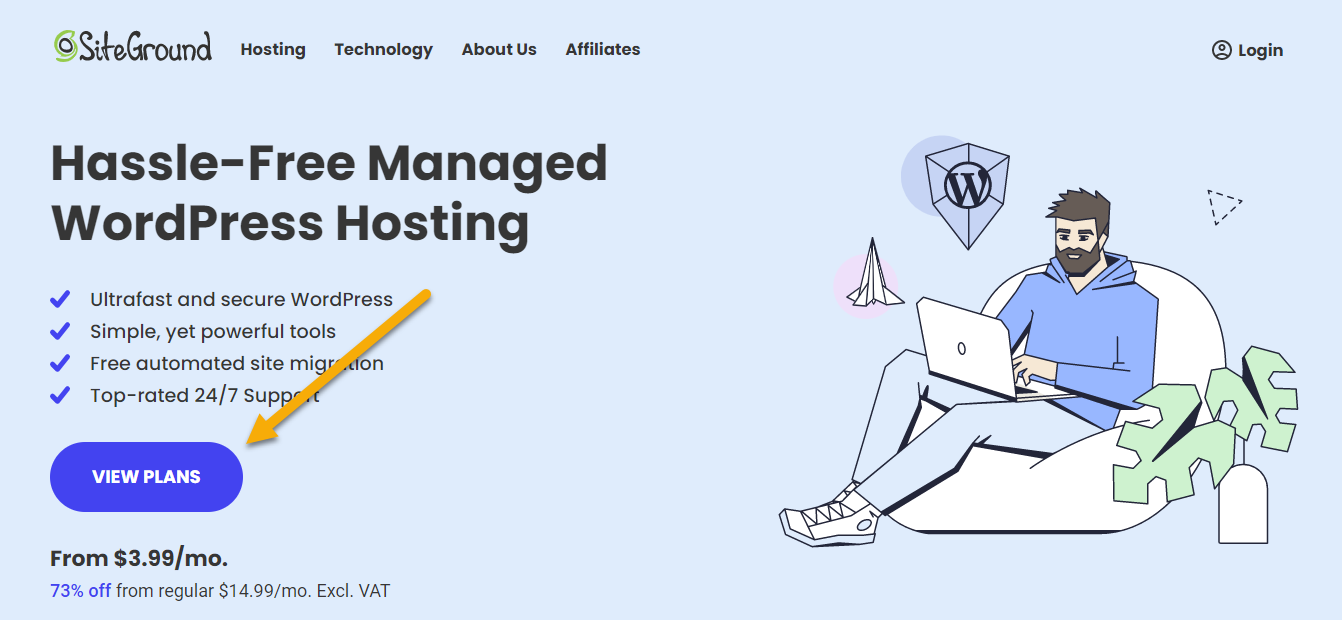
Let's kick things off by buying your domain from SiteGround Hosting. So, head over to the SiteGround website and hit that "VIEW PLANS" button.
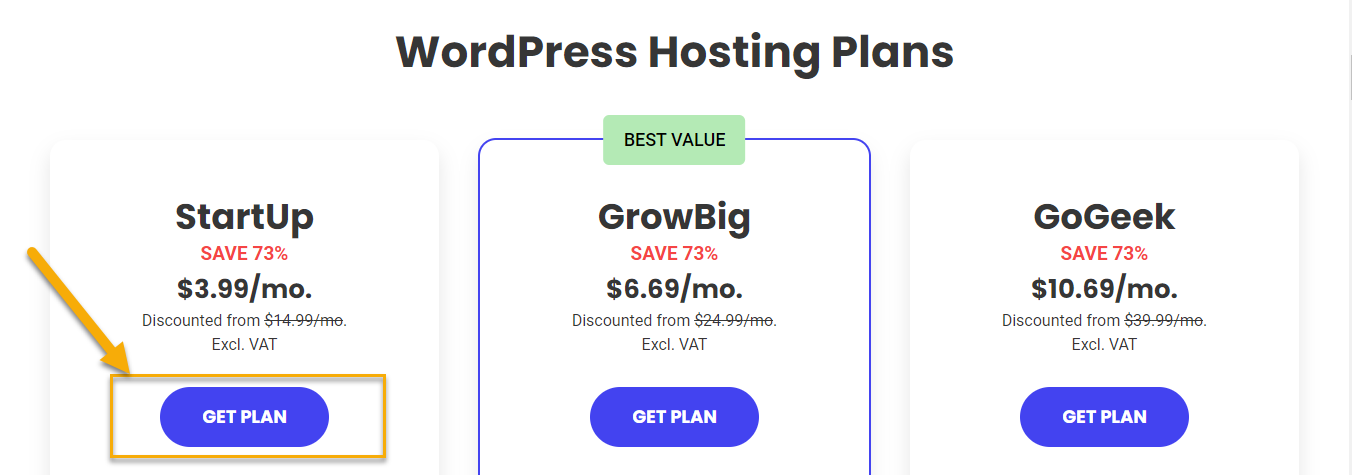
WordPress Hosting Plans are now available for you to pick from, tailored to your specific requirements. If you're just starting out, SiteGround has got you covered with the "Startup" plan. Simply click 'Get Plan' to secure your purchase.
So, next up is buying your domain. You just need to type in the domain you wish to register. However, if you've already got a domain, there's an option for you to select "I already have a domain."

If the domain you've chosen is up for grabs, you'll receive a hearty congratulations. But if it's already taken, don't worry; SiteGround will suggest other available domains for you.
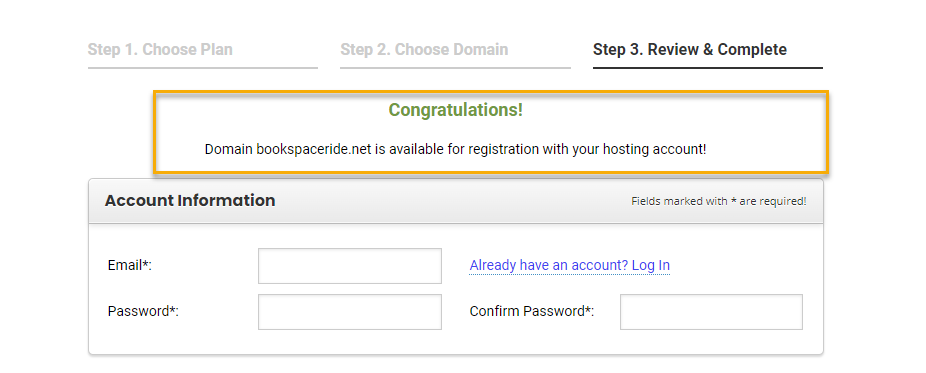
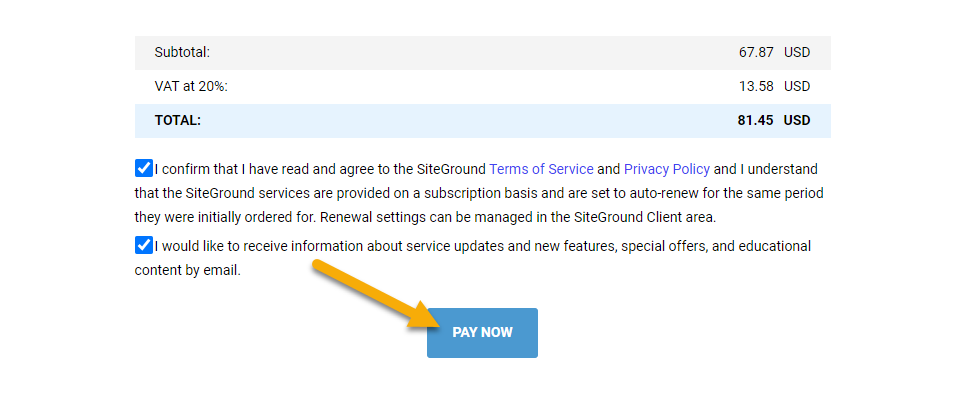
So, what you need to do is complete the entire form. It'll ask for several details, including your Account Information, Client Information, Payment Information, and Purchase Information. Once you've filled in all the necessary fields, simply click on the 'Pay Now' button to finish up.
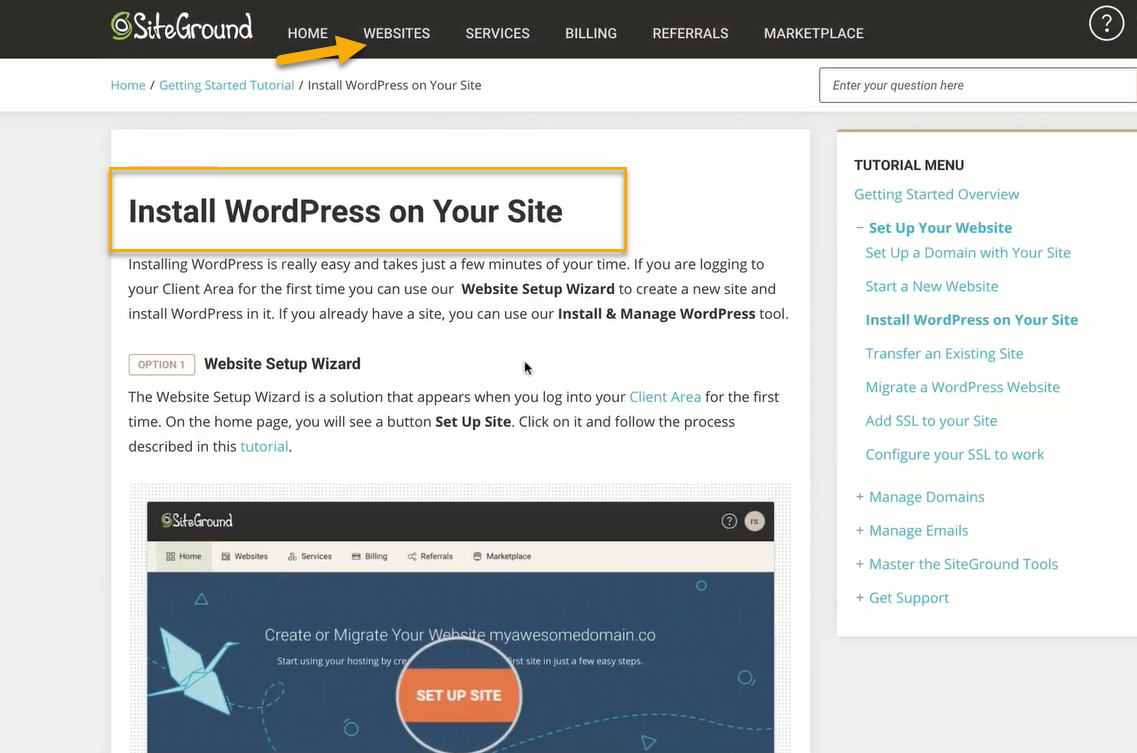
You'll see a variety of choices popping up on your screen. Go ahead and select the option that says 'Install WordPress.'
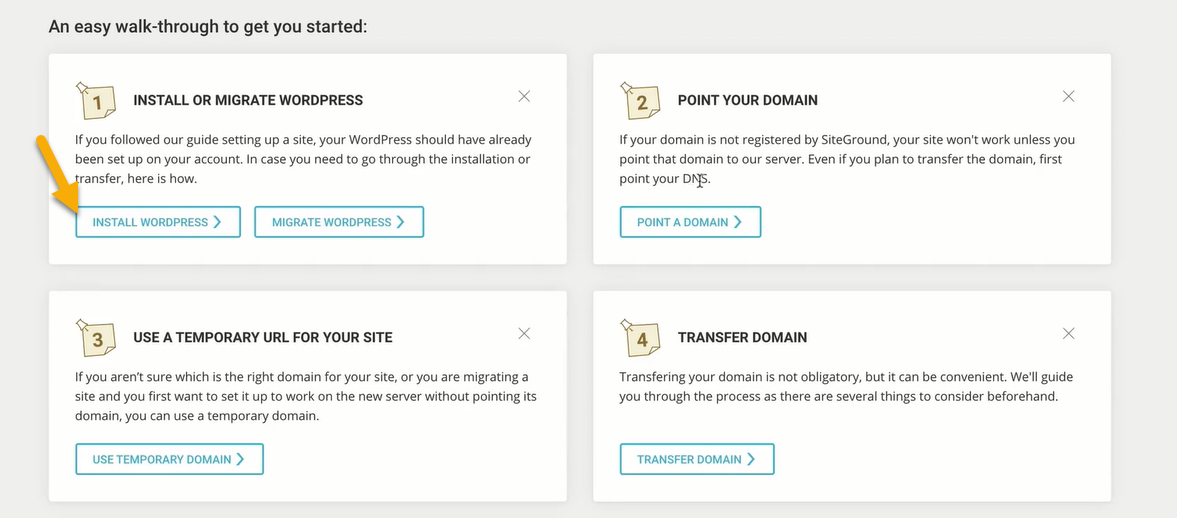
You're about to see a handy guide pop up on your screen that's going to walk you through the process of installing WordPress on Your Site. You need to click on the ‘Websites.’
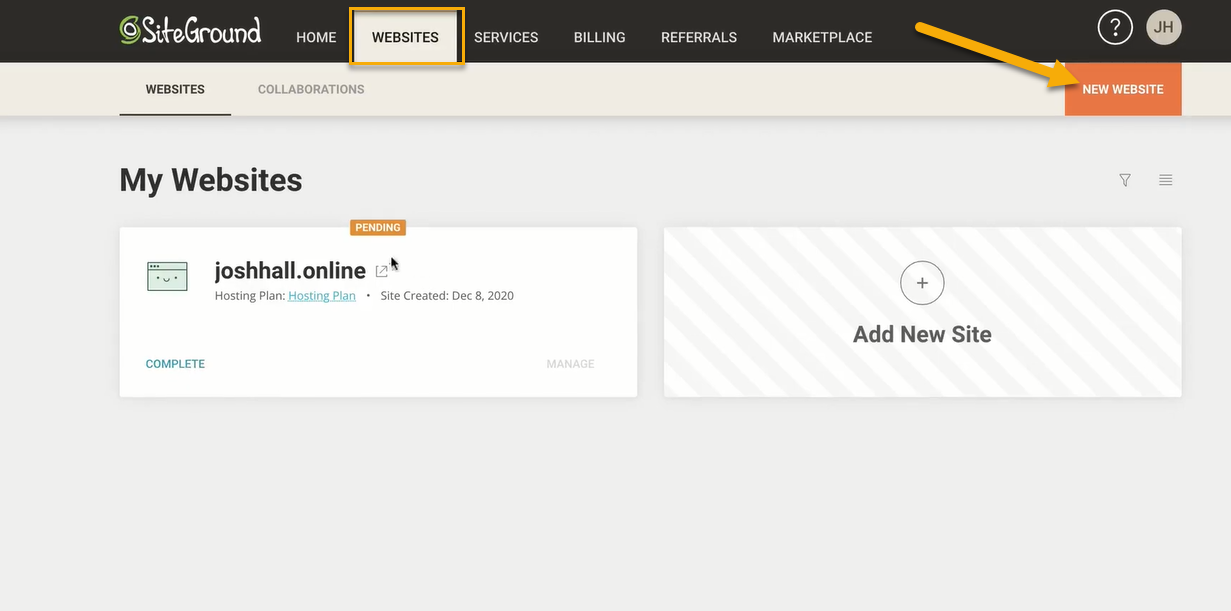
You can now view all your websites in this section. To create a new one, just navigate to the top right corner of your screen and click on 'New Website.'
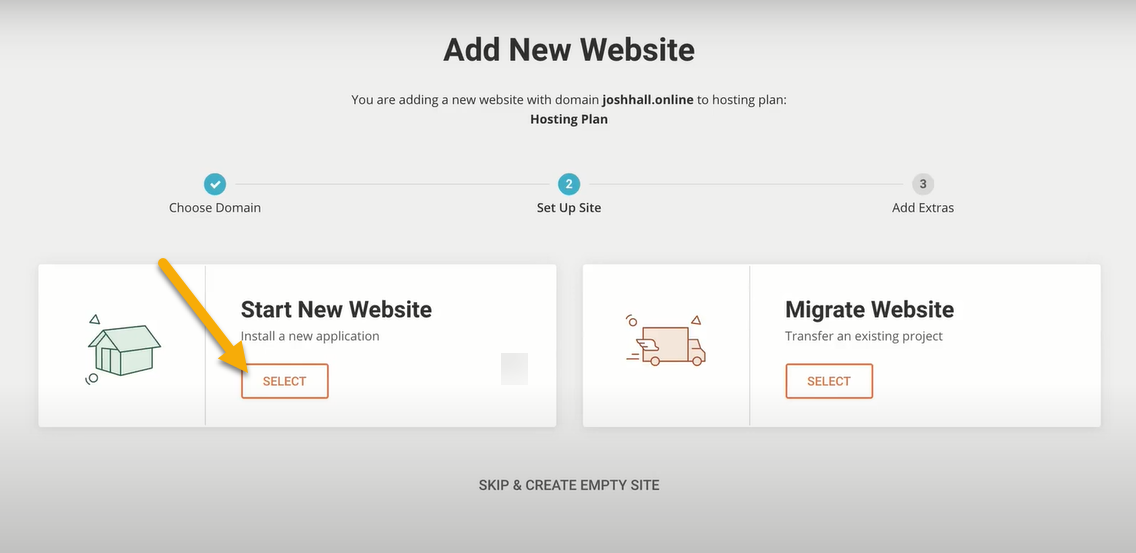
You're going to come across two options. The first one is labeled as "Start New Website," and the second one as "Migrate Website." What you need to do is click the ‘select’ button located beneath the "Start New Website" option.
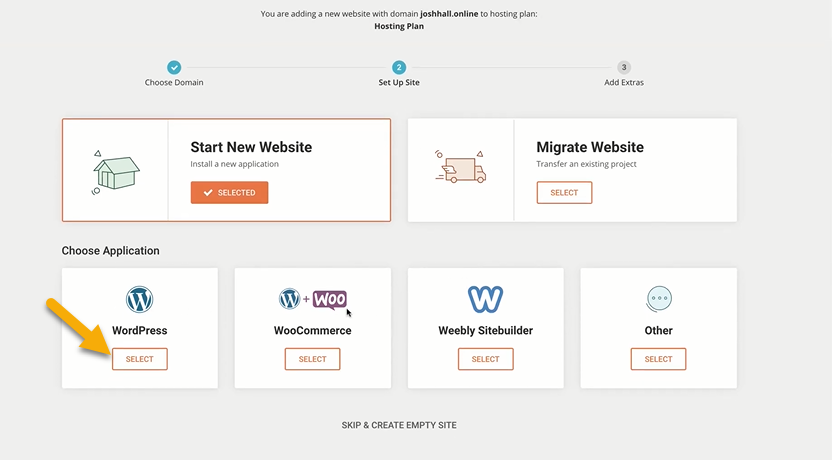
Now choose your application as WordPress.
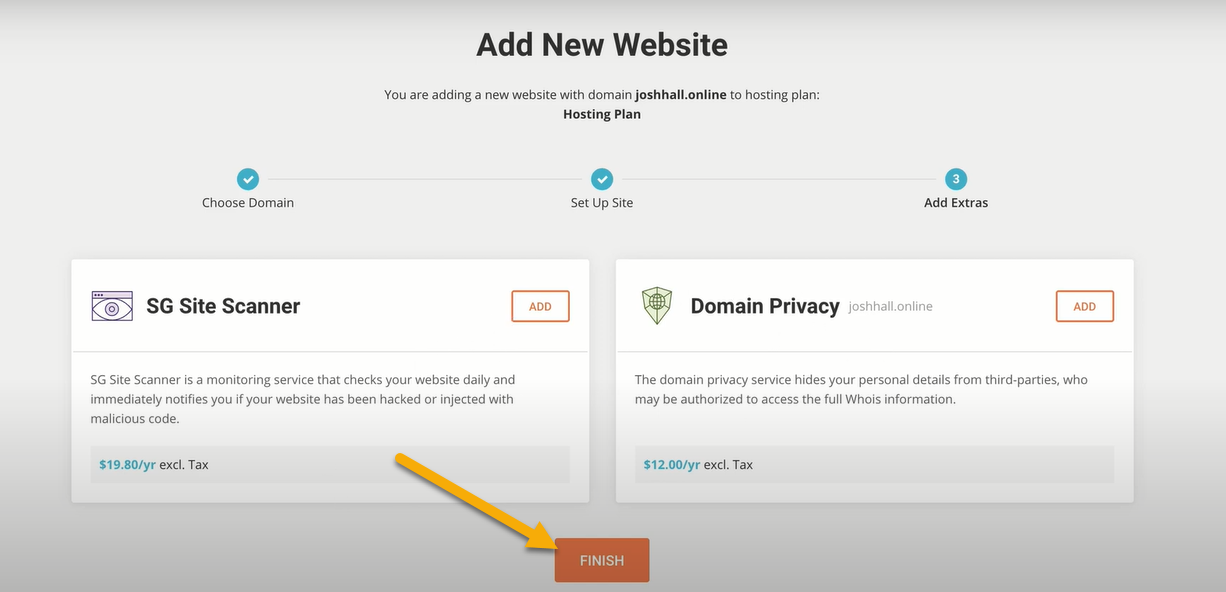
Behind this, you will see Siteground will ask you for the login credentials. You need to enter your username and password. Then click on Continue to log in to the siteground account.
Next, simply click on ‘Finish’.
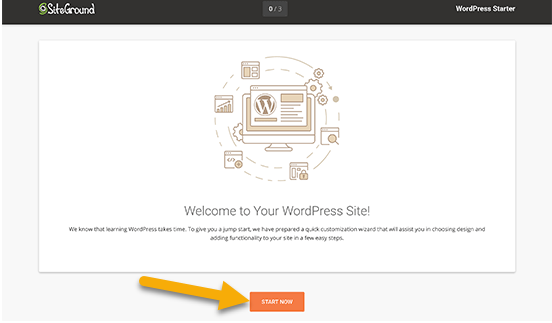
The moment you step into SiteGround, its website setup wizard springs into action, ready to guide you through the initial stages of getting WordPress up and running. All you need to do to embark on this journey is to hit that 'Start Now' button.
Once you hit the 'Start Now' button, you'll be presented with a variety of designs. You can choose any of them to give your website the exact look and feel you're aiming for.

The next step involves selecting the features you'd like to incorporate into your site. By default, SiteGround has the 'Contact Form' preselected as it's a crucial element for any website. But of course, you have the freedom to choose other features that best fit your needs.
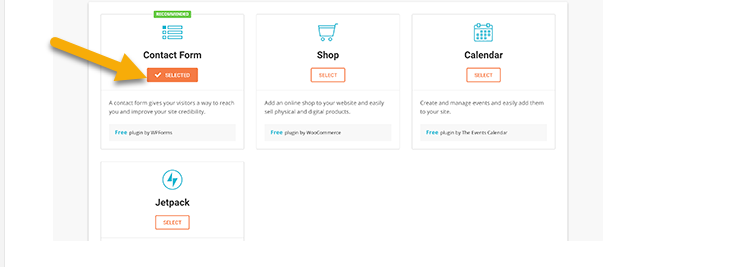
Once you've picked out all the features that are a good fit for your needs, go ahead and hit the 'Next' button to move forward.
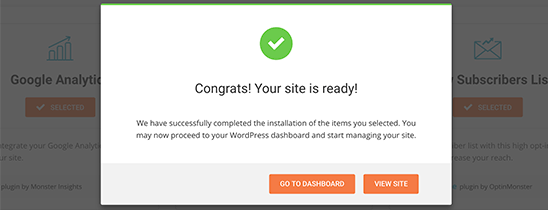
Now, let's give your site a bit of a marketing boost. SiteGround offers you the ability to install MonsterInsights for your Google Analytics needs, AIOSEO for making sure you're up to snuff with your search engine optimization, and OptinMonster for a seamless lead generation process.
When you're done with these steps, find and click the 'Complete' button. The starter wizard will take it from here and wrap up the installation process for you. In a short while, you'll see a success message and a 'Go to Dashboard' button. Click it, and you're all set.
Method 3: How to Install WordPress on HostGator
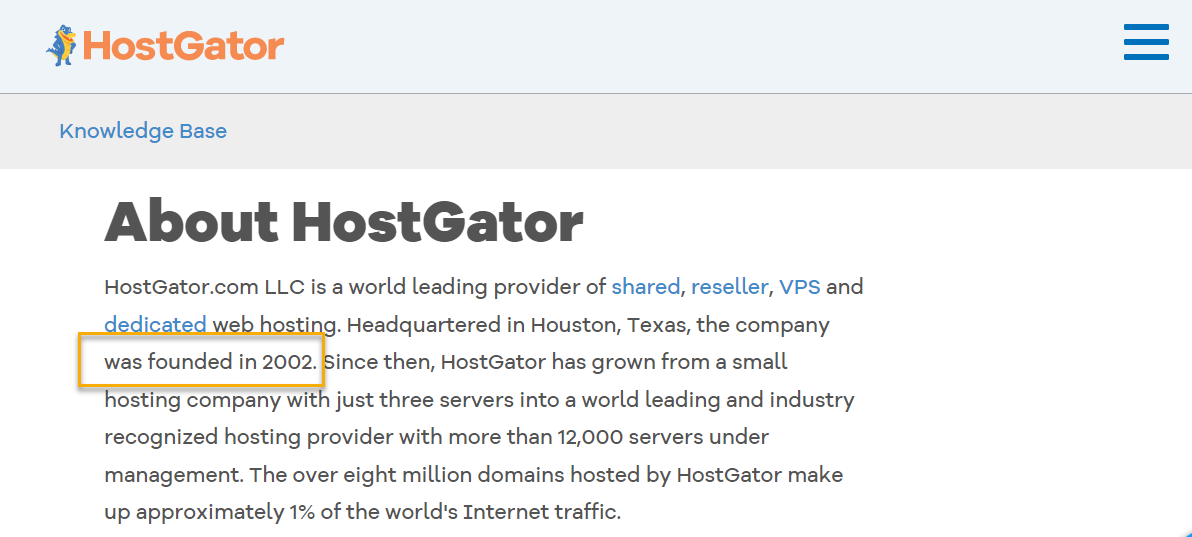
HostGator is a well-known web hosting service provider founded in 2002. It offers a wide range of services, including shared hosting, dedicated hosting, VPS hosting, cloud hosting, WordPress hosting, and more.
One important thing to note about HostGator is its reputation for reliability and excellent customer service. It offers 24/7 support and a 45-day money-back guarantee, which is longer than the industry standard. This makes it a great choice for individuals and businesses looking for a trustworthy and customer-centric hosting service.
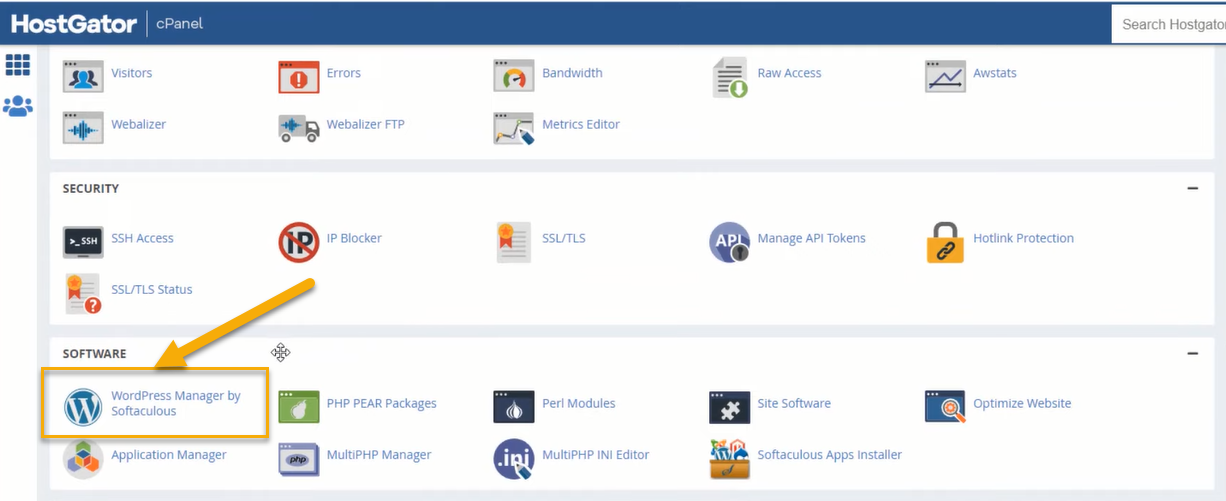
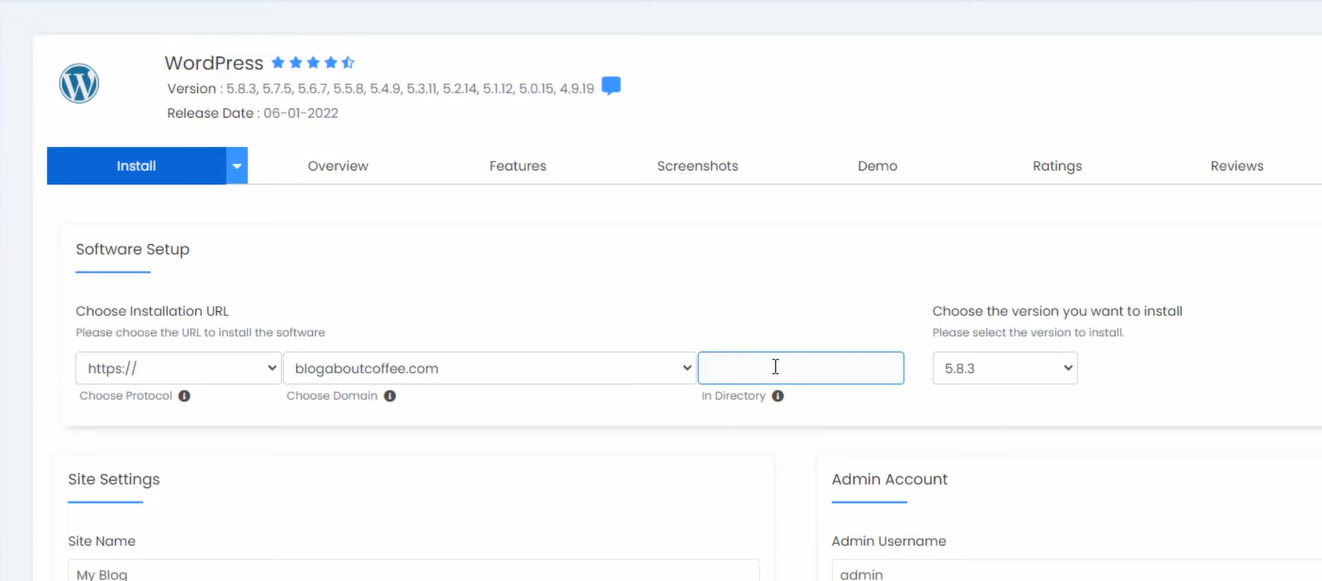
To begin with, please sign in to your HostGator hosting account. Once you're logged in, go ahead and buy the domain you'd like, making sure to choose a plan that suits your needs. After you've done that, navigate to your hosting account's dashboard. From there, you'll want to locate and click on 'WordPress Manage by Softaculous.'
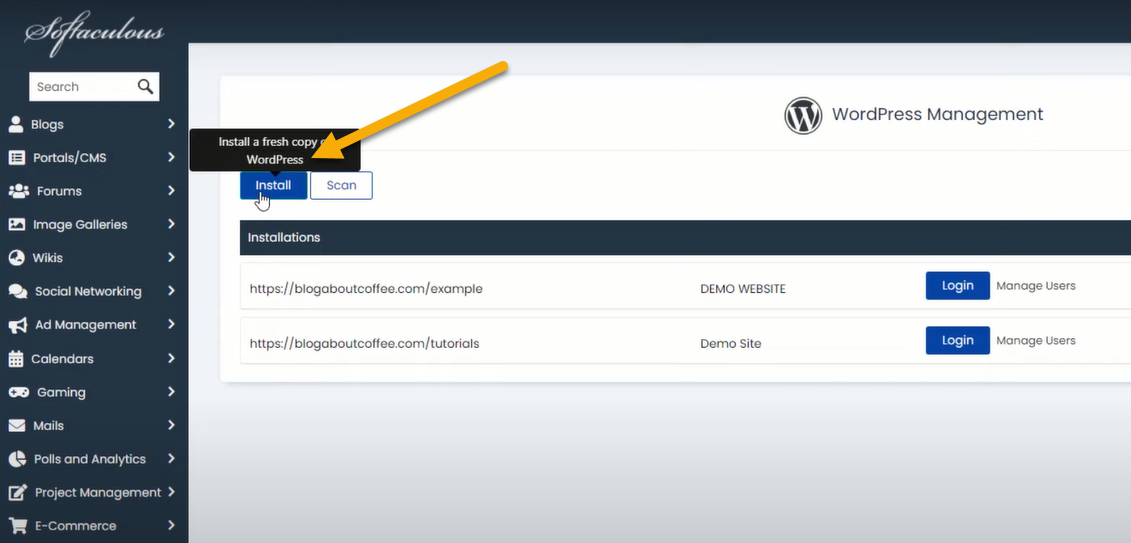
In the New window, click on the ‘install’ button.
Next, you'll need to complete the entire form, which requires details for your software setup and site settings. You'll choose your preferred language and then go ahead and select the appropriate plugin. Make sure you fill out all the required fields.
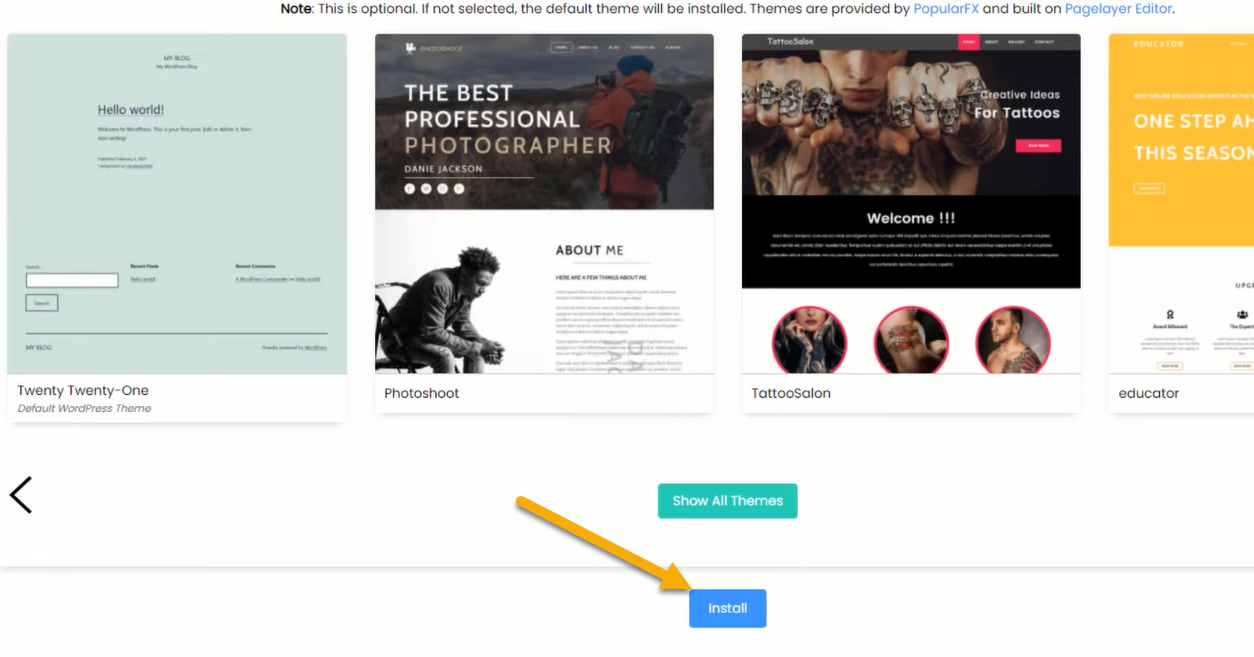
Then select the theme as last then click on install.
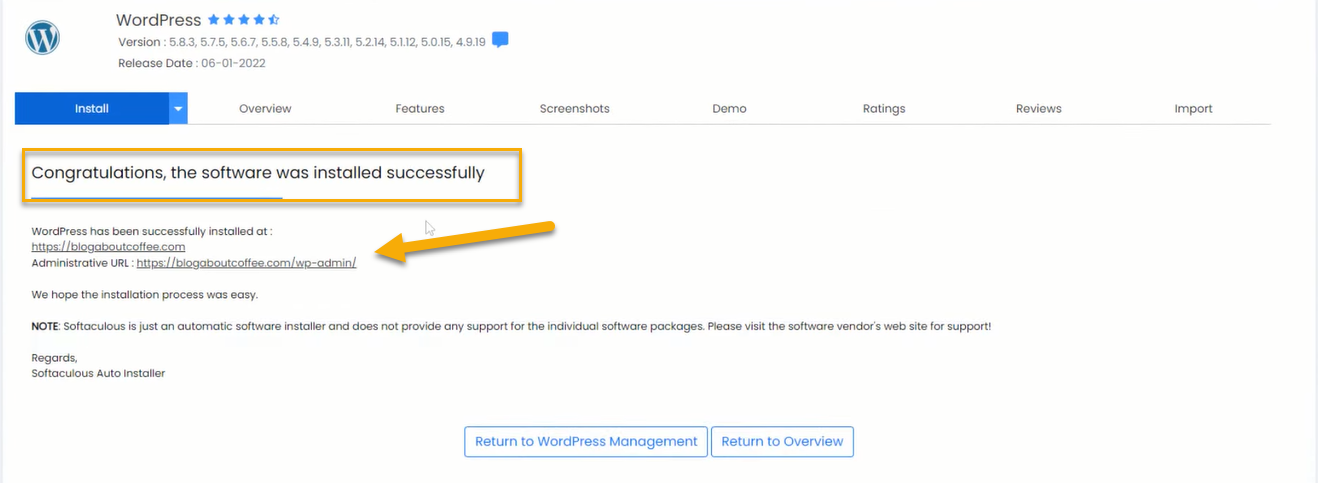
Once you see the congratulatory message confirming the software installation on your screen, go ahead and click on the URL displayed.
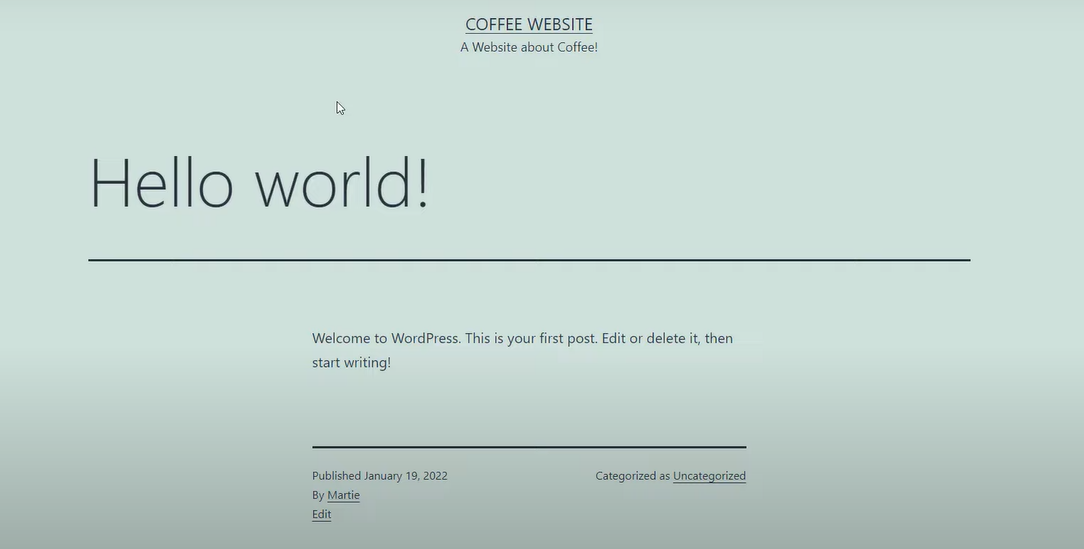
Now website is live have a look;
Method 4: How to Install WordPress from cPanel
Cpanel is a popular web-based hosting control panel that helps users manage their web hosting servers. It provides an intuitive interface for creating and managing websites, email accounts, databases, security settings, and more.
You'll come across an auto-installer script here which is designed to simplify your WordPress installation process.
To make sure you're covered no matter which one your provider uses, we're going to walk you through the WordPress installation process for each of these three auto-installers. Just follow along with the guide that corresponds to the auto-installer available on your cPanel dashboard.
Web hosting providers typically choose their preferred auto-installer script, with Softaculous, Fantastico and others being top choices.
Method 5: How to Install WordPress Using Fantastico
Fantastico is a commercial script library that automates the installation of web applications to a website. It is provided with some web hosting control panels such as cPanel. The library includes various applications, including WordPress, Joomla, phpBB, MediaWiki, Drupal, and many more.
The main advantage of using Fantastico is that it allows website owners to install popular software and tools on their sites without having technical knowledge about the installation process. It handles all the complexities of software installation behind the scenes, such as setting up databases and configuring files.
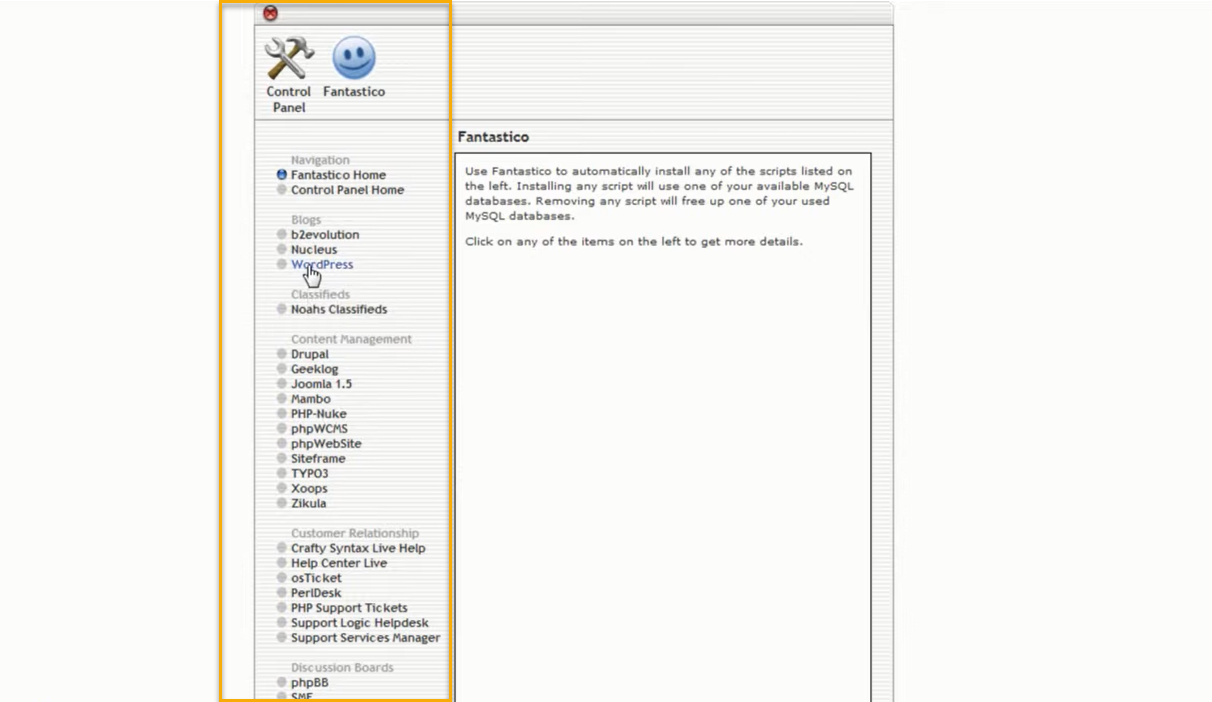
Firstly you need to look for the Fantastico in your cpanel dashboard. Login to your cpanel dashboard, and then in services and software, you will find Fantastico.

All of the features are now visible on your Fantastico dashboard. If we're focusing on installing WordPress, you'll want to head over to the left side of the dashboard and click on the 'WordPress' option. Let's move forward with that.
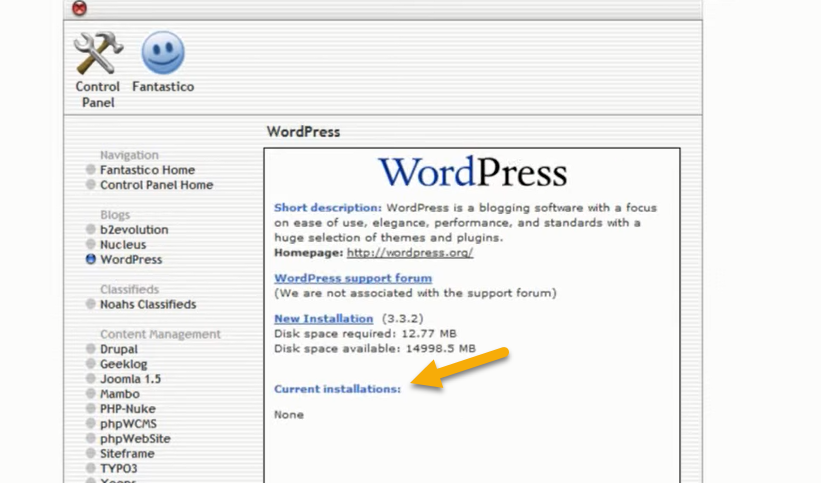
Moving forward with the WordPress installation process, your next step is to click on "Current Installations." This is the second step, and it's crucial for continuing the setup.
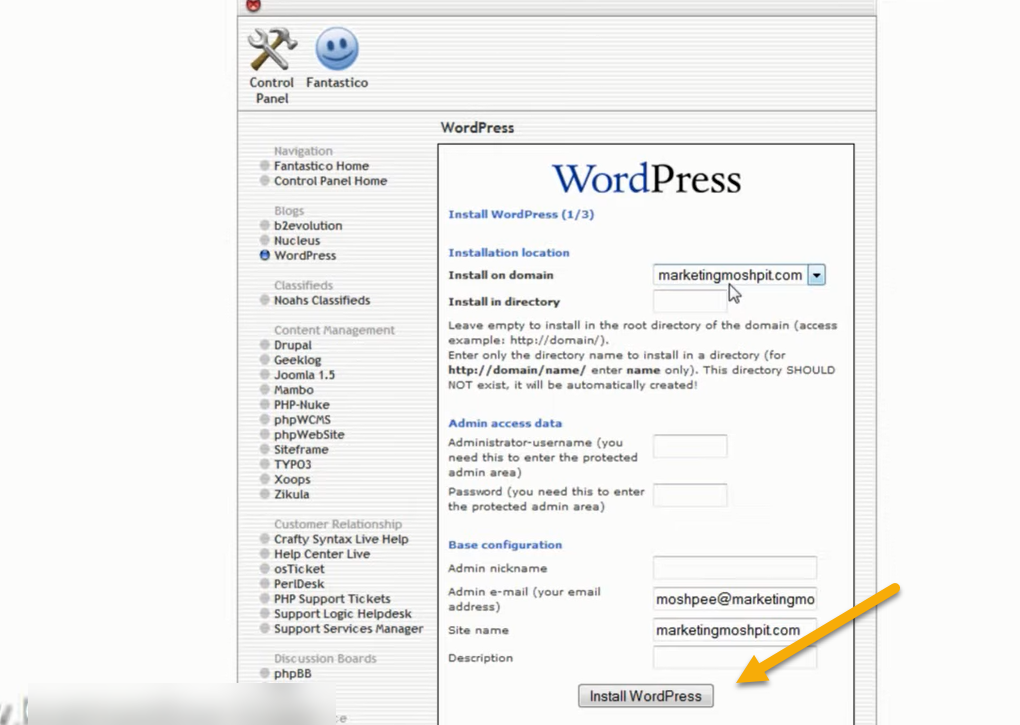
The next step involves entering some key details. You'll need to provide your domain URL, specify the domain location, and set up your admin access credentials, including your admin email. Once you've filled in all these details, go ahead and click on 'Install WordPress’.
Now click on Finish installation.
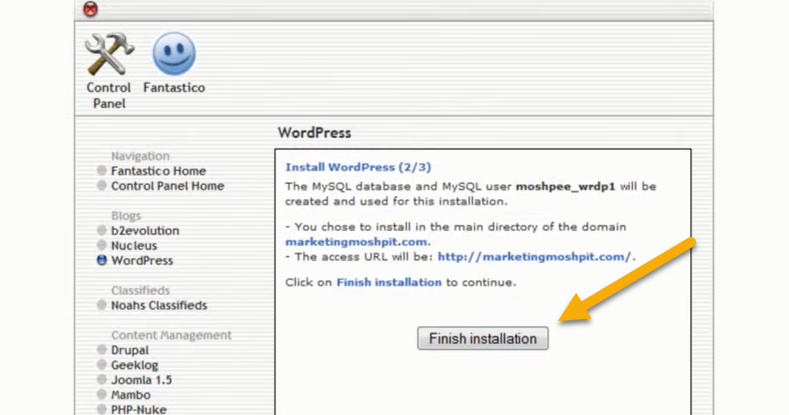
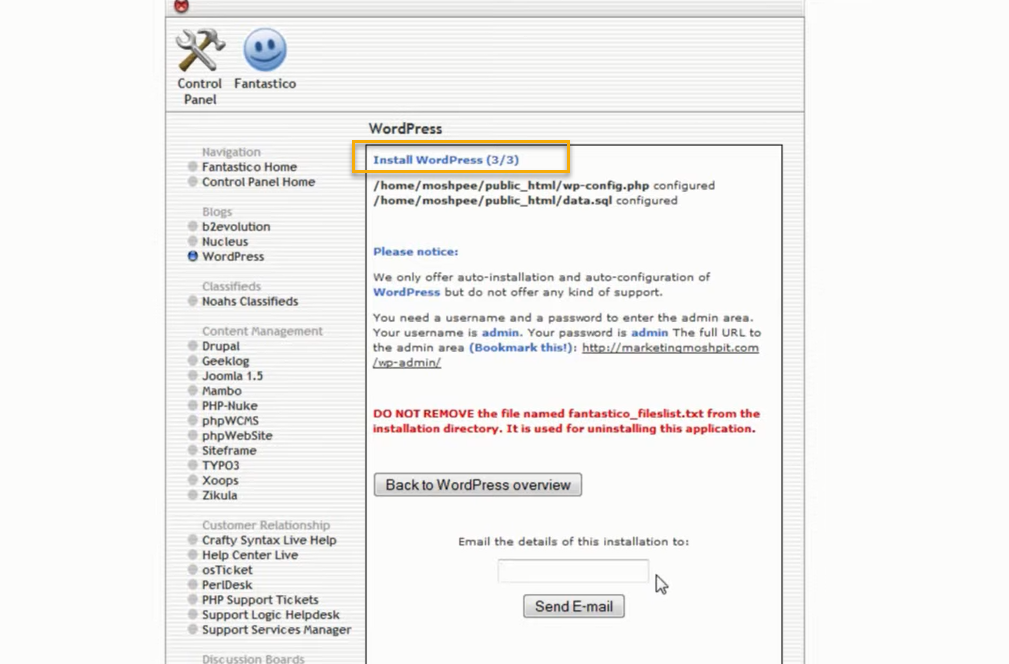
Fantastico is currently handling your WordPress installation. As soon as the process is completed, a success message will appear to confirm the installation. Kindly provide your email address; this is where we'll send the confirmation message and a verification link.
Wrapping Up
In conclusion, installing WordPress on various hosting platforms like Bluehost, SiteGround, and HostGator or utilizing cPanel is a streamlined process that can be accomplished effectively with a little patience and attention to detail.
Each platform offers unique advantages; Bluehost shines with its automatic WordPress installation and robust security, SiteGround distinguishes itself with a highly intuitive setup wizard, and HostGator excels with its reliability and excellent customer service.
With cPanel, the process is simplified further by the availability of auto-installers like Fantastico. By choosing a suitable hosting service, purchasing a domain, and following the respective installation processes, one can efficiently set up a WordPress website.
Be patient, engage with the learning curve, and you'll have a functioning WordPress site in no time. Remember, launching a successful WordPress site is not just about the setup but also involves continuous effort in site management and optimization.
FAQs
What is the process for installing WordPress on my computer?
To install WordPress on your computer, you'd first need to set up a local server environment, which can be done using software like XAMPP or MAMP. After downloading and installing one of these, download the latest version of WordPress from the WordPress.org website. Unzip this file and move it into your local server directory. Then, create a new database via your local server software and note down the details. Now, in your browser, navigate to localhost/your_wordpress_folder, and follow the WordPress installation prompts using the database details you noted earlier.
Is WordPress a web server?
No, WordPress is not a web server. WordPress is a tool used for creating and managing websites and blogs called a content management system (CMS). It requires a web server to function, as the server is responsible for storing the site's data and making it accessible over the internet. Web servers like Apache or Nginx serve the WordPress site to users when they visit the website.
Do WordPress websites utilize HTML or CSS?
Yes, WordPress does utilize both HTML (HyperText Markup Language) and CSS (Cascading Style Sheets). HTML is the backbone of any webpage; it's used to create the basic structure and content of a webpage, like headings, paragraphs, and images. CSS, on the other hand, is used to control the layout and look of the webpage. It dictates the colors, fonts, and overall design. Even though WordPress automates much of the web design process, understanding HTML and CSS can be beneficial for customization.
What is the role of Fantastico in installing WordPress using cPanel?
Fantastico is a library of scripts designed for commercial use that can automate web application installation on a website. It simplifies the process by handling all the complexities of software installation behind the scenes, such as setting up databases and configuring files, making it easier for users without technical knowledge about the installation process. One of its features is the installation of WordPress.
How does Bluehost support the process of setting up a WordPress website?
Bluehost offers an easy one-click WordPress installation, making it a recommended option for hosting. After signing up and choosing a domain name, Bluehost automatically handles the WordPress installation. Users can then log into their Bluehost account and create their WordPress website.
What are some marketing enhancements that SiteGround offers for WordPress websites?
SiteGround allows users to install several marketing enhancements for their WordPress sites. These include MonsterInsights for Google Analytics needs, AIOSEO for search engine optimization, and OptinMonster for a seamless lead generation process. These tools can give a significant boost to the marketing efforts of your website.


.png)
