


Have you ever encountered the frustrating ERR_CONNECTION_REFUSED error while browsing the web? You're not alone. This common Chrome error message can leave you scratching your head, wondering what went wrong and how to fix it.
The ERR_CONNECTION_REFUSED error occurs when your browser's attempt to connect to a website is blocked by something, whether it's a faulty internet connection, a problem with your browser settings, or an issue with the website itself. It's like trying to enter a locked door without the right key - no matter how much you try, you just can't get through.
But don't worry, there are several ways to troubleshoot this error and get back to browsing your favorite sites in no time.
In this blog post, we'll dive into the most common causes of ERR_CONNECTION_REFUSED and provide you with these step-by-step Ways to resolve the issue.
- Turn Off Synchronization to Google
- Check the Status of the Website
- Disable Any Chrome Extensions
- Reinstall the Chrome Browser
- Assess Your Proxy Settings and Adjust Them as Needed
- Clear Your DNS Cache
- Troubleshoot Internet Connection
- Clear Your Browser’s Cache
- Deactivate Your VPN
- Change Your DNS Address
- Restart Your Network Router
- Disable Firewall for Network your Connection
- Disable Antivirus Software Temporarily
So, if you're ready to say goodbye to ERR_CONNECTION_REFUSED and hello to smooth, uninterrupted browsing, keep reading. By the end of this post, you'll be equipped with the knowledge and tools you need to tackle this pesky error like a pro.
13 Ways to Fix “ERR_CONNECTION_REFUSED” Error
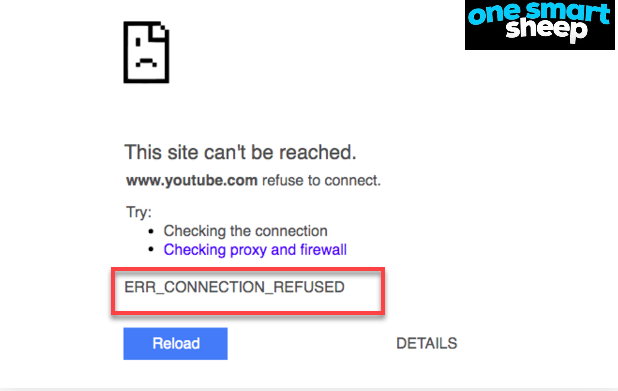
Encountering the ERR_CONNECTION_REFUSED error on Google Chrome typically indicates that something is preventing the browser from accessing the desired webpage.
This error, often a reflection of client-side troubles, may arise from various issues including network connection disruptions.
When this error appears, it suggests that despite several attempts by Chrome to establish a connection to the server, something interrupts this process, leading to a timeout.
Unfortunately, Chrome does not provide a specific reason for this blockage, merely alerting you to an overarching connectivity problem with its generic error message.
It's essential to check your internet settings or consider potential firewall restrictions that might be causing this issue. Let’s delve into the Wayss to fix this error one by one visually.
Way 1. Turn Off Synchronization to Google
Difficulties with Google's synchronization features can occasionally lead to the ERR_CONNECTION_REFUSED error in Chrome.
This issue may manifest when there is a disruption or inconsistency in syncing your Google account with Chrome, affecting the browser's ability to load web pages effectively.
To resolve this, you might consider temporarily disabling synchronization in Google Chrome. Here’s a step-by-step guide on how to do this:
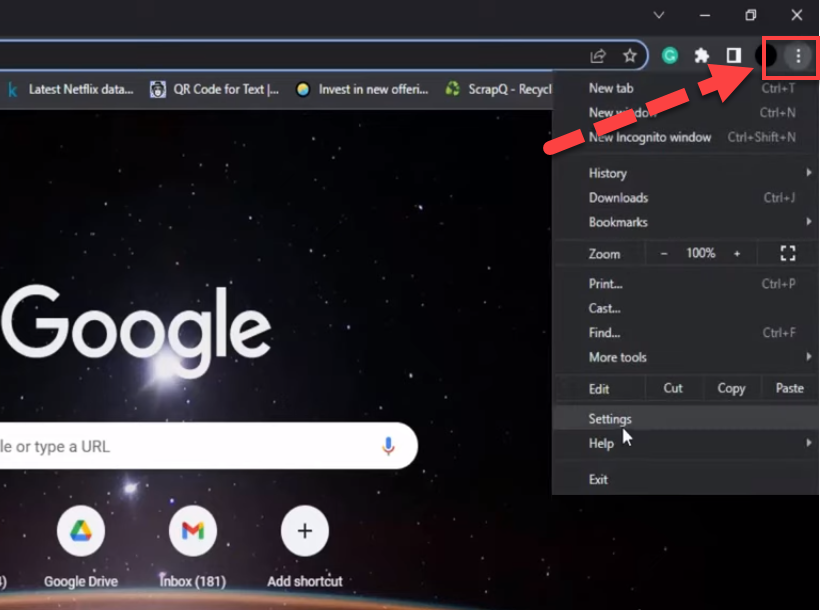
- Begin by clicking the three-dot menu located at the top right corner of the browser, adjacent to the address bar.
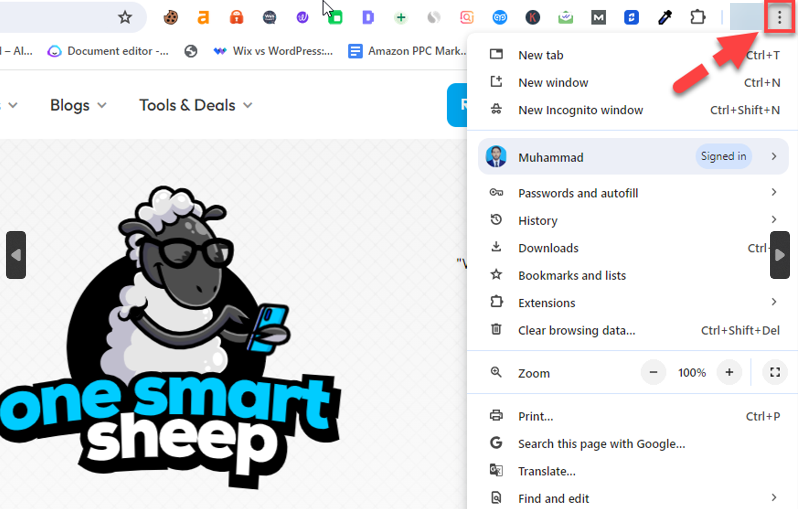
- From the dropdown menu, select "Settings" to access Chrome's settings panel.

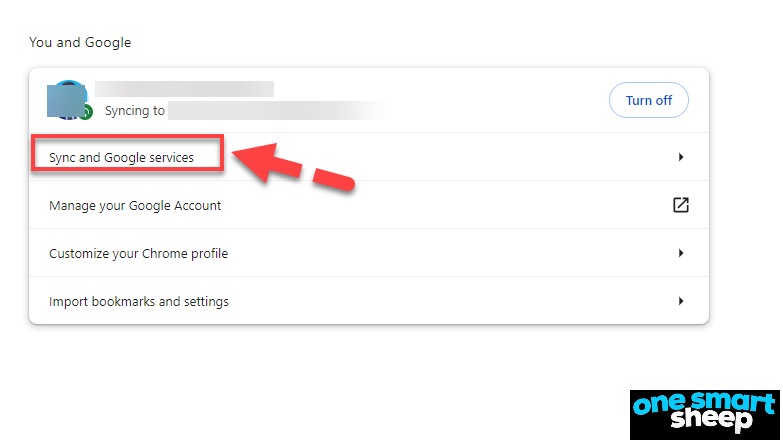
- Navigate to "Sync and Google Services."
- Within this section, you will find the option to "Turn off." Click this to disable synchronization temporarily.
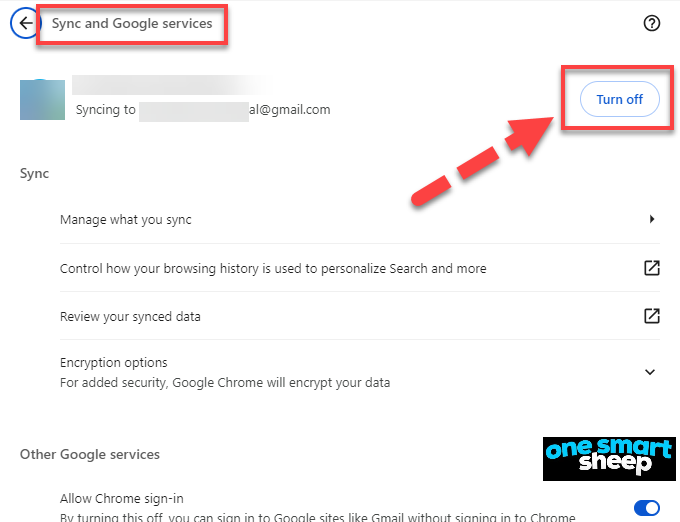
After disabling synchronization, attempt to access the webpage again to see if the error persists. If the problem is resolved, it's advisable to re-enable synchronization after your browsing session to continue benefiting from Chrome's sync capabilities.
This ensures that your bookmarks, passwords, and other browsing data are consistently updated across all devices linked to your Google account.
Way 2. Check the Status of the Website
When encountering the ERR_CONNECTION_REFUSED error, your initial step should be to verify the status of the website you are attempting to access. It's important to recognize that this error may not necessarily stem from your own internet connection but could be due to issues with the website's server.
To determine the source of the problem, try visiting a different web page. If you encounter the same error message, it's likely that the issue lies with your internet connection. However, if the second page loads without issue, the problem may indeed be with the original site.
For a more precise check, you can utilize services like "Down For Everyone Or Just Me." Here’s how to use this tool:
Enter the URL of the website that isn’t loading—for example, onesmartsheep.com.
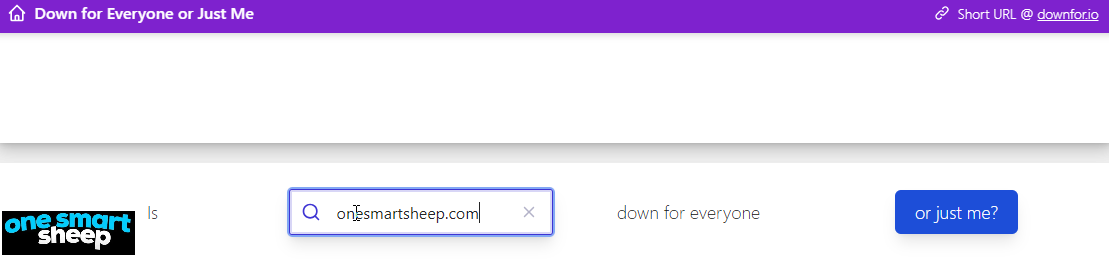
Click on the "Or just me?" button.
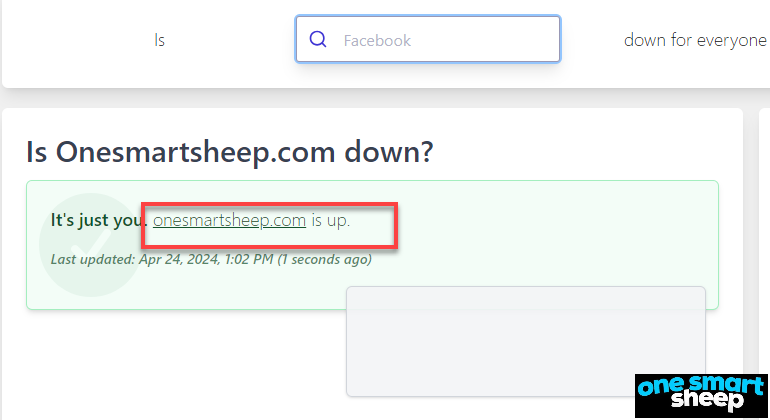
This message shows that the website onesmart sheep is up and there is no issue related to the website.
This tool will then indicate whether the website is offline (down) or online (up). If the website is down, unfortunately, the only recourse is to wait for the issue to be resolved by the site's administrators.
However, if the website is online and still not loading for you, further troubleshooting on your end is necessary.
Way 3. Disable Any Chrome Extensions
Chrome extensions have the ability to modify your browser's behavior, including how it handles network requests and connections.
If an extension is poorly coded, conflicts with other extensions, or becomes outdated, it can lead to various issues, such as the "ERR_CONNECTION_REFUSED" error.
- Modifying network settings or proxy configurations
- Blocking or intercepting network requests
- Injecting scripts or styles that interfere with website functionality
- Consuming excessive system resources, causing the browser to become unresponsive
Step-by-Step Guide to Disable Chrome Extensions:
To identify and disable the problematic Chrome extension causing the "ERR_CONNECTION_REFUSED" error, follow these steps:
- Open Google Chrome and click on the three-dot menu icon in the upper-right corner of the window.

- From the dropdown menu, select "More tools" and then "Extensions."

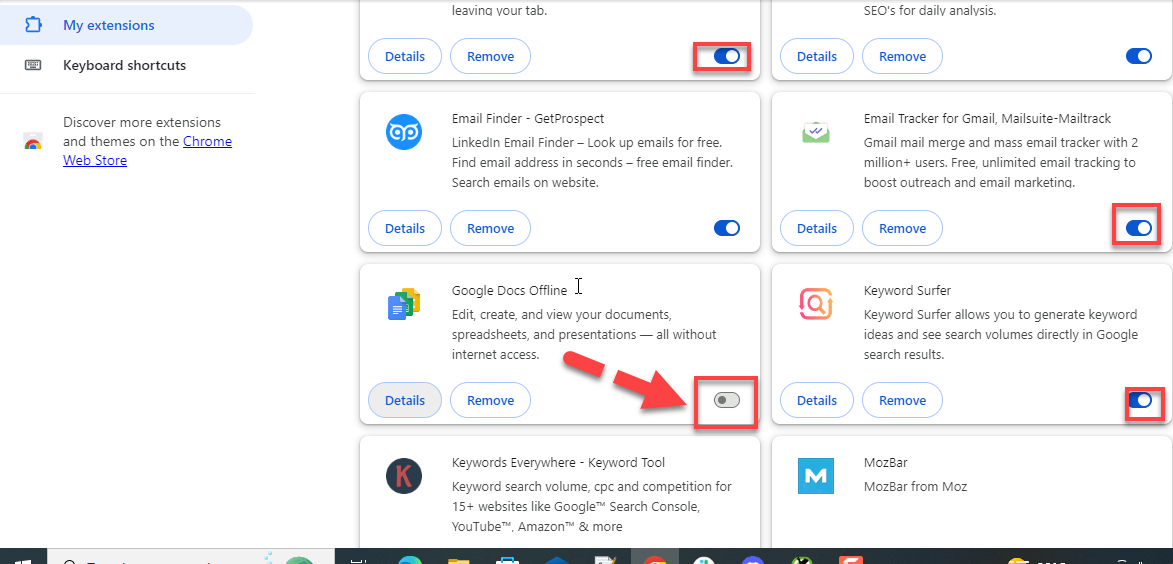
- In the Extensions page, look for any recently installed or suspicious extensions that might be related to the error.
- To disable an extension, uncheck the box next to "Enabled" or click on the toggle switch to turn it off.
Way 4. Reinstall the Chrome Browser
Google Chrome is undoubtedly a leading browser choice for accessing the internet, yet it's not immune to performance issues. Users often find Chrome consuming excessive system resources or behaving erratically. Additionally, concerns about privacy may lead some to seek alternatives.
Whether you're looking to completely remove Chrome or simply perform a clean reinstallation on your PC, here’s a detailed guide on how to uninstall and reinstall Google Chrome:
Uninstalling Google Chrome on Windows:
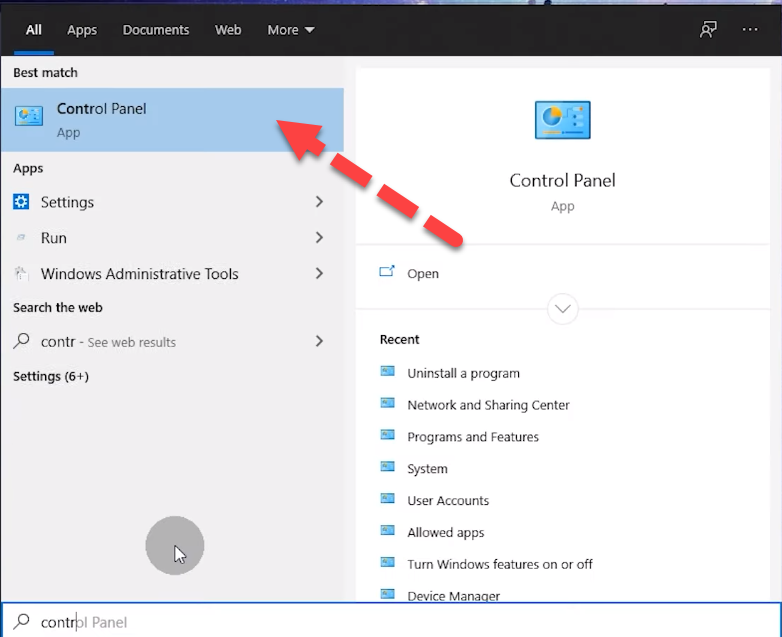
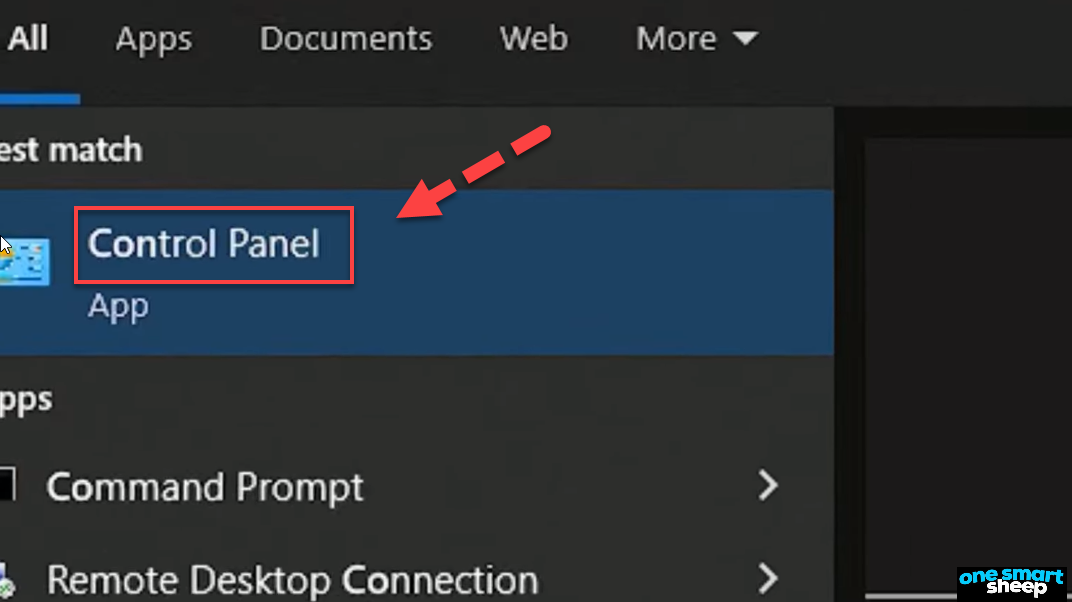
- Press the Windows key on your keyboard.
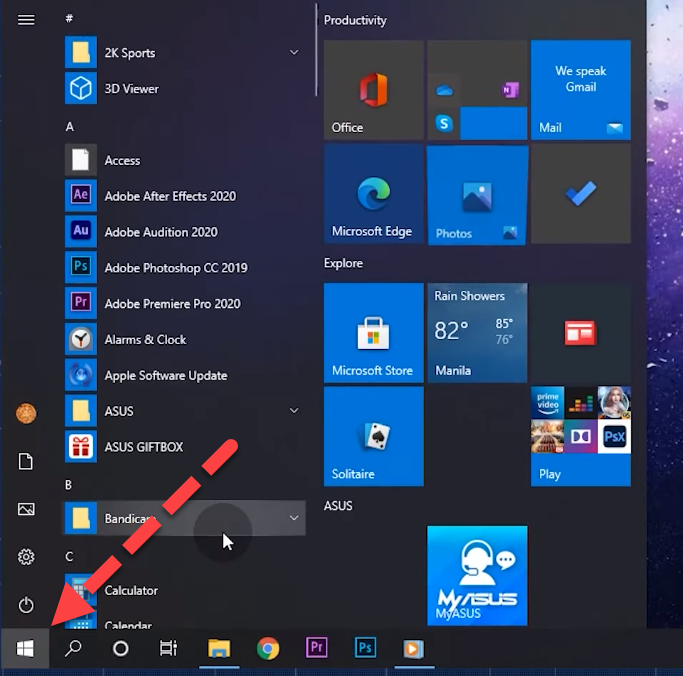
- Type "Control Panel" and open it from the search results.
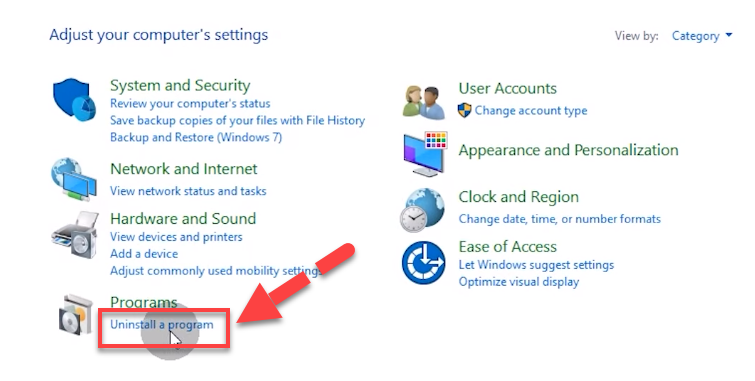
- In the Control Panel, select "Uninstall a program" from the options.
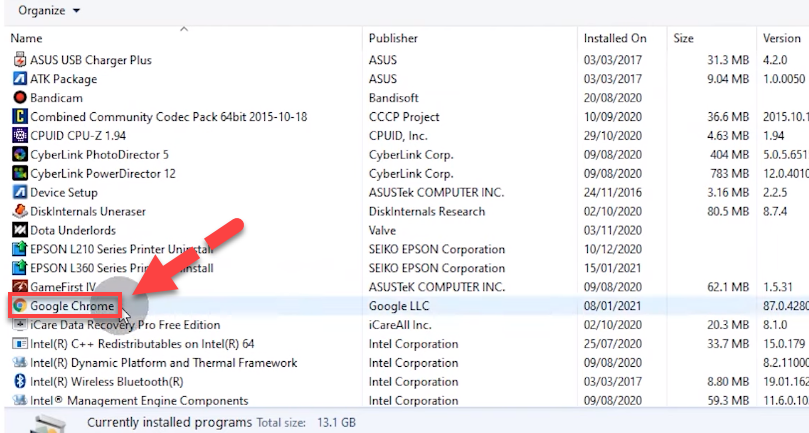
- Find Google Chrome in the list of installed programs, right-click on it, and choose "Uninstall."
- Follow the prompts to complete the uninstallation process.
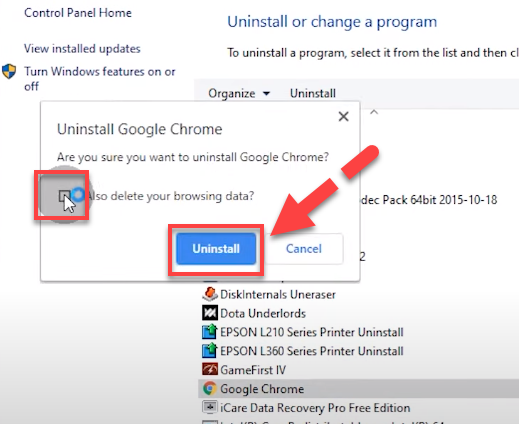
- For a thorough cleanup, consider deleting your browsing data as well.
Reinstalling Google Chrome on Windows:
- Using another browser, such as Microsoft Edge, navigate to the official Google Chrome download page (link provided in the video description below).
- Download the latest version of Google Chrome.
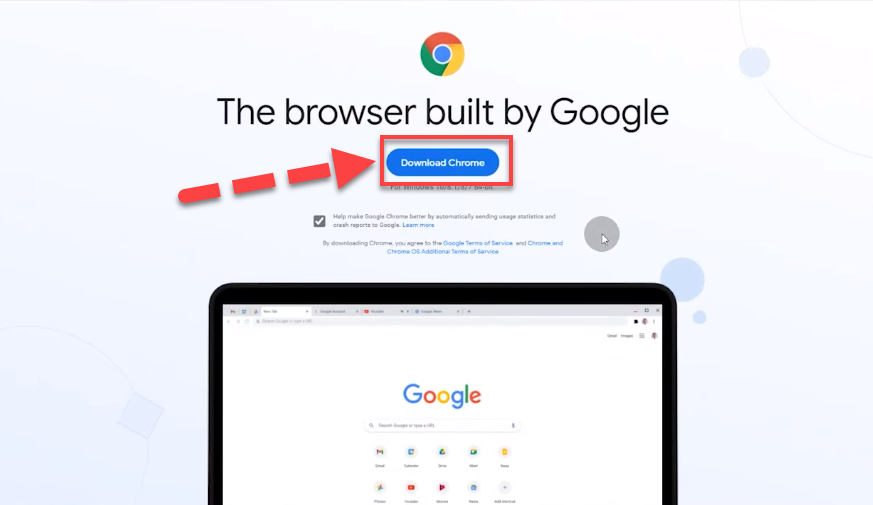
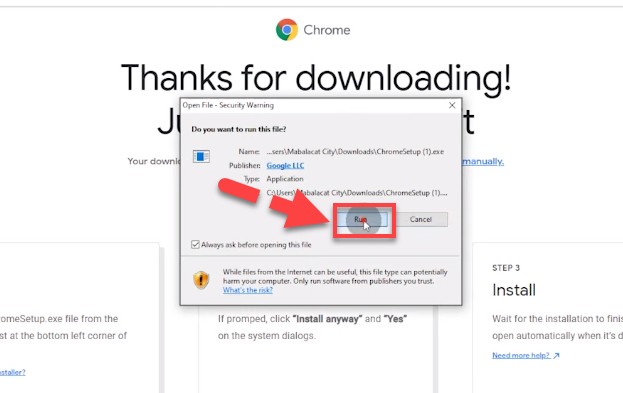
- Run the installation file to reinstall Chrome, and follow the on-screen instructions to complete the setup.
Uninstalling Google Chrome on macOS:
- Ensure Chrome is completely closed by right-clicking the Chrome icon in the dock and selecting "Quit."
- Open Finder and click on the "Applications" folder.
- Locate Google Chrome and drag it to the Trash.
- To remove your profile information as well, open Finder, click "Go" at the top menu, then "Go to Folder." Enter the path provided in the video description to access the Chrome directory.
- Delete the contents by dragging them to the Trash, then empty the Trash to complete the uninstallation.
Way 5. Assess Your Proxy Settings and Adjust Them as Needed
When you use a proxy server, your internet traffic is routed through the server before reaching its destination. If the proxy server is not configured correctly, it may fail to establish a stable connection or properly handle the data being transmitted. This can result in the "ERR_CONNECTION_REFUSED" error, preventing you from accessing the desired website.
Additionally, if the proxy server is experiencing high traffic, technical difficulties, or is undergoing maintenance, it may not be able to process your request, leading to the connection reset error.
Step-by-Step Guide to Disable Your Proxy Server:
To resolve the "ERR_CONNECTION_REFUSED" error caused by a proxy server, you can try disabling the proxy settings in your browser or operating system. Here's how to do it in Google Chrome:
- Open Google Chrome and click on the three-dot menu icon in the upper-right corner of the window.

- From the dropdown menu, select "Settings."

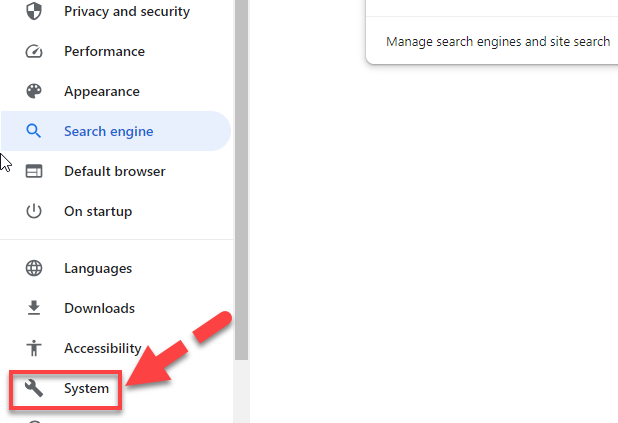
- Scroll down and click on "Advanced" to expand the menu.
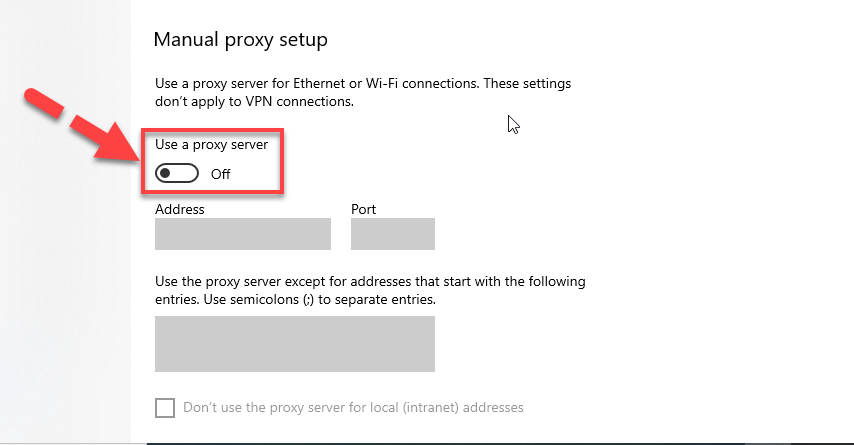
- Under the "System" section, click on "Open proxy settings."
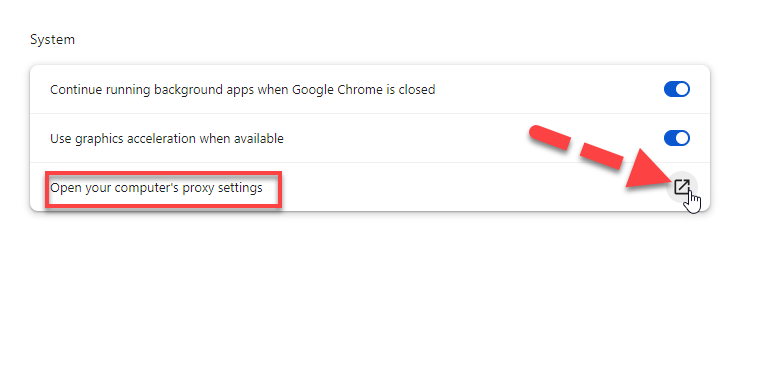
- Uncheck the box next to "Use a proxy server for your LAN."
Way 6. Clear Your DNS Cache
I'll walk you through the process of clearing the cache in cPanel, which can help optimize your website's performance by removing old and potentially outdated data. Here's how you can do it:
- Log into Your cPanel: Start by opening your cPanel. You can usually access this from your hosting provider's website or directly via a URL, typically in the format of http://yourdomain.com/cpanel.
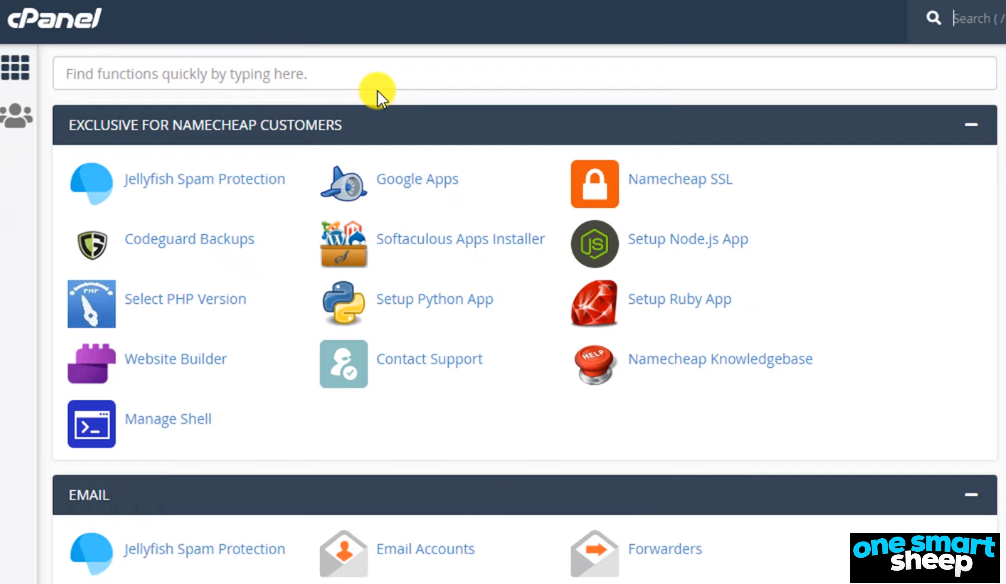
- Access the Cache Management Tool:
In the cPanel interface, locate the search box which is generally at the top of the page.
Type "cache" into the search box to filter out the relevant options.
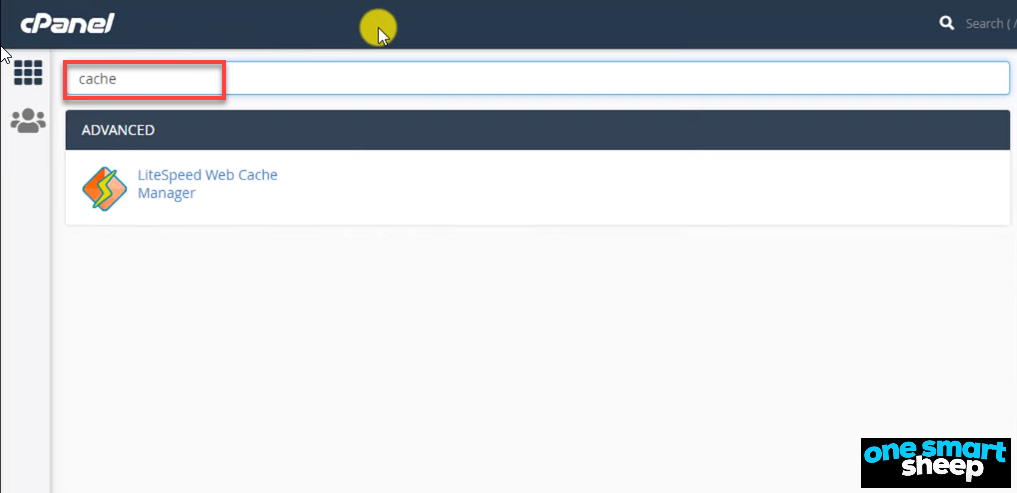
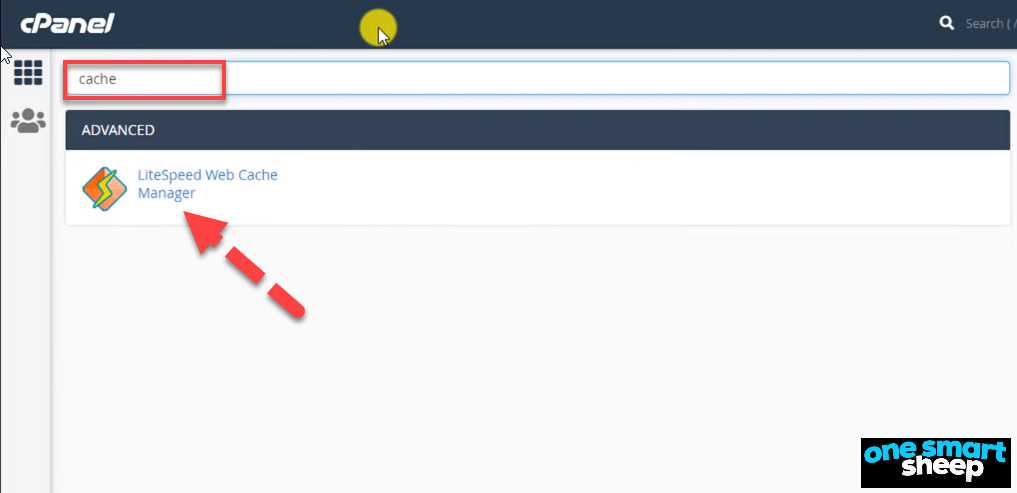
- Open LightSpeed Web Cache Manager:
Click on the 'LightSpeed Web Cache Manager' from the search results. This tool is specifically useful if your server uses LightSpeed technology, which is common with many hosting providers.
- Clear the Cache:
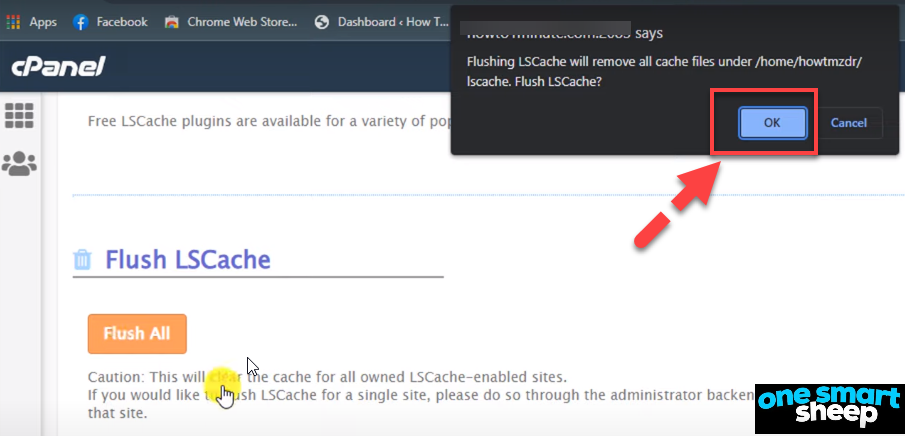
Scroll down to the relevant section in the LightSpeed Web Cache Manager.
Click on the 'Flush All' button to clear all cached content. This action will remove all stored cache files and essentially refresh the cache storage.

Confirm the action by clicking 'OK' when prompted to ensure that you want to proceed with clearing the cache.
Way 7. Troubleshoot Internet Connection
If you're seeing the "ERR_CONNECTION_REFUSED" error, one of the first things to check is your internet connection. A faulty or unstable connection can prevent your browser from reaching the desired website.
To troubleshoot your internet connection on Windows, go to Settings > Network & Internet > Troubleshoot.
Select your network adapter and follow the prompts to diagnose and fix any issues.
If the troubleshooter doesn't resolve the problem, try switching to a different network, such as your mobile data connection. If the error disappears, the issue likely lies with your original network. In this case, contact your Internet Service Provider (ISP) for assistance.
By ensuring a stable internet connection, you can often resolve the "ERR_CONNECTION_REFUSED" error and get back to browsing without interruption.
Way 8. Clear Your Browser’s Cache
While these features are designed to improve your browsing experience, they can sometimes cause problems. If a website undergoes significant changes or updates, your browser's cached files may become incompatible, leading to errors like "ERR_CONNECTION_REFUSED" By clearing your cache and cookies, you force your browser to fetch the latest version of the website, which can resolve the issue.
Step-by-Step Guide to Clear Cache and Cookies:
Although the process may vary slightly depending on your browser, the general steps to clear cache and cookies are similar. Here's how to do it in Google Chrome:
- Open Google Chrome and click on the three-dot menu icon in the upper-right corner of the window.
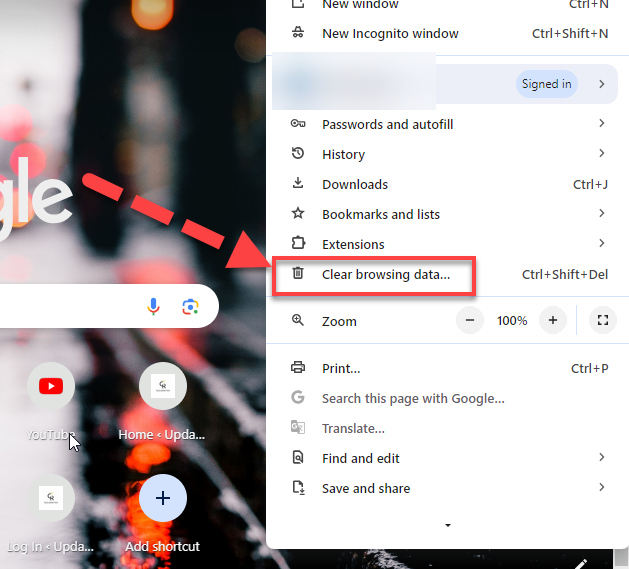
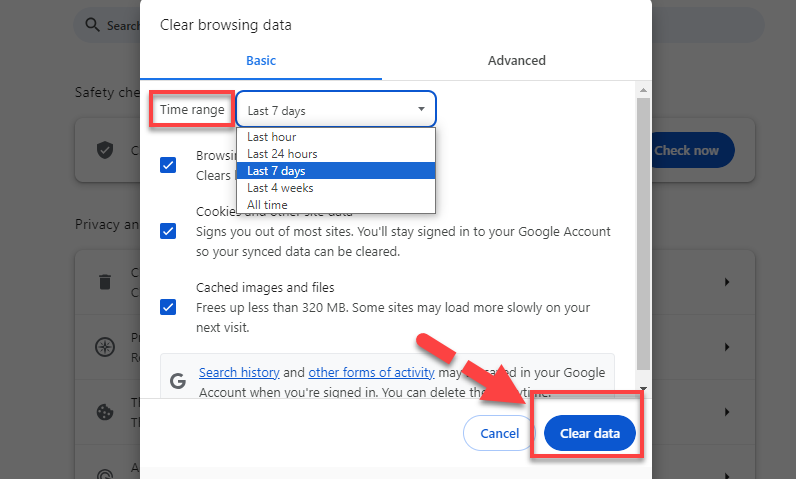
- From the dropdown menu, select "More tools" and then "Clear browsing data."
- In the pop-up window, choose the time range for which you want to delete the data. To ensure you remove all outdated files, select "All time."
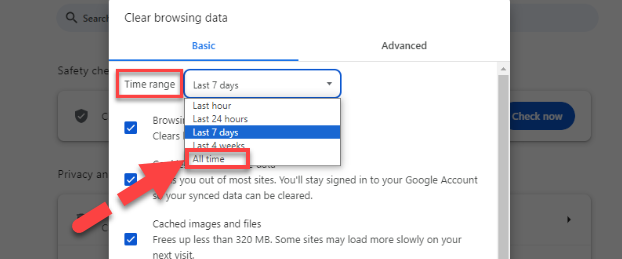
- Check the boxes next to "Cookies and other site data" and "Cached images and files."
- Click on the "Clear data" button and wait for the process to complete.
After clearing your cache and cookies, restart your browser and try accessing the website that previously displayed the "ERR_CONNECTION_REFUSED" error. In most cases, this simple solution will resolve the issue, and you'll be able to browse the site without any further problems.
Way 9. Activate or Deactivate Your VPN
When connecting to a VPN, encountering the ERR_CONNECTION_REFUSED can be frustrating. However, you can resolve this issue and establish a successful VPN connection by following these steps:
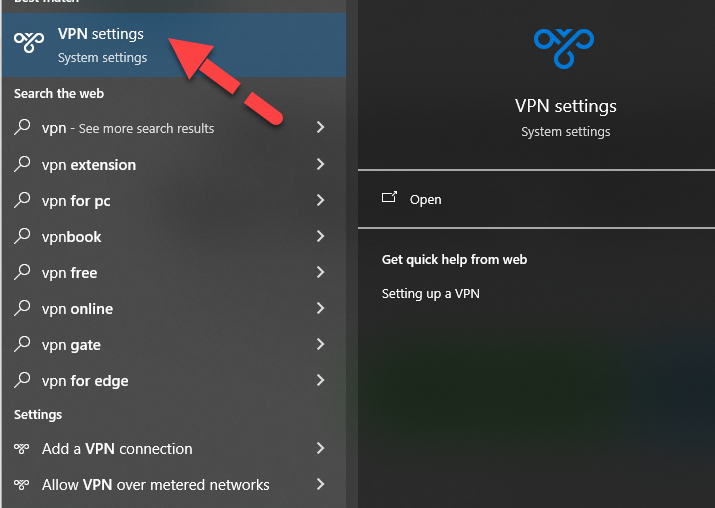
- Open the search tab on your device and type "VPN" to access your VPN settings.
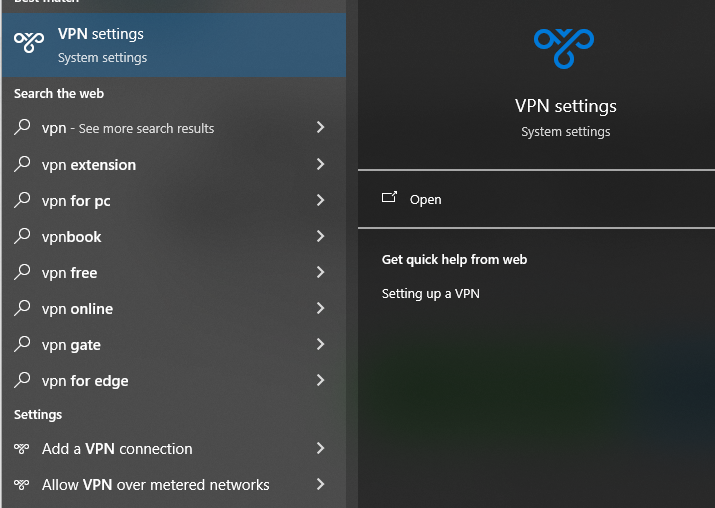
- Locate the VPN icon and click on it to open the VPN configuration menu.
- In the VPN settings, you will find two toggles that need to be adjusted:
- Toggle 1: "Allow VPN over metered networks" - Ensure that this toggle is turned on. This setting allows your VPN to function properly even when connected to metered networks, such as mobile data connections.
- Toggle 2: "Allow VPN while roaming" - Activate this toggle to enable VPN connectivity while roaming on different networks, ensuring uninterrupted access to your VPN service.
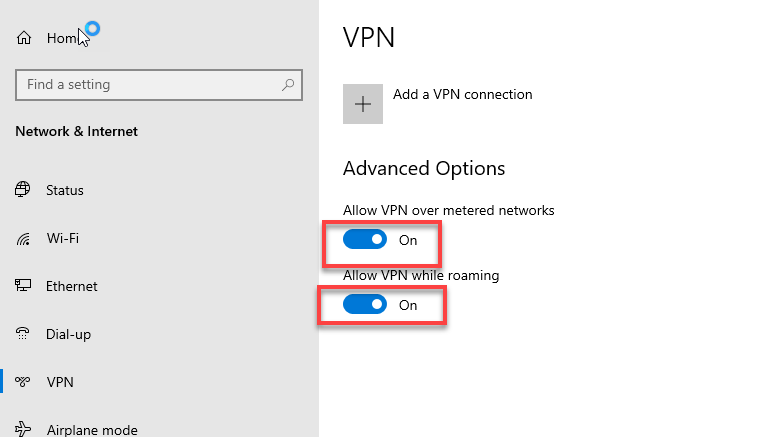
After enabling both toggles, your device should successfully connect to the VPN network.
If you are already connected to a VPN network and encountering the ERR_CONNECTION_REFUSED in chrome, it is essential to troubleshoot the connection:
Disconnect from the current VPN network to rule out any potential conflicts.
Verify that both the "Allow VPN over metered networks" and "Allow VPN while roaming" toggles are turned OFF in your VPN settings.

Disabling these toggles can help resolve any compatibility issues between your VPN and Cloudflare, thereby eliminating the ERR_CONNECTION_REFUSED.
Way 10. Change Your DNS Address
Open the Control Panel by typing "Control Panel" in the Windows search bar and selecting it from the results.
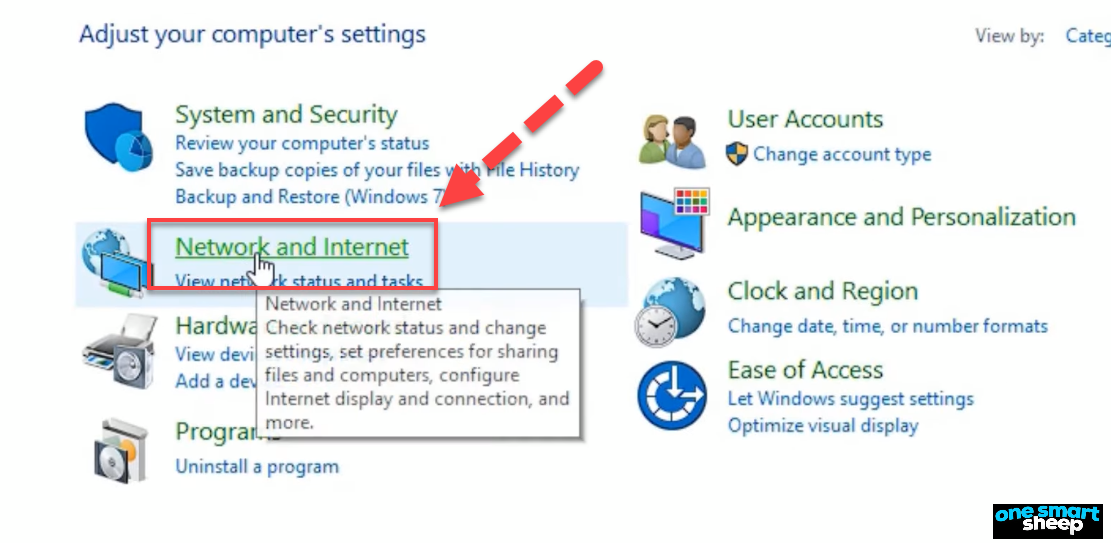
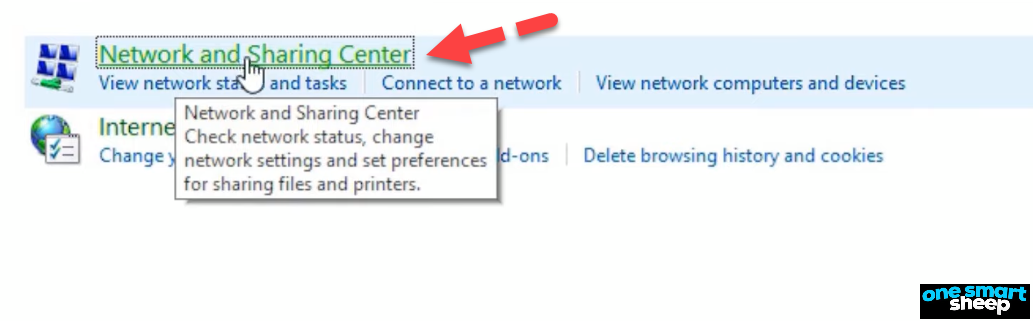
Navigate to Network and Internet > Network and Sharing Center.
Click on Change adapter settings.
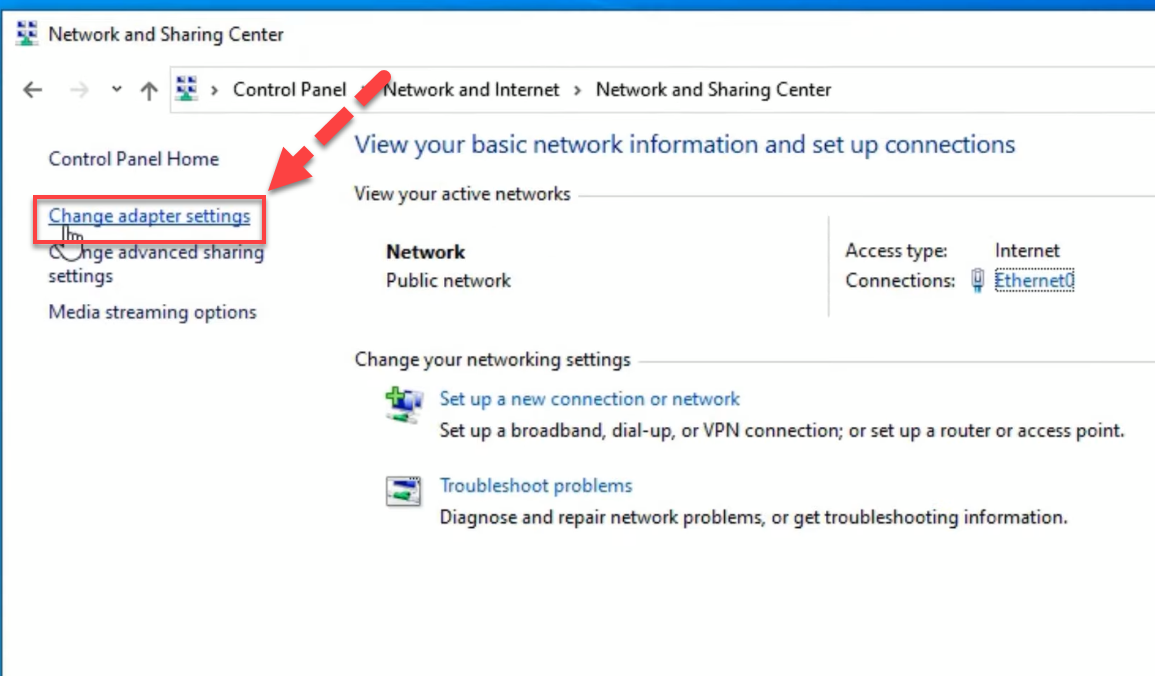
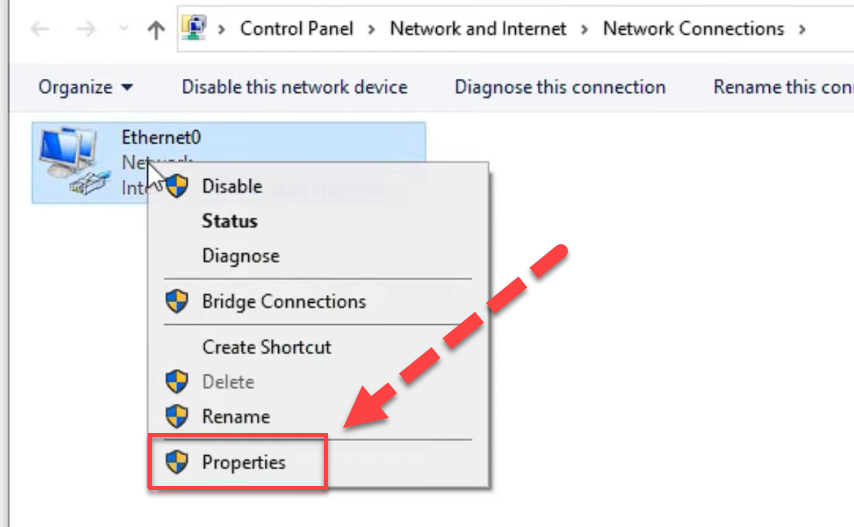
When you click on the adapter settings you will find “Ethernet()”.
Right-click on your active network connection and select Properties.
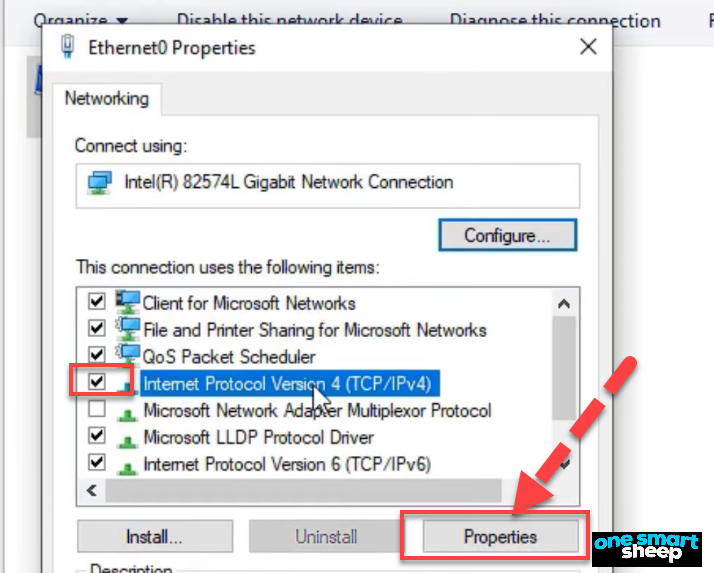
Scroll to and select Internet Protocol Version 4 (TCP/IPv4), then click Properties.
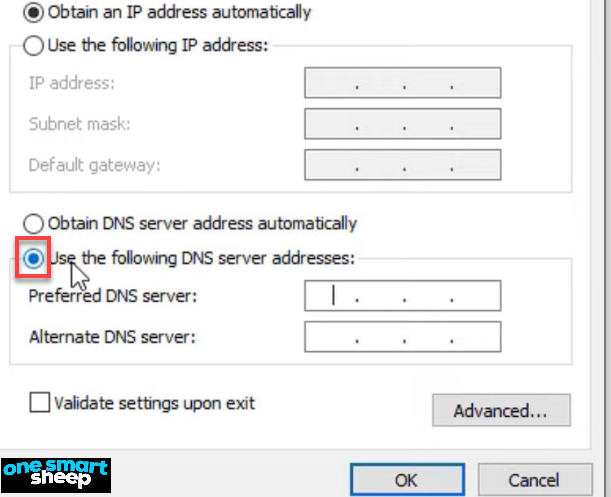
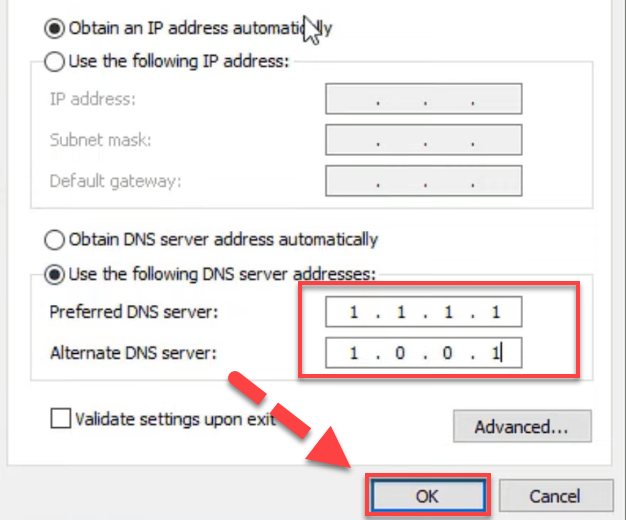
In the DNS section, select Use the following DNS server addresses.
Set the Preferred DNS server to 1.1.1.1 and the Alternate DNS server to 1.0.0.1.
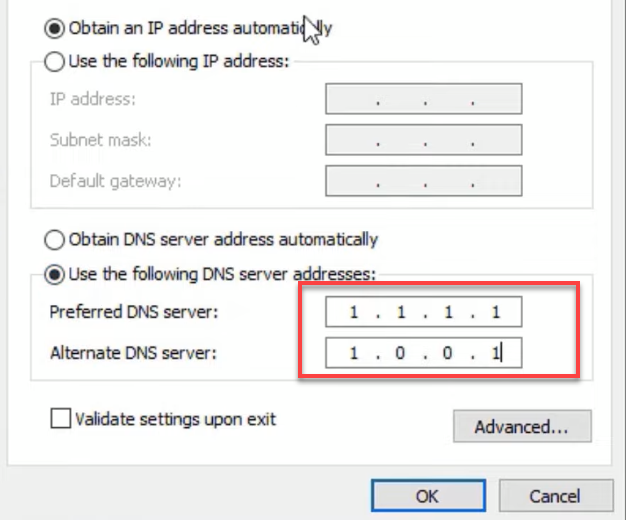
Click OK to save your changes and close all open windows.
Way 11. Restart Your Network Router
Restarting your network router can often help resolve the ERR_CONNECTION_REFUSED error by re-establishing a stable connection between your device and the internet.
When you restart your router, it clears any temporary glitches or conflicts that may be interfering with your connection. This process, known as power cycling, allows the router to reset its internal components and start fresh.
To restart your router:
1. Unplug the power cord from the router and the wall outlet.
2. Wait at least 30 seconds to allow the router's internal capacitors to discharge completely.
3. Plug the power cord back into the wall outlet and the router.
4. Wait for the router to reboot and re-establish a connection, which typically takes a few minutes.
After your router has restarted, try accessing the website again. If the ERR_CONNECTION_REFUSED error has been resolved, it means that a temporary issue with your router was causing the problem.
If the error persists after restarting your router, you may need to investigate other potential causes, such as browser settings, firewall configurations, or issues with the target website itself.
Way 12. Disable Firewall for Network your Connection
When troubleshooting the "ERR_CONNECTION_REFUSEDT" error, one of the steps you may need to take is temporarily disabling your firewall and antivirus software. This process will vary depending on the specific software you're using, so be sure to consult the documentation for your particular programs.
To disable the Windows Defender Firewall:
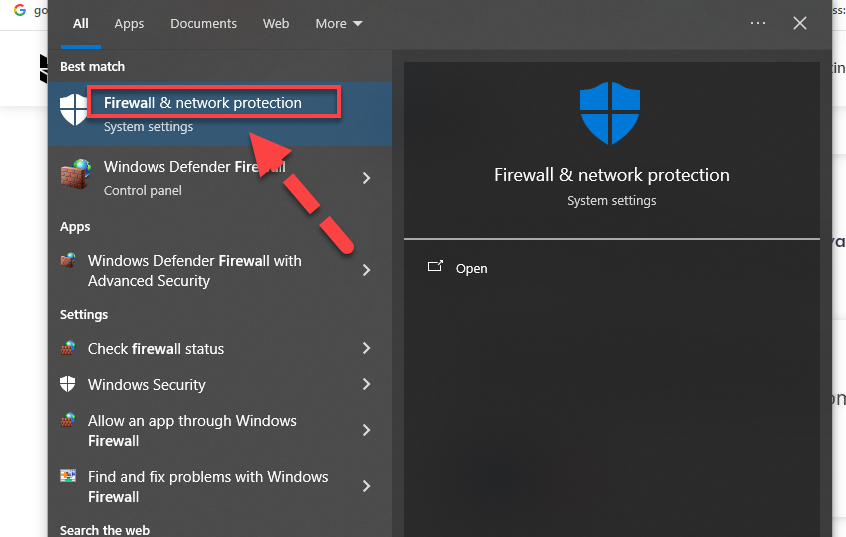
- While still in the Privacy & security section, click on Firewall & network protection.
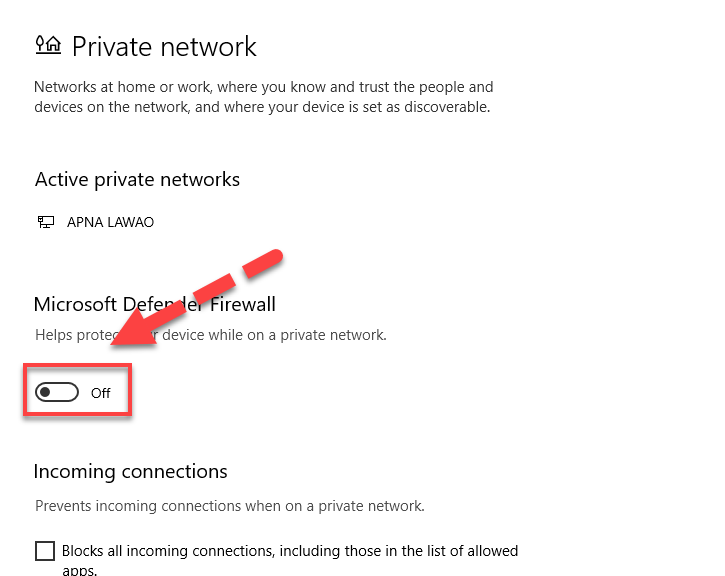
- Open the settings for each network profile (domain network, private network, and public network).
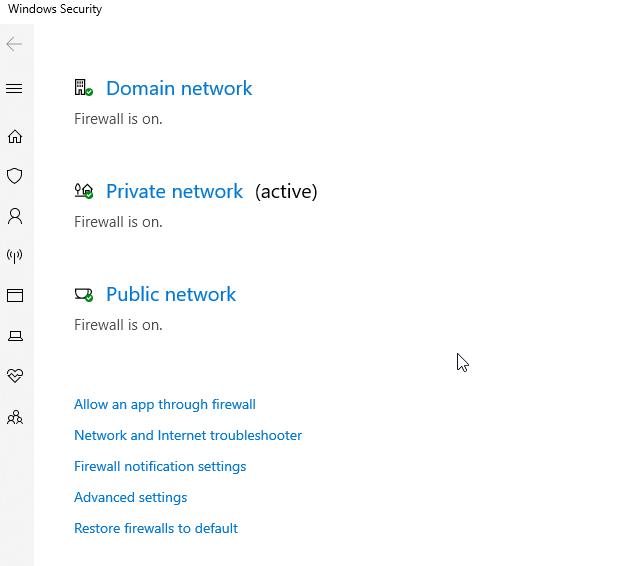
- Turn off the Microsoft Defender Firewall toggle switch for each profile.
Way 13. Disable Antivirus Software Temporarily
Disabling antivirus software in Windows 10 can be necessary for certain tasks, such as software installation or troubleshooting. Here's how you can disable both third-party antivirus programs and the default Windows Defender:
Disabling a Third-Party Antivirus Program:
- Locate the Antivirus Icon: Find the antivirus icon in your system tray, typically located at the bottom-right corner of your screen.
- Right-Click the Icon: Right-click on the antivirus icon.
- Select Disable: From the context menu that appears, select the option to disable or turn off the antivirus. The wording may vary depending on the software you are using.
Disabling Windows Defender Antivirus:
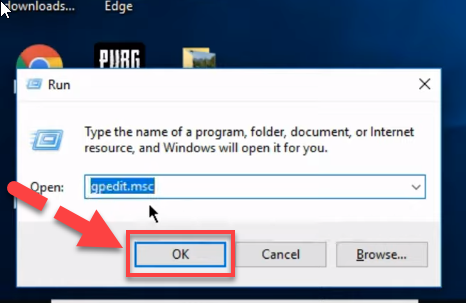
- Open Run Dialog: Press Windows key + R to open the Run dialog box.
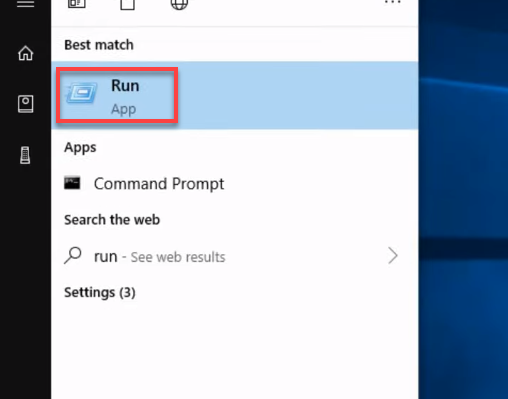
- Launch Group Policy Editor: Type gpedit.msc in the Run dialog and press Enter to open the Local Group Policy Editor.
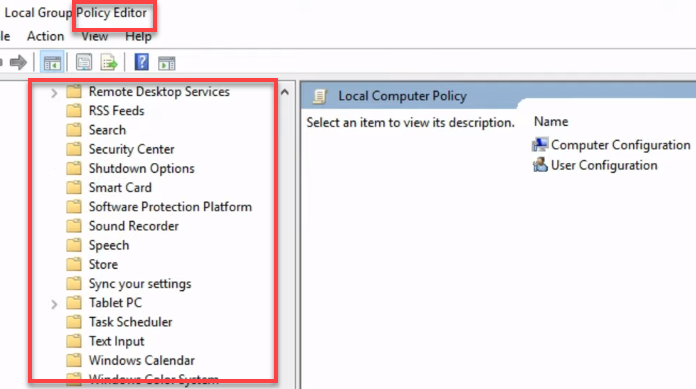
- Navigate to Windows Defender Settings:
- Click on Administrative Templates under Computer Configuration.
- Then, click on Windows Components.
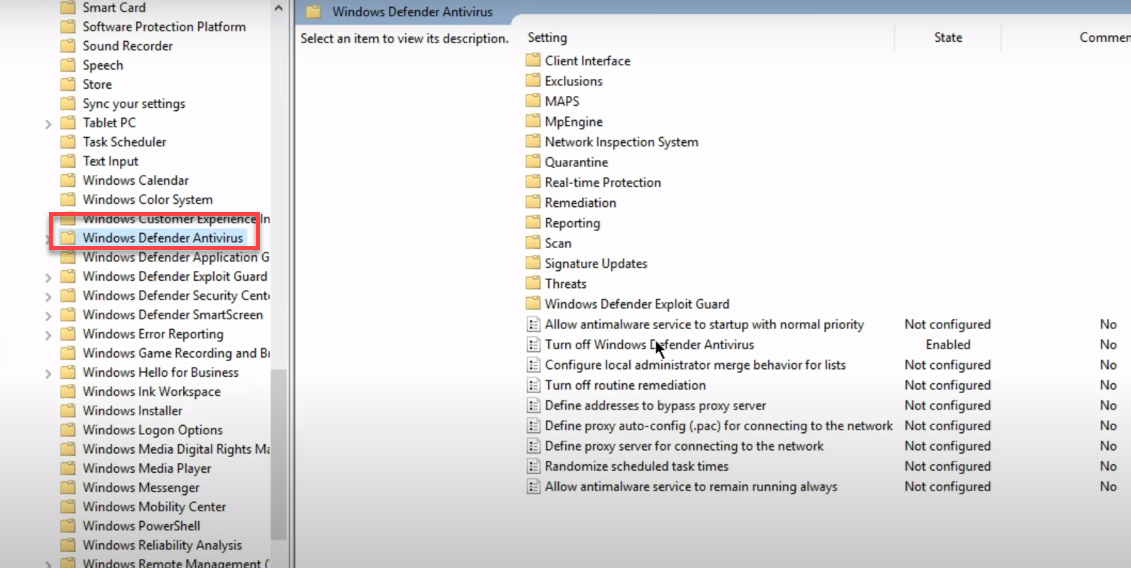
- Scroll down and find Windows Defender Antivirus.
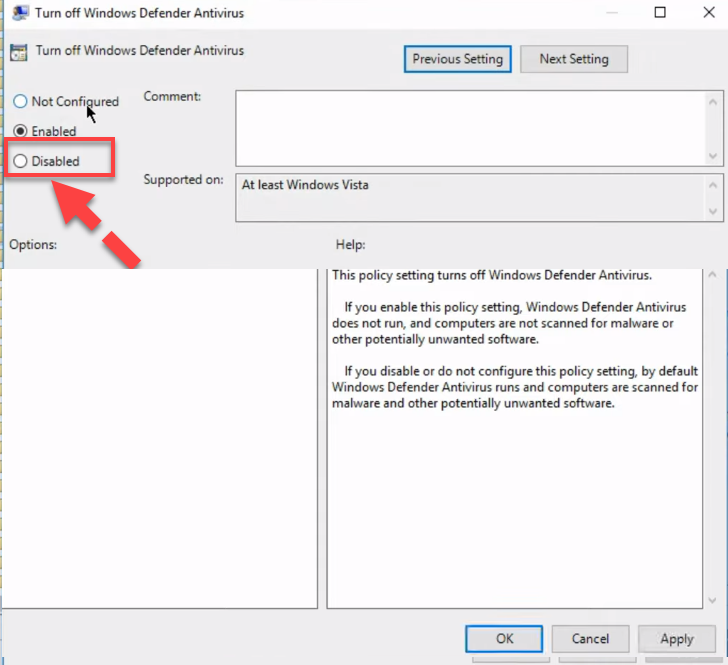
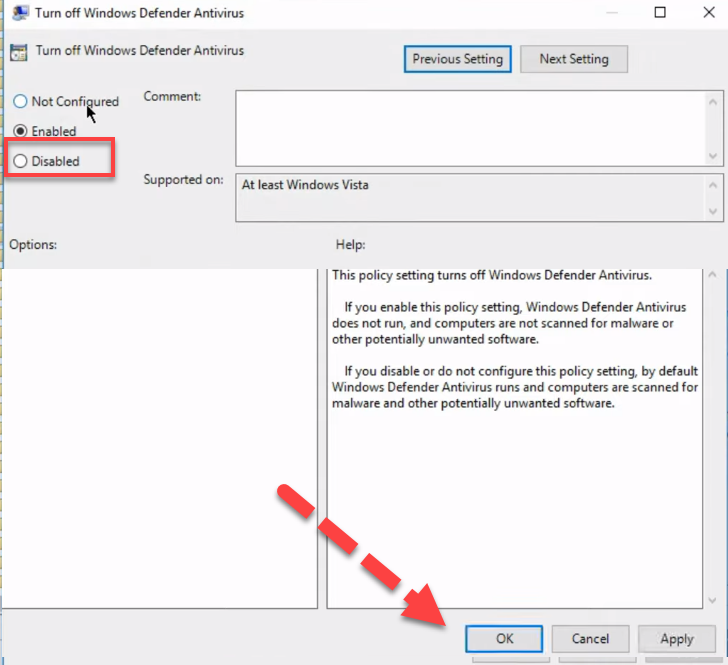
- Double-click on Turn off Windows Defender Antivirus.
- In the window that opens, select Enabled to disable Windows Defender.
- Click Apply, then OK.
- Server Unavailability: If the server is down due to maintenance, overload, or technical issues, it cannot respond to requests from your browser.
- Client-Side Network Issues: Problems with your own network, such as unstable connections, incorrect network configurations, or issues with network hardware (modems or routers) can cause this error.
- Firewall or Security Settings: Overly restrictive firewall settings or security software on your computer can block access to certain servers, leading to this error.
- Browser Configuration Issues: Incorrect settings or corrupted files within your browser can prevent it from accessing certain servers.
- DNS Problems: If DNS settings are incorrect or the DNS cache is corrupted, your browser may not be able to resolve the server address of the website you are trying to visit.
- Expired Browser Cache and Cookies: Sometimes outdated cache files or cookies can conflict with new data and cause connection issues.
- ISP Restrictions: Occasionally, Internet Service Providers (ISPs) may block access to certain websites or servers, either as part of network management or due to legal requirements.
- VPN and Proxy Issues: If you are using a VPN or proxy service, improper configuration or issues with these services can lead to connection errors.
4. Disable Windows Defender:
Variation for the Error “ERR_CONNECTION_REFUSED” in Different Browsers
The ERR_CONNECTION_REFUSED error can manifest differently across various web browsers, leaving users puzzled about the cause and potential solutions. Let's take a closer look at how this error appears in some of the most popular browsers:
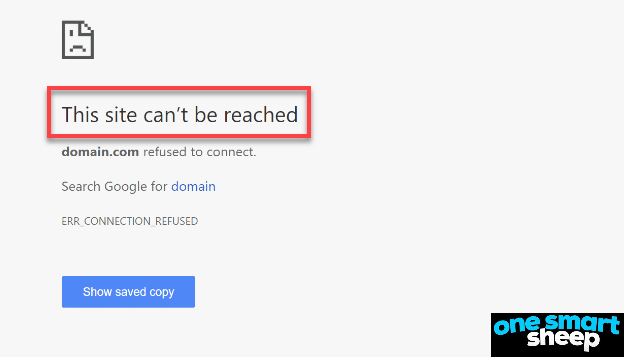
1. Google Chrome:
In Chrome Error shows this message on the screen "This site can't be reached" or "This webpage is not available"
When you encounter the ERR_CONNECTION_REFUSED error in Google Chrome, you'll see a message stating that the site can't be reached or the webpage is unavailable.
This indicates that “your attempt to connect to the website was denied.”
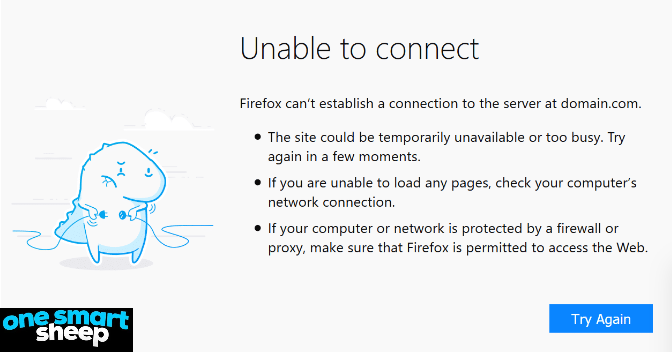
2. Mozilla Firefox:
When you are using mozilla firefox as web browser you will the error for like this on the screen
"Unable to connect"
Firefox users will see a straightforward message: "Firefox can't establish a connection to the server at domain.com." This concise error message doesn't provide much insight into the underlying issue.
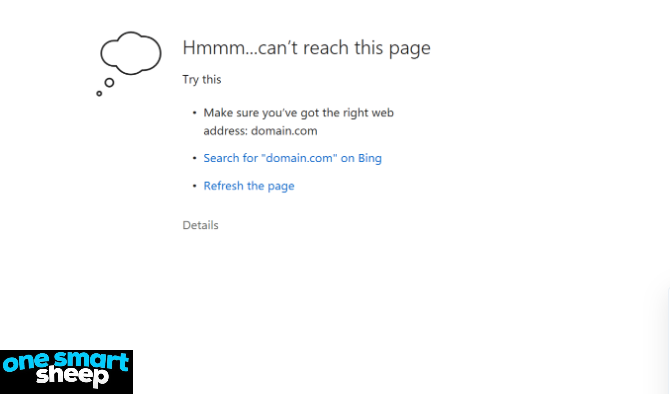
3. Microsoft Edge
When are you using Microsoft edge you will find the error on the screen like this "Hmmm…can't reach this page"
Microsoft Edge displays a rather vague message when confronted with the ERR_CONNECTION_REFUSED error: "Make sure you've got the right web address: domain.com." This message doesn't offer any valuable troubleshooting information.
It's important to note that the ERR_CONNECTION_REFUSED error can stem from various sources, ranging from server-side issues to client-side problems. Incorrect firewall settings, server misconfigurations, or even unexpected downtime can trigger this error.
Additionally, an unreliable internet connection can contribute to the appearance of this error message.
Unfortunately, the ERR_CONNECTION_REFUSED error message doesn't provide any insights into the specific cause of the problem. As a user, it's your responsibility to investigate and resolve the underlying issue, which can be a challenging task without proper guidance.
What are the Causes Due to Which ERR_CONNECTION_REFUSED Error Occur?
The ERR_CONNECTION_REFUSED error occurs when a web browser is unable to establish a connection to the server hosting the desired website. Here are some common causes of this error:
Wrapping Up
Our journey through the various solutions to the ERR_CONNECTION_REFUSED error in Google Chrome, it's evident that this problem can arise from multiple angles—be it network issues, browser settings, or disruptions at the server level.
We've explored 13 distinct ways to tackle this error, ensuring that you're well-equipped to handle it whenever it might occur. From adjusting proxy settings and clearing DNS caches to disabling extensions and tweaking firewall settings, each method provides a strategic approach to regain smooth browsing. Remember, effective troubleshooting is about systematic testing and elimination, so if one solution doesn't resolve the issue, simply move on to the next.
Armed with these tools, you’re now prepared to face this common but perplexing error with confidence and get back to enjoying a seamless internet experience. So go ahead, apply these fixes, and reclaim your access to the digital world without interruptions.
FAQs
How do I fix a refused connection?
To fix a refused connection, check your internet settings and ensure your browser is up-to-date. Disable any conflicting browser extensions, clear your browser's cache, and reset your network settings. If issues persist, consider checking if your firewall or antivirus settings are blocking the connection.
Why does a site refuse to connect?
A site may refuse to connect due to server-side issues, such as downtime or configuration errors, or client-side problems like incorrect DNS settings, a misconfigured firewall, or an outdated browser. Ensuring both server and client settings are correct can help resolve these issues.
How do I fix err_connection_reset?
To fix the ERR_CONNECTION_RESET error, start by clearing your browser cache and cookies. Check your network connection and restart your router. Ensure that your firewall or antivirus isn't blocking your connection. If using a VPN, try disabling it to see if connectivity is restored.
What is Err_connection_reset only in Chrome?
If ERR_CONNECTION_RESET appears only in Chrome, it often points to problems specific to the browser. Reset Chrome settings to default, disable unnecessary extensions, and clear the cache. If the problem persists, reinstalling Chrome may be necessary.
How can I reset my internet connection?
To reset your internet connection, unplug your modem and router from power for at least 30 seconds. Plug them back in and wait for the lights to stabilize, indicating a connection. Alternatively, go to your device's network settings and select the option to reset network settings.
What is a connection error?
A connection error occurs when a device cannot establish a network connection. This can be due to a variety of issues, including poor signal strength, network congestion, incorrect settings, or hardware failures. Diagnosing and fixing these can restore connectivity.