


In the booming world of eCommerce, the journey to creating a successful online store can feel like navigating through a labyrinth.
With a myriad of decisions to make- from selecting a suitable platform to identifying your target audience, implementing secure payment methods, creating a compelling brand identity, optimizing your WordPress site for SEO, and utilizing powerful plugins, each step shapes your business's pathway to success.
Dive into this comprehensive guide that lays out the multi-layered process of setting up a thriving eCommerce store, making the daunting task not only manageable but also exciting.
With careful planning, strategic execution, and a clear vision, your online store can rise above the digital noise and make a mark in the bustling online marketplace.
Step 1: Configuring Your E-Commerce Platform
When launching an online store, the first crucial step is selecting an optimal online platform to host your business. This decision can significantly impact the way your business operates, from inventory management to customer service.
Therefore, choosing the right platform requires careful consideration of your business needs and the specific features of each platform.
Two of the most popular choices for online businesses are Shopify and WordPress, coupled with WooCommerce. Both platforms have their strengths, and the best choice largely depends on your specific needs and requirements.
Shopify is a complete e-commerce platform that lets you start, grow, and manage a business.

It offers customizable themes and an easy-to-use interface, so even those with minimal technical knowledge can create a professional-looking store. Shopify is a fully hosted platform, meaning you don't have to worry about maintaining software, installing updates, or keeping backups. They manage all of this for you.
Shopify offers three pricing plans:
- Basic Shopify: $25/month - includes all the basics for starting a new business.
- Shopify: $65/month - everything you need for a growing business.
- Advanced Shopify: $399/month - advanced features for scaling your business.
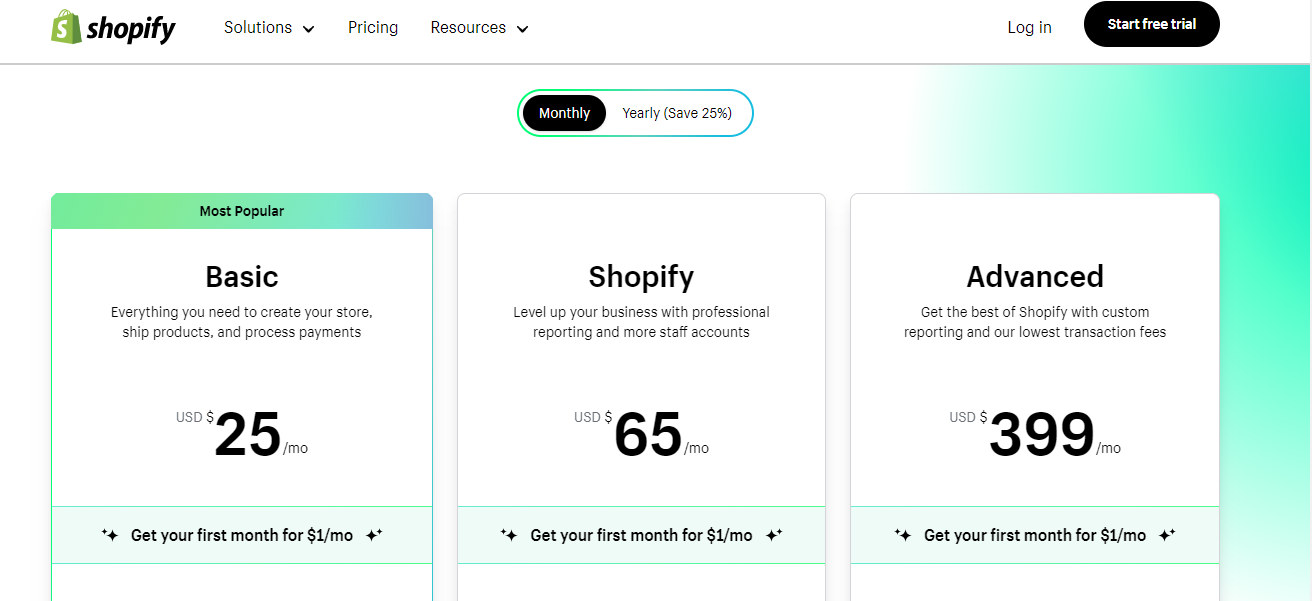
Each plan offers different features, including access to additional tools and lower transaction fees as you upgrade. It's best to carefully review what each plan offers to decide which is most suited to your business.
On the other hand, WordPress+WooCommerce is an open-source platform that gives you the flexibility to fully control and customize your online store. WooCommerce is a WordPress plugin, so you'll need to set up a WordPress website first, then install the WooCommerce plugin.
It's a great choice for businesses that already have a WordPress website or those that value full control over their store's customization.
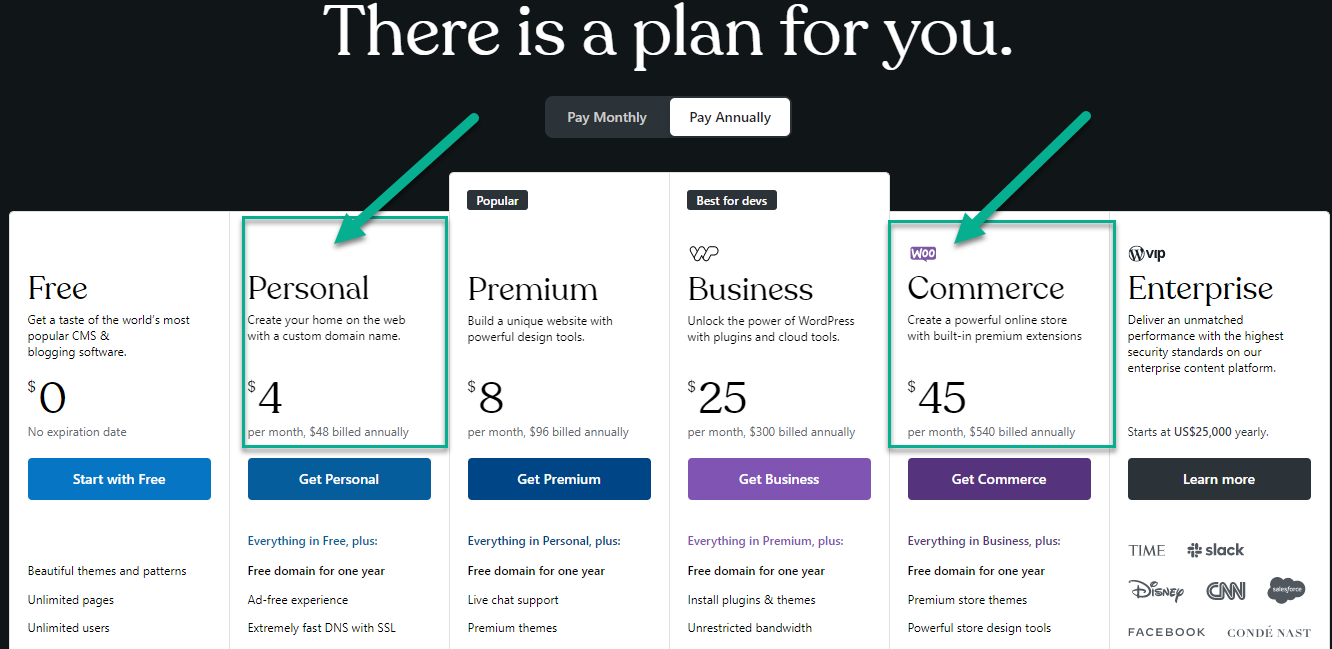
While WordPress and WooCommerce are free to use, you'll need to factor in the cost of web hosting, a domain name, and an SSL certificate. You may also choose to pay for premium WordPress themes or plugins.
The pricing can vary greatly depending on your selections, but to give an example, hosting can range from $4 to $45 per month.
In terms of deciding which platform is the best, there's no one-size-fits-all answer. If you want an all-in-one, hassle-free solution and don't mind paying a monthly fee, Shopify may be the best option.
If you want more control over your online store and are willing to handle more of the technical side, WordPress+WooCommerce could be the better choice. It's crucial to consider your own comfort with technology, your budget, and your specific business needs when making this decision.
A domain name is like your website's address; it's what users type into their browsers to find your site. For example, 'google.com.'
On the other hand, an SSL certificate provides secure, encrypted connections between your site and your visitors. It's essential for protecting sensitive information and boosting your site's credibility.
Bluehost, a hosting provider officially recommended by both WordPress and WooCommerce, has kindly stepped forward with a great offer for our users. They're providing a few key extras for you: a free domain name, an SSL certificate, and even a significant discount on their web hosting services.
Step 2: Identifying Your Intended Market
Your target audience is the specific group of people you want to reach with your marketing message. They are the people who are most likely to buy your products or use your services, and they are united by some common characteristics, like demographics and behaviors.
Understanding your target audience is crucial for your online store for several reasons. First, it helps you create effective marketing messages that speak directly to your audience.
Secondly, it enables you to make strategic decisions about where to advertise and how to shape your products or services to better serve your customers.
Finally, it saves you time, effort, and money because you're not trying to market to everyone, just to those who are likely to be interested in what you're offering.
As a new e-commerce entrepreneur, there are three main categories to focus on:
- Product Selection: The products you choose to sell will play a huge role in attracting your target audience. Understanding what your audience needs or wants will help you make smart decisions about what products to offer.
- Pricing Strategy: The price point you choose will also have a significant impact. It's important to understand how much your target audience is willing to spend and price your products accordingly.
- Marketing and Sales Channels: Different audiences use different platforms. Knowing where your audience spends their time online can help you identify the best channels to market your products.
One of the biggest mistakes new business owners make is trying to appeal to everyone. This is not only impractical, but it can also be detrimental to your business.
A product or service that tries to cater to everyone often ends up appealing to no one. It's much more effective to identify a specific target audience and focus your efforts on meeting their specific needs and desires.
Step 3: Establishing Your WooCommerce Store
WooCommerce is a popular plugin for WordPress turning a website into a fully functional online store. It's flexible, user-friendly, and customizable, giving business owners complete control over their site's e-commerce capabilities.
Importantly, it allows seamless integration of services like payment processing, shipping, and inventory management. Its versatility makes WooCommerce a significant asset for online businesses.
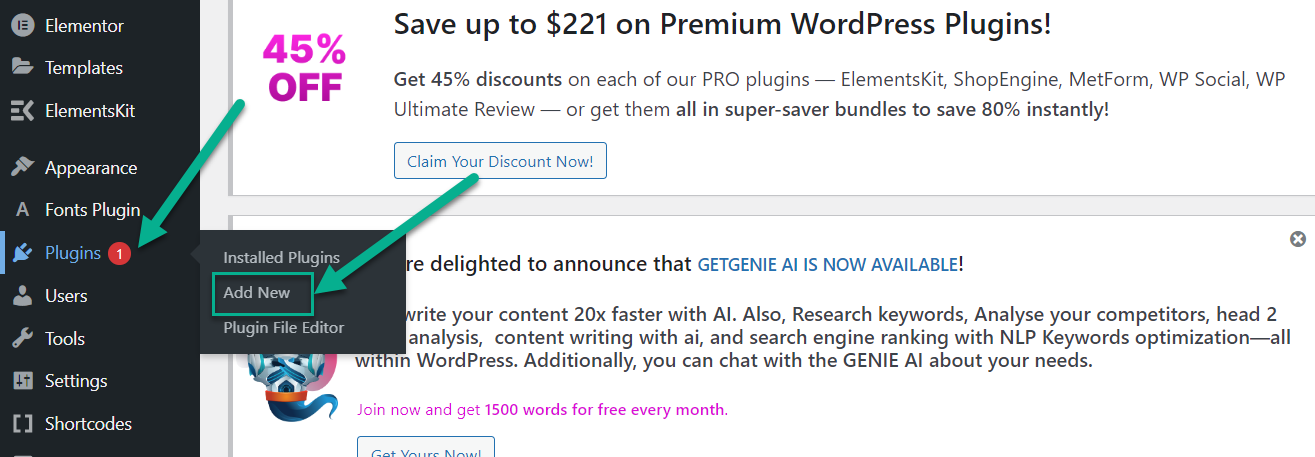
The next step you need to take is to set up the WooCommerce plugin. Here's how to do it: Start by heading over to the dashboard of your WordPress account. There, you'll be looking for the plugin section.
Once you've found that, you're just one click away from opening a pop-up window. In this, you'll see an option to 'Add a New.' Go ahead and click on that.
So once you've followed the previous steps, WordPress will begin the installation process for the WooCommerce plugin. You'll just need to hang tight for a moment while this happens. As soon as it's done installing, there's just one more thing you need to do - click on 'Activate.'

After you've activated the plugin, a setup wizard will appear. Now, this wizard isn't just for show; it's going to guide you through some key settings that are crucial for your journey.
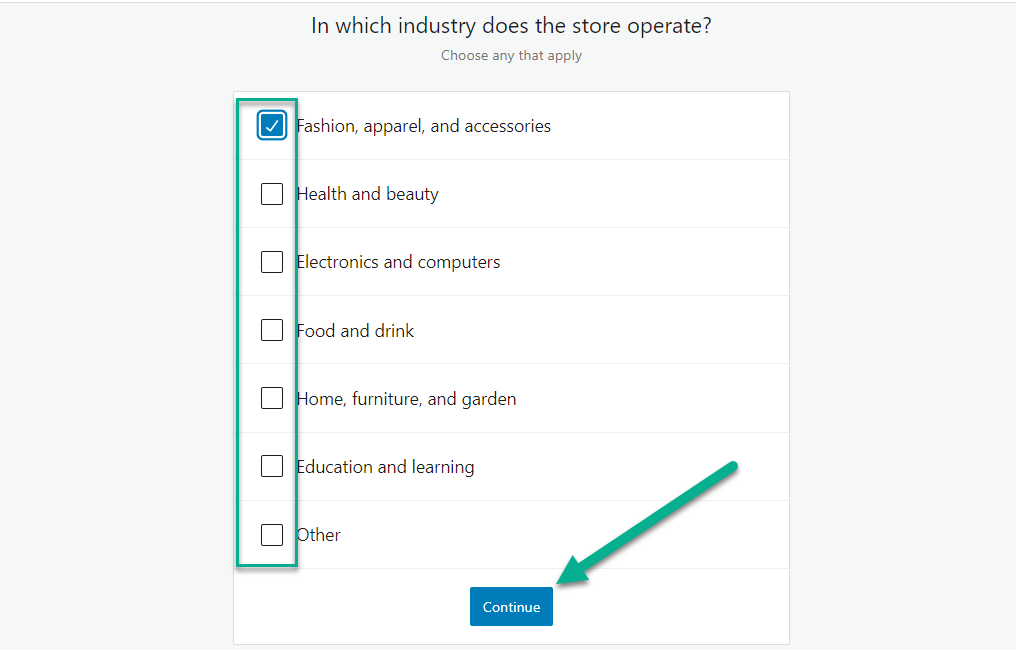
The next thing the setup wizard will do is inquire about your store's industry. Don't worry; it'll provide you with a selection of options to choose from. So, go ahead and pick the one that best represents your business.
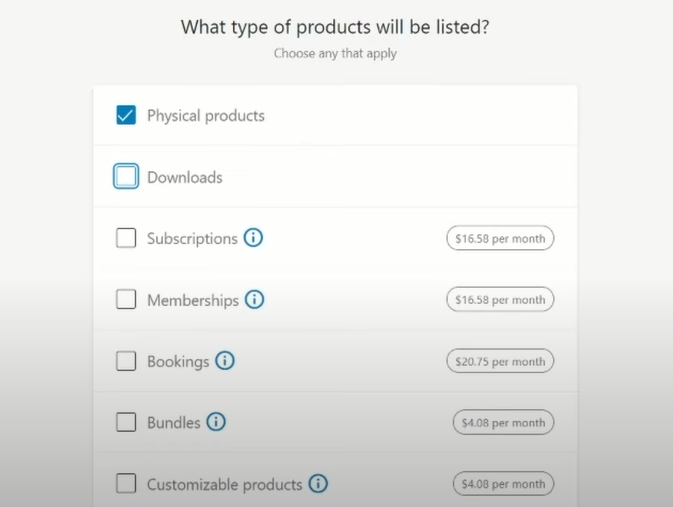
Moving on, the wizard is going to ask about the kind of products you're planning to list. If your products are the type that requires shipping, you'll want to select 'physical products.'
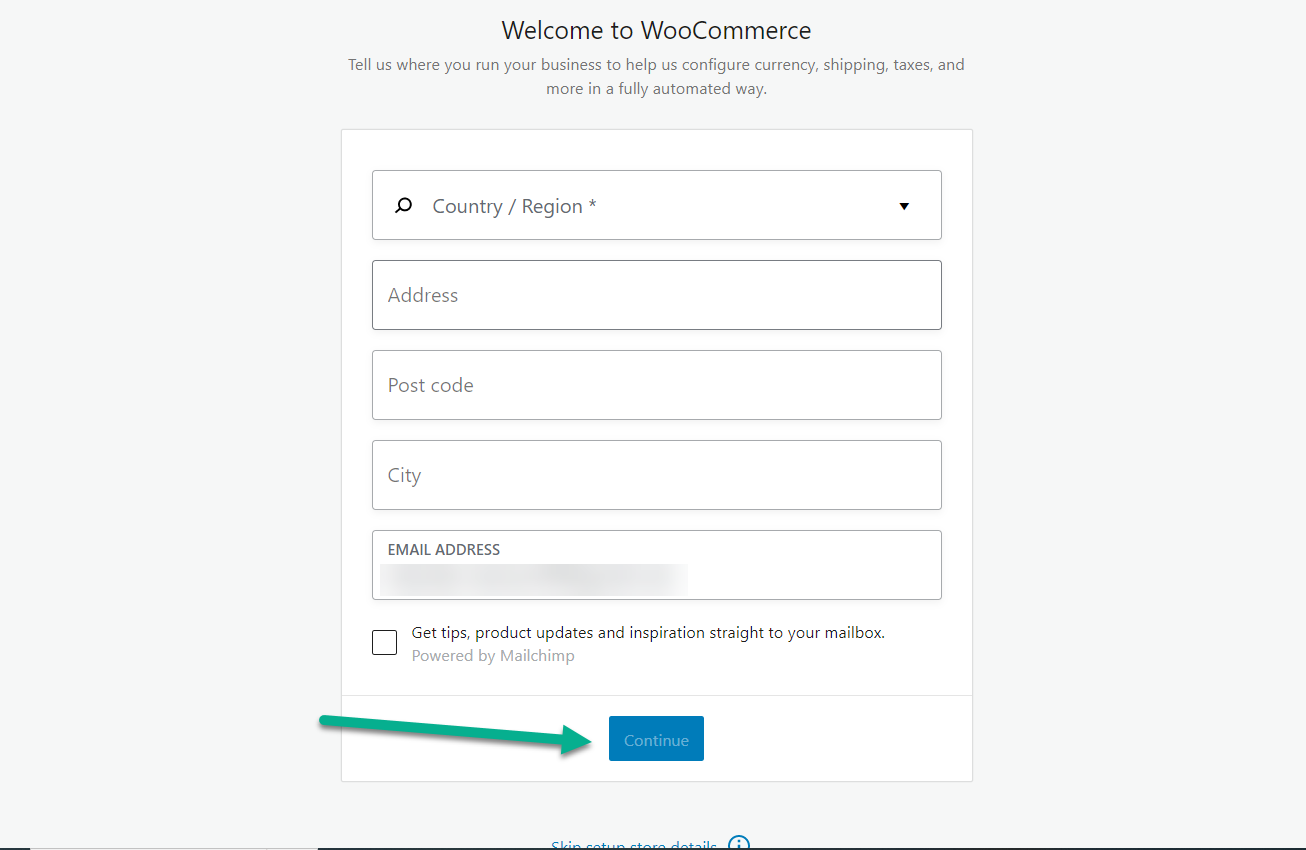
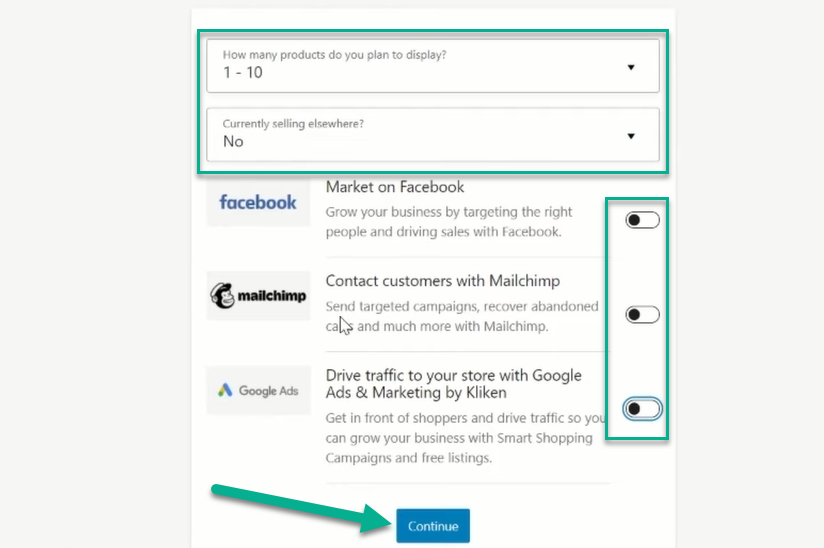
After you've handled that, you'll be prompted to fill in some specific details about your business.
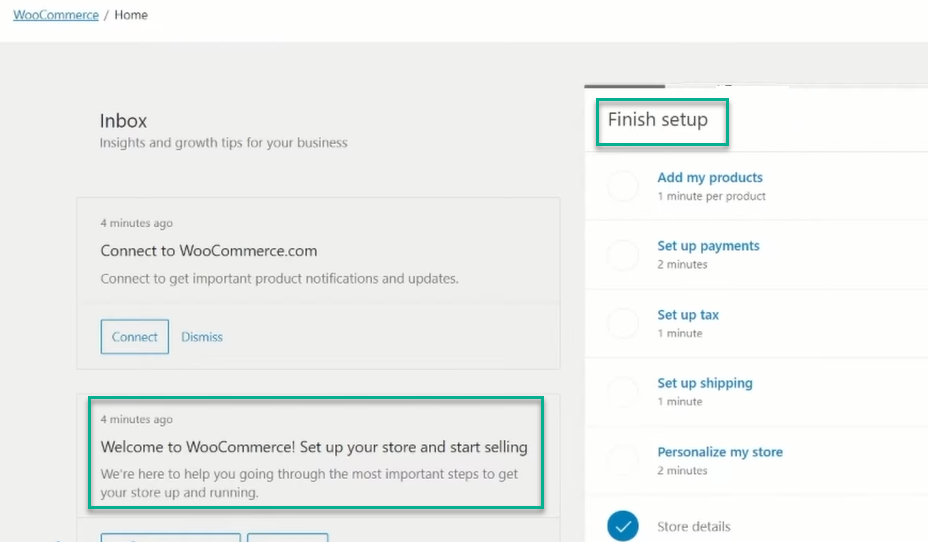
Once you've taken care of the business details, the next stop is the 'Free Features' tab. It's pretty self-explanatory; this is where you can explore and choose from a variety of complimentary features that could be beneficial for your business.
The Free Features Tab, available after activating the WooCommerce plugin, is a section where you can access and enable a variety of free enhancements to optimize your online store.
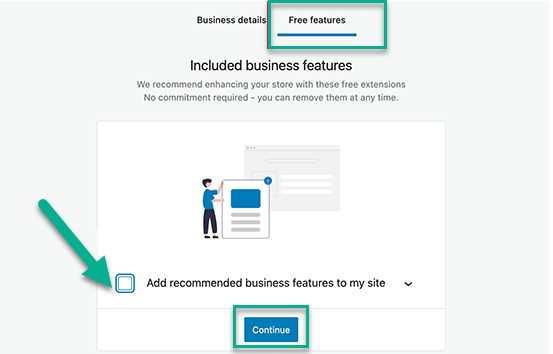
If you notice a checkbox that's already marked during this process, it might be worth unchecking it. Why, you ask? Well, if it's checked, it means that a bunch of additional plugins you may not need will also be installed. So, keep an eye out and make sure to uncheck this box if you want to avoid cluttering up your system.
Moving on, you'll be faced with a fun decision - selecting your theme or ‘Continue with my active theme.’ This is the visual style of your online store, so pick something that suits your business perfectly. Of course, if you're not quite ready for that, you can stick with your default theme.
Another great option to consider is exploring the free themes available. They're a cost-effective way to make your online store look fabulous. Remember, the theme is your digital storefront, so choose wisely.
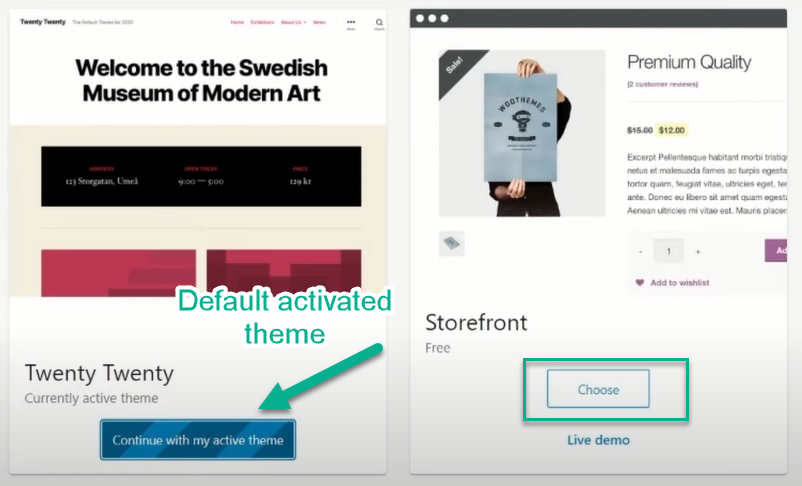
Once you've successfully activated the theme, congratulations, you've completed the WooCommerce plugin setup. Now comes the exciting part, your online store will sport a new professional look.
Step 4: Linking with a Payment Service
Linking a payment method to your online store is crucial. It facilitates a smooth transaction process, fostering trust in your customers. The convenience of a seamless, secure payment experience can enhance customer satisfaction, influencing repeat purchases and brand loyalty.
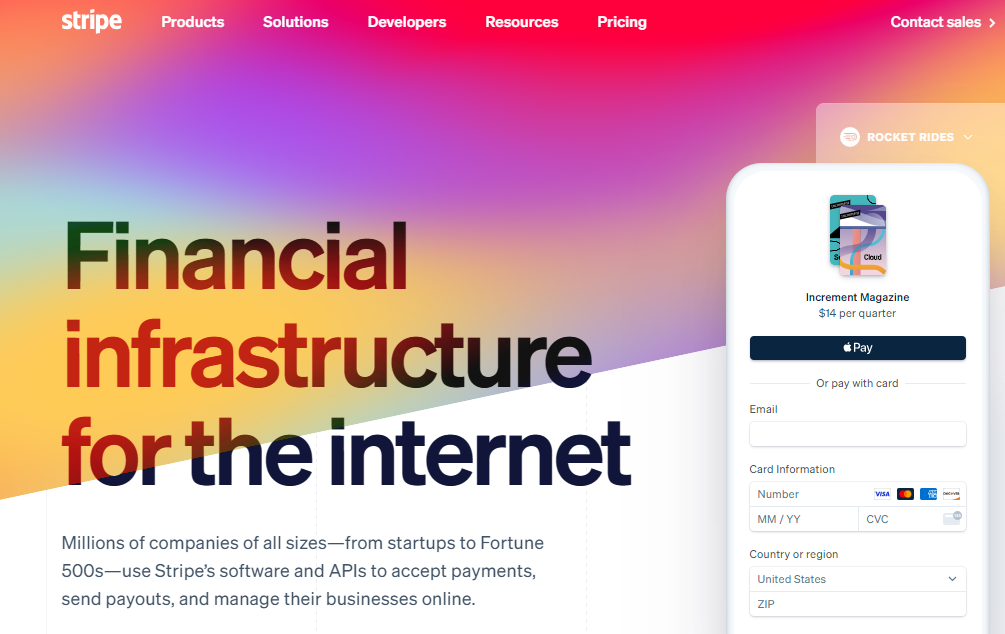
So, if you're looking to link payment methods to your online store, the first step is to create an account on Stripe. It's a popular choice, Stripe is a robust global platform that securely processes online payments. It's designed to simplify your e-commerce transactions, making accepting payments from your customers easier.
Once you've successfully logged into your Stripe account, you'll notice your profile icon tucked away in the top right corner of your screen.
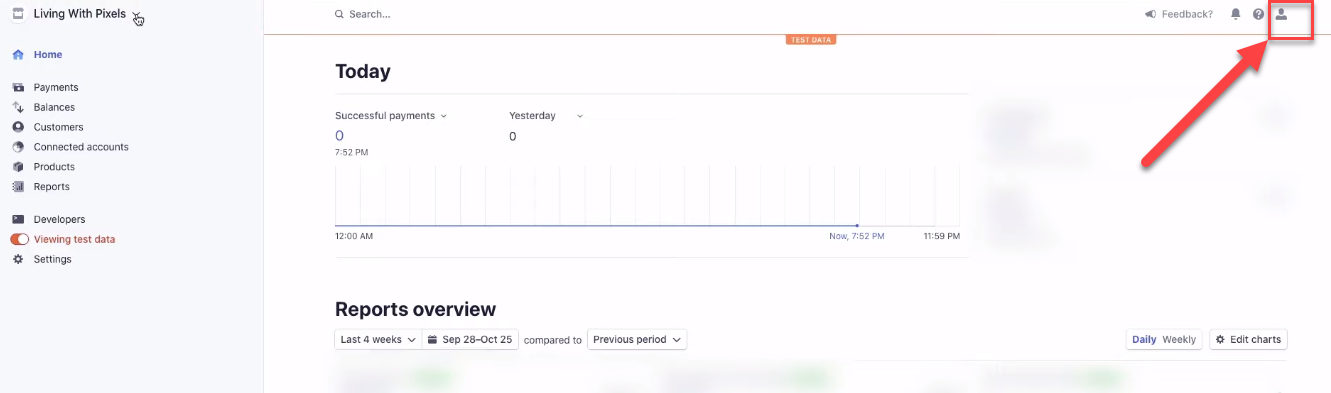
Let's move to the next step. On your dashboard, please locate "API Keys", it's towards the left bottom. Click on it. You'll find something called the "secret key" here.
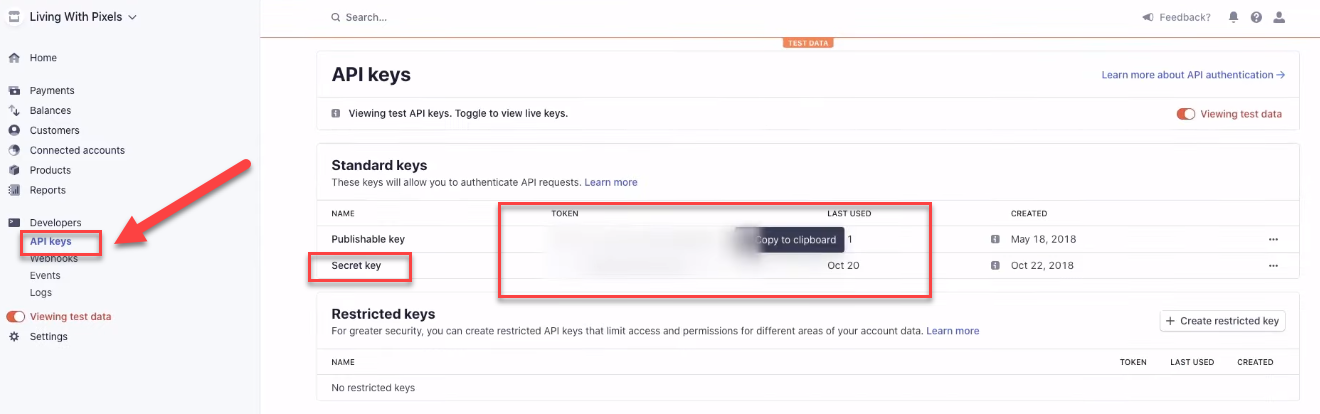
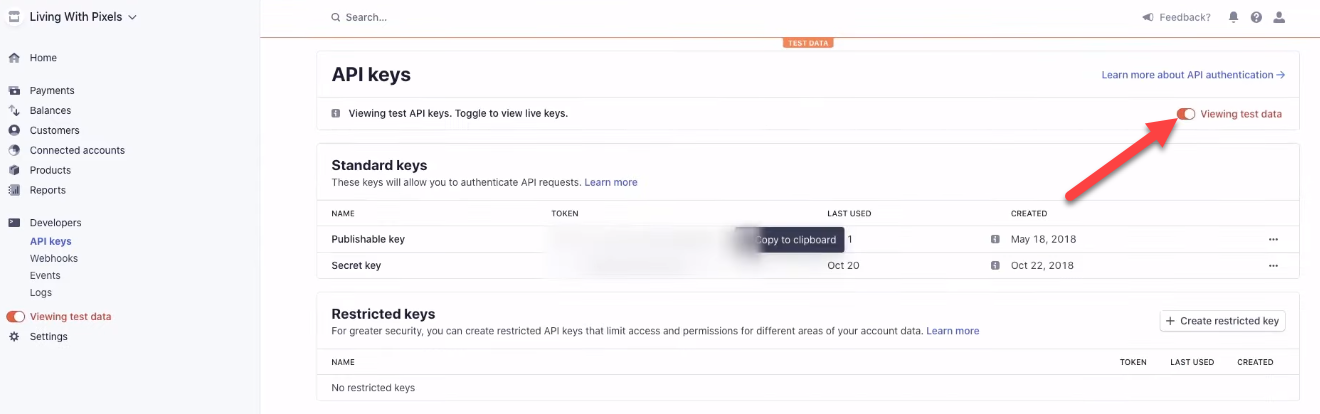
Sure, to retrieve the Stripe plugin's key, simply click 'Viewing Test Data'. This key is essential as it will be used in the subsequent step of the Stripe plugin setup.
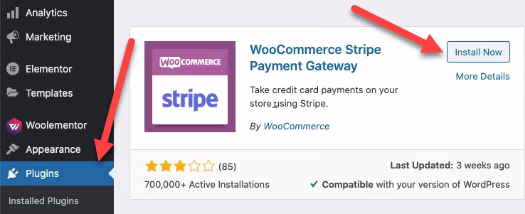
Now you need to install and then activate the ‘Woocommerce Stripe Payment Gateway’.
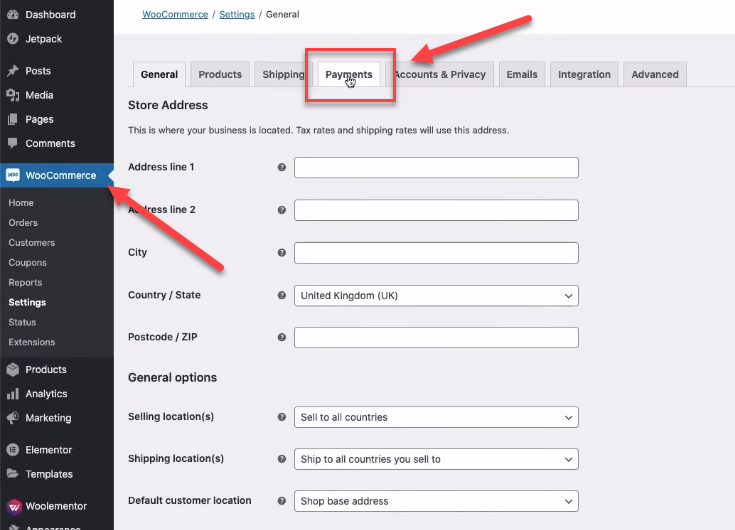
In your dashboard click on Plugin and then click on the ‘Setting’.
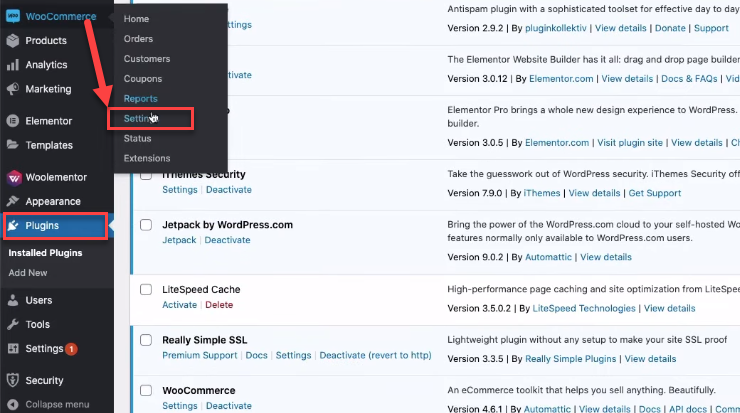
Now click on WooCommerce and then in the header click on the ‘Payments’.
There are a variety of payment methods you can integrate into your online store for the seamless purchase of goods. This makes payment easy for your users. One of the most popular methods is Cash on Delivery. To activate it, just click the button adjacent to the option.
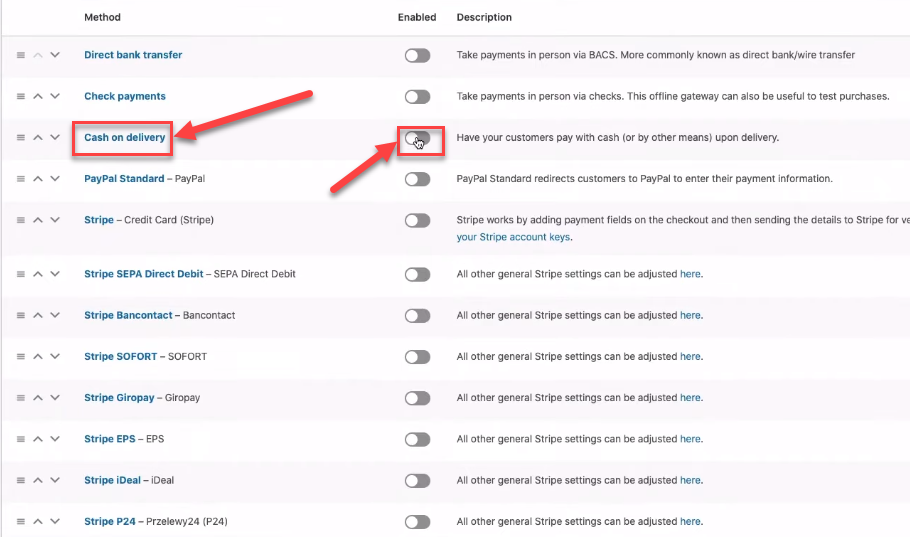
To verify if the addition has succeeded on your online store, you'll need to pop over to your store's website and refresh the page. When done, you should see changes reflecting the update. Also you can add PayPal Standard method of payment in the same way as cash on delivery.

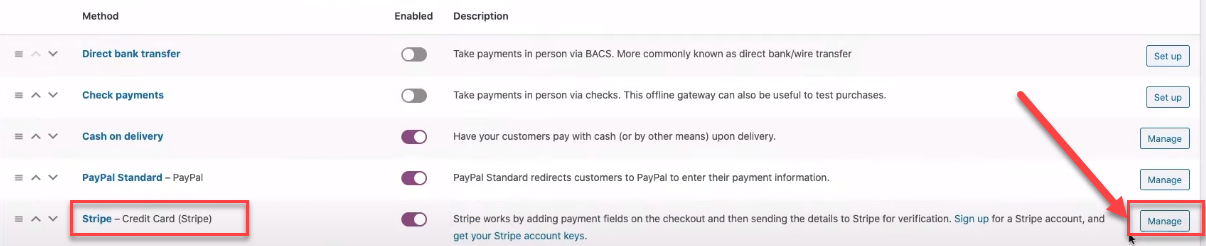
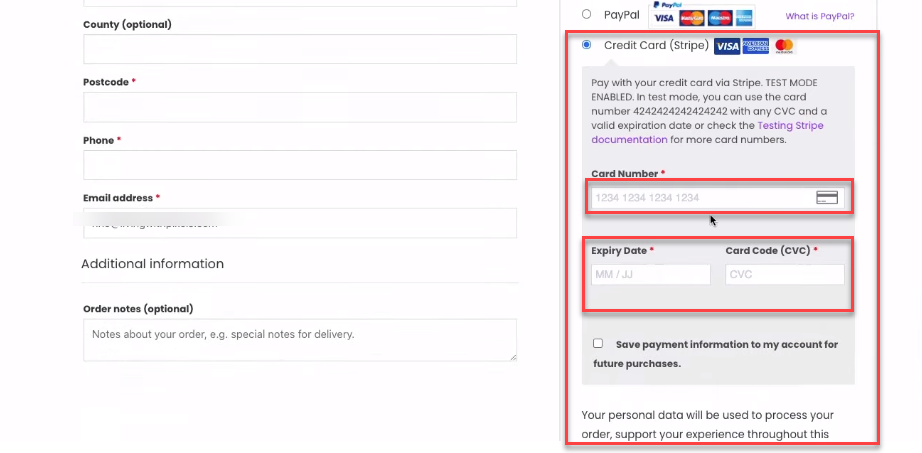
Let's add a credit card as your payment method. Simply look for 'Stripe - Credit Card (Stripe)' and hit the 'Manage' button next to it.
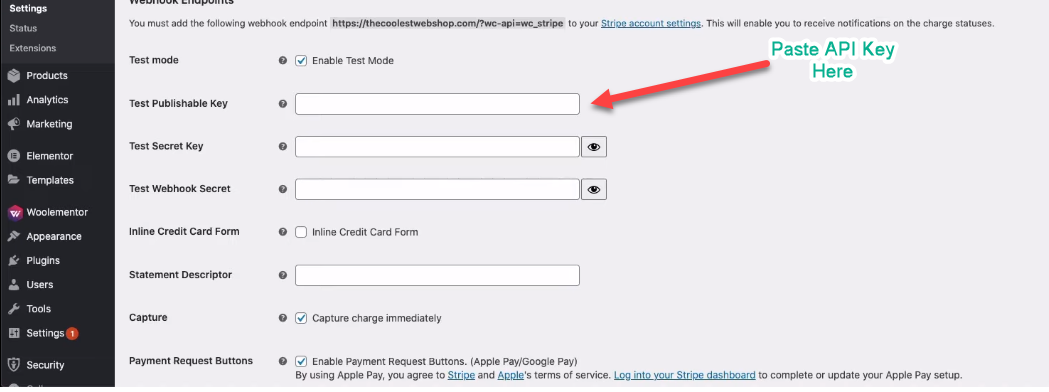
Next, let's get your Stripe API Key copied and pasted into the Stripe plugin on your WordPress dashboard. But before we do that, double-check if 'Enable the Test Mode' is activated. If it's not, please go ahead and click on it.
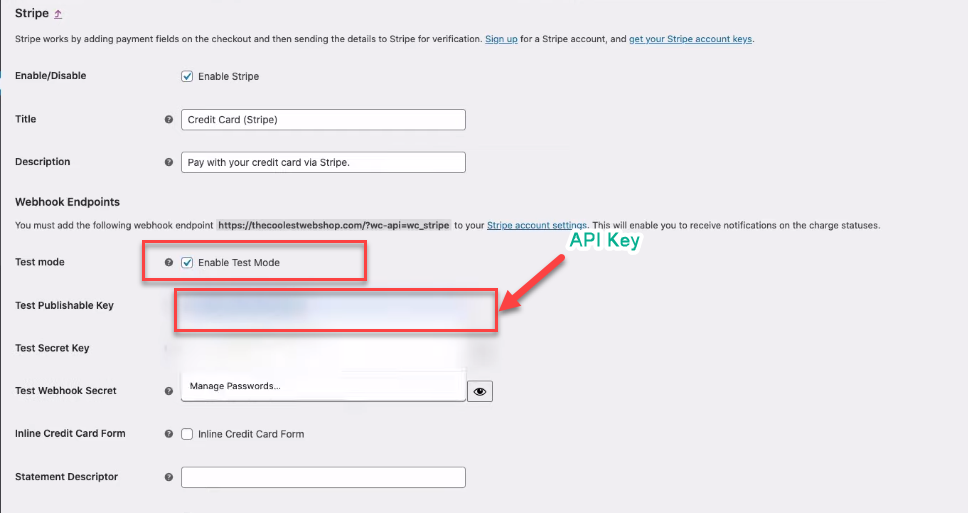
Now, let's go ahead and paste your API key right here. Once that's done, simply scroll down and give that 'Save Change' button a click.
Please check if the credit payment method has been added to our system? It's important to ensure our customers have this option for their transactions.
Step 5: Launching Your Promotional Strategies
Branding plays a pivotal role in the success of your online store. It's how your store is perceived, establishing a unique identity that differentiates it from competitors. It builds customer trust and loyalty, driving repeat business.
To turn your store into a brand, focus on consistency in visuals and messaging, ensuring they reflect your store's personality and values.
Provide exceptional customer service to create positive experiences and promote your brand's story to connect emotionally with customers. It's all about creating a memorable impression that resonates with your audience.
Indeed, a unique logo can significantly benefit your online store. It's essentially your brand's visual ambassador, instantly recognizable and memorable. A well-designed logo communicates your brand's personality and values at a glance.
Apple is a prime example. Its simple yet unique logo - the bitten apple - is recognized globally. This branding has played a significant role in its rise to one of the world's most successful tech companies.

To leverage this, ensure your logo is consistently used across all customer touchpoints - from your website to marketing materials. A recognizable logo can build trust and familiarity, eventually contributing to customer loyalty and your business success.
Using environment-friendly colors could resonate with eco-conscious customers, potentially contributing to your store's success. This could be viewed as a reflection of your brand's commitment to sustainability.
Implement this by choosing colors associated with nature, like green or brown, for your site design. But ensure these colors align with your overall brand identity. Remember, consistency is key in branding, and every element, including color, should reflect your brand values.
Step 6: Starting the Process of Wordpress Optimization
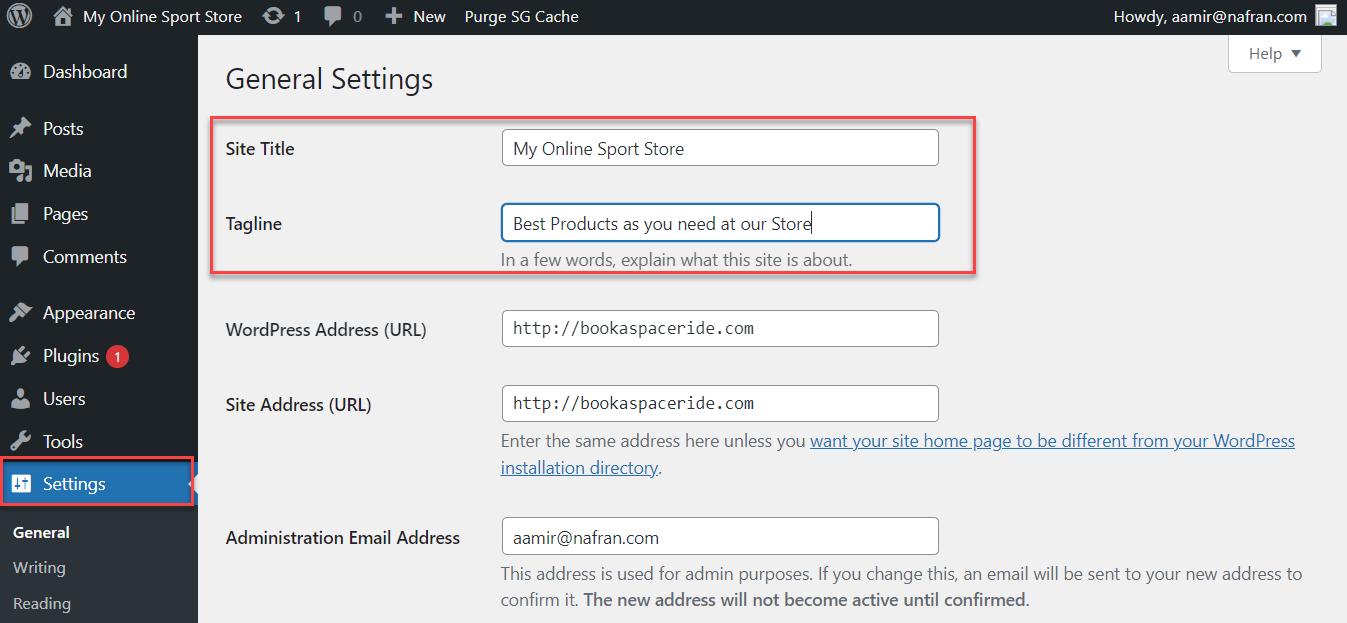
The first step to enhancing your online store's branding is optimizing your title and tagline. By conducting a thorough competitor analysis, you can craft a distinctive, effective title and tagline that reflect your brand's unique value.
Here's how you do it:
Log into your WordPress site via 'Wp-login.' Once in your dashboard, navigate to 'Settings' then click 'General.' Here, you can modify your title and tagline to align with your brand identity. Remember, an effective title and tagline can make a big difference in branding.
An SSL (Secure Sockets Layer) certificate is a type of digital certificate that provides authentication for a website and enables an encrypted connection.
It's crucial for securing data transfer, logins, and credit card transactions, hence enhancing website security and user trust.
While some providers offer free SSL certificates, such as Let's Encrypt, others charge a fee for premium certificates that come with added features and warranties.
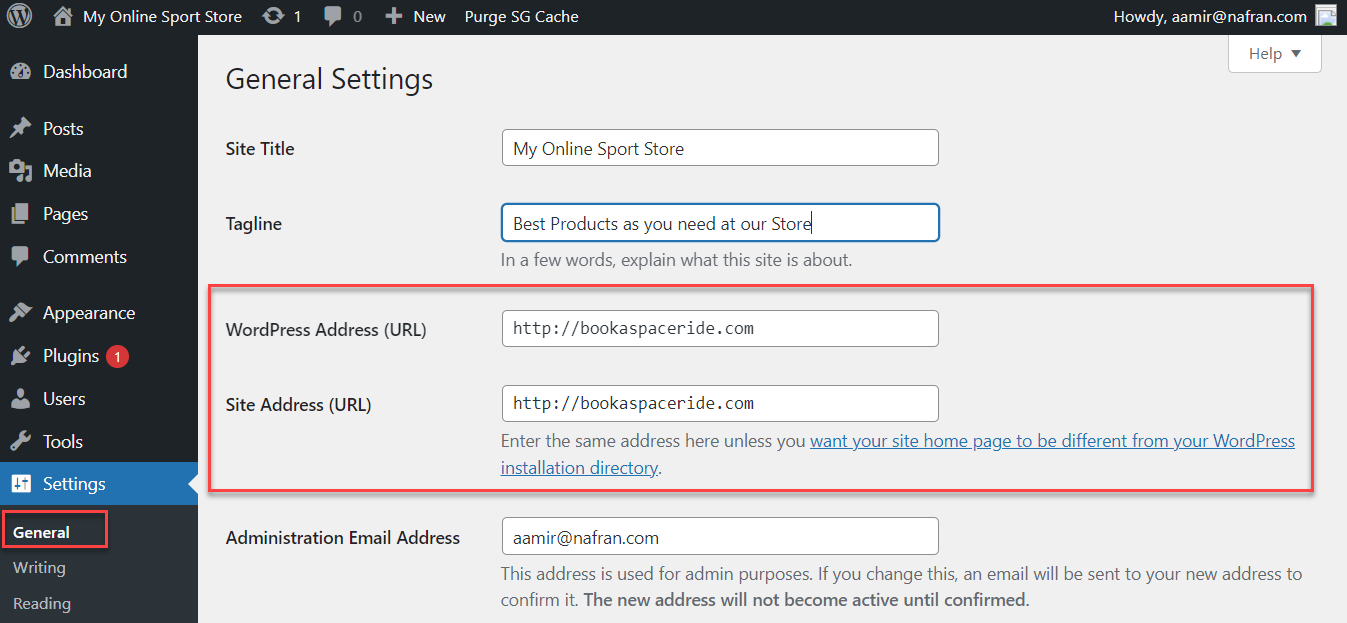
To configure WordPress for HTTPS (which uses SSL), follow these steps:
- Purchase and install an SSL certificate from a reliable certificate authority.
- Log into your WordPress admin panel.
- Go to "Settings" and select "General."
- Change both the WordPress Address (URL) and Site Address (URL) from 'http://' to 'https://.'
- Save changes.
Remember, an SSL certificate is not just about security but also impacts SEO rankings, as Google gives preference to HTTPS-enabled websites.
Step 7: Adding Items to Your Virtual Store
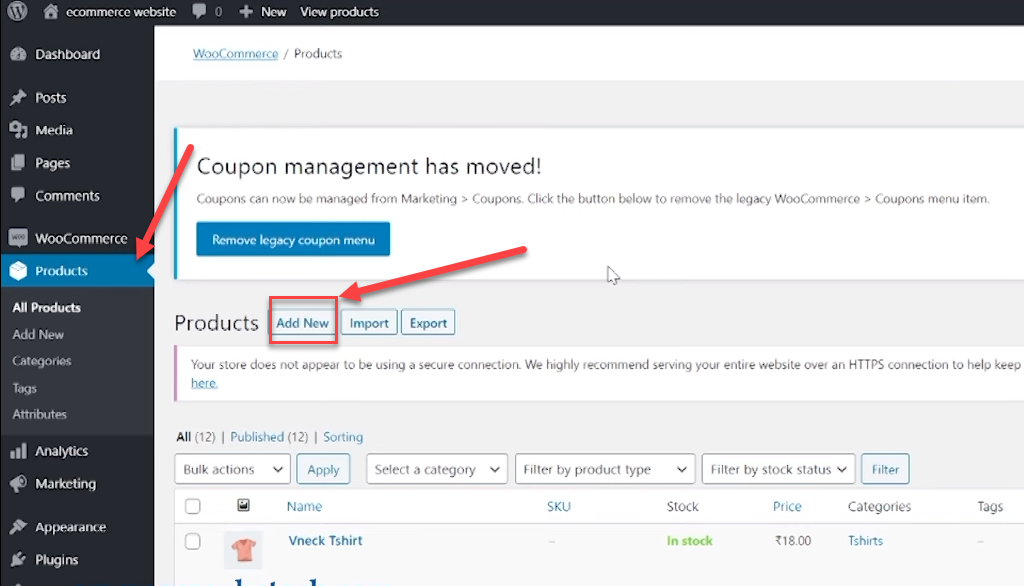
Next up, let's add a new product to your store. Simply head over to your WordPress Dashboard and look for the 'Products' tab. Click on it, and then select 'Add New.' You're now ready to introduce your latest offering to your customers.
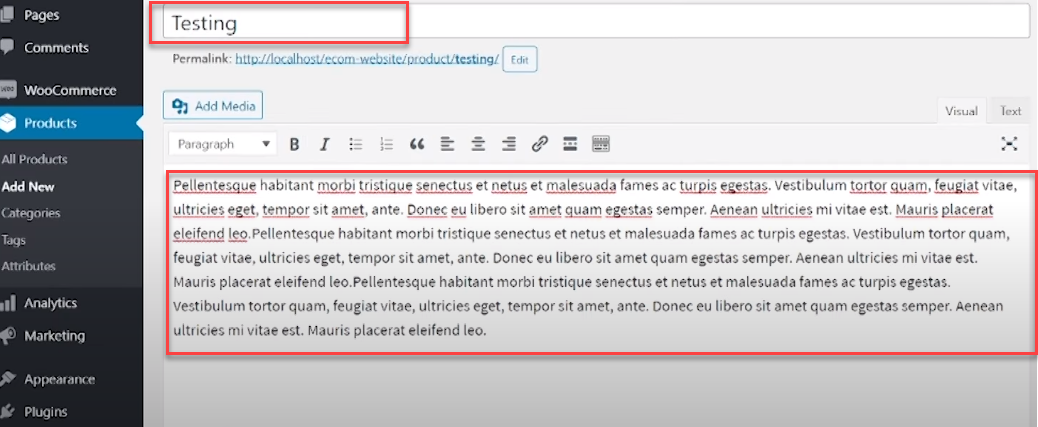
First off, it's crucial to ensure the name of your product is optimized. This aids in enhancing visibility and appeal. After you've nailed the product name, it's time to craft a comprehensive product description.
The goal here isn't just to describe the product but to convince potential customers of its value. Remember, a compelling product description can greatly influence purchase decisions.
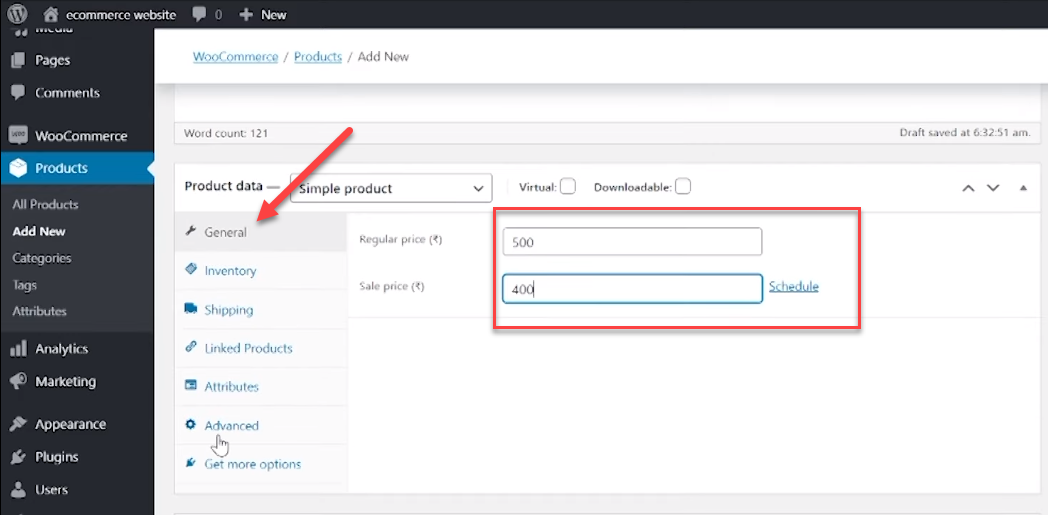
On this platform, you have the ability to set two price points for your products. The 'Regular Price' option refers to the original, undiscounted price of your item. Then, we have the 'Sale Price,' which is the discounted rate you're offering to customers. This dual pricing setup allows you to showcase your deals clearly and effectively.
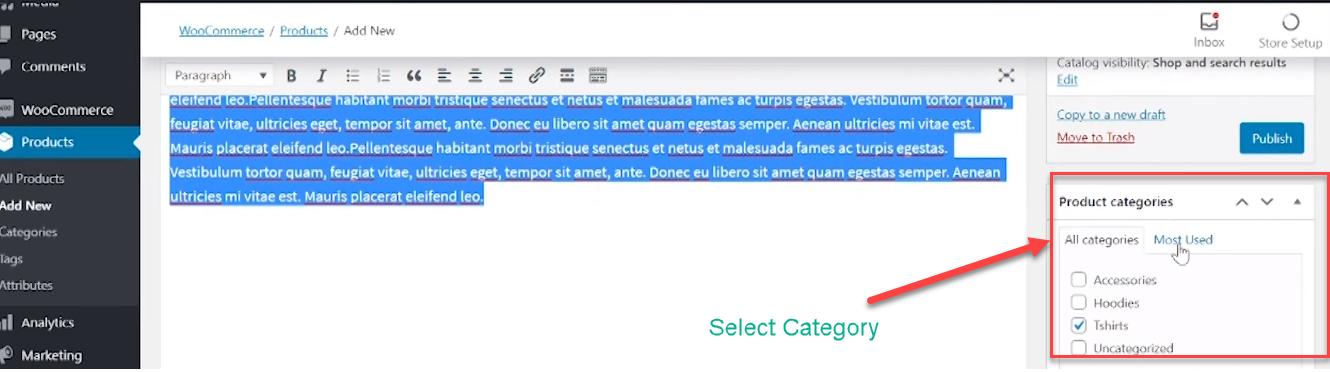
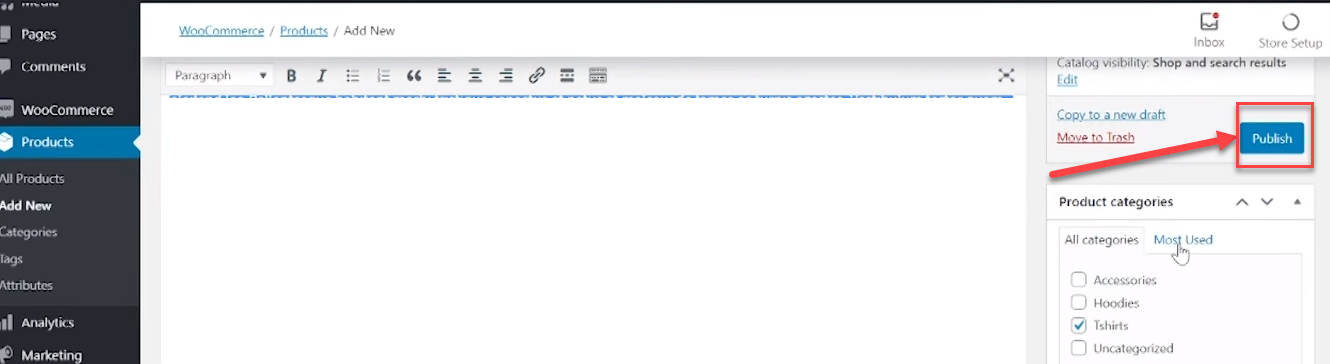
As you scroll down the page, you'll spot the categories section on the right-bottom side of your screen. This is where you can classify your product based on its type. For instance, I've chosen 'T-shirt' for our product category. Remember, correctly categorizing your product can enhance the browsing experience for your customers.
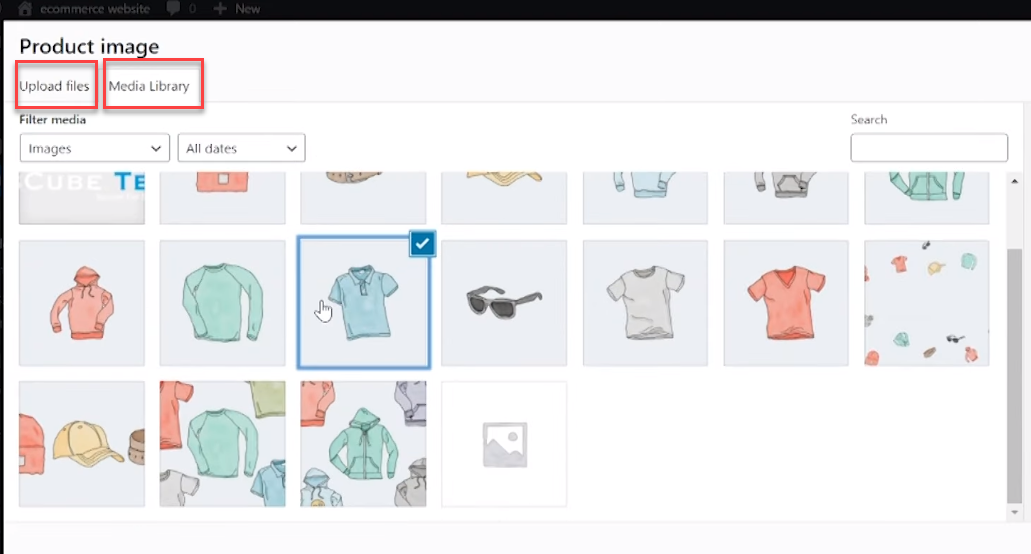
To showcase your products effectively on your online platform, it's essential to use high-quality images.
Here's how you can add them: Click on the 'Add Media' button, from where you can choose images directly from your gallery or use previously uploaded ones.
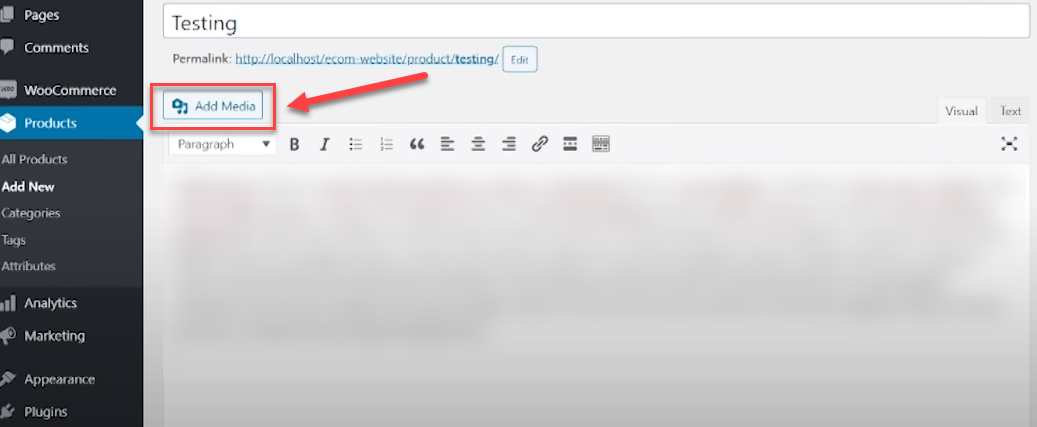
Adding the right visuals can make a substantial difference in presenting your products to customers.
Alright, you're almost there. All you need to do now is to click 'Publish,' which you'll find at the top right corner of your screen. Go ahead and give it a click to make your changes live.
Step 8: Choosing and Personalizing Your Website Theme
WordPress themes control the visual layout and design of your website. They define how your site looks and functions, from the color scheme and typography to the layout of different pages. They're the foundation for creating a consistent look and feel for your brand online.
Indeed, while thousands of WordPress themes are at your disposal, not all are suitable for an eCommerce store. Your choice of theme significantly impacts your online shop's functionality and user experience.
Thus, selecting a theme specifically designed for eCommerce is essential, offering features like shopping carts, product galleries, and secure payment options.
A well-chosen theme can enhance your store's aesthetic appeal and performance, fostering customer satisfaction and boosting sales.
Should you need assistance in choosing a theme, consider referring to our guide, "49 Amazingly Free Blog Themes to Elevate Your Content in 2023". This resource can be incredibly helpful in guiding your selection process.
Step 9: Expanding Your Ecommerce Site Using Plugins
Plugins can significantly enhance your online store's capabilities, extending its functionalities beyond just selling products. They can help with everything from SEO optimization to improving site speed, managing inventory, and even facilitating better customer service.
Here are a few plugins that could be beneficial for your online store's success:
- WooCommerce: This is arguably the most popular eCommerce plugin for WordPress. It turns your website into a fully functional eCommerce store, complete with inventory management, a variety of payment options, and shipping settings.
- Yoast SEO: This plugin helps optimize your store for search engines, potentially driving more organic traffic to your site. It allows you to add meta tags, generate sitemaps, and provides real-time content analysis to improve your SEO.
- Jetpack: Jetpack offers a suite of tools to secure your website, optimize your images (for site speed), and connect your store to social media platforms.

- Akismet: This plugin helps in combating comment spam, which is crucial for maintaining the credibility of your website and saving your time in moderating comments.
- WP Rocket: This is a caching plugin that can improve your website's load times, enhancing the user experience and potentially improving your ranking on search engines.
Wrapping Up
The creation of a prosperous online store is a comprehensive undertaking, requiring thoughtful strategy and careful execution.
From selecting a suitable platform like Shopify or WooCommerce, to pinpointing a specific target market, each decision shapes your business operations and its potential for success.
The implementation of robust payment methods like Stripe, along with diverse options such as Cash on Delivery and PayPal, provide a secure and user-friendly experience, bolstering trust among customers.
Promoting a strong brand identity is another critical aspect of this process, encompassing visual consistency, compelling messaging, exceptional customer service, and a distinctive logo.
All these components should embody the values and preferences of your audience, such as sustainability, which can significantly enhance your brand's appeal.
Moreover, optimizing your WordPress site through strategic SEO tactics, including distinctive title and tagline, SSL certification, and carefully curated product details, bolsters your site's credibility and visibility.
The selection of an eCommerce-specific WordPress theme plays a pivotal role in enhancing your store's aesthetic and functionality, while plugins like WooCommerce, Yoast SEO, Jetpack, Akismet, and WP Rocket extend its capabilities and improve the user experience.
To sum up, the journey to a successful eCommerce store demands strategic decisions, careful planning, and diligent execution. It might be challenging, but with the correct tools and a clear vision, your online store can flourish in the competitive digital marketplace.


.png)
