


Have you ever wondered how to unpublish a WordPress page when you need to make changes or restrict access? This question becomes particularly relevant when you install a new WordPress theme on your website.
Often, this installation brings along several pages that may not align with your site's purpose or design. To maintain a clean, user-friendly website, it's essential to know how to unpublish these unnecessary pages.
In this guide, you will learn 5 ways to unpublish WordPress pages or posts
- Making a WordPress page password protected
- Unpublishing a single WordPress page
- Drafting multiple WordPress pages
- Making WordPress page member only
- When to unpublish a WordPress page
We'll take you through the surprisingly easy steps to make your WordPress pages private, whether you're fine-tuning your content, managing a private blog, or handling an internal network.
Let's dive into the various methods to keep your WordPress content just where you want it - visible to the right eyes at the right time."
Method 1. Making a WordPress Page Password Protected
Are you seeking to maintain the confidentiality of your WordPress content? Whether it's sensitive information on a page or a private post, WordPress offers a built-in feature to secure your content with passwords.
In this guide, we will walk you through two straightforward methods to password-protect your WordPress pages or posts.
Step 1. Built-in WordPress Feature
WordPress includes an easy-to-use password protection function that allows you to secure individual pages and posts.
When this feature is activated, visitors are prompted to enter a password to access the content.
While the page or post title, category, and publisher may still be visible depending on your theme settings, the main content will be locked behind the password you set.
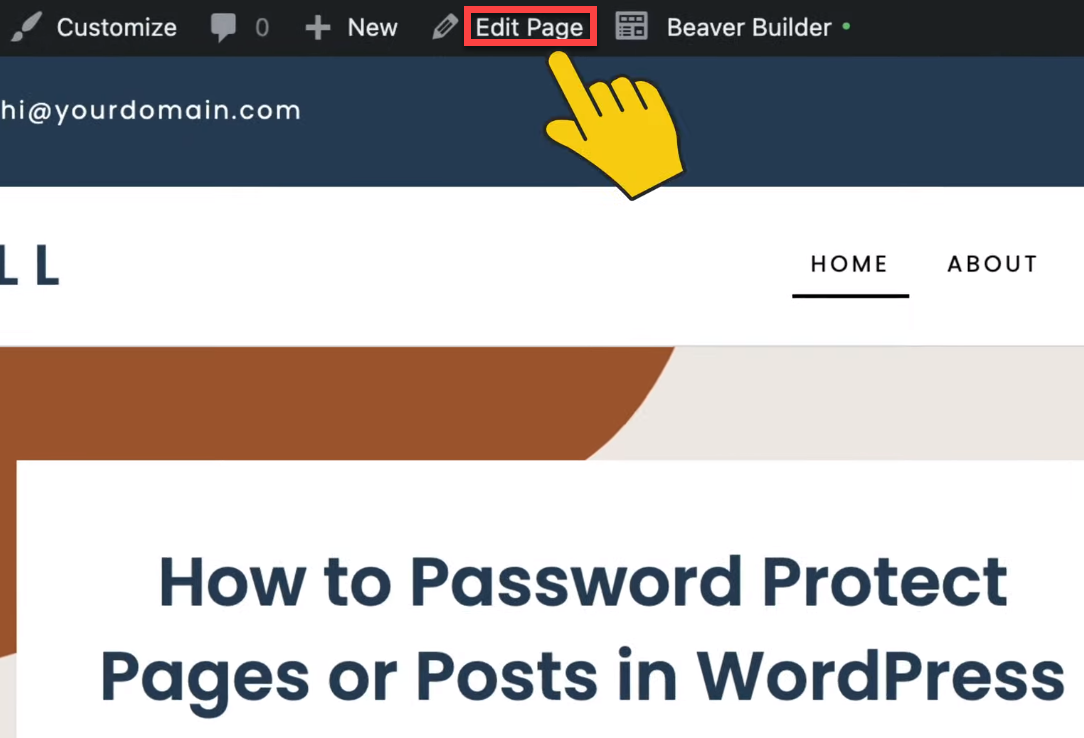
Step 2. Accessing the Editor
Navigate to the page or post you want to protect. Click on 'Edit Page' or 'Edit Post' from your WordPress dashboard or from the top navigation bar on the front end.
Step 3. Adjusting Visibility Settings
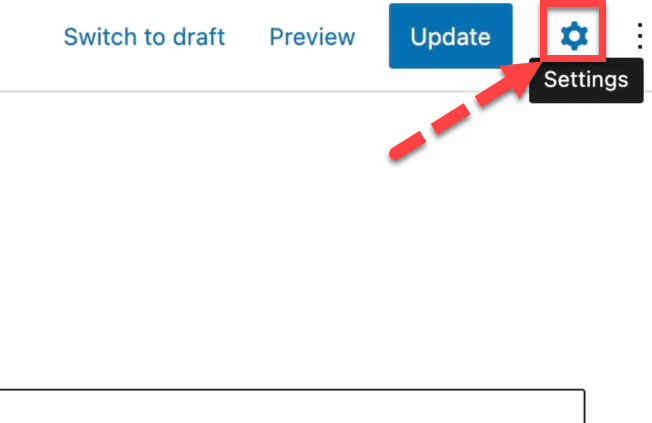
In the editor, look to the right-hand sidebar for 'Status and Visibility.' Click to expand this section.
If you don't see these options, make sure the settings panel is open and the 'Page' or 'Post' settings are selected by clicking on the gear icon.

Move your cursor now to the upper right corner of the screen and click on the setting icon.
When you click on the setting icon you will find a pop up that will open below the icon. Now you need to click on the Page and then click on the Status & Visibility.

Now the thing that you need to do is click on the Public option as in the WordPress public had been set by default.

Step 4. Setting a Password
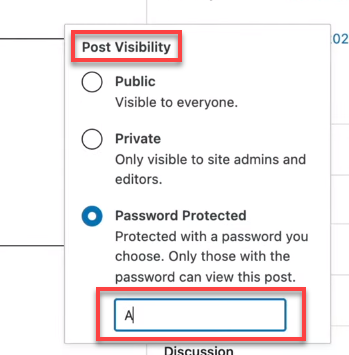
In the 'Visibility' section, you'll see the current setting is 'Public.' Click on this to change it. You'll be presented with three options:
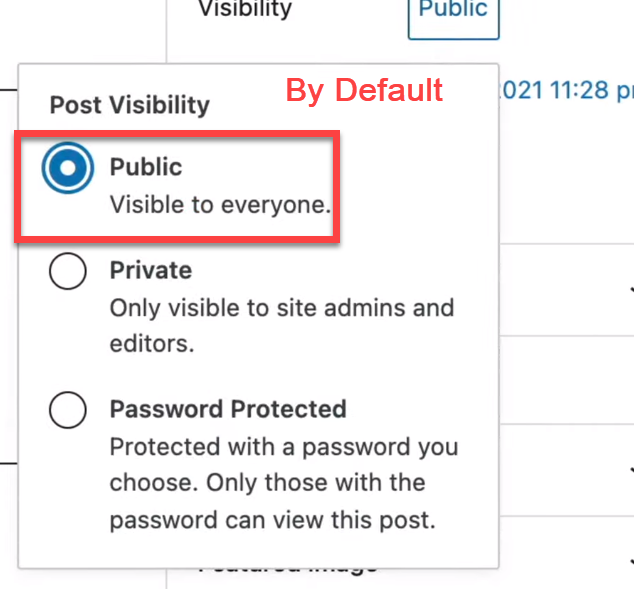
'Public,' 'Private,' and 'Password Protected.' Select 'Password Protected' and enter a secure password of your choice.

When you click on the Password Protected option you will see a text box will open where you can add your desired password. People should enter that password to access the content.

Step 5. Saving Changes
Once you've entered a password, click 'Update' or 'Publish' to save your changes.

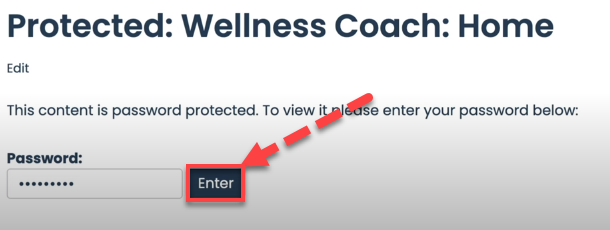
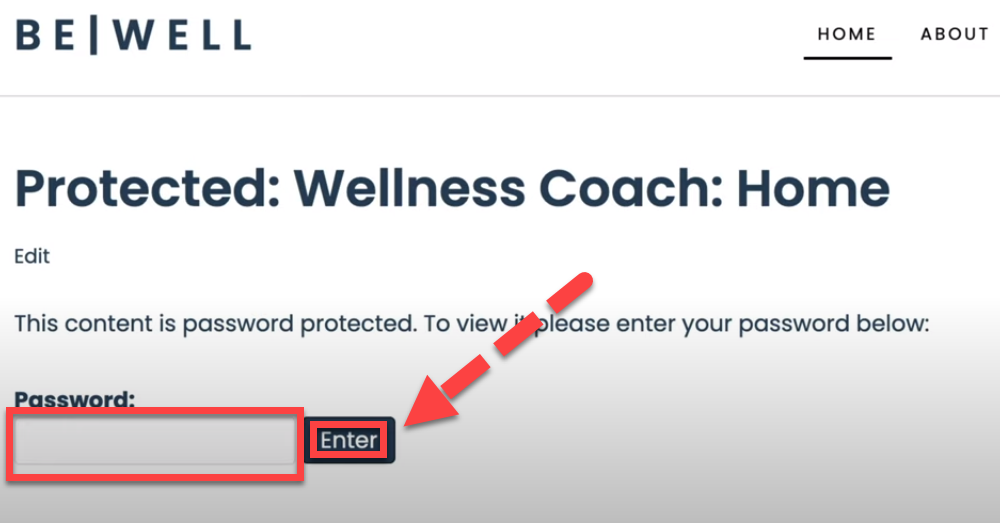
Step 6. Testing
View the page or post from the front end. Upon entering the password, you will be able to access the content.
Method 2. Unpublishing a Single WordPress Page
Learn how to quickly unpublish WordPress pages for editing or privacy reasons or to restrict access to certain user groups. Using this guide, you can either unpublish your pages.
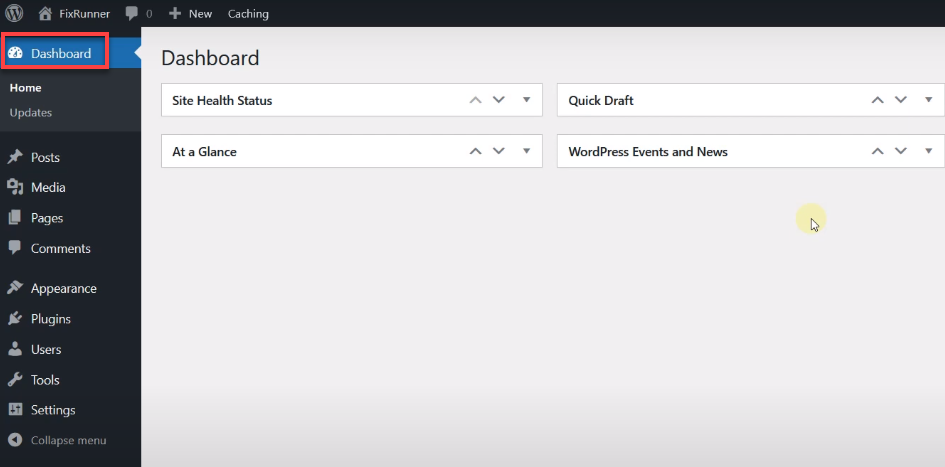
Step 1. Go to the Dashboard
To begin, you must log in to your WordPress dashboard, the backend interface where you can adjust settings to affect what is displayed on the front end of your website.
Step 2. Click on “Pages”
Now navigate this dashboard for the Pages option and then click on Pages and then All Pages option.
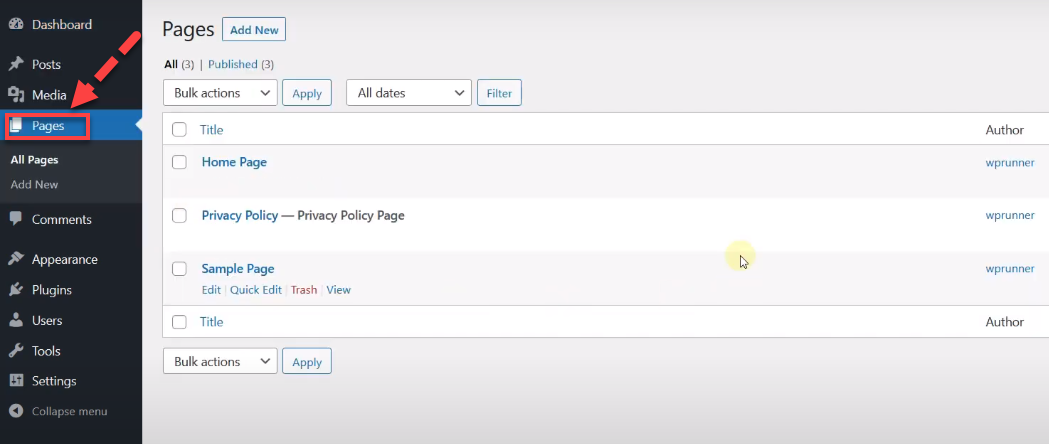
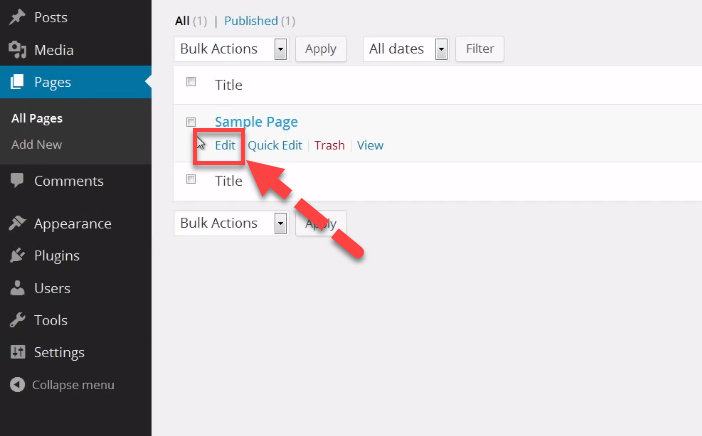
Step 3. Select the Page
Decide which page you want to modify and which content you intend to remove from the site. Underneath the title, you will find four choices; select the 'Edit' option to proceed.

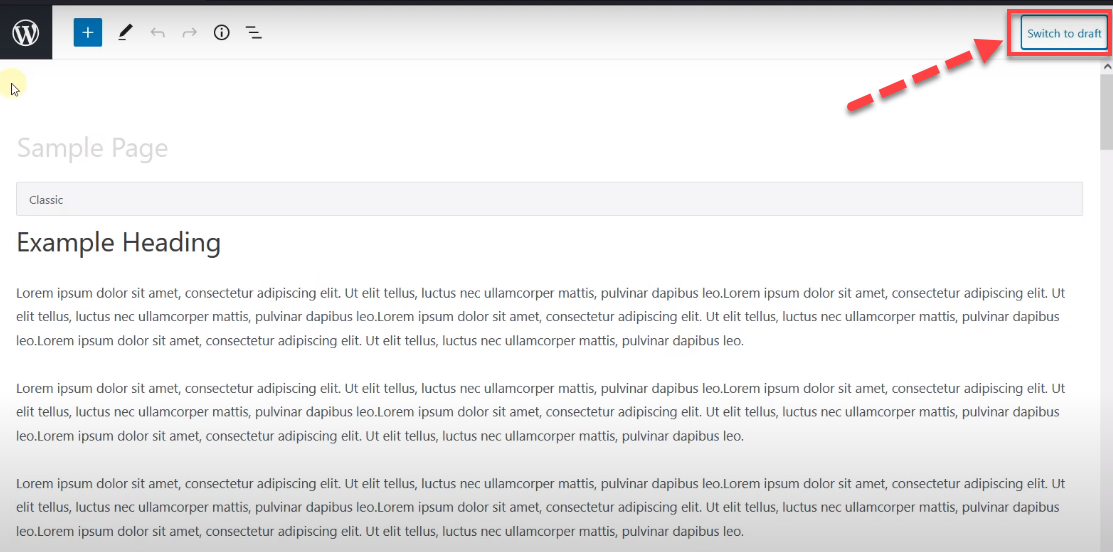
Step 4. Click on “Switch to Draft”
The 'Switch to Draft' feature is used when you have a published page or post that you no longer wish to display on your website.
Upon clicking 'Edit,' this option can typically be found in the top right corner of the screen. Simply click on 'Switch to Draft' to proceed.
Method 3. Unpublishing Multiple WordPress Pages
Often, when you select and install a theme that seems perfect for your website, you'll encounter the need to unpublish numerous redundant pages or posts.
For your convenience, we've put together a detailed guide below on how to efficiently unpublish multiple pages at once, streamlining your website management process.
Learn More:
How to Unpublish a Wix Site (Visual Step by Step Guide)
Step 1. Select All the Page You Want to Unpublish
Upon selecting 'All Pages' or 'All Posts' from the dashboard, you'll have the option to choose the pages or posts you wish to unpublish.
Just click on the checkbox beside the WordPress Page to make your selection. Note that this process does not require any additional plugins like accordion or artist plugins.
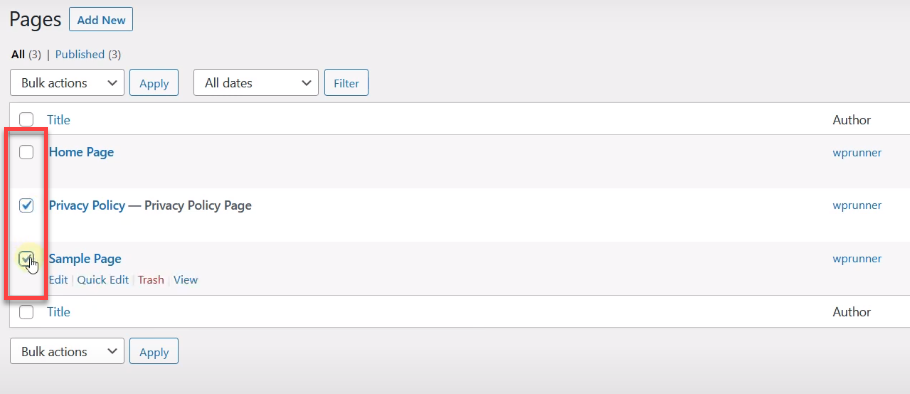
Under the main 'Pages' heading, you'll find an action box, typically set to 'Bulk Actions' by default. Clicking on the dropdown arrow will reveal a menu with options such as 'Move to Trash' and 'Edit.'
Step 2. Click on the Actions Pop up and the Select “Edit”
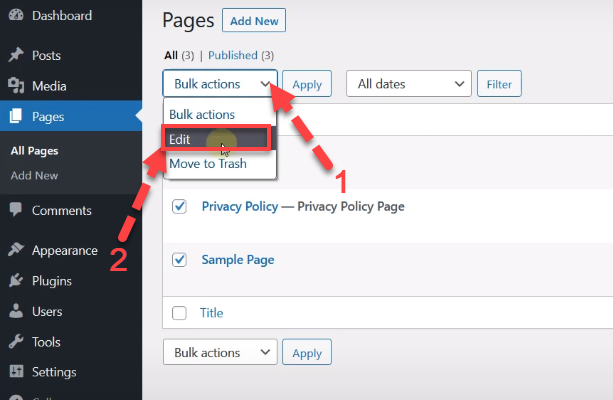
Click on the “Apply” Button adjacent to the Edit box.

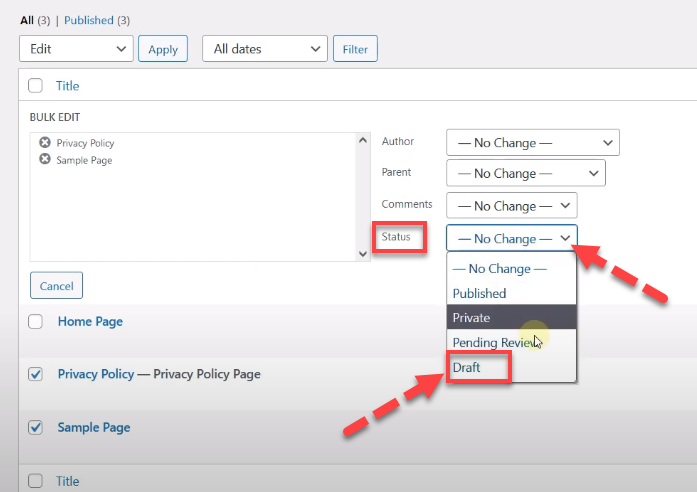
Step 3. Change the Status of the Selected Pages to “Draft”
After clicking the 'Apply' button, a new settings page will appear on your screen. Here, you can configure settings for Author, Parent, and Comments. Additionally, you have the option to adjust the Status setting.
By default, it is set to 'No Change'. To unpublish the selected pages, click on the dropdown menu and select the 'Draft' option.
This action will save all chosen pages as drafts, which you can use in the future.
If you decide not to use these pages later, you can permanently remove them by selecting the 'Move to Trash' option.
Method 4: How to Make WordPress Page Members Only
If you want to limit access to certain pages on your WordPress site, using a password protection plugin is an easy option. Plugins like WordPress Access Control make it simple to set a password for visitors to enter before viewing your private page.
Simply install and activate the plugin, then head to the page you wish to password protect. Scroll down to find the plugin settings where you can create your customized password. Make sure to save your changes.
When anyone tries to access this page, they will be prompted to enter the password before proceeding. You have complete control to remove the password requirement at any time.
The benefit of using a password protection plugin over deleting, archiving or making the page private is that you can share the password directly with those you want to grant access to. This allows the page to stay published and accessible with one extra authorization step.
You can set varying password levels if you have multiple pages or content you want to tier access to. And some advanced plugins will even allow you to set user-specific passwords for even greater control.
With the flexibility of password plugins, unpublishing important WordPress pages doesn't have to be all or nothing. Restrict what needs to be restricted while keeping other content public.
Step 1: Install and Activate WordPress Access Control Plugin
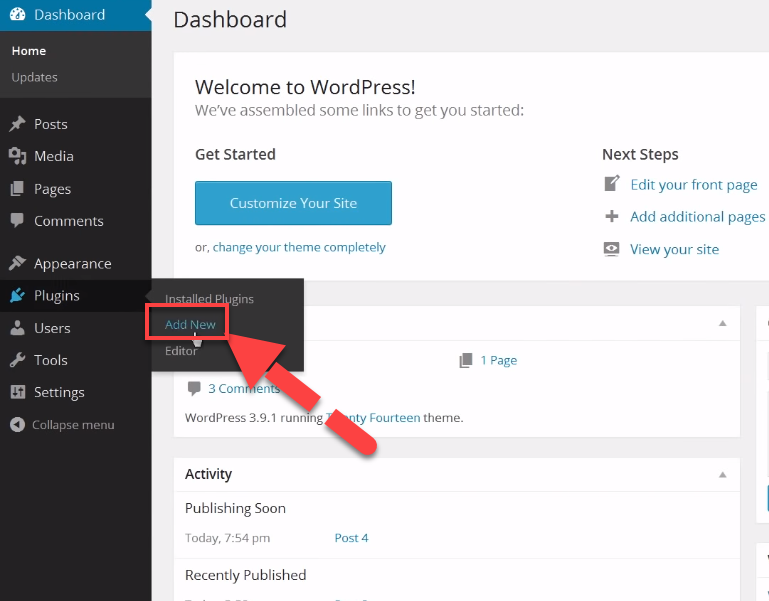
To begin this process, the initial step involves adding a plugin. To accomplish this, navigate to the dashboard and click on 'Plugins'. Then, from the dropdown menu, select 'Add New'.
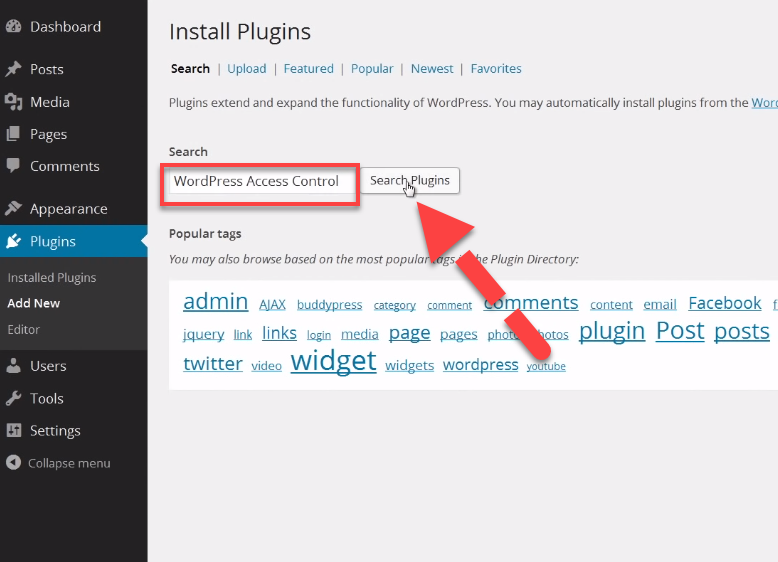
Now, type 'WordPress Access Control' into the search bar, and then click the 'Search' button located next to it.
Navigate to the 'Installed Plugins' section using the dropdown menu, then click on the 'Install Now' button to install the necessary plugin.
This will assist in setting up pages or posts for members only. Note that there is no requirement to use an accordion plugin for this purpose.

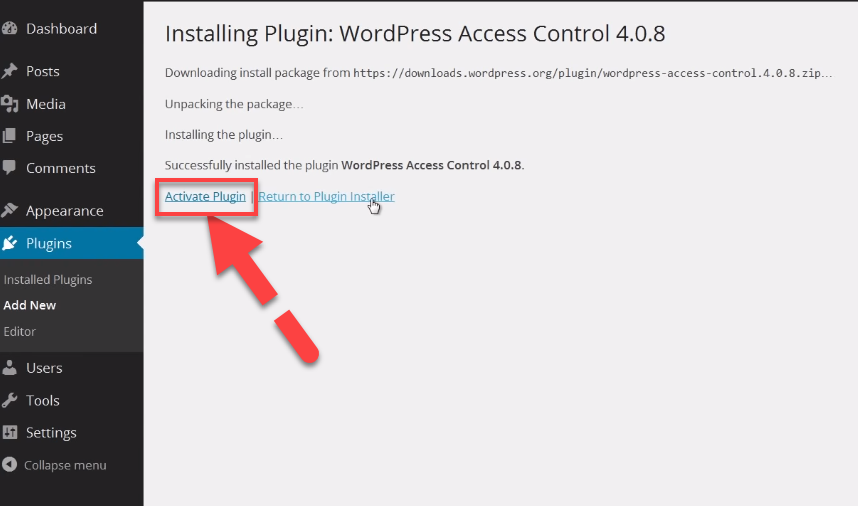
When you have installed it. Please click on the Active button as a next step.
Step 2: Do Settings for the Activated Plugin
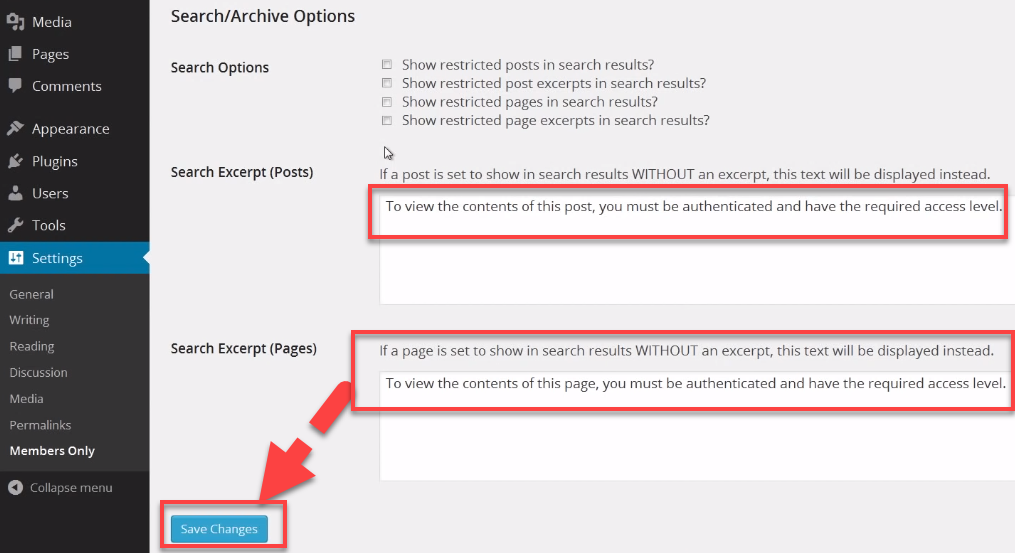
After installing the WordPress Access Control plugin, you'll need to configure some settings. To do this, go to the Dashboard, select 'Settings', and then choose the 'Member Only' option from the dropdown menu.

Now, activate this plugin for use on your blog and posts. Ensure that the 'Make Blog Members Only' box is checked. Then, scroll down to find and review the 'Always Accessible By' option.

Configure the settings according to your requirements for both 'Default Post' and 'Post Only Accessible By'. Similarly, adjust the settings for 'Default Pages' and 'Page Only Accessible By'.
Make sure to check and enable the boxes for the options you wish to activate. If they are not already enabled, do so.

After doing all the settings you need to click on the Save Changes button.
Step 3: Edit Page to Make It Member Access Only
Select 'Pages', and then click on the 'Edit' button for the page you wish to restrict to member-only access.
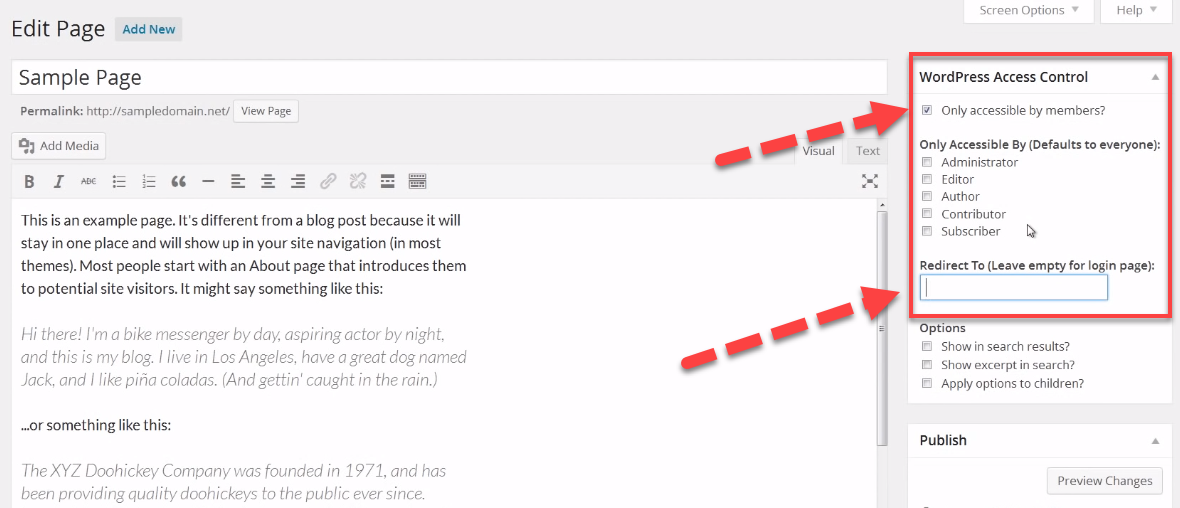
Look at the top right corner of the page, where you'll find the 'WordPress Access Control' section.
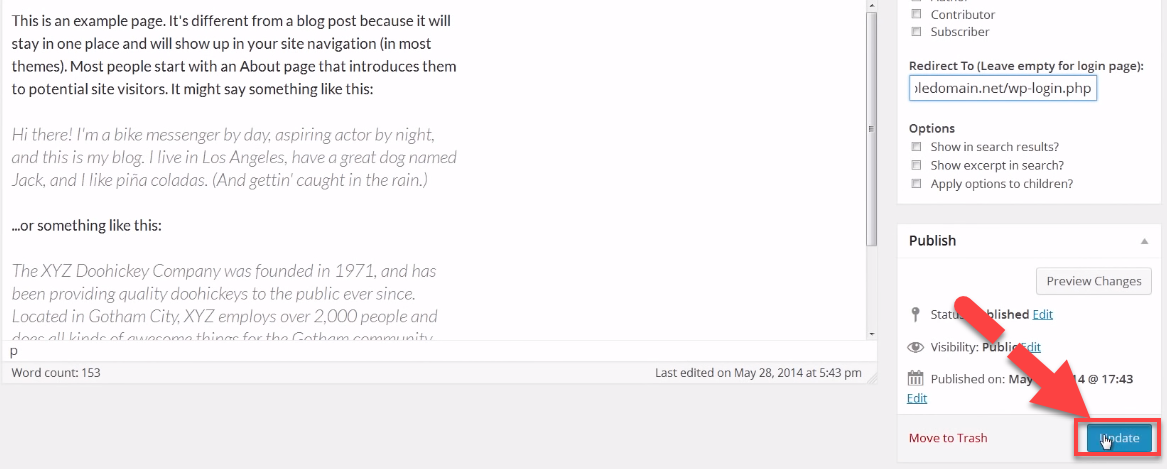
Under this, there's an option for 'Only Accessible by Members'; enable this checkbox. If you wish to redirect this page to the PHP admin page, enter the admin page URL in the redirect box. Finally, click the 'Update' button located at the bottom of the page
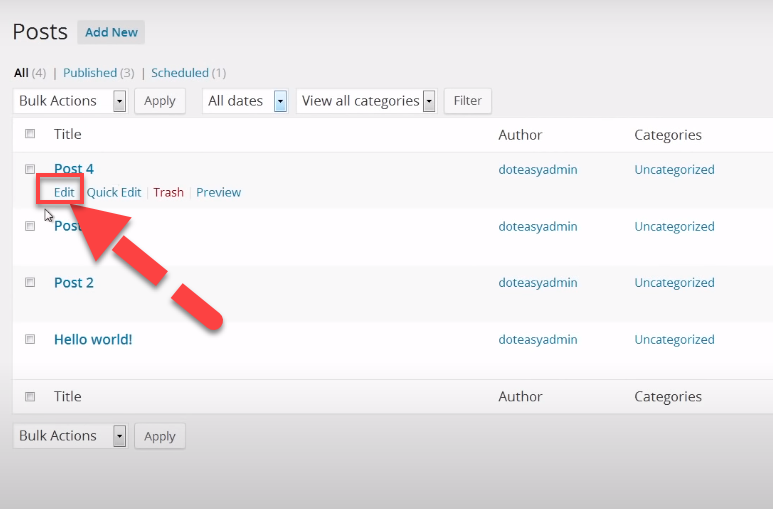
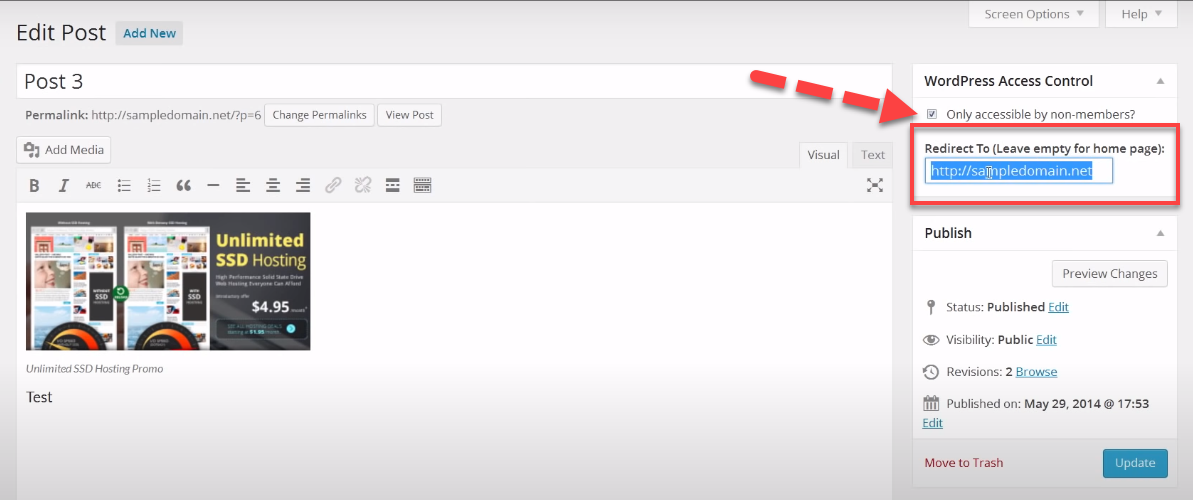
Step 4: Edit Post to Make It Member Access Only
For Posts, follow the same procedure as outlined for Pages. First, click on the 'Edit' button, which will take you to the WordPress editor.
Activate the WordPress Access Control and, if desired, set up a redirect to the admin page – the choice is yours. Once you click the 'Update' button, the post will be set to Member Only access.
Method 5: When It Becomes Necessary to Unpublish a WordPress Page
Removing irrelevant, outdated, or poor-quality pages is pivotal for refining your website's overall user experience and search visibility. Google favors websites that prioritize publishing people-focused content that engages audiences.
Rather than deleting pages permanently, setting them to private restricts access for unauthorized users while still allowing you to restore or improve the content later if needed. Similarly, enabling password protection functionality allows granular control over who can view specific pages.
Passwords effectively act as access keys, keeping portions of your site viewable only to those visitors you voluntarily credential. This is useful for providing exclusive previews to colleagues, clients, or users who sign up for premium memberships or promotions.
Leveraging WordPress settings to unpublish or password-protect web pages allows you to streamline site content for visitors while segmenting access.
Tidy up your online space without erasing creative assets that could prove useful again in the future with some refinement. Restriction doesn't have to mean deletion.
Why We Need to Unpublish a “WordPress Page”
- Content Updates or Corrections: If a page contains outdated information errors or needs significant revisions, unpublishing it temporarily prevents visitors from viewing incorrect or incomplete content.
- Seasonal or Event-Specific Pages: For content relevant only at certain times (like event promotions or seasonal offers), it makes sense to unpublish the page once the event or season is over.
- Testing New Designs or Features: When experimenting with new layouts or functionalities, it's often better to unpublish the page to avoid confusing your audience with a work-in-progress.
- SEO Strategy: If a page is underperforming in search engine rankings and negatively impacting your site's SEO, it may be better to unpublish and revamp it.
- Privacy Concerns: If a page unintentionally exposes sensitive information or wasn't meant for the public eye, unpublishing it protects privacy.
- Transitioning Content: During website restructures or when merging, splitting, or archiving content, it's useful to unpublish pages to manage this transition smoothly.
- Reducing Clutter: To keep your website streamlined and easy to navigate, it's often a good idea to unpublish pages that are no longer relevant or necessary.
- Legal or Compliance Issues: If the content on a page becomes legally problematic or fails to comply with regulatory standards, removing it promptly is essential.
Wrapping Up
We've explored various methods to enhance the privacy and control of your WordPress site. From making pages or posts password-protected to unpublishing content for various reasons, such as updates, privacy, or SEO strategies, these methods offer flexibility and security for your website content.
We also delved into how to manage your WordPress menu and hide specific page sections or titles, providing you with the tools to tailor your site to your specific needs.
Remember, whether it's securing sensitive information or cleaning up your site's content, WordPress provides an array of options to maintain control over what is shared and displayed, ensuring your site remains professional, relevant, and user-friendly.
FAQs
Can we unpublish a site after publishing it?
Yes, it's possible to unpublish a WordPress site after it has been published. You can do this by changing the visibility of your pages and posts to 'Private' or 'Draft' in the WordPress dashboard. This change will make the content inaccessible to the public but still available for editing and republishing later.
How do I hide a page from my menu in WordPress?
To hide a page from your menu in WordPress, navigate to 'Appearance'> 'Menus' in your dashboard. Here, you'll see the structure of your menu. Locate the page you want to remove, click on the arrow next to it, and select 'Remove.' This will hide the page from your menu without affecting the page itself.
How do you hide a page section in WordPress?
Hiding a section on a WordPress page can be done through custom CSS or by utilizing a page builder plugin, such as Elementor or WPBakery. To use CSS, add a custom CSS class to the section and then define that class in your stylesheet with ‘display: none. In page builders, you typically have an option in the section's settings to hide it based on conditions or devices.
How do I hide a page or post title in WordPress?
When you want to hide a page or post title in WordPress, you can use a plugin specifically designed for this purpose or add custom CSS code. Most modern themes and page builders also offer an option to hide the title in their settings. If you're comfortable with the code, you can add custom CSS like .page-id-xx .entry-title { display: none; }, where xx is your page's or post's ID, to your theme's custom CSS section.


.svg)
.svg)
.svg)

